After you increase the capacity of a disk, you must extend its partitions and file systems to use the added space. Disks cannot be shrunk, so plan your storage needs carefully.
Resizing overview
Resizing a disk involves two main steps:
Purchase additional storage for your disk in the ECS console. This is like buying a larger hard drive but not yet installing it. A successful payment does not complete the resizing process.
Make the new space available in the instance's operating system. This is like formatting the new space on the hard drive so the system can recognize and use it.

Step 1: Increase disk capacity
Prerequisites
Make sure that one of the following conditions is met:
The disk is attached to an ECS instance. The instance must not be expired and must be in the Running or Stopped state.
The disk is in the Unattached state.
Procedure
Go to ECS console - Block Storage - Cloud Disks. In the top-left corner, select the region and resource group for the target resource.
Find the disk that you want to resize and click Resize in the Actions column.
We strongly recommend that you create a snapshot for the disk to back up its data before resizing. This prevents data loss from operational errors. On the Determine Disk and Read Notes page, verify the disk information, click Create Snapshots, set a name and retention period for the snapshot, and then click Confirm.
ImportantUsing snapshots incurs fees.

When Yes appears in the Resizing Supported column, click I Understand Risks and Have Backed Up Data. Proceed.
The time required to create a snapshot depends on factors such as the amount of data on the disk and the available bandwidth. You can go to the Snapshots page in the ECS console and view the creation status in the Progress column.
In the Configure Resizing Method and New Size wizard, set the parameters, confirm the fees, and then click OK.
ImportantYou are charged for the added capacity when you resize a disk.
Parameter
Description
New Disk Size
The new capacity cannot be smaller than the current capacity.
Resizing Method
Online Resizing (Recommended): After you increase the capacity of the disk, you do not need to restart the instance. The new capacity takes effect immediately.
Offline Resizing: Use this method if the disk is in the Unattached state, the instance is in the Stopped state, or you are using certain instance types that support only offline resizing.
(Conditional) For a subscription disk, after the 5-second countdown in the payment pop-up window ends, click Complete Payment, and then complete the payment. After the payment is complete, return to the resizing workflow and click Paid. Close the dialog box.
If you click Paid. Close the dialog box. before you complete the payment, this stops the resizing process. You must click Pay for the order, complete the payment, and then return to the resizing workflow.
Step 2: Extend partitions and file systems
Prerequisites
If the disk is in the Unattached state, you must attach it to an ECS instance.
If you used offline resizing to increase the disk capacity in the previous step and the disk is attached to an ECS instance, you must restart or start the instance.
If no file system has been created on the data disk, follow the instructions in Initialize a data disk.
Procedure
After you increase the disk capacity, you must extend its partitions and file systems to use the new space. Alibaba Cloud provides two methods:
Use the console to extend (Recommended): Use Cloud Assistant to extend partitions and file systems from the console. This method is convenient and avoids running manual commands.
Use the command line to extend: Log on to the instance and manually run commands to extend the partitions and file systems. This method offers high flexibility and is widely applicable.
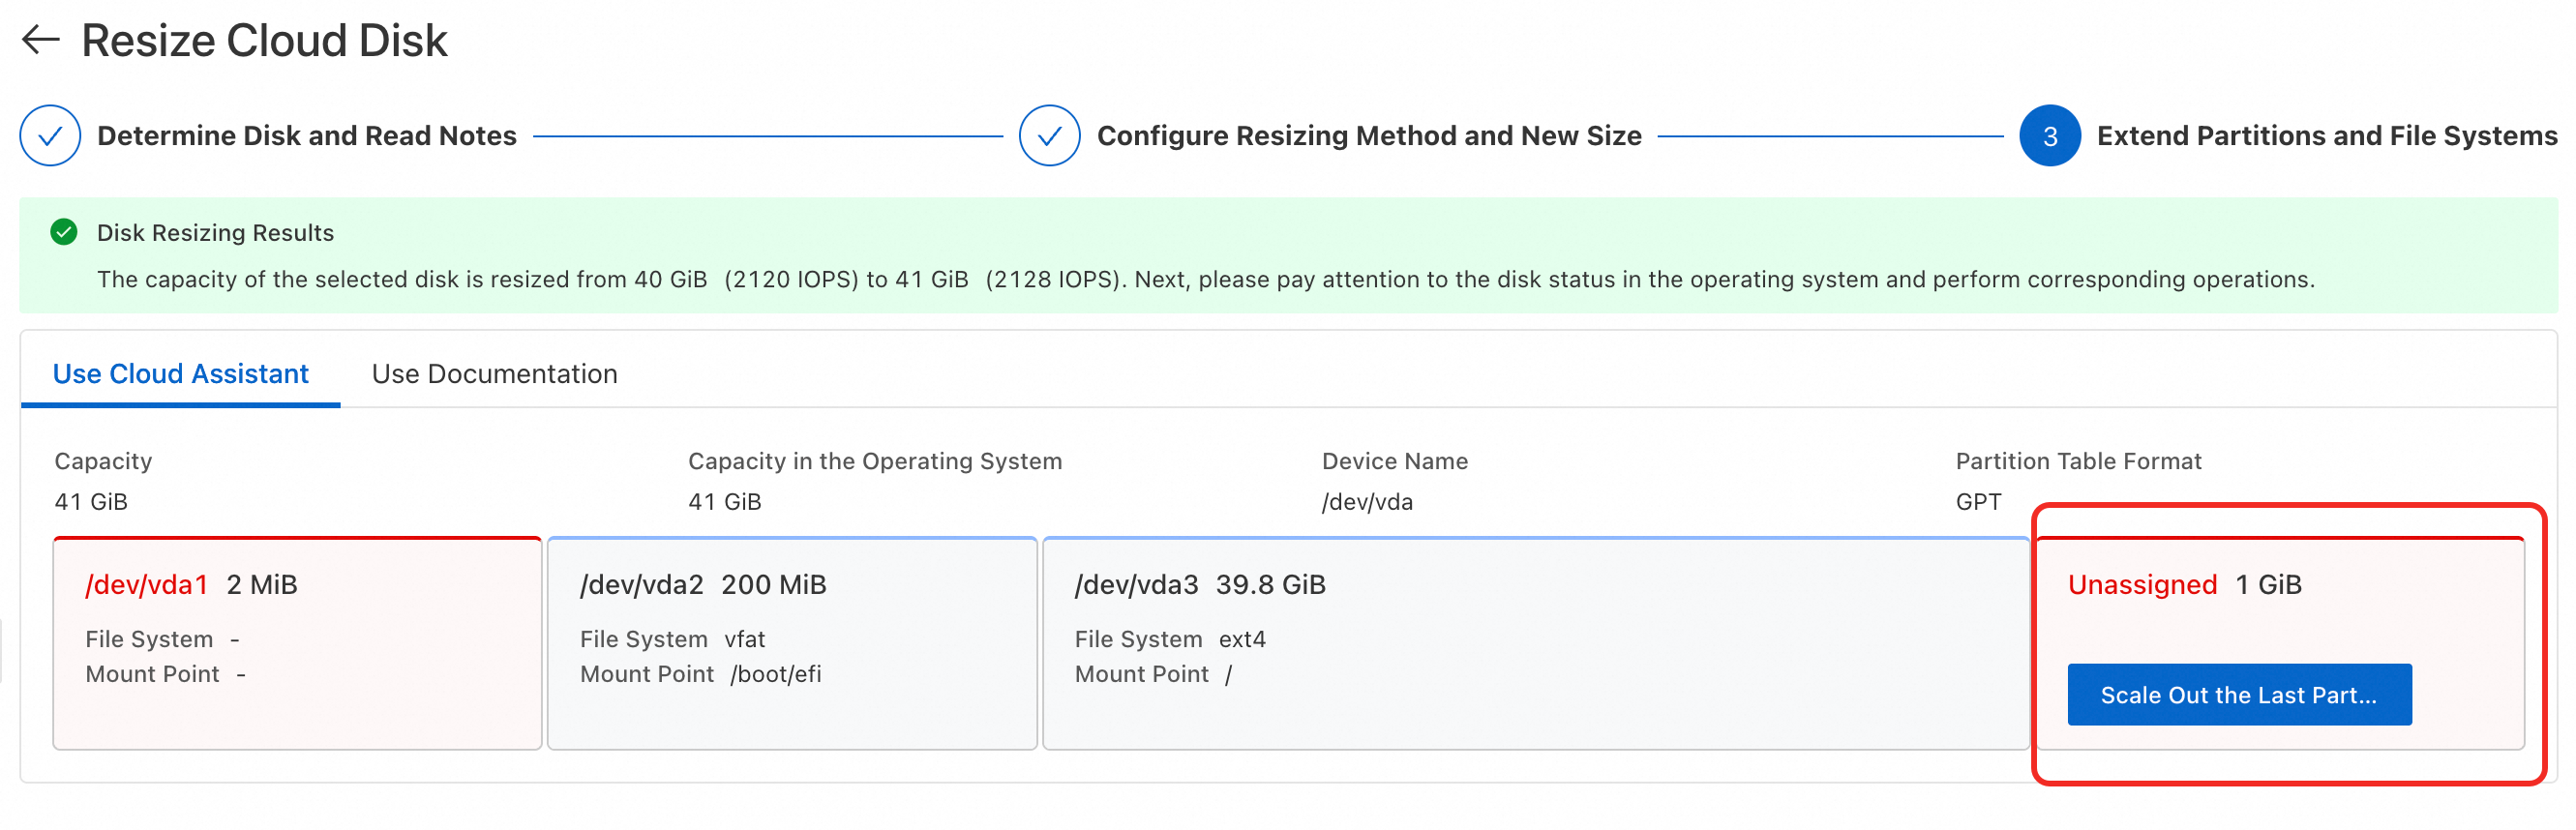
Extend with console (recommended)
If you accidentally close this page, you can return to the operation page from the Block Storage tab of the instance details page.
In the Unassigned section, click Scale Out the Last Partition and File System.
If you have not granted permissions to Cloud Assistant, you must grant them when prompted.
If the page displays the message Cloud Assistant query or execution failed or Instance OS Version Not Supported, you must use the command line to extend the disk.
In the Partitions and file systems extension performed via Cloud Assistant. dialog box, click Execute Now. When the message Cloud Assistant successfully extended partitions and file systems. appears, the extension is complete. Click Close.
ImportantBefore you proceed, make sure that the command is correct to prevent extension failures.
Extend with CLI
Extend a partition
Check the OS version on the instance details page. For CentOS 6 and earlier, OpenSUSE 42.3, and Debian 8 and earlier, you must extend the partition and file system offline.
Log on to the ECS instance.
Go to ECS console - Instances. In the top-left corner, select the region and resource group for the target resource.
Go to the details page of the target instance. In the upper-right corner, click Connect and select Workbench. Log on to the instance as prompted to open the terminal.
Extend the partition.
Run
sudo lsblkto check the device name and partition number of the disk to be resized.$ sudo lsblk NAME MAJ:MIN RM SIZE RO TYPE MOUNTPOINT vda 253:0 0 50G 0 disk ├─vda1 253:1 0 2M 0 part ├─vda2 253:2 0 200M 0 part /boot/efi └─vda3 253:3 0 39.8G 0 part / vdb 253:16 0 40G 0 disk /dataIf the disk to be resized does not have a partition, you can directly resize the file system. In this example, the data disk
vdbdoes not have a partition, so you do not need to resize the partition.If the capacity of the disk to be resized is greater than the total capacity of the partitions, you need to resize a partition. In this example, the system disk
vdahas a capacity of 50 GiB and contains three partitions. The total capacity of the partitions is 40 GiB, and you need to resize the last partition,vda3.ImportantYou can extend only the last partition on a disk.
The following table describes common device naming and partition formats.
If the sudo lsblk command displays output in the vgx format, this indicates that the disk partitions are managed by Logical Volume Manager (LVM). After you extend the disk capacity in the console, you must use LVM to extend the logical volume.
Device type
Device name
Partition number
Disks that do not use the NVMe protocol
The format is
vd[a-z], such asvda(system disk),vdb, andvdc.The format is
vd[a-z]<partition number>. For example, invda3, the partition number is 3.NVMe-compliant disks
The format is
nvmeXn1, such asnvme0n1,nvme1n1, andnvme2n1.The format is
nvmeXn1p<partition_number>. For example, innvme0n1p1, the partition number is 1.
Install the extension tool.
Alibaba Cloud Linux and CentOS
type growpart || sudo yum install -y cloud-utils-growpart
sudo yum update cloud-utils-growpart
type sgdisk || sudo yum install -y gdisk
Debian and Ubuntu
sudo apt-get update
sudo apt-get install -y cloud-guest-utils
type sgdisk || sudo apt-get install -y gdisk
Run the command to extend the partition.
Replace
<device name>and<partition number>in the command with the device name and partition number that you obtained in step a, and then run the command.ImportantMake sure that a space exists between the device name and the partition number.
sudo LC_ALL=en_US.UTF-8 growpart /dev/<DeviceName> <PartitionNumber>The keyword
CHANGEDin the response indicates that the command was executed successfully. If the command fails, see Common issues of partition expansion to troubleshoot and resolve the issue.In the command,
LC_ALL=en_US.UTF-8is an environment variable used to handle the encoding of Chinese systems.
Verify the partition extension.
Run the
sudo lsblkcommand. If the total size of the partitions equals the device capacity, the partition is successfully resized. In this example, both the capacity of the devicevdaand the total size of the partitions are 50 GiB. You must then resize the file system to make the added space available.$ sudo lsblk NAME MAJ:MIN RM SIZE RO TYPE MOUNTPOINT vda 253:0 0 50G 0 disk ├─vda1 253:1 0 2M 0 part ├─vda2 253:2 0 200M 0 part /boot/efi └─vda3 253:3 0 49.8G 0 part / vdb 253:16 0 40G 0 disk /data
Extend a file system
Run the command
sudo lsblk -fand record the target device name, file system type, and mount directory of the disk to be resized for use when you resize the file system.$ sudo lsblk -f NAME FSTYPE LABEL UUID MOUNTPOINT vda ├─vda1 ├─vda2 vfat 7938-FA03 /boot/efi └─vda3 ext4 root 33b46ac5-7482-4aa5-8de0-60ab4c3a4c78 / vdb ext4 3d7a3861-da22-484e-bbf4-b09375894b4f /dataIf the device has partitions, the Target device name is the name of the last partition. In the example, for the system disk
vda, the Target device name isvda3, the File system type isext4, and the Mount directory is/.If a device does not have a partition, the Target Device Name is the same as the device name. For example, for the data disk
vdb, the Target Device Name isvdb, the File System Type isext4, and the Mount Directory is/data.
Extend the file system.
ext2, ext3, or ext4
Replace the
<target device name>variable in the command with the target device name from the previous step and run the command.sudo resize2fs /dev/<TargetDeviceName>xfs
Replace
<mount directory>in the command with the mount directory that you obtained in the previous step, and then execute the command.sudo xfs_growfs <MountPoint>
Verify that the file system is extended.
Run the
sudo df -Thcommand to verify that the file system size (the value of theSizefield in the output) is consistent with the disk capacity.When a file system is created, it reserves some capacity to store metadata. Therefore, the file system size may be slightly smaller than the capacity displayed in the console.
Billing
When you resize a disk, you are charged for the added capacity. The billing method for the added capacity is the same as that for the original disk.
Subscription disks: After you resize a subscription disk, you are immediately charged for the new capacity. You must pay for the price difference between the old and new capacities for the remaining subscription period.
Price difference = (Monthly price/30 days) × Remaining duration × Added capacity.
The remaining duration is measured in days and is accurate to the second.
Pay-as-you-go disks: After you resize a pay-as-you-go disk, you are billed based on the new capacity. Charges are calculated on an hourly basis. The bill for the current hour is generated in the next hour.
If you have purchased a Storage Capacity Unit (SCU), it automatically offsets bills for pay-as-you-go disks. For more information, see Block storage billing.
FAQ
FAQ: Increasing disk capacity
Why does the new capacity not take effect?
After you increase the capacity of a disk, the OS cannot automatically detect the new capacity. You must manually extend the partitions and file systems based on their respective types to make the added capacity usable.
How to resize a disk using an API?
We strongly recommend that you call the CreateSnapshot operation to create a snapshot for the disk before you increase its capacity, to prevent data loss from operational errors.
Using snapshots incurs snapshot fees.
After the snapshot is created, call the ResizeDisk operation to increase the disk capacity.
After you increase the disk capacity, you must extend the partitions and file systems.
Call the RunCommand operation to send commands to the target instance (refer to the commands in Extend with CLI). Then, call the DescribeInvocations operation to query the command output and verify the extension of the partitions and file systems.
I Understand Risks and Have Backed Up Data.proceed is grayed out and cannot be selected. What should I do?
Check whether a snapshot is being created for the disk. You cannot resize a disk while a snapshot is being created for it. Wait for the snapshot creation to complete before resizing the disk.
What to do after offline resizing without a restart?
Offline resizing requires an instance restart to take effect. If your business operations do not allow a restart but you have already selected offline resizing, you can perform an online resizing of 1 GiB to make both the added capacity and the previous offline resized capacity take effect online. This operation is a secondary resizing and incurs additional fees. Proceed with caution based on your business requirements.
Which instance types support only offline resizing?
ecs.ebmc4.8xlarge
ecs.ebmhfg5.2xlarge
ecs.ebmg5.24xlarge
ecs.t1
ecs.s1
ecs.s2
ecs.s3
ecs.c1
ecs.c2
ecs.m1
ecs.m2
How to return to the Cloud Assistant extension page?
This feature is in invitational preview. Only some customers in specific scenarios can view and enable the Cloud Assistant detection feature to return to the extension page.
On the Block Storage tab of the instance details page, enable the Cloud Assistant detection feature.
If the Cloud Assistant Check is not available, extend with CLI the disk.

For the target disk, click 2/3 Checks Passed in the In-system Status Check column, and click Extend Partitions and File Systems to return to the page.
Why is the new partition capacity not effective?
Run sudo lsblk and check the Size field. If the partition size does not match the device size, the resize has not taken effect. Resizing a partition usually does not require a reboot. If the partition resize has not taken effect, it may be due to an older operating system version. You must reboot the instance for the change to take effect.
FAQ: Extending partitions
Error with growpart:
no tools available to resize disk with 'gpt'The operating system does not have the
gdisktool installed. To resize GPT partitions, you must install the gdisk tool based on your operating system type.CentOS and similar distributions
type sgdisk || sudo yum install -y gdiskDebian, Ubuntu, and similar distributions
sudo apt-get update
type sgdisk || sudo apt-get install -y gdisk
Error with growpart:
command not foundThe operating system does not have the
growparttool installed. Run the following commands based on your operating system type to install thegrowparttool (thegdisktool is also required to expand a GPT partition).CentOS and similar distributions
type growpart || sudo yum install -y cloud-utils-growpart
sudo yum update cloud-utils-growpart
type sgdisk || sudo yum install -y gdisk
Debian, Ubuntu, and similar distributions
sudo apt-get update
sudo apt-get install -y cloud-guest-utils
type sgdisk || sudo apt-get install -y gdisk
An error is reported when you run the growpart command to expand a partition:
unexpected output in sfdisk --version [sfdisk, from util-linux 2.23.2].Cause: The Chinese version of the operating system uses a character encoding type other than en_US.UTF-8.
Solution:
Run the
localecommand to check the character encoding of the ECS instance. If it is not en_US.UTF-8, change it to that encoding.Run the following command to switch the character encoding type.
export LANG=en_US.UTF-8If the issue persists, run the following command to switch the character encoding type.
export LC_ALL=en_US.UTF-8
If the issue persists, try running the
rebootcommand to reboot the ECS instance.
ImportantAfter you switch the character encoding and successfully extend the partition, you can switch back to the original character encoding if needed.
When you run the
growpartcommand to expand a partition, you receive the errormkdir: cannot create directory ... No space left on device.The disk has insufficient space to create a temporary directory. You must delete unnecessary files and then extend the partition.
The following error is returned when you run the growpart command to expand a partition
unexpected output in sfdisk --version [sfdisk (util-linux-ng 2.17.2)].The fdisk version is incompatible with the growpart version. Downgrade the growpart version to 0.27.
The growpart command returns the error
FAILED: unable to determine partition type.The disk is not partitioned. You do not need to extend a partition. You can directly extend the file system.
When you run the growpart command to expand a partition, the following message is displayed
WARNING: MBR/dos partitioned disk is larger than 2TB. Additional space will go unused.The MBR partition format does not support disks that are larger than 2 TiB. You must first convert the MBR partition of the data disk to a GPT partition and then extend the GPT partition.
Run
sudo lsblk: the partition is expanded to only 2 TiBThe MBR partition type does not support disks that are larger than 2 TiB. You must first convert the MBR partition of the data disk to a GPT partition and then extend the GPT partition.
You receive the following error when you install the growpart tool in CentOS 6:
Error: Cannot retrieve repository metadata.The CentOS 6 OS has reached its end of life (EOL). You must change the CentOS 6 EOL repository before you can install the tool.
When you run the growpart command to expand a partition, the message
NOCHANGE: partition 1 could only be grown by 2015 [fudge=2048]is displayed.If you have no available space when resizing a partition, it is usually because the instance was not restarted after an offline disk resize was performed in the console. As a result, the disk changes have not taken effect. After an offline resize, you must use the ECS console or an API to restart or start the instance. (Restarting by running the
rebootcommand inside the instance is ineffective.)
FAQ: Extending file systems
When you run the
resize2fscommand, the errorCouldn't find valid filesystem superblock.oropen: Is a directory while opening /mntis reported.When you extend a file system, you must specify the correct disk partition name, not the device name or mount point.
The resize2fs command returns the following message:
The filesystem is already ... blocks long. Nothing to do!.Reason: The file system has no expandable capacity. This may be because the partition was not expanded or the expansion did not take effect.
Solution:
First, confirm that the partition has been successfully extended by using the growpart command. If you have not performed this step, run the growpart command to extend the partition.
If you have successfully run the growpart command to extend the partition, it may be because you are using an earlier OS version that cannot update the system partition table online. Restart the instance, and then run the resize2fs command.
Error with resize2fs:
Permission deniedCause: The file system expansion usually fails because of inconsistencies or errors in the file system itself.
Solution:
Run the
dmesg -T | grep fscommand. If the output contains a message similar toThere are errors in the filesystem, this indicates that the file system is inconsistent.Create a snapshot to back up the disk data.
If your services permit, run the
umountcommand to unmount the mounted partition or the entire disk according to your environment.If it is a system disk (you cannot
umountit), you must detach and attach the system disk to another instance to repair it.Try using the
e2fsckcommand to make repairs.
Error with resize2fs:
inodes (4294967296) must be less than 4294967295.Cause: The
bytes-per-inodewas not set correctly during initialization.If you need to expand the capacity to 64 TiB, add
-i 65536to the command when you create the file system.Solution: Create a new disk to copy the data.
Importantbytes-per-inodecannot be modified after the disk is initialized.Create an empty data disk with the capacity you want for the current instance.
When you initialize a data disk and create an ext4 file system, add
-i 65536to the command.Manually copy the data from the original disk to the new disk.
Verify that your business is running as expected. You may need to restart relevant services to confirm this.
After you confirm that your business is running as expected, you can detach and release the original data disk. For more information, see Detach a data disk and Release a disk.
Why does OS disk capacity differ from purchased capacity?
When a file system is created, it reserves some capacity to store metadata. Therefore, the file system size may be slightly smaller than the capacity displayed in the console.