You can build an FTP server on a Windows simple application server to enable remote file transfers.
Prerequisites
A simple application server that runs Windows Server 2008 R2 or later is created. For more information, see Create a server.
Step 1: Add Internet Information Services (IIS) and FTP server roles
Ensure that IIS and FTP services are added to your instance. If not, perform the following steps to add them.
-
Connect to the Windows simple application server.
For more information, see Connect to a Windows server.
-
In the lower-left corner of the Windows desktop, click the
 icon and click Server Manager.
 -
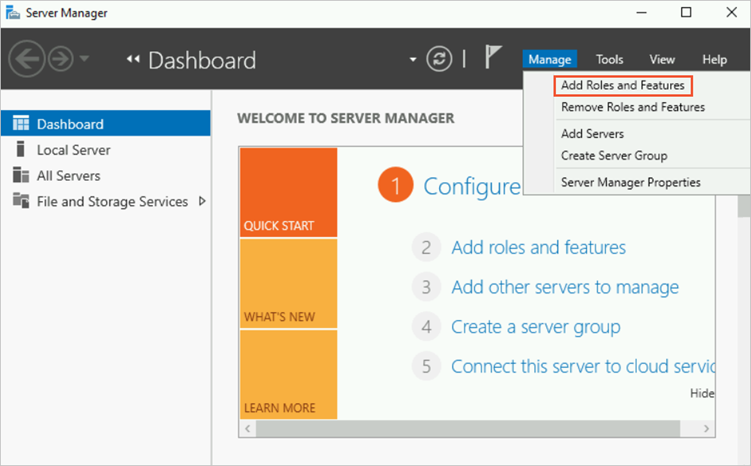
In the top navigation bar, choose .
-
In the Before you begin dialog box, click Next.
-
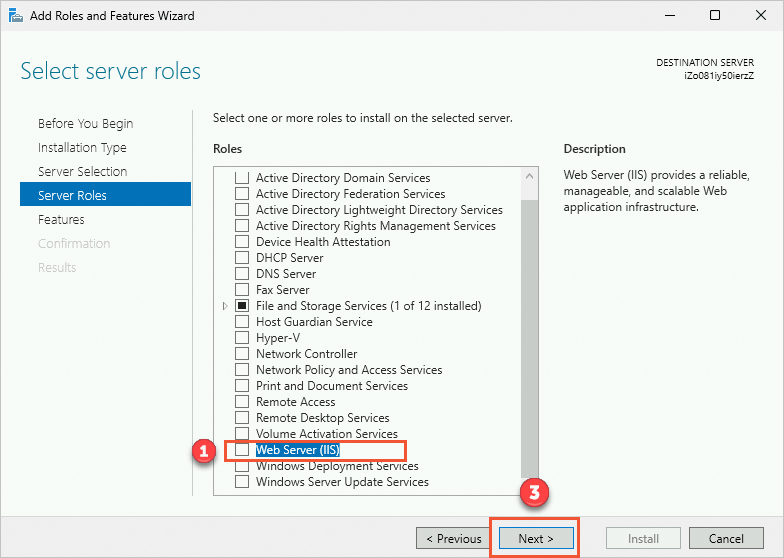
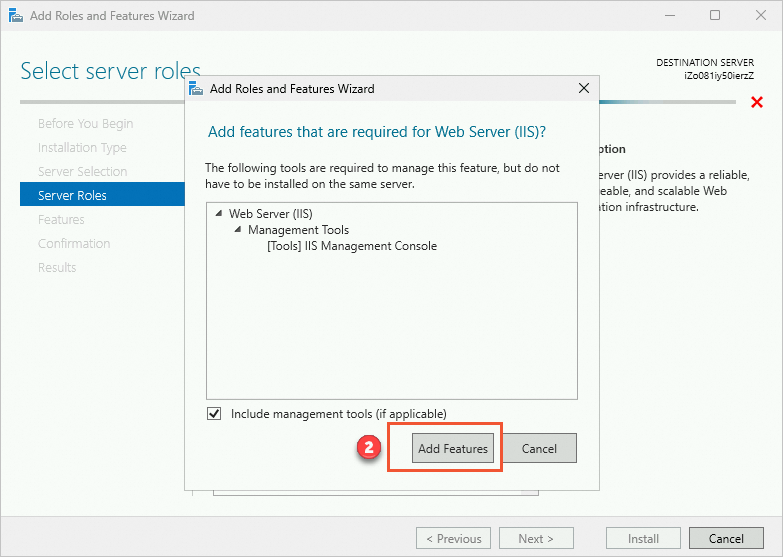
Select Web Server (IIS). In the dialog box that appears, click Add Features and click Next.
-
Keep defaults and click Next until you reach the Select role services page.
-
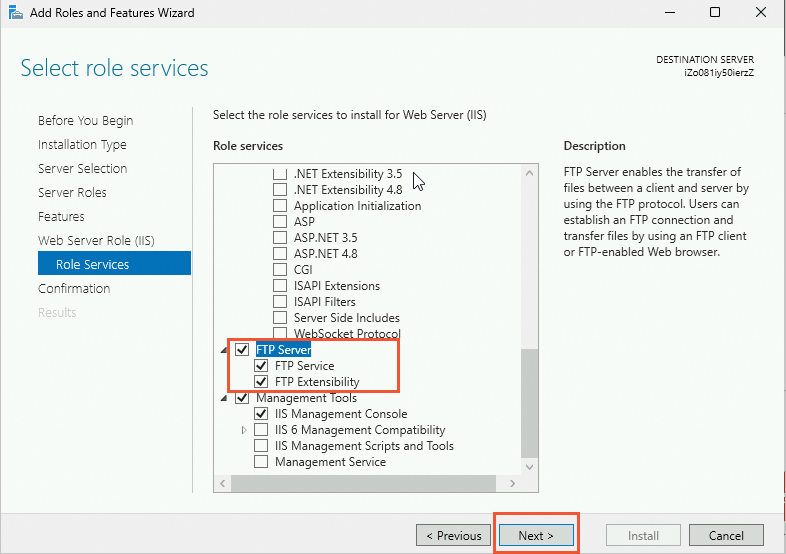
Select IIS Management Console and FTP Server, and click Next.
-
Click Install. After installation completes, click Close.
(Optional) Step 2: Create a Windows user to access the FTP site
Create a Windows user for FTP authentication. Skip this step if only anonymous users (username anonymous or ftp) need access.
-
In Server Manager, choose .
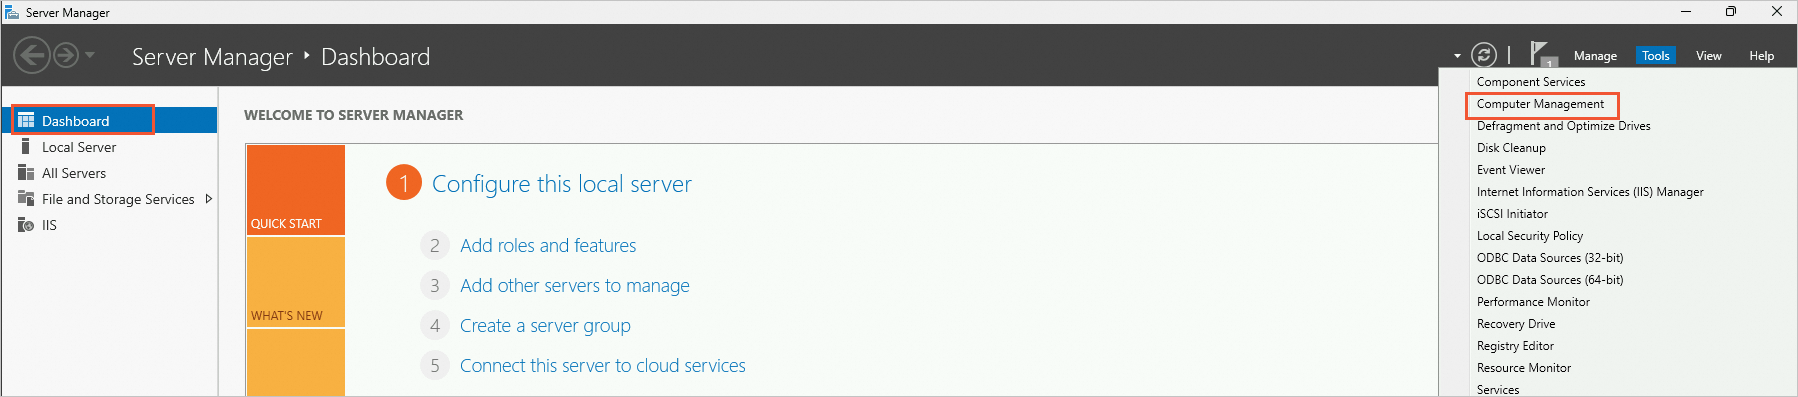
-
In the left navigation pane, choose . Right-click a blank area and select New User.
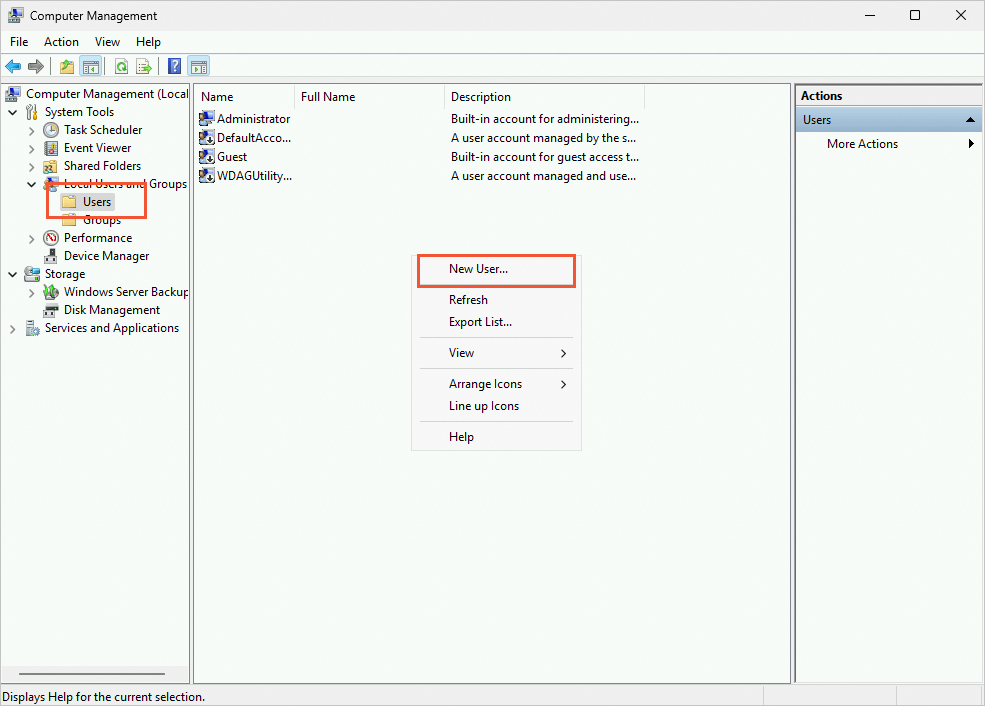
-
In the pop-up window, set User Name and Password.
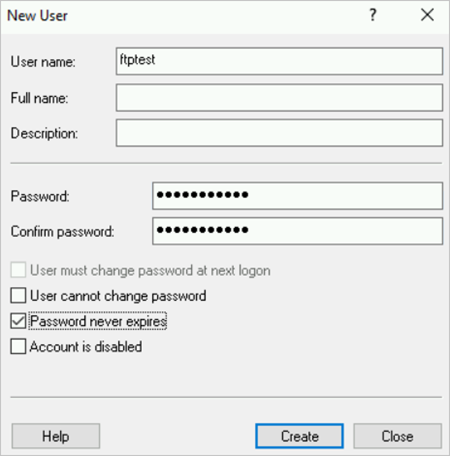 Configuration details:
-
User name: Example:
ftptest. -
Password and Confirm password: Enter a custom password.
NoteThe password must contain uppercase letters, lowercase letters, and digits. Keep your password secure to prevent security risks.
-
Password-related settings: Select Password never expires.
-
-
Click Create and close the New User dialog box.
Step 3: Set permissions for the shared folder
Create a shared folder for the FTP site and configure its permissions. All file transfers occur within this folder.
-
Create a folder on the Windows instance for the FTP site.
Example: Create a folder named work on the C drive.
-
Right-click the work folder and select Properties (R).
-
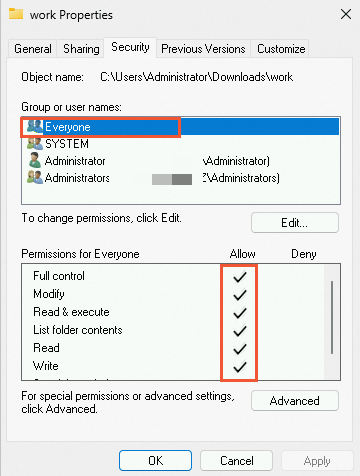
Click the Security tab, select Everyone, and click Modify.
If Everyone is not listed, add it first. See What do I do if the Everyone option is missing when I set folder permissions?.
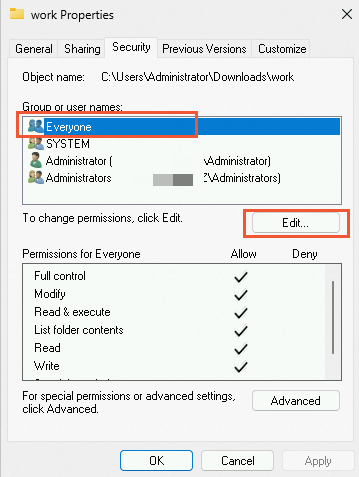
-
Select Everyone, select the required permissions, and click OK.
This example grants all permissions.
Step 4: Add and configure the FTP site
-
In the lower-left corner of the Windows desktop, click the
icon and click Server Manager. -
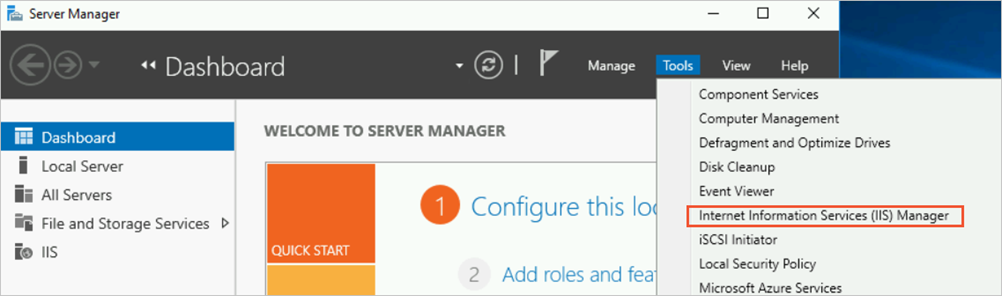
In the top navigation bar, choose .
-
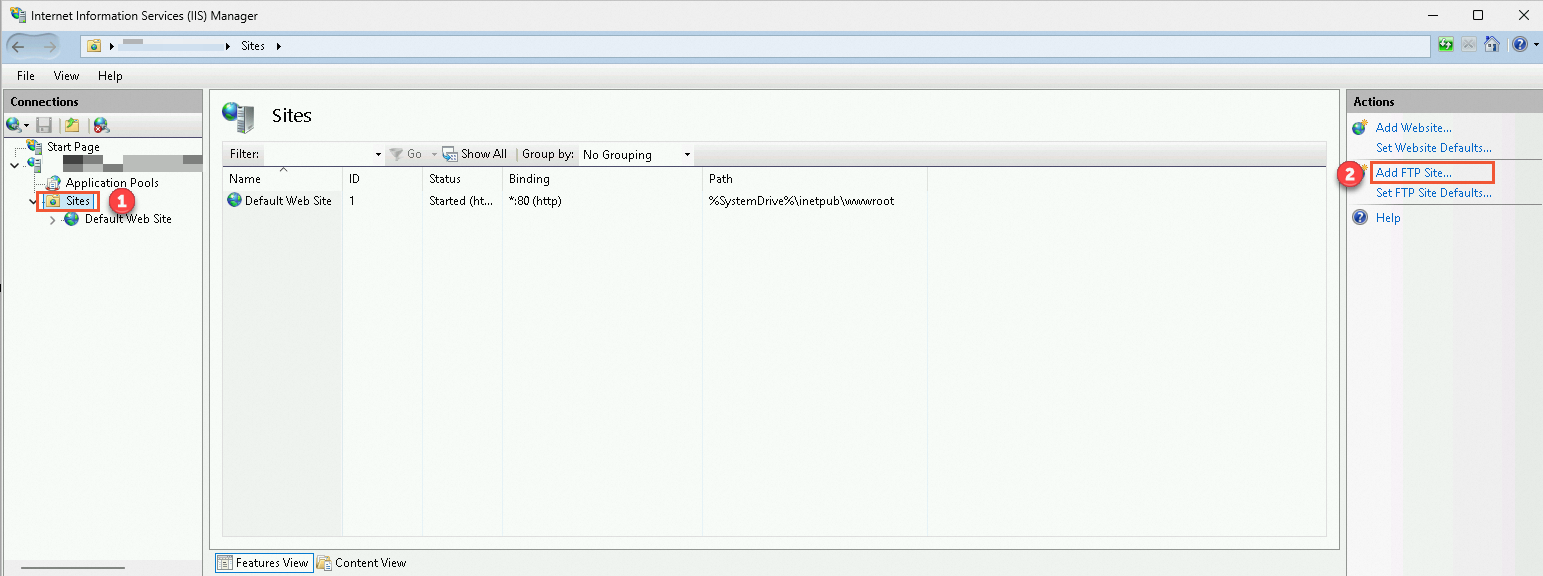
In the left navigation pane, choose . In the Actions pane, click Add FTP Site.
-
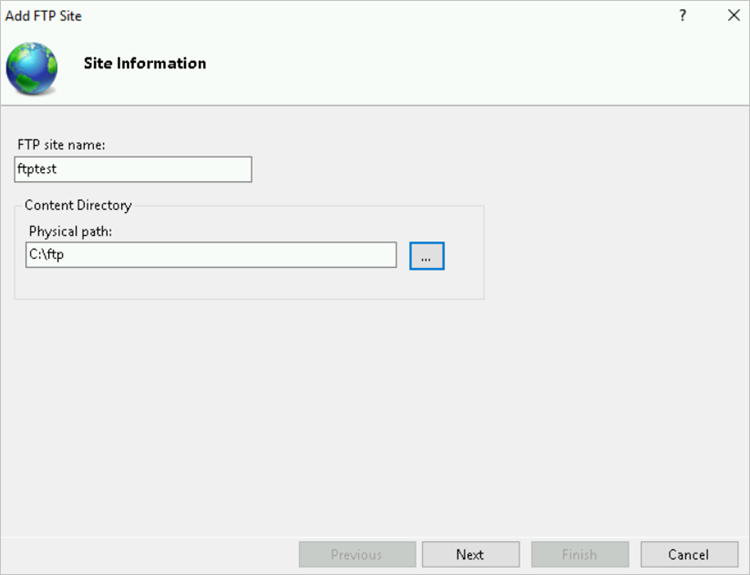
Set the site information and click Next.
 Configuration details:
-
FTP site name: A custom name, such as
ftptest. -
Content Directory: The shared folder. Example: the ftp folder on drive C.
-
-
Set the IP address and SSL certificate, and click Next.
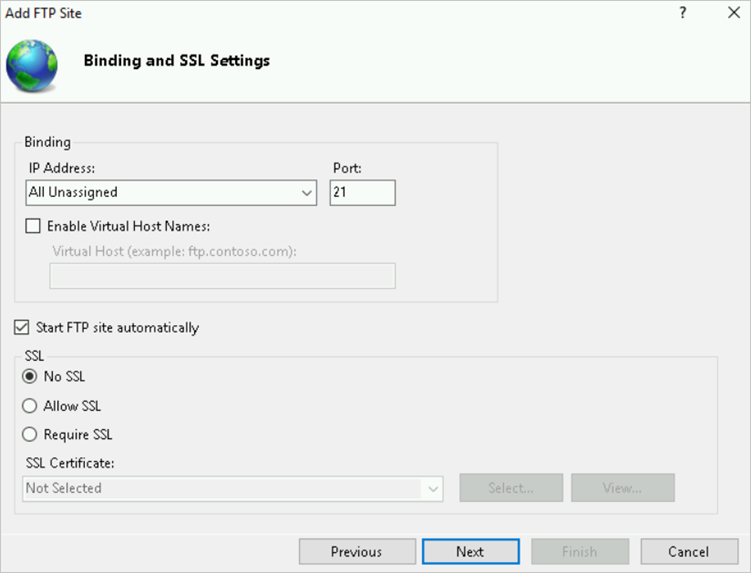 Configuration details:
-
IP Address: Keep the default.
-
SSL: This example selects No SSL. To secure data transfers with an existing SSL certificate, select Allow SSL or Require SSL.
-
No SSL: No SSL encryption.
-
Allow SSL: Supports both non-SSL and SSL connections.
-
Require SSL: Requires SSL encryption for all FTP connections.
-
-
Keep defaults for other items.
NoteIf you select Allow or Yes, you must select an SSL certificate. See Creating a server certificate.
-
-
Set authentication and authorization, and click Finish.
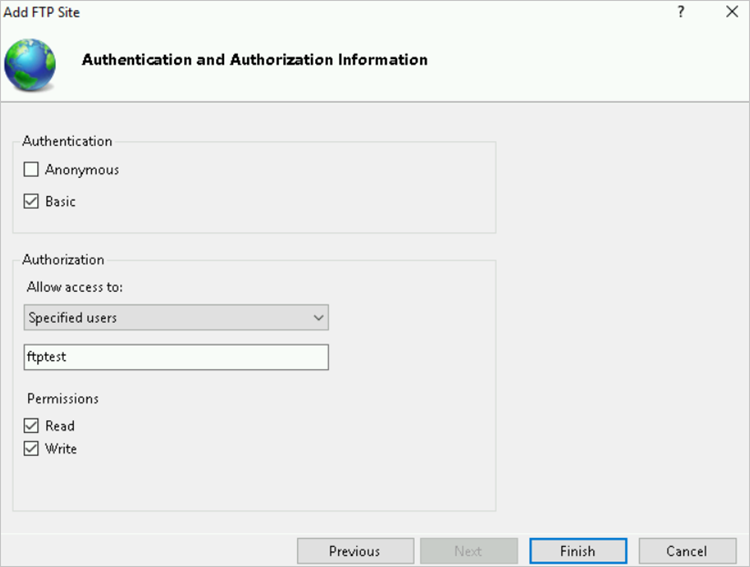 Configuration details:
-
Authentication: This example selects Basic to use the
ftptestuser. Select Anonymous to allow anonymous access without data security requirements.-
Anonymous: Allows access with the username
anonymousorftp. -
Basic: Requires a valid username and password. Because basic authentication transmits unencrypted passwords, use it only when the connection is secure, such as with SSL.
-
-
Authorization: This example selects Specified users and enters ftptest.
-
All users: All users, anonymous or identified, can access the shared folder.
-
Anonymous users: Anonymous users can access the shared folder.
-
Specified roles or user groups: Only members of specific roles or user groups can access the shared folder. Enter the role or user group.
-
Specified users: Only specified users can access the shared folder. Enter the username.
-
-
Permissions: Select the Read and Write permissions.
The new FTP site appears in IIS Manager.
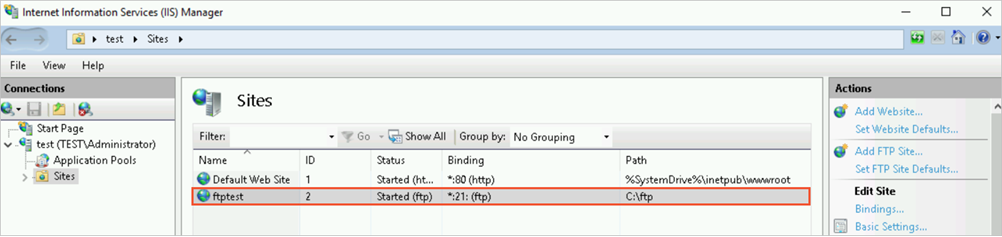
-
-
Configure the firewall for the FTP site.
-
In IIS Manager, double-click the FTP site
ftptestto open its home page. -
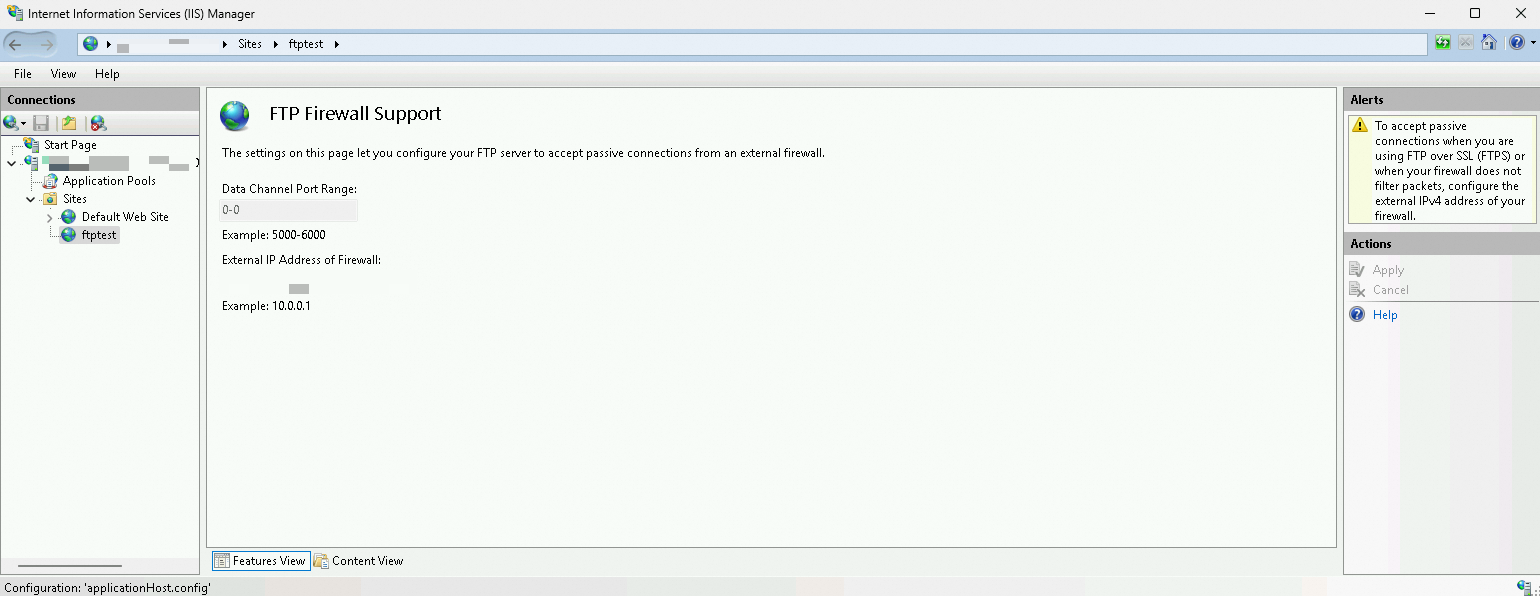
Double-click FTP Firewall Support.
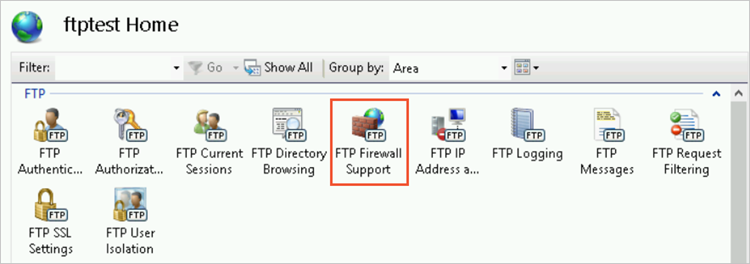
-
Configure the following parameters and click Application:
-
Data Channel Port Range: Port range for passive connections. Valid values: 1025 to 65535.
-
External IP Address of Firewall: The public IP address of the ECS instance.
-
-
Open Command Prompt and restart the FTP service:
net stop ftpsvc

net start ftpsvc
-
Step 5: Configure security groups and the firewall
Add inbound security group rules to allow traffic on port 21 and the passive mode port range (1024 to 65535).
Use high-numbered ports. This example uses ports 40000 to 40100.
-
In the firewall settings of the Windows simple application server, add an inbound rule to allow traffic on port 21 and ports 29000 to 30000. For more information, see Configure firewall rules.
Set the protocol to TCP and the source to
0.0.0.0/0(which allows access from all IP addresses). -
(Optional) Configure the Windows firewall.
By default, the internal firewall is disabled. If enabled, allow traffic on TCP port 21 and ports 40000 to 40100.
For other firewall settings, see Microsoft official documentation.
Step 6: Use a client to test access to the FTP site
You can use File Explorer, a CLI, a browser, or a third-party FTP client to test the FTP server. This example uses File Explorer on a local Windows computer.
-
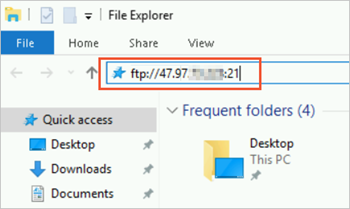
On the local Windows client, open File Explorer. In the address bar, enter
ftp://<Public IP address of the FTP site>:21.Example with Windows 10:
-
In the Log On As dialog box, enter the credentials and click Log On.
Use the
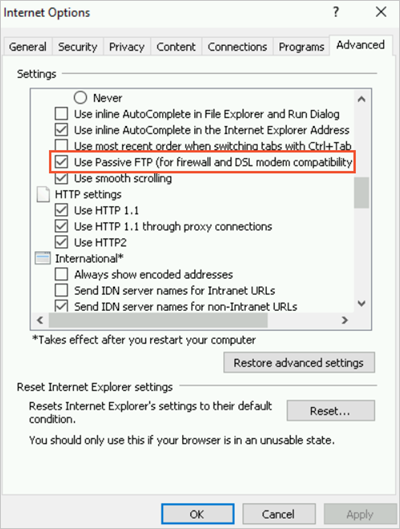
ftptestusername and its password.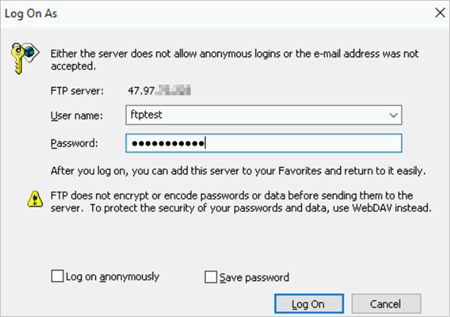 If Use Passive FTP is not enabled in Internet Explorer, you cannot access the FTP site (error codes 200 and 501). Enable Use Passive FTP and try again:
-
Open Internet Explorer.
-
Click the
 icon and click Internet options.
 -
On the Premium tab, select Use Passive FTP (for firewall and DSL modem compatibility).
-
Click Application and click OK.
After accessing the shared ftp folder, create a test folder named test.
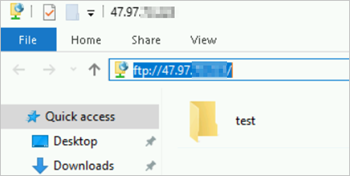 Log on to the Windows instance again. If the test folder appears in the ftp folder on drive C, the FTP site is ready.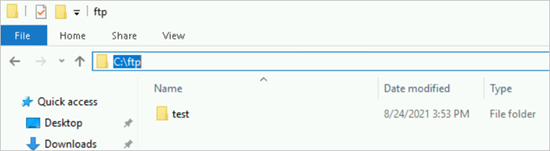
-
Next steps
To manage files in Object Storage Service (OSS) with FTP, install OSS FTP. See Install OSS FTP.
OSS FTP maps file and folder operations to OSS ob