When you need to coordinate multiple cloud services, invoke functions in sequence, or automate multi-step business processes, CloudFlow lets you define these orchestrations as workflows. Each workflow chains together a series of task nodes -- independent operations such as function invocations, API calls, or service integrations -- that you want to execute.
Build a workflow from a blank canvas using CloudFlow Studio (drag-and-drop visual editor) or YAML.
Prerequisites
Before you begin, make sure that you have:
An Alibaba Cloud account with CloudFlow activated
(Optional) A Function Compute function, if your workflow invokes functions
(Optional) An execution role with the required permissions, if your workflow integrates cloud services
Step 1: Create a blank workflow
Log on to the new CloudFlow console. In the top navigation bar, select a region.
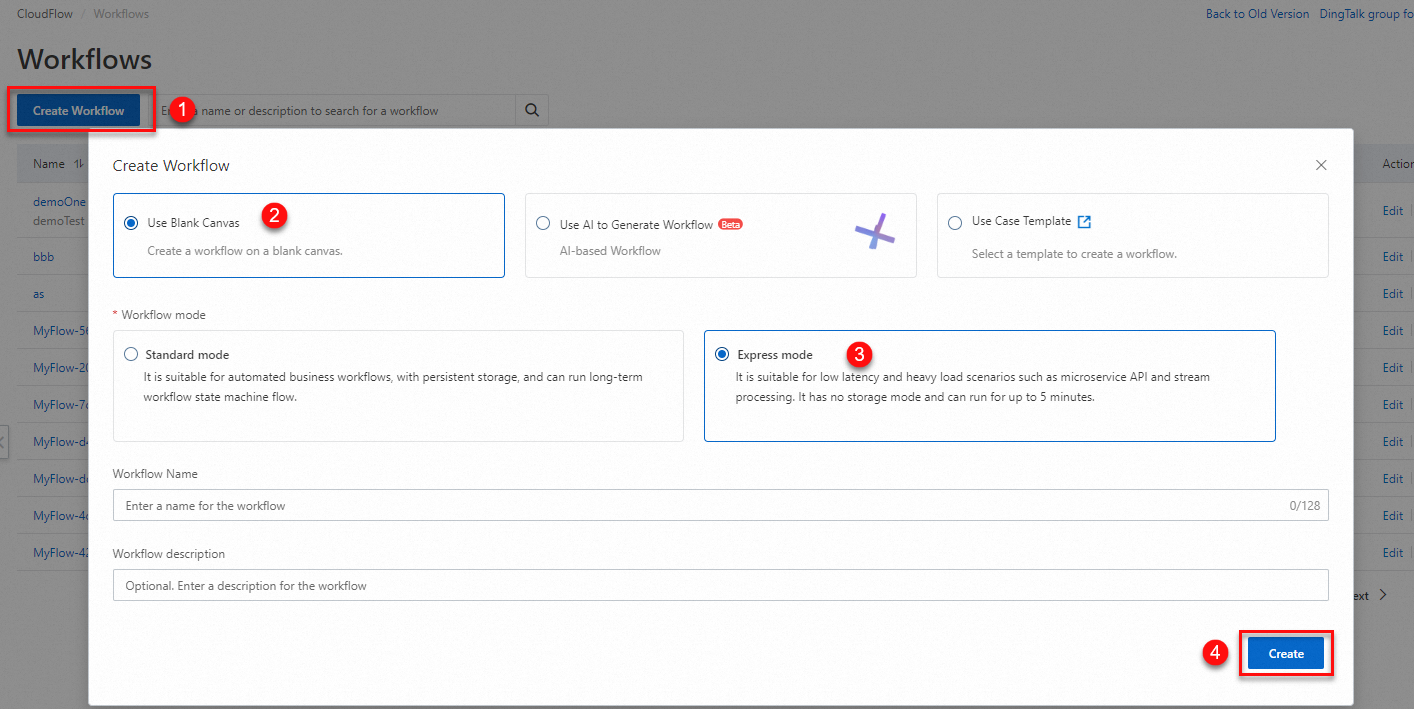
On the Workflows page, click Create Workflow.
In the Create Workflow dialog box, select Use Blank Canvas.
For Workflow mode, select Express Mode. Keep the default settings for other parameters.
NoteThis guide uses express mode. For differences between the two modes, see Standard mode and express mode.
Step 2: Edit the workflow
After you create the workflow, the Edit Workflow page opens. Define your workflow logic using one of the following methods.
Option A: Use CloudFlow Studio
CloudFlow Studio provides a drag-and-drop visual editor for designing workflows.
To build a workflow in CloudFlow Studio:
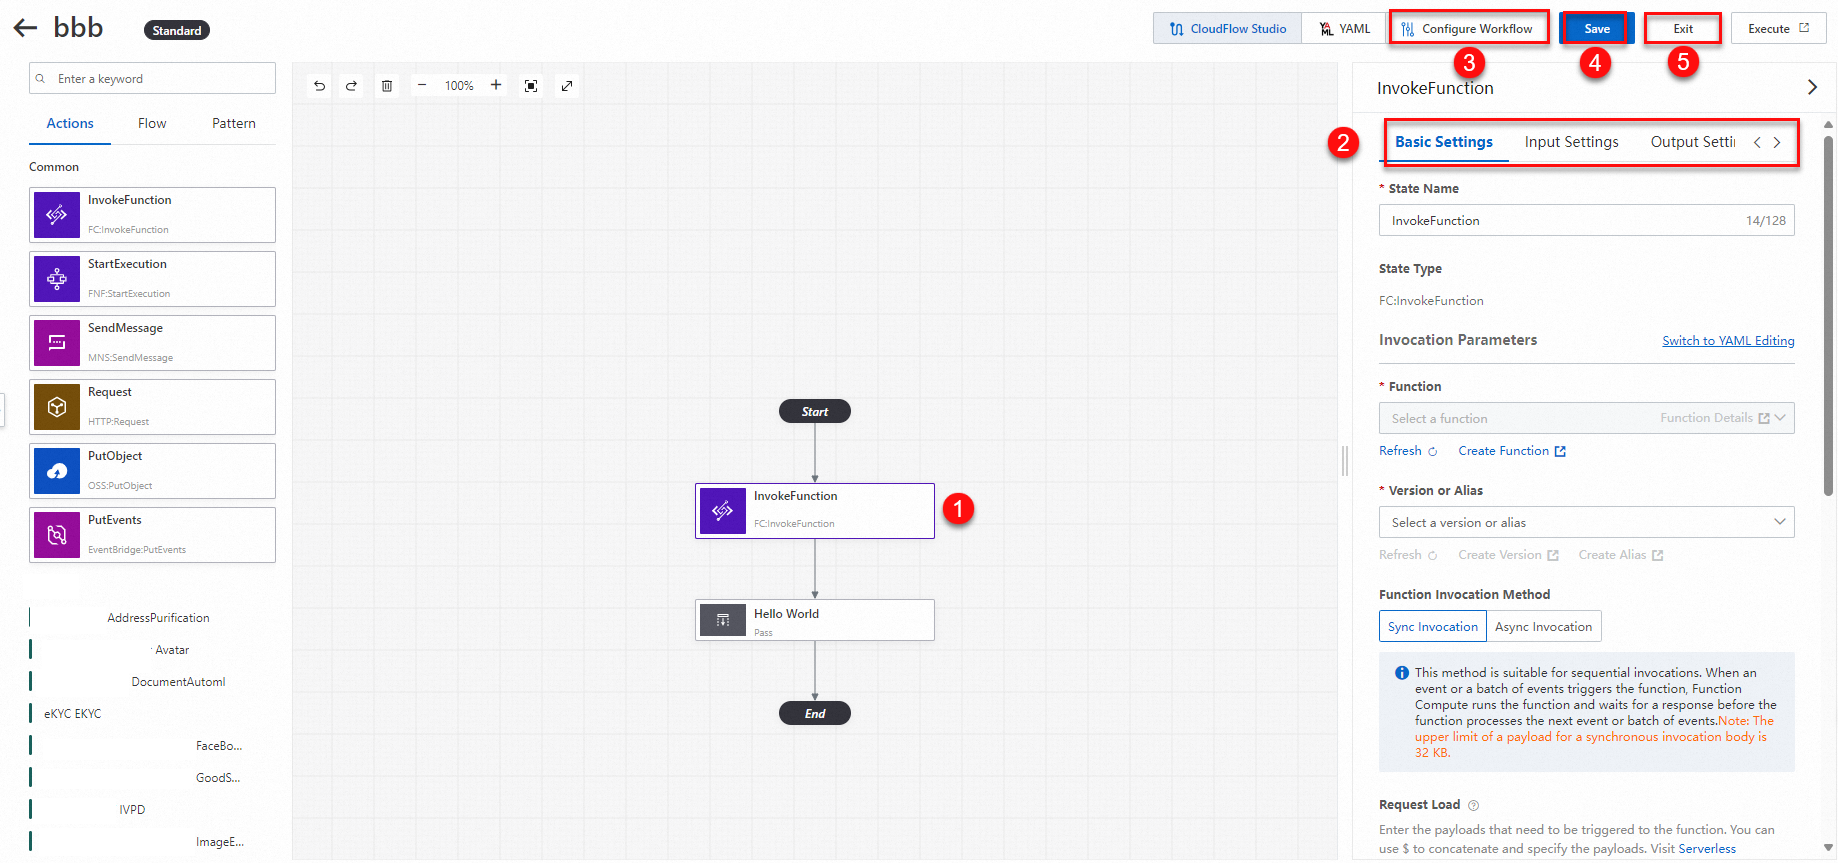
On the CloudFlow Studio tab, select a state node or flow node and drag it to the desired position on the canvas. You can also adjust the positions of nodes in an existing flow chart to modify a business flow chart.
Select a node on the canvas to configure it. Each node has four configuration sections:
Section Purpose Basic Settings Set the node name and core properties Input Settings Control what data the node receives Output Setting Control what data the node passes to the next state Troubleshooting Define retry and error-handling policies (Optional) On the Configure Workflow tab, assign an execution role to the workflow.
NoteAn execution role is required when the workflow integrates cloud services (including CloudFlow itself). See Create execution roles.
Click Save, then click Exit.
Example: Configure an InvokeFunction task node
The following example shows how to configure an InvokeFunction node. Use default values for any parameters not listed.
Basic Settings
| Parameter | Description | Example |
|---|---|---|
| State Name | A descriptive name for the node. | InvokeFunction |
Invocation Parameters
Specify the function to invoke, its version or alias, and the invocation method. Click Switch to YAML Editing to define these parameters in YAML instead.
Sample YAML:
invocationType: Sync
resourceArn: acs:fc:cn-beijing:1034354682****:functions/GPU-demo/LATEST
body:
key: value| Parameter | Description | Example |
|---|---|---|
| Function | The function to invoke. | myfunction |
| Version or Alias | The function version or alias. | LATEST |
| Function Invocation Method | Sync Invocation or Async Invocation. See Function invocation. | Sync Invocation |
| Request Load | The payload that triggers the function, in YAML or JSON. | See the following example. |
| Next State | The state the workflow transitions to after this node completes. | Parallel |
Sample request payload (JSON):
{
  "key1": "value1",
  "key2.$": "$.myStateInput.key",
  "key3": 100
}
Input Settings
Choose how to filter inputs for the node:
| Option | Behavior |
|---|---|
| Use JSONPath to select some parameters | Enter a JSONPath filter expression to extract specific fields from the input. |
| Original inputs as node inputs | Pass the full input to the node without filtering. |
| Use parameter filters to construct parameters | Build a new input object in YAML or JSON. |
Sample parameter filter (YAML):
FieldA: 123
FieldB: string
FieldC.$: $Input
Output Settings
Choose how to filter outputs from the node:
| Option | Behavior |
|---|---|
| Use JSONPath to select some parameters | Enter a JSONPath filter expression to extract specific fields from the output. |
| Pass raw inputs to outputs | Forward the original input as the node output, ignoring the node result. |
| Use parameter filters to construct parameters | Build a new output object in YAML or JSON. |
Troubleshooting
Define retry and error-capture rules for the node. These settings apply only in workflow integration scenarios. For details, see Error handling.
*Retry upon error*
Click Add Retry to add a retry policy.
| Parameter | Description | Example |
|---|---|---|
| Error Type | One or more error types to match. | FC.BadResponse |
| Maximum Retries | The maximum number of retry attempts. | 5 |
| Retry Interval Seconds | Seconds between retries. Maximum: 86400. | 3 |
| Backoff Multiplication Factor | The multiplier applied to the retry interval after each attempt. | 1 |
| Maximum Backoff Seconds | The upper bound (in seconds) for exponential backoff intervals. | 5 |
*Capture errors and exceptions*
Click Add Capture Rule to define a fallback when an error occurs.
| Parameter | Description | Example |
|---|---|---|
| Error Type | One or more error types to match. | FC.EntitvToolLarge |
| Fallback Status | The state the workflow transitions to when the error is caught. | Hello World |
| Response | A YAML or JSON response attached to the fallback state input. | {"key": "hello world"} |
Option B: Use YAML
Define your workflow by writing a YAML definition directly in the code editor.
On the Edit Workflow page, click the YAML tab.
Enter a workflow definition in the code editor on the left. The flow chart on the right updates in real time. Sample YAML workflow definition:
   Type: StateMachine
   Name: my-wkfl
   SpecVersion: v1
   StartAt: InvokeFunction
   States:
     - Type: Task
       Name: InvokeFunction
       Action: FC:InvokeFunction
       TaskMode: RequestComplete
       Parameters:
         invocationType: Sync
         resourceArn: >-
           acs:fc:{regionId}:{accountId}:functions/myfunction/LATEST
       Retry:
         - Errors: []
           Description: 'Retry policy #1'
           MaxAttempts: 1
           IntervalSeconds: 1
       Next: Hello World
       Catch:
         - Errors:
             - FC.AccessDenied
           Description: 'Error capture rule #1'
           Next: Hello World
     - Type: Pass
       Name: Hello World
       End: true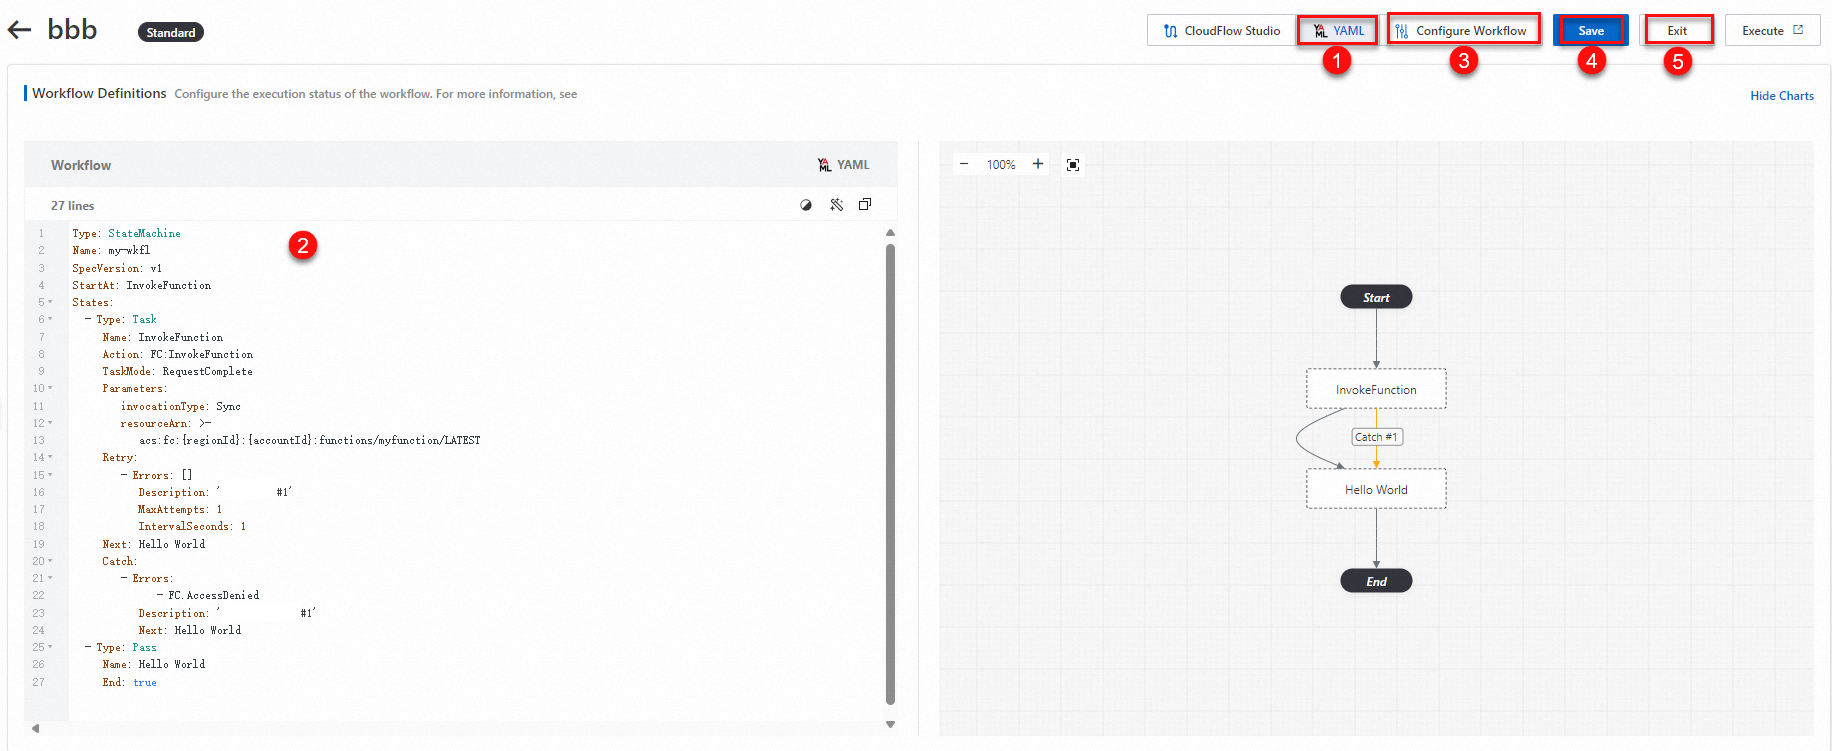
Before saving, replace the placeholder values in
resourceArnwith your actual function ARN:acs:fc:{regionId}:{accountId}:functions/myfunction/LATESTTo get a function ARN, see Obtain the ARN of the function.Placeholder Description Example {regionId}The region where your function resides. cn-hangzhou {accountId}Your Alibaba Cloud account ID. 1034354682**** myfunctionYour function name. GPU-demo LATESTThe function version. Replace with a specific version or alias as needed. v1 (Optional) On the Configure Workflow tab, assign an execution role to the workflow.
NoteAn execution role is required when the workflow integrates cloud services (including CloudFlow itself). See Create execution roles.
Click Save, then click Exit.
Step 3: Verify the workflow
After you save the workflow, run it to confirm that it works as expected.
On the Workflows page, click the workflow you created to open its details page.
Follow the steps in Execute a workflow to start an execution.
Check the execution result. A successful execution confirms that your workflow definition and node configurations are correct.
Modify a workflow
After creating a workflow, you can view, modify, and delete the workflow. This section describes how to modify a workflow.
Log on to the new CloudFlow console. In the top navigation bar, select a region.
On the Workflows page, click the workflow to open its details page.
In the upper-right corner, click Edit Workflow, then choose CloudFlow Studio or YAML mode.
CloudFlow Studio -- Add or remove task states, update Basic Settings, Input Settings, Output Settings, and Troubleshooting for each node. Click Save, then click Exit.
YAML -- Edit the workflow definition in the code editor. Preview changes in the flow chart on the right. Click Save, then click Exit.
(Optional) To update the workflow description or execution role, click Configure Workflow at the top of the Edit Workflow page. After making changes, click Save, then click Exit.