You can import Azure logs into Security Center (Agentic SOC) to centralize log ingestion and enable unified parsing and threat detection. This improves the efficiency of multicloud security operations. This solution uses the Kafka compatibility of Azure Event Hubs to consume logs using an endpoint, topic, and primary connection string for authentication. You can then configure an import task, a destination Logstore, and parsing and detection rules in Security Center.
How it works
This solution uses the compatibility between Azure Event Hubs and the Apache Kafka protocol, which allows an Event Hub to function as a Kafka service. Security Center acts as a Kafka client that uses a specified endpoint, topic, and credentials to retrieve log data from the Event Hub. The retrieved data is then used for unified normalization, parsing, and threat detection. The configuration process is as follows:

Prepare an Event Hub in Azure
For more information, see the official Azure document Create an event hub using the Azure portal.
Step 1: Create a resource group
Log on to the Azure portal.
In the navigation pane on the left, select Resource groups, and then click Create.

On the Create a resource group page, set the following parameters, and then click Review + create.
Subscription: Select the Azure subscription for the resource group.
Resource group: Enter a unique name for the resource group.
Region: Select the region for the resource group.
After you confirm the information, click Create.
Step 2: Create an Event Hubs namespace
In the navigation pane on the left, click All services. In the Analytics service area, click Event Hubs.
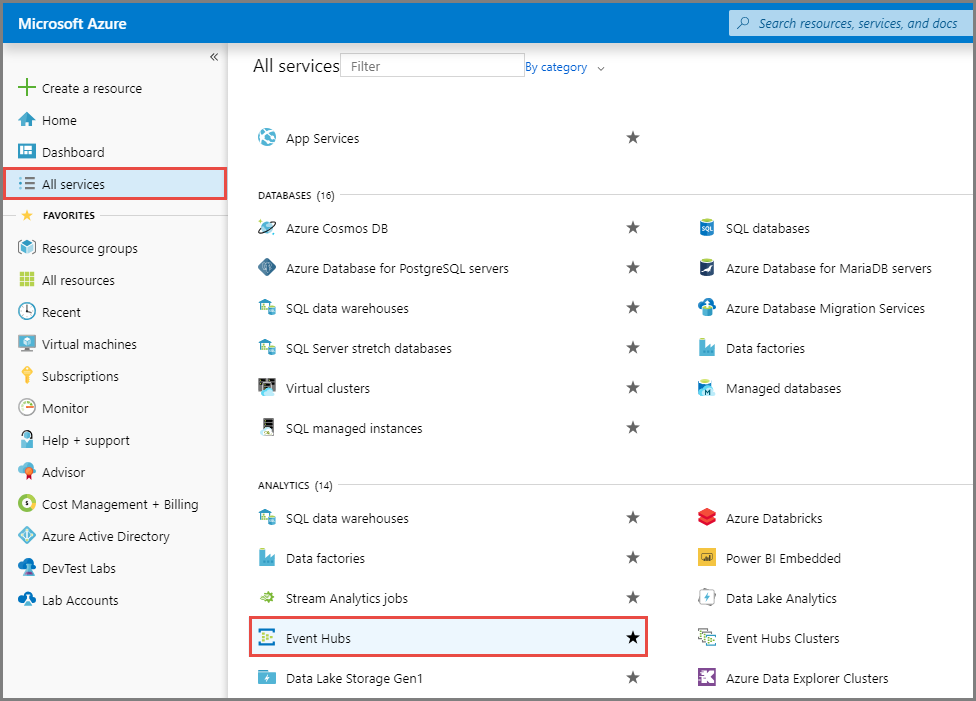
On the Event Hubs page, click Create and configure the following parameters.
Subscription: Select the subscription that you specified in Step 1.
Resource group: Select the resource group that you created in Step 1.
Namespace name: Enter a name for the namespace. The corresponding endpoint (Kafka broker address) appears below the text box.

Region: Select the same region as the resource group that you created in Step 1.
Pricing tier: Select a pricing tier as needed. The default value is Basic. To restrict access to the Event Hubs namespace to only Agentic SOC, select Standard, Premium, or Dedicated. For more information, see Configure an Event Hubs whitelist (optional).
NoteFor more information about the differences between tiers, see Quotas and limits, Event Hubs Premium, and Event Hubs Dedicated.
Throughput units / Processing units (Premium tier): Keep the default configurations.
NoteFor more information about throughput units or processing units, see Scalability of Event Hubs.
Auto-inflate: Enable this feature as needed.
On the Networking tab, set Network connectivity to Public access, and then click Review + create at the bottom of the page.
ImportantTo allow exclusive access by Agentic SOC to the Event Hubs namespace, you must configure a network whitelist in Azure. For more information, see Configure an Event Hubs whitelist (optional).
After you confirm the configuration, click Create and wait for the deployment to complete.
On the Your deployment is complete page, click Go to resource to view the namespace details page.
NoteAlternatively, on the Event Hubs home page, you can click a namespace name in the list to open its details page.
Step 3: Create an event hub
On the details page of the namespace that you created in Step 2, click + Event Hub.
On the creation page, enter the required information and click Review + create.
Name: Enter a name for the Event Hub.
ImportantThe Event Hub name corresponds to the topic in the Kafka configuration. We recommend that you use a descriptive and easily understandable name.
Other configurations: Keep the default settings.
On the confirmation page, click Create and wait for the task to complete.
Return to the namespace homepage to view the newly created data in the Event Center section.
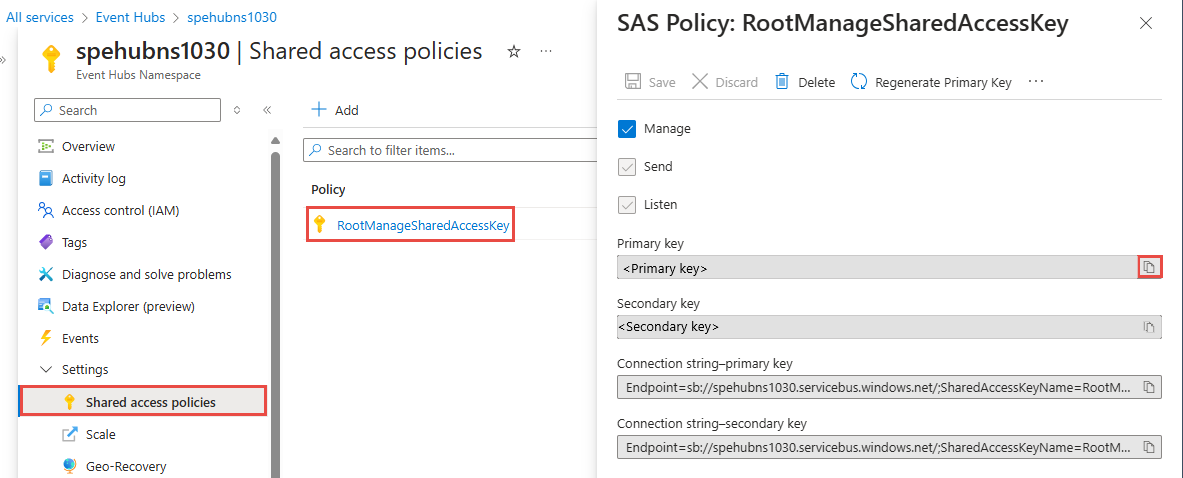
Step 4: Get the primary connection string
On the namespace page, in the navigation pane on the left, under Settings, click Shared access policies.
Click the primary policy,
RootManageSharedAccessKey. In the policy details pane, copy the primary connection string.ImportantThe primary connection string is the credential (password) for the Kafka import.
Step 5: Write data to the event hub
Follow the instructions in the official Azure documentation to write the data that you want to analyze to the event hub that you created in Step 3. For more information, see the following documents:
Configure data import in Security Center
Step 1: Authorize Security Center to access the Event Hub
Go to the Security Center console > System Settings > Feature Settings. In the upper-left corner of the page, select the region where your assets are located: Chinese Mainland or Outside Chinese Mainland.
On the Multi-cloud Configuration Management tab, click Multi-cloud Assets. Then, click Grant Permission and select IDC from the drop-down list. In the panel that appears, configure the following parameters:
Service Provider: Select Apache.
Connection Type: Select Kafka.
Endpoint:
<YOUR-NAMESPACE>.servicebus.windows.net:9093.NoteReplace
<YOUR-NAMESPACE>with the Event Hubs namespace name.Username: The value is fixed to
$ConnectionStringand cannot be changed.Password: The primary connection string of the Event Hubs namespace.
Communication Protocol:
sasl_ssl.SASL Authentication Mechanism:
plain.
Configure a synchronization policy
AK Service Status Check: This parameter is not applicable. Skip this step.
Step 2: Create a data import task
Create a data source
Create a data source for the Azure log data. If you have already created one, skip this step.
Log on to the Security Center console and navigate to Agentic SOC > Integration Center. In the upper-left corner of the page, select the region where your assets are located: Chinese Mainland or Outside Chinese Mainland.
On the Data Source tab, create a data source to receive logs. For more information, see Create a data source for Simple Log Service (SLS).
Source Data Source Type: Select Agentic SOC Dedicated Collection Channel (Recommended) or User Log Service.
Add Instances: We recommend that you create a new Logstore to isolate data.
On the Data Import tab, click Add Data. In the panel that appears, configure the following parameters:
Data Source Type: Kafka.
Endpoint:
<YOUR-NAMESPACE>.servicebus.windows.net:9093, where<YOUR-NAMESPACE>is the Event Hubs namespace name.Topics: The name of the Event Hub that you set when you created the event hub.
Value Type: json.
Configure the destination data source
Data Source Name: Select the data source that you created in the Create a data source step of this section.
Destination Logstore: Select the Logstore that you set in the Create a data source step of this section.
Click OK to save the configuration. After the data import task is configured, Security Center automatically retrieves logs from Azure Event Hubs.
Configure an Event Hubs whitelist (optional)
The Basic tier does not support the configuration of a network whitelist.
For more information, see the official Azure document: Configure IP firewall rules for an existing namespace.
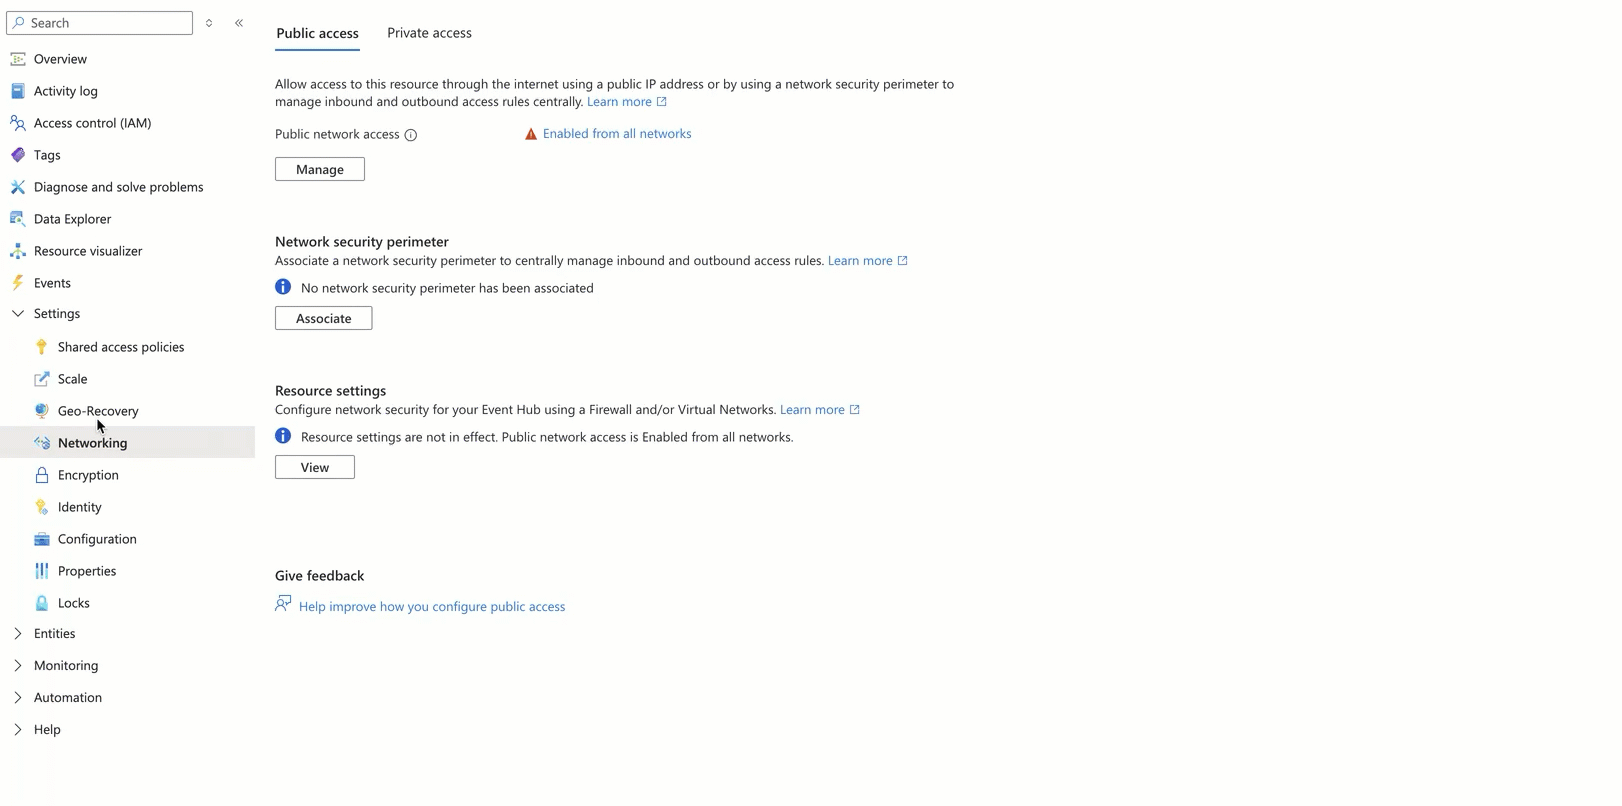
On the Event Hubs namespace page, click Networking under Settings in the navigation pane on the left.
On the Network page, go to the Public Access tab and click the Manage button in the Public network access area.
On the public network access configuration page, in the Default action section, select Enable from selected networks.
In the IP Addresses section, enter the IP addresses to add to the whitelist, and click Save. The following example shows how to perform this operation and lists the whitelisted IP addresses:
IP addresses of the region where your SLS project is located:
Region
VPC IP address whitelist
Public IP address whitelist
China (Hangzhou)
100.104.0.0/16
114.55.8.190
47.99.57.53
114.55.85.98
47.99.212.49
120.26.169.131
118.178.236.24
47.98.173.126
China (Shanghai)
100.104.0.0/16
101.133.151.144
47.102.141.56
106.15.248.175
47.102.99.12
China (Qingdao)
100.104.0.0/16
47.104.146.34
120.27.20.55
China (Beijing)
100.104.0.0/16
59.110.6.146
39.105.19.110
47.93.61.189
182.92.187.76
China (Zhangjiakou)
100.104.0.0/16
8.142.80.93
47.92.90.166
8.142.152.234
39.100.37.56
China (Hohhot)
100.104.0.0/16
39.104.61.213
China (Ulanqab)
100.104.0.0/16
8.130.10.99
39.101.66.131
China (Shenzhen)
100.104.0.0/16
120.76.47.88
119.23.150.175
China (Heyuan)
100.104.0.0/16
47.113.195.162
47.113.192.163
China (Guangzhou)
100.104.0.0/16
8.134.56.134
China (Chengdu)
100.104.0.0/16
47.108.26.166
China (Hong Kong)
100.104.0.0/16
8.210.69.249
47.52.240.106
Singapore
100.104.0.0/16
47.241.44.82
47.88.153.120
South Korea (Seoul)
100.104.0.0/16
8.213.130.255
Japan (Tokyo)
100.104.0.0/16
47.74.56.187
Malaysia (Kuala Lumpur)
100.104.0.0/16
47.254.195.145
Indonesia (Jakarta)
100.104.0.0/16
149.129.233.70
Philippines (Manila)
100.104.0.0/16
8.212.131.139
Thailand (Bangkok)
100.104.0.0/16
8.213.194.187
Germany (Frankfurt)
100.104.0.0/16
47.91.76.65
47.91.89.173
UK (London)
100.104.0.0/16
8.208.86.103
8.208.3.16
US (Virginia)
100.104.0.0/16
47.253.208.218
47.90.252.237
US (Silicon Valley)
100.104.0.0/16
47.88.8.7
47.88.7.168
Agentic SOC region IPs:
Region
Public IP whitelist
Chinese Mainland
106.14.241.32
Outside Chinese Mainland
8.222.217.173
Analyze imported data
After the data is ingested, you must configure parsing and detection rules to allow Security Center to analyze the logs.
Create a New Access Policy
For more information, see Product integration. Create a new integration policy and configure the following parameters:
Data Source: Select the target data source that you configured in the data import task.
Standardized Rule: Agentic SOC provides built-in standardized rules for some cloud products that you can use directly.
Standardization Method: When you convert access logs into alert logs, only the Real-time Consumption method is supported.
Configure threat detection rules
Based on your security requirements, you must enable or create log detection rules in rule management to analyze logs, generate alerts, and create security events. For more information, see Detection Rules.
Expenses and costs
This solution incurs costs from the following services. Before you proceed, review the billing documentation for each product to estimate your costs.
Azure: Event Hubs pricing.
On the Alibaba Cloud side: Costs depend on the data storage method you choose.
NoteFor information about Agentic SOC billing, see Billing details and Pay-as-you-go billing for Threat Analysis and Response.
For information about Simple Log Service (SLS) billing, see SLS billing overview.
Data source type
Agentic SOC billable items
SLS billable items
Notes
Agentic SOC Dedicated Collection Channel
Log ingestion fee.
Log storage and write fees.
NoteBoth items consume Log Ingestion Traffic.
Fees for items other than log storage and writes (such as public network traffic).
Agentic SOC creates and manages the SLS resources. Therefore, fees for Logstore storage and writes are billed through Agentic SOC.
User Log Service
Log ingestion fee, which consumes Log Ingestion Traffic.
All log-related fees (including storage, writes, public network traffic, etc.).
All log resources are managed by Simple Log Service (SLS). Therefore, all log-related fees are billed through SLS.