Deploy SchedulerX in a Kubernetes cluster
SchedulerX schedules tasks, multi-language scripts, and HTTP interfaces in Kubernetes environments. It also schedules native Kubernetes Jobs, CronJobs, and Pods. This guide walks you through deploying a SchedulerX agent in your Kubernetes cluster.
Why use SchedulerX for Kubernetes scheduling
SchedulerX adds centralized scheduling, monitoring, and management on top of native Kubernetes workloads:
Console-based script editing -- Write and update Shell, Python, PHP, or Node.js scripts without rebuilding container images or editing YAML manifests. Scripts run automatically as Pods.
Visual workflow orchestration -- Build task workflows with a drag-and-drop interface instead of writing Argo-style YAML. The visual graph also helps pinpoint bottlenecks at runtime.
Built-in alerting -- Receive failure and timeout alerts through SMS, phone, email, or webhooks (DingTalk, WeCom, Lark).
Automatic log collection -- Pod logs are collected automatically. Troubleshoot failures directly in the console without setting up a separate log service.
Real-time monitoring dashboard -- Track task execution status from a built-in dashboard.
Hybrid online and offline scheduling -- Run resource-intensive, low-frequency tasks (hourly or daily) as isolated Pods while keeping lightweight, high-frequency tasks in-process with your application.
Choose a deployment method
| Method | Best for | How it works |
|---|---|---|
| Deployment YAML (recommended) | Non-Java applications | Deploys a standalone schedulerx-agent Pod that schedules tasks in separate Pods |
| Helm chart | Simplified, repeatable installs | Same architecture as Deployment YAML, packaged as a Helm chart |
| Java SDK | Java applications that also run Kubernetes tasks | Runs the SchedulerX agent in-process alongside your application |
Prerequisites
Before you begin, make sure that you have:
A Kubernetes cluster -- either an Alibaba Cloud Container Service for Kubernetes (ACK) cluster or a self-managed cluster. See Create a Kubernetes cluster
An activated SchedulerX service. See Activate SchedulerX
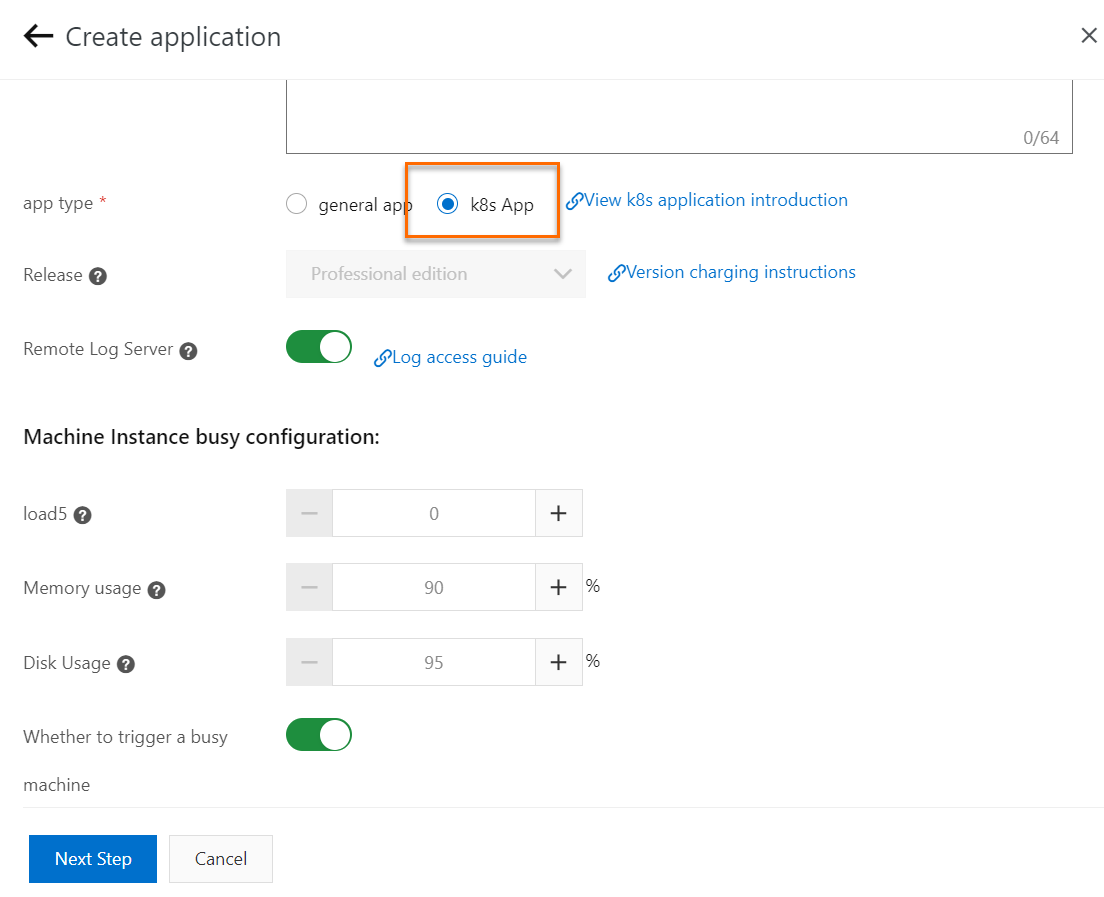
A Kubernetes-type application created in the Distributed Task Scheduling Platform console. See Create an application
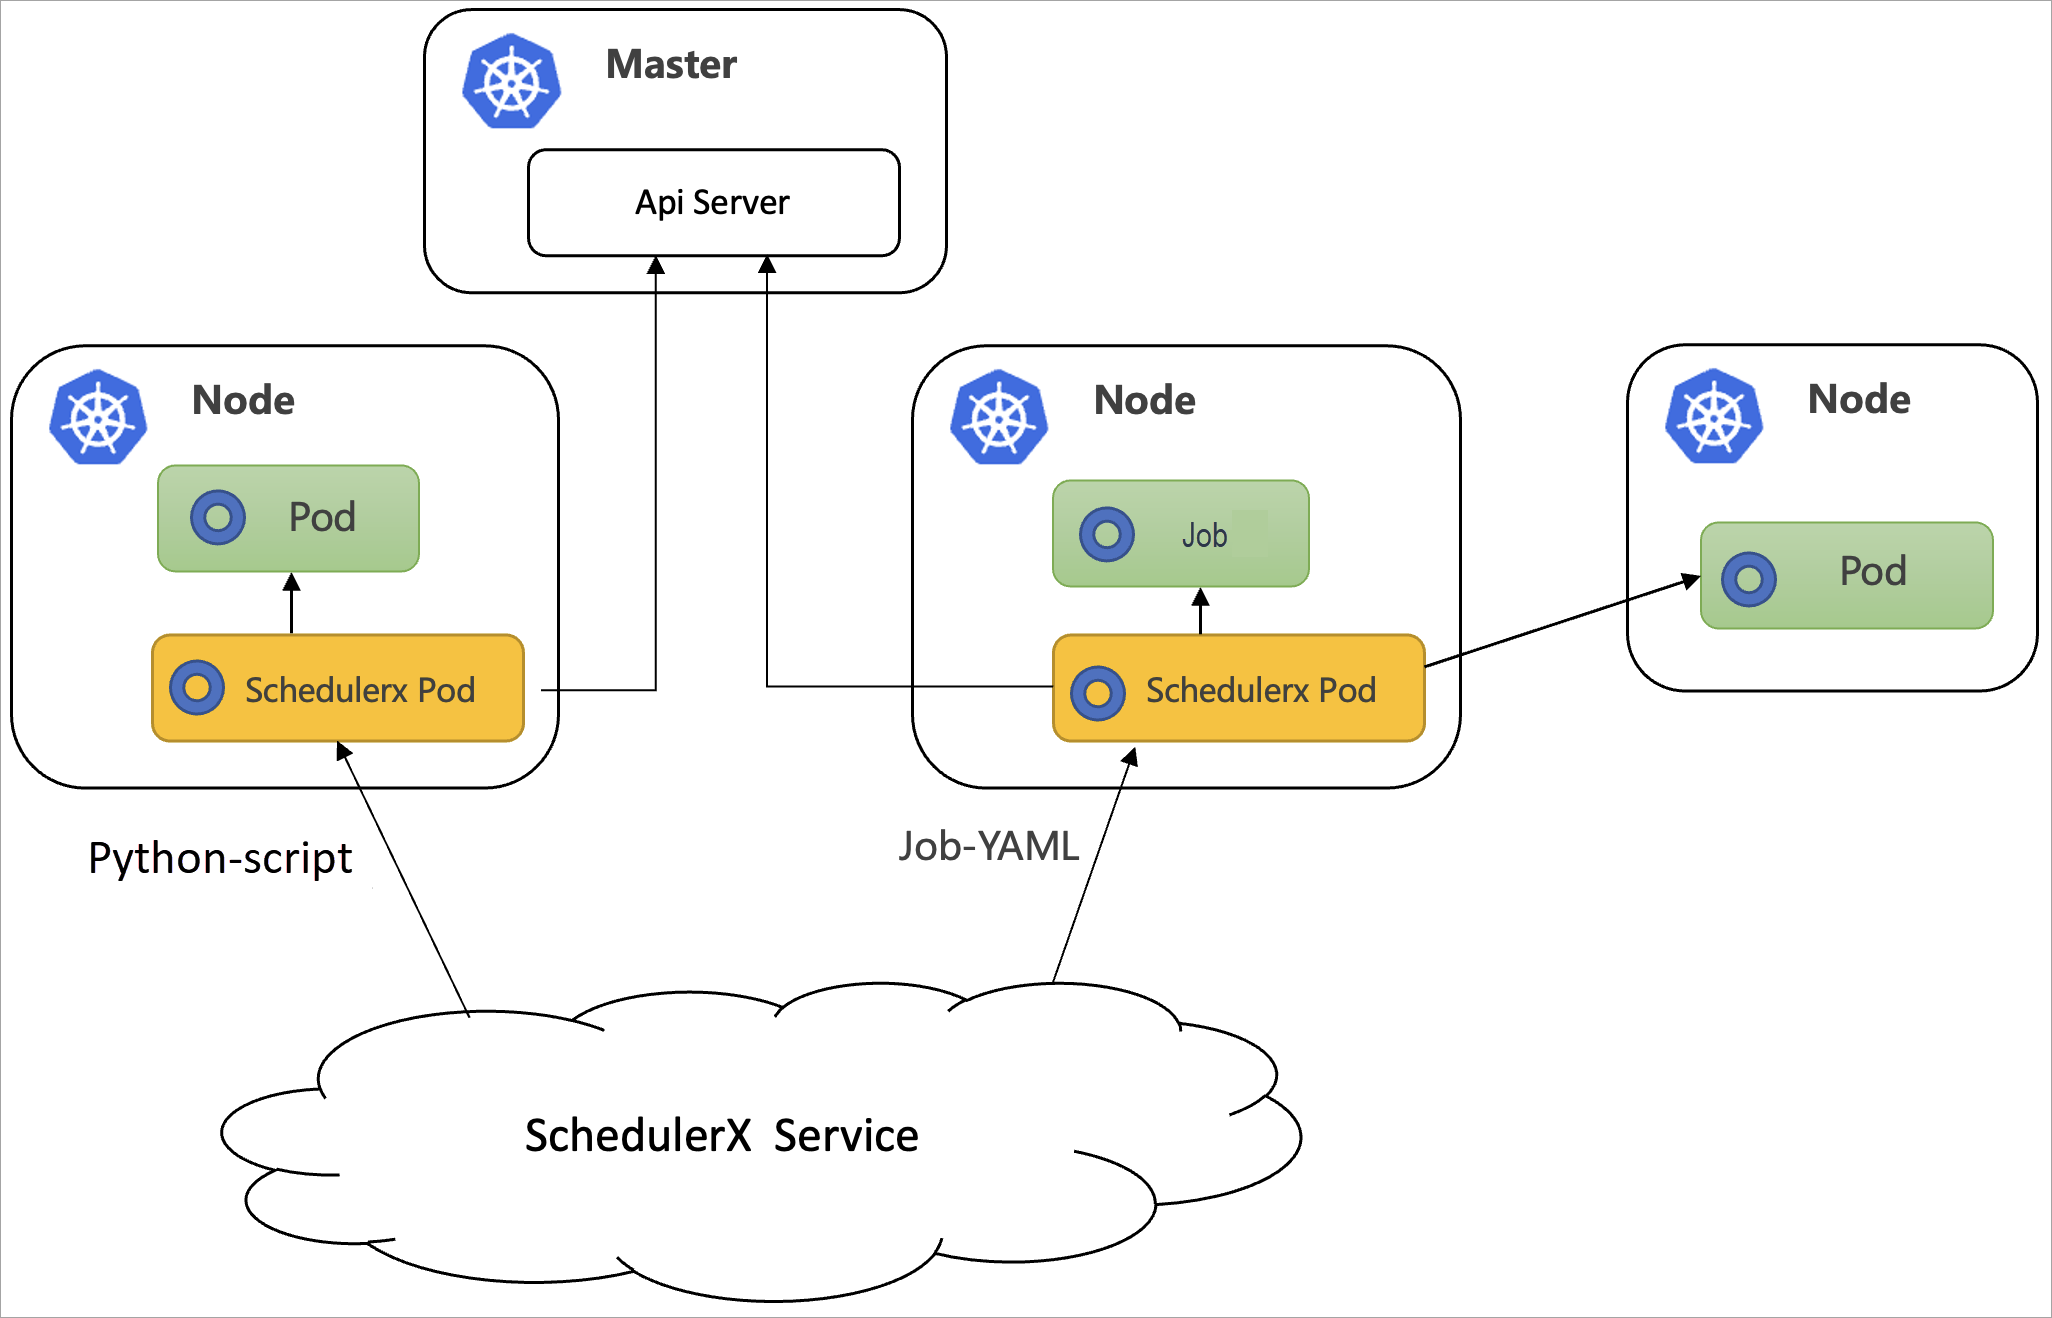
Deploy with a Deployment YAML (recommended)
Use this method for non-Java applications. The SchedulerX agent runs as a standalone Deployment and starts task workloads in separate Pods.
Step 1: Configure RBAC
SchedulerX Kubernetes tasks authenticate through a ServiceAccount. Apply the following RBAC configuration once per cluster and namespace.
Single-namespace scheduling: Use a Role and RoleBinding to restrict SchedulerX to one namespace.
apiVersion: v1
kind: ServiceAccount
metadata:
  name: schedulerx
---
apiVersion: rbac.authorization.k8s.io/v1
kind: Role
metadata:
  name: schedulerx-role
rules:
  - apiGroups: [""]
    resources: ["pods"]
    verbs: ["create","delete","get","list","patch","update","watch"]
  - apiGroups: [""]
    resources: ["pods/log"]
    verbs: ["get","list","watch"]
  - apiGroups: [""]
    resources: ["configmaps"]
    verbs: ["create","delete","get","list","patch","update"]
  - apiGroups: [""]
    resources: ["events"]
    verbs: ["watch"]
  - apiGroups: ["batch"]
    resources: ["jobs","cronjobs"]
    verbs: ["create","delete","get","list","patch","update","watch"]
---
kind: RoleBinding
apiVersion: rbac.authorization.k8s.io/v1
metadata:
  name: schedulerx-binding
subjects:
  - kind: ServiceAccount
    name: schedulerx
roleRef:
  apiGroup: rbac.authorization.k8s.io
  kind: Role
  name: schedulerx-role
Cross-namespace scheduling: Use a ClusterRole and ClusterRoleBinding to schedule Pods and Jobs across multiple namespaces.
apiVersion: v1
kind: ServiceAccount
metadata:
  name: schedulerx
---
apiVersion: rbac.authorization.k8s.io/v1
kind: ClusterRole
metadata:
  name: schedulerx-cluster-role
rules:
  - apiGroups: [""]
    resources: ["pods"]
    verbs: ["create","delete","get","list","patch","update","watch"]
  - apiGroups: [""]
    resources: ["pods/log"]
    verbs: ["get","list","watch"]
  - apiGroups: [""]
    resources: ["configmaps"]
    verbs: ["create","delete","get","list","patch","update"]
  - apiGroups: [""]
    resources: ["events"]
    verbs: ["watch"]
  - apiGroups: ["batch"]
    resources: ["jobs","cronjobs"]
    verbs: ["create","delete","get","list","patch","update","watch"]
---
kind: ClusterRoleBinding
apiVersion: rbac.authorization.k8s.io/v1
metadata:
  name: schedulerx-cluster-binding
subjects:
  - kind: ServiceAccount
    name: schedulerx
    namespace: <NAMESPACE1>
  - kind: ServiceAccount
    name: schedulerx
    namespace: <NAMESPACE2>
roleRef:
  apiGroup: rbac.authorization.k8s.io
  kind: ClusterRole
  name: schedulerx-cluster-role
Step 2: Deploy the SchedulerX agent
Save the following YAML as schedulerx-agent.yaml, replace the environment variable placeholders, and apply it with kubectl apply -f schedulerx-agent.yaml.
apiVersion: apps/v1
kind: Deployment
metadata:
  name: schedulerx-agent
  labels:
    app: schedulerx-agent
spec:
  replicas: 1
  selector:
    matchLabels:
      app: schedulerx-agent
  template:
    metadata:
      labels:
        app: schedulerx-agent
    spec:
      serviceAccountName: schedulerx
      containers:
      - name: schedulerx-agent
        image: schedulerx-registry.cn-hangzhou.cr.aliyuncs.com/schedulerx2/agent:latest-amd64
        imagePullPolicy: Always
        resources:
          requests:
            cpu: 500m
        env:
          - name: "SCHEDULERX_ENDPOINT"
            value: "<your-endpoint>"
          - name: "SCHEDULERX_NAMESPACE"
            value: "<your-namespace-id>"
          - name: "SCHEDULERX_GROUPID"
            value: "<your-application-id>"
          - name: "SCHEDULERX_APPKEY"
            value: "<your-application-key>"
          - name: "SCHEDULERX_STARTER_MODE"
            value: "pod"
        livenessProbe:
          exec:
            command: ["/bin/bash","/root/health.sh"]
          timeoutSeconds: 30
          initialDelaySeconds: 30
Replace the following placeholders with your actual values:
| Placeholder | Description | Where to find it |
|---|---|---|
<your-endpoint> | SchedulerX service endpoint for your region, such as addr-sh-internal.edas.aliyun.com | See Endpoints |
<your-namespace-id> | Namespace ID | Namespaces page in the SchedulerX console |
<your-application-id> | Application ID (GroupId) | Application Management page in the SchedulerX console |
<your-application-key> | Application key (AppKey) | Application Management page in the SchedulerX console |
Select the right agent image
Choose the agent image based on your cluster's chip architecture and region:
| Architecture | Region | Image |
|---|---|---|
| x86_64 | Chinese mainland | schedulerx-registry.cn-hangzhou.cr.aliyuncs.com/schedulerx2/agent:latest-amd64 |
| x86_64 | Regions outside the Chinese mainland | schedulerx-registry.ap-southeast-1.cr.aliyuncs.com/schedulerx2/agent:latest-amd64 |
| ARM64 | Chinese mainland | schedulerx-registry.cn-hangzhou.cr.aliyuncs.com/schedulerx2/agent:latest-arm64 |
| ARM64 | Regions outside the Chinese mainland | schedulerx-registry.ap-southeast-1.cr.aliyuncs.com/schedulerx2/agent:latest-arm64 |
Step 3: Verify the deployment
Check that the agent Pod is running:
kubectl get pods -l app=schedulerx-agentExpected output:
NAME                               READY   STATUS    RESTARTS   AGE
schedulerx-agent-xxxxxxxxx-xxxxx   1/1     Running   0          30s
Confirm the connection in the SchedulerX console: go to the Application Management page and verify that the instance appears as connected.
Deploy with a Helm chart
This method uses a Helm chart to deploy the SchedulerX agent as a Kubernetes Deployment. In addition to the shared prerequisites, make sure Helm is installed.
Step 1: Download the Helm chart
wget https://schedulerx2.oss-cn-hangzhou.aliyuncs.com/helm/schedulerxchart-2.0.0.tgzStep 2: Get connection parameters
Log on to the Distributed Task Scheduling Platform console.
In the top navigation bar, select a region.
In the left navigation pane, click Application Management.
Find your application and click Connection Settings in the Actions column. In the upper-left corner of the Connection Settings page, select Kubernetes.
Step 3: Install the chart
Run the following command with your connection parameters from the previous step.
Note: Replace the connection parameters in the command with the parameters of your target application. The default registry address in the connection settings is for an x86_64 image on the public network. Choose the correct image for your cluster's architecture and region from the agent image table.
helm install schedulerxchart schedulerxchart-2.0.0.tgz \
  --set SCHEDULERX_ENDPOINT=acm.aliyun.com\
  ,SCHEDULERX_NAMESPACE=f856c3f8-a15c-4a7e-9b4e-f812a9f8****\
  ,SCHEDULERX_GROUPID=k8s-test3\
  ,SCHEDULERX_APPKEY=****\
  ,SCHEDULERX_AGENT_IMAGE=schedulerx-registry.cn-hangzhou.cr.aliyuncs.com/schedulerx2/agent:latest-amd64
Step 4: Verify the deployment
After installation completes, confirm the agent Pod is running:
kubectl get pods -l app=schedulerx-agentThen check the Application Management page in the SchedulerX console to verify the instance is connected.
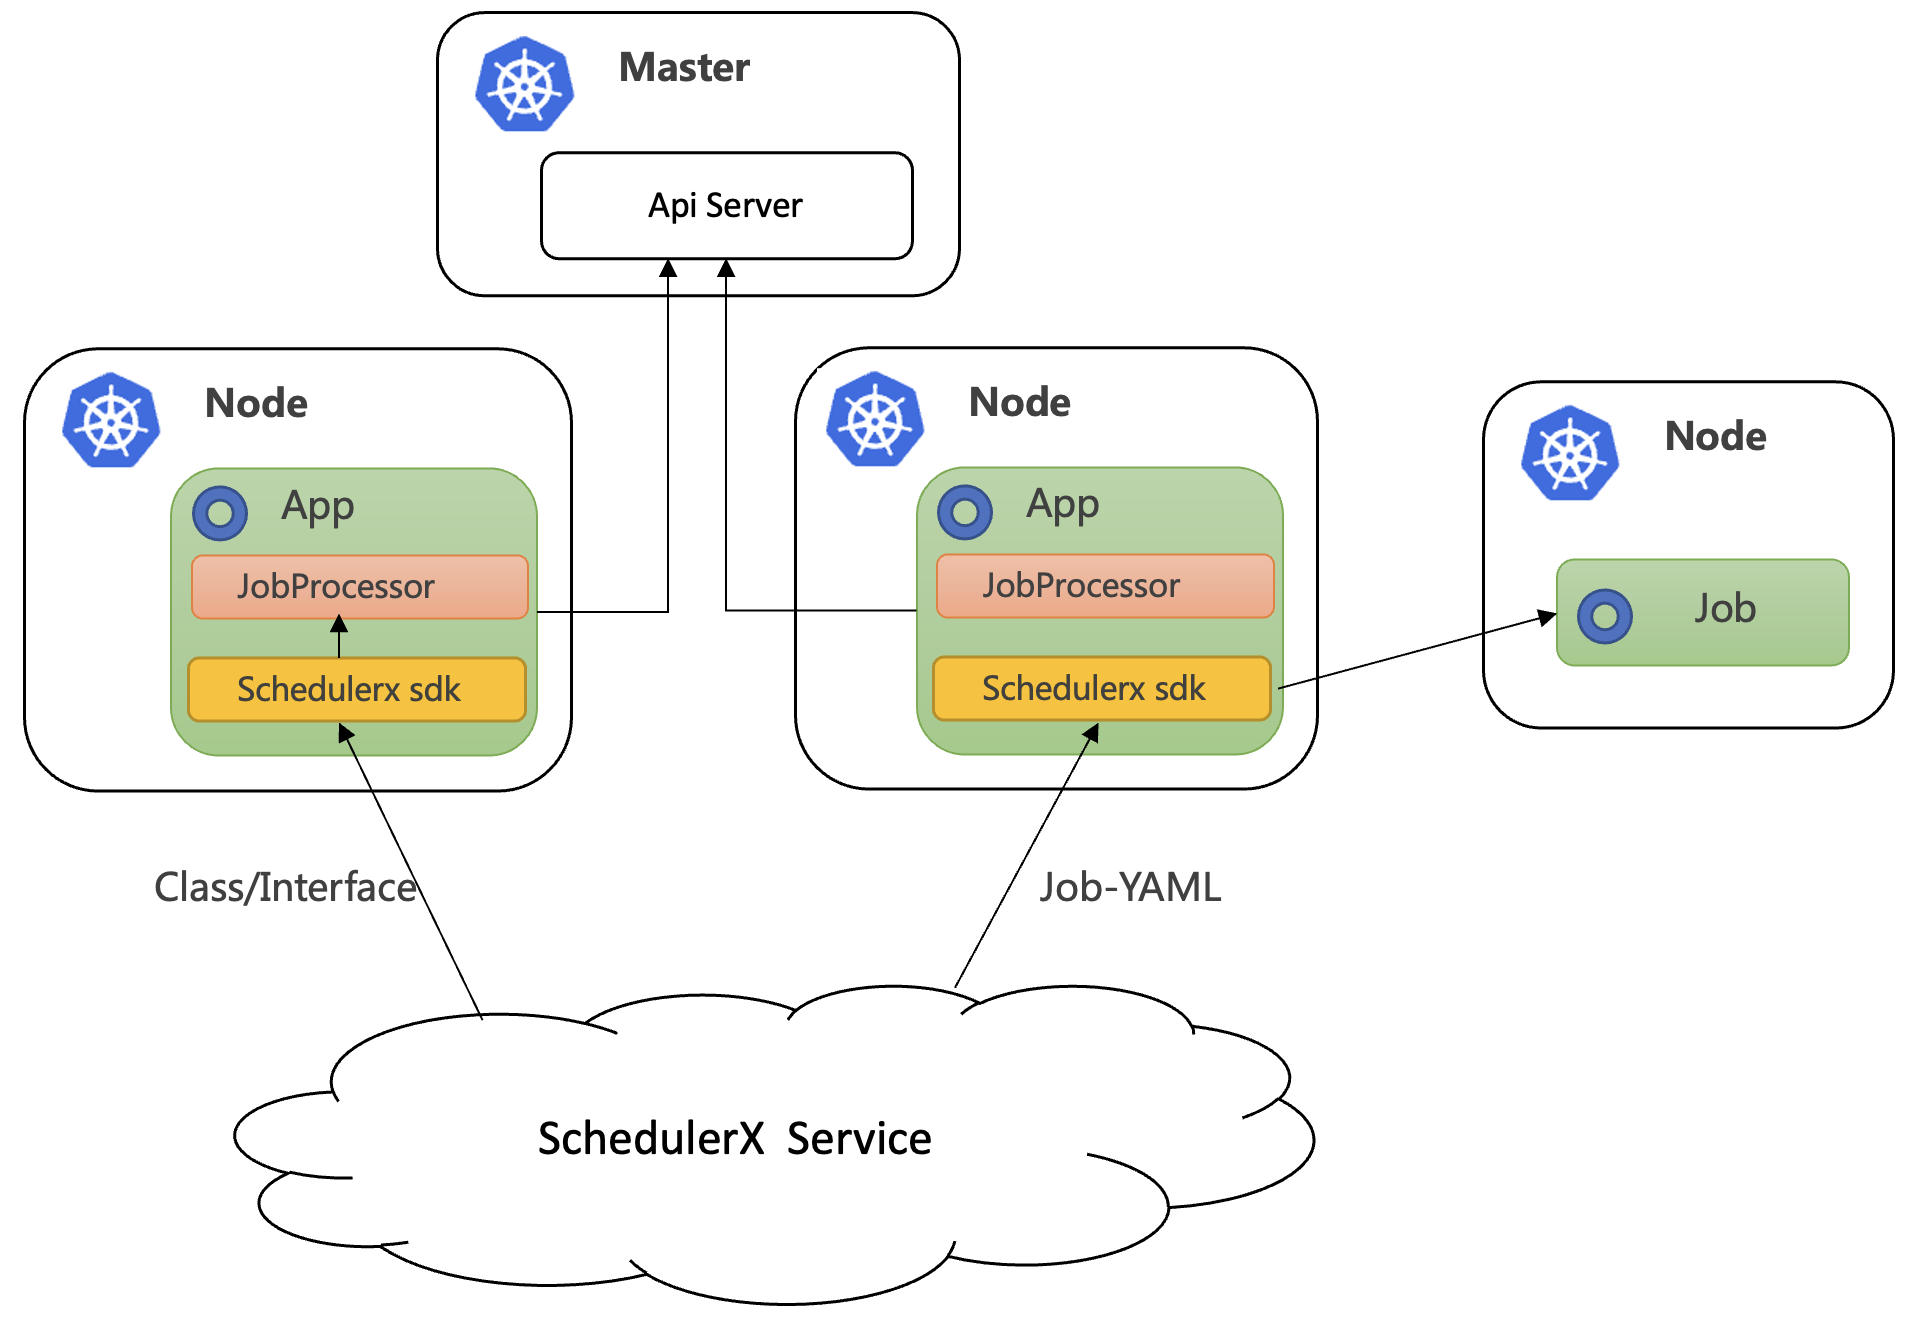
Deploy with the Java SDK
Use this method if your application is Java-based and requires both Java tasks and Kubernetes tasks. The SchedulerX agent runs in-process alongside your application.
Step 1: Add Maven dependencies
Add the Spring Boot starter and the Kubernetes plugin to your pom.xml. For the latest version number, see Release notes.
<dependency>
  <groupId>com.aliyun.schedulerx</groupId>
  <artifactId>schedulerx2-spring-boot-starter</artifactId>
  <version>${schedulerx2.version}</version>
</dependency>
<dependency>
  <groupId>com.aliyun.schedulerx</groupId>
  <artifactId>schedulerx2-plugin-kubernetes</artifactId>
  <version>${schedulerx2-plugin-kubernetes.version}</version>
</dependency>
Step 2: Connect to SchedulerX
Follow the instructions in Connect a Spring Boot application to SchedulerX.
Create a Kubernetes task
After the agent connects, create a Kubernetes task on the Task Management page in the SchedulerX console. For step-by-step instructions, see Task management.
The following resource types are available for Kubernetes tasks:
| Resource type | Description | Default image | Pod naming pattern |
|---|---|---|---|
| Shell-Script | Run a Shell script as a Pod | busybox | schedulerx-shell-{JobId} |
| Python-Script | Run a Python script as a Pod | Default Python image | schedulerx-python-{JobId} |
| PHP-Script | Run a PHP script as a Pod | php:7.4-cli | schedulerx-php-{JobId} |
| Nodejs-Script | Run a Node.js script as a Pod | node:16 | schedulerx-node-{JobId} |
| Job-YAML | Run a native Kubernetes Job | User-specified | N/A |
| CronJob-YAML | Run a native Kubernetes CronJob | User-specified | N/A |
| Pod-YAML | Run a native Kubernetes Pod | User-specified | N/A |
For script-based resource types, use the default image or specify your own. Edit the script directly in the SchedulerX console -- changes take effect on the next scheduled run.
Note: When using Pod-YAML:
Do not run Pods with long lifecycles, such as web applications that never terminate.
Set the restart policy to
Never. Otherwise, the Pod restarts continuously.