Connect an on-premises network to Alibaba Cloud through a Smart Access Gateway (SAG) device in inline mode, with DHCP enabled on the LAN side to dynamically assign IP addresses and network settings to clients.
Sample scenario
A company has deployed cloud services in a Virtual Private Cloud (VPC) in the China (Hangzhou) region. Its new branch office in Hangzhou needs to connect the on-premises network to Alibaba Cloud.
The company uses an SAG-1000 device to connect the on-premises network to Alibaba Cloud in inline mode. DHCP is enabled on the LAN side to centrally manage and dynamically assign IP addresses to clients, and deliver the headquarters' DNS server IP address, reducing IP and DNS configuration overhead.
After configuring the SAG device, the company uses Cloud Connect Network (CCN) and Cloud Enterprise Network (CEN) to connect the on-premises and cloud networks.
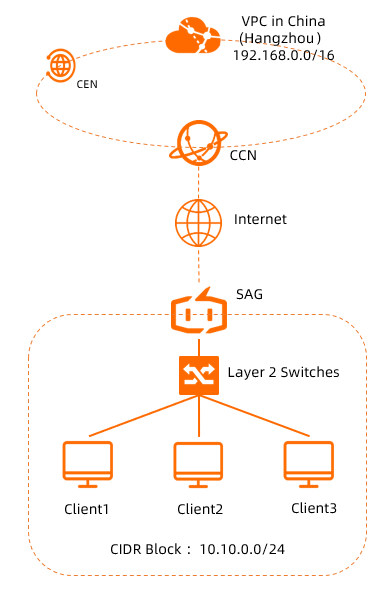
Network plan
The following table describes the network plans in this scenario. You can plan IP addresses and private CIDR blocks as needed. Make sure that the private CIDR block of the on-premises network does not overlap with that of the VPC.
|
Resource |
Plan and configuration |
|
on-premises network |
10.10.0.0/24 |
|
Smart Access Gateway device |
|
|
VPC |
192.168.0.0/16 |
Prerequisites
-
You have created a VPC in the China (Hangzhou) region and deployed cloud services in the VPC. For more information, see Create a VPC with an IPv4 CIDR block.
-
You are familiar with the security group rules for the Elastic Compute Service (ECS) instances in your VPC. Ensure these rules allow clients from the on-premises network to access your cloud resources. For more information, see View security group rules and Add a security group rule.
Procedure

Step 1: Purchase an SAG device
After you purchase SAG devices in the SAG console, Alibaba Cloud delivers the devices to the specified address and creates SAG instances. You can use the SAG instances to manage your SAG devices.
To use SAG devices in areas outside the Chinese mainland, you must purchase SAG devices from third-party vendors that are authorized by Alibaba Cloud. For more information, see Purchase SAG devices.
Log on to the SAG console.
On the Smart Access Gateway page, choose .
On the buy page, set the following parameters and click Buy Now.
Area: Select the area where you want to use the SAG device. In this example, Mainland China is selected.
Device Spec: Select the model of the SAG device. In this example, SAG-1000 is selected.
Have SAG Devices Already: Select whether you already have an SAG device. In this example, No is selected.
Edition: Select the edition of the SAG device. By default, SAG-1000-Standard is selected.
Quantity: Select the number of SAG devices that you want to purchase. In this example, 1 is selected.
Area: Select the area of the bandwidth that is used by the SAG device. The area is the same as that of the SAG device and cannot be changed.
Name: Enter a name for the SAG instance.
The name must be 2 to 128 characters in length, and can contain digits, periods (.), hyphens (-), and underscores (_). It must start with a letter.
Peak Bandwidth: Select the maximum bandwidth value of the SAG device.
Subscription Duration: Select a subscription duration.
On the Confirm Order page, confirm the information and click Confirm Purchase.
In the Shipping Address dialog box, enter the recipient address and then click Buy Now.
-
On the Pay Now page, select a payment method and complete the payment.
The SAG device is shipped within two business days after you place the order. If it is not shipped within this period, check the shipping status as follows:
On the Smart Access Gateway page, find the target SAG instance.
In the Operation column, click the
 icon and select View Shipping Update.
In the Order Updates panel, view the shipping updates.
After receiving the SAG device, check that the device and its accessories are complete and undamaged. If any items are missing or damaged, contact Alibaba Cloud After-Sales Support. For more information about the accessories for an SAG-1000 device, see SAG-1000 device accessories.
Step 2: Activate and connect the SAG device
Log on to the SAG console.
In the top navigation bar, select the region. In this example, Mainland China is selected.
On the Smart Access Gateway page, find the SAG instance and choose
 > Activate in the Actions column.
 In the Activate dialog box, click OK.
-
After activating the device, connect it to your on-premises network according to your network plan.
-
Use an Ethernet cable to connect the WAN port (Port 5) of the SAG device to the modem.
-
Use an Ethernet cable to connect the LAN port (Port 4) of the SAG device to the Layer 2 switch.
-
If the SAG device is purchased from a third-party vendor, you must manually associate the SAG device with the SAG instance. For more information, see Add device.
Step 3: Configure the SAG device
Log on to the web console of the SAG device to configure it. Before you begin, ensure the device is powered on, has a stable 4G signal, and is connected to Alibaba Cloud.
-
Log on to the web console of the SAG device.
Use an Ethernet cable to connect a local computer to the management port of the SAG device (Port 2 by default). Then, open a web browser to log on to the web console. For more information, see Step 1: Configure the local client and Step 2: Set a password for the first logon.
-
Assign roles to the ports of the SAG device.
-
After you log on to the web console of the SAG device, click Configure in the top navigation bar.
-
In the left-side navigation pane, click Port Allocation.
-
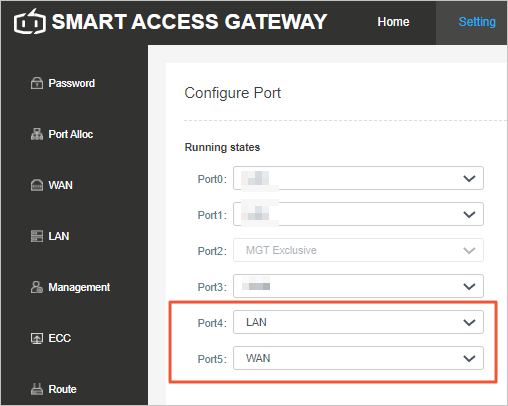
On the Port Allocation page, find the target port, select a port role, and then click OK.
-
Port 4: Select LAN.
-
Port 5: Select WAN.
-
-
-
Configure the WAN port.
-
In the left-side navigation pane, click Manage WAN Ports.
-
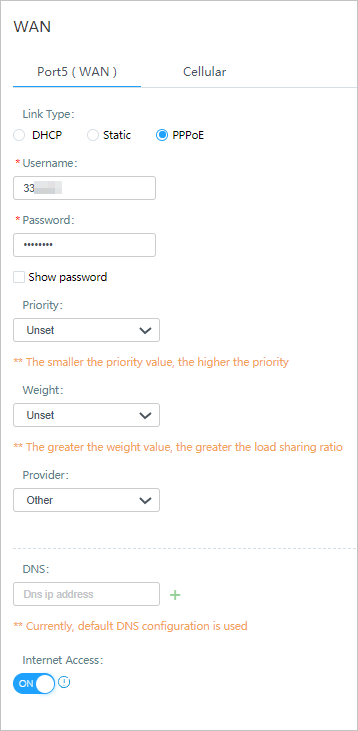
On the Manage WAN Ports page, click Port 5 (WAN), configure the following parameters, and then click OK.
-
Connection Type: Select PPPoE.
-
Username: Enter 33****.
-
Password: Enter 1234****.
-
Internet Access: This feature is enabled in this example.
-
Keep the default settings for the other parameters.
-
-
-
Configure the LAN port.
-
In the left-side navigation pane, click Manage LAN Ports.
-
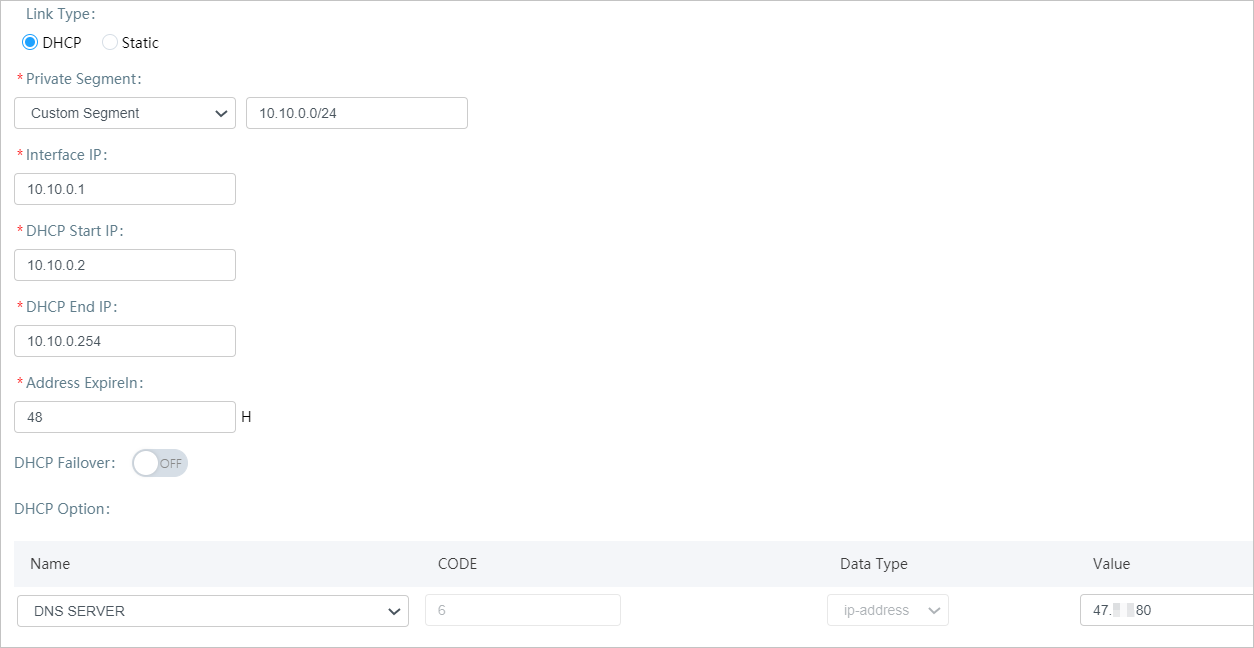
On the Manage LAN Ports page, click Port 4 (LAN), configure the following parameters, and then click OK.
-
Connection Type: Select Dynamic IP.
-
Private CIDR Block: Select Custom CIDR Block and enter the private CIDR block of the on-premises network: 10.10.0.0/24.
-
Interface IP: The IP address of the LAN port. In this example, enter 10.10.0.1.
-
DHCP Start IP: In this example, enter 10.10.0.2.
-
DHCP End IP: In this example, enter 10.10.0.254.
-
Lease Term: The default value of 48 hours is used in this example.
-
DHCP Failover: This feature is disabled in this example.
-
DHCP Option: On the right side of the page, click Add, configure the DHCP option based on the following information, and then click OK in the Operation column.
-
Name: Select DNS SERVER.
-
CODE: The default value is 6.
-
Data Type: The default value is ip-address, which indicates that you must enter the IP address of a DNS server in the Value field.
-
Value: Enter the IP address of the DNS server. In this example, enter 47.XX.XX.80.
-
-
-
Step 4: Configure the cloud network
After configuring the SAG device, set up the cloud network on the Smart Access Gateway console to connect your on-premises network to Alibaba Cloud.
Log on to the SAG console.
In the top navigation bar, select the region. In this example, Mainland China is selected.
-
Configure synchronization for on-premises routes.
On the Smart Access Gateway page, find the SAG instance and click Network Configuration in the Actions column.
In the left-side navigation pane, click Method to Synchronize with On-premises Routes.
On the Method to Synchronize with On-premises Routes tab, select Static Routing and click Add Static Route.
-
In the Add Static Route dialog box, enter the private CIDR block of the on-premises network, 10.10.0.0/24, and then click OK.
-
Create and associate a CCN instance.
In the left-side navigation pane, click CCN.
On the CCN page, click Create CCN Instance.
In the Create CCN Instance dialog box, set the following parameters and click OK.
Resource Group: Select the resource group to which the CCN instance belongs.
Instance Name: Enter a name for the CCN instance.
On the CCN page, click the ID of the CCN instance to go to the details page.
On the details page of the CCN instance, click the Associated SAG Instances tab. On the tab, click Associate with SAG.
On the Current Account tab of the Associate with SAG panel, set the following parameters and click OK.
Resource Group: Select the resource group to which the SAG instance belongs.
SAG: Select the SAG instance.
-
Create and attach a CEN instance.
-
In the left-side navigation pane, choose to go to the CEN console.
-
On the CEN Instance page, click Create CEN Instance.
-
In the Create CEN Instance dialog box, configure the following parameters and click OK.
-
Name: Enter a name for the CEN instance.
-
Description: Enter a description for the CEN instance.
-
Resource Group: Select the resource group to which the CEN instance belongs.
This parameter is not configured in this example. After the CEN instance is created, it is assigned to the default resource group.
-
Tag: Enter a tag for the CEN instance. This parameter is not configured in this example.
-
-
On the CEN Instance page, find the CEN instance that you just created and click its ID.
-
On the tab, click Create Transit Router.
-
In the Create Transit Router dialog box, configure the transit router instance and click OK.
Parameter
Description
Configuration
Region
The region to which the transit router instance belongs.
In this example, select the China (Hangzhou) region.
Version
The version of the transit router instance.
The system automatically determines and displays the version of the transit router instance in the current region.
Multicast
Whether to enable the multicast feature for the transit router instance.
The default value is used in this example, which means the multicast feature is not enabled.
Name
Enter a name for the transit router instance.
Enter a custom name.
Description
Enter a description for the transit router instance.
Enter a custom description.
Tag
Enter a tag for the transit router instance.
This parameter is not configured in this example.
Transit Router CIDR
Enter a CIDR block for the transit router.
For more information, see Transit router CIDR blocks.
You do not need to configure a CIDR block for the transit router in this example.
-
On the tab, find the transit router created for the target region, and in the Actions column, click Create Connection.
-
On the Connection with Peer Network Instance page, configure the network instance information and click OK.
NoteThis topic describes only the required parameters. For information about all parameters, see Create a VPC connection.
Parameter
Description
Network Type
Select VPC.
Region
Select the region where the network instance to be attached is located. In this example, select China (Hangzhou).
Transit Router
The system automatically displays the transit router instance created in the current region.
Account
Select the type of account that owns the network instance you want to attach.
A transit router can connect to network instances that are in the same account or in different accounts:
-
If the network instance and the transit router instance belong to the same Alibaba Cloud account, select Current Account.
-
If the network instance and the transit router instance belong to different Alibaba Cloud accounts, select Another Account and enter the ID of the Alibaba Cloud account (root account) to which the network instance belongs.
In this example, select Current Account.
Billing Method
The default billing method for a transit router is Pay-As-You-Go.
For more information about the billing rules for the pay-as-you-go method, see Billing.
Billing overviewNetwork Instance
Select the VPC instance to be attached.
Switch
Select a vSwitch in an availability zone supported by the transit router.
-
If the Enterprise Edition transit router supports only one availability zone in the current region, you must select a vSwitch in that availability zone.
-
If the Enterprise Edition transit router supports multiple availability zones in the current region, you must select one vSwitch in at least two availability zones. These vSwitches provide zone-level disaster recovery for traffic between the VPC and the transit router.
We recommend that you select a vSwitch in each availability zone to reduce traffic detours, minimize transmission latency, and achieve higher performance.
-
-
On the tab, find the transit router created for the target region, and in the Actions column, click Create Connection.
-
On the Connection with Peer Network Instance page, configure the network instance information and click OK.
Parameter
Description
Instance Type
Select Cloud Connect Network(CCN).
Region
Select the region where the network instance to be attached is located. In this example, select Mainland China CCN.
Transit Router
The system automatically displays the transit router instance created in the current region.
Account
Select the type of account that owns the network instance you want to attach.
-
If the network instance and the transit router instance belong to the same Alibaba Cloud account, select Current Account.
-
If the network instance and the transit router instance belong to different Alibaba Cloud accounts, select Another Account and enter the ID of the Alibaba Cloud account (root account) to which the network instance belongs.
In this example, select Current Account.
Network Instance
Select the ID of the CCN instance to be attached.
After you create the CCN attachment, the attachment is automatically associated with the default route table of the transit router, and the CCN instance automatically advertises its routes to the default route table of the transit router.
-
-
Step 5: Test the connectivity
-
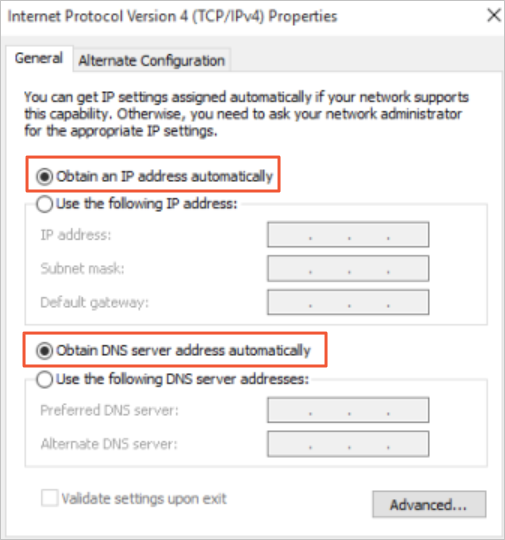
On a client in your on-premises network, configure its network interface card (NIC) to automatically obtain an IP address and a DNS server address. For more information, refer to the client's operating system manual.
The following figure shows an example for a Windows operating system.
-
Once the configuration is complete, the SAG device automatically assigns an IP address and a DNS server IP address to the client. On the client, run the ping command to test connectivity to an ECS instance in your VPC. If you receive reply packets, the connection is successful.
ping <IP address of the ECS instance>