After you configure a Data Lake Formation (DLF) catalog, you can access tables in the DLF instance directly from the Realtime Compute for Apache Flink development console. You do not need to manually register DLF tables. This improves the efficiency of job development and ensures data correctness. This topic describes how to create, view, use, and delete a DLF catalog.
This topic applies only to DLF-Legacy. We recommend that you use the latest version of Data Lake Formation (DLF) instead of DLF-Legacy. For more information about how to use the new version of DLF, see Manage Paimon catalogs.
Background information
Alibaba Cloud Data Lake Formation (DLF) is a unified metadata management product offered by Alibaba Cloud. You can use DLF to manage tables in open source formats, such as Iceberg, Hudi, Delta, Parquet, ORC, or Avro.
Prerequisites
You must activate the Alibaba Cloud Data Lake Formation (DLF)-Legacy service
Limits
Flink supports managing only Iceberg and Hudi data lake formats in a DLF catalog.
Create a DLF catalog
You can create a DLF catalog using the UI or by running SQL commands. We recommend that you use the UI.
UI method
Go to the Data Management page.
Log on to the Realtime Compute for Apache Flink console.
Find the workspace that you want to manage and click Console in the Actions column.
Click Data Management.
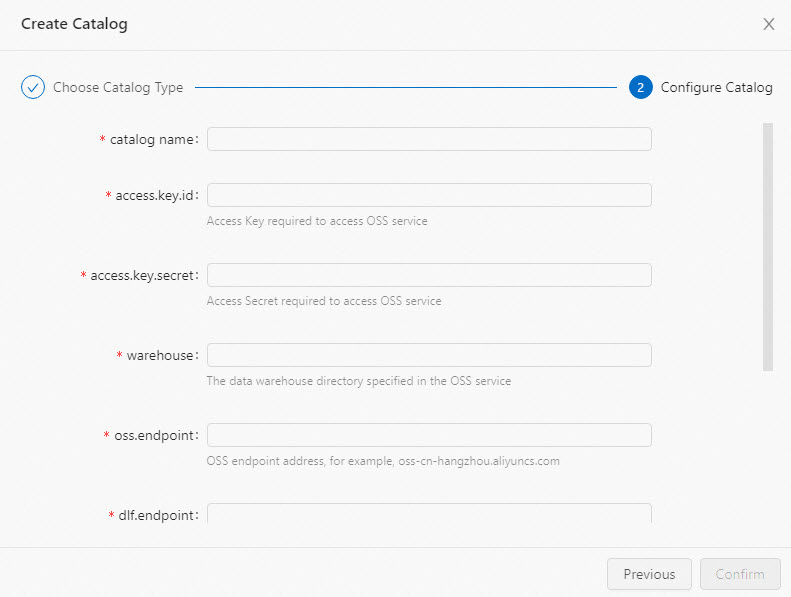
Click Create Catalog, select DLF, and then click Next.
Create a DLF catalog.
Configure the catalog information.
Configuration item
Description
Required
Remarks
catalogname
The name of the DLF catalog.
Yes
Enter a custom name in English.
access.key.id
The AccessKey ID required to access Object Storage Service (OSS).
Yes
For more information about how to obtain an AccessKey pair, see Obtain an AccessKey pair.
access.key.secret
The AccessKey secret required to access OSS.
Yes
For more information about how to obtain an AccessKey pair, see Obtain an AccessKey pair.
warehouse
The default OSS path where tables in the DLF catalog are stored. This is the data warehouse directory specified in the OSS service.
Yes
Supports OSS and Hadoop Distributed File System (HDFS).
OSS path format:
oss://<bucket>/<object>.OSS-HDFS path format:
oss://<bucket>.<oss-hdfs-endpoint>/<object>.
Where:
bucket: The name of your OSS bucket. You can view it in the OSS console.
object: The path where your data is stored. You can view it in the OSS console.
oss-hdfs-endpoint: The endpoint of the OSS-HDFS service. In the OSS console, go to the Overview page of the bucket. In the Access Ports section, view the Endpoint of the HDFS Service.
NoteOnly Ververica Runtime (VVR) 8.0.3 and later supports setting this parameter to an OSS-HDFS path.
oss.endpoint
The endpoint of Alibaba Cloud OSS. Example:
oss-cn-hangzhou-internal.aliyuncs.comYes
Supports OSS and OSS-HDFS.
For OSS service endpoints, see Regions and endpoints.
For the OSS-HDFS service endpoint, go to the Overview page of the bucket in the OSS console. In the Access Ports section, view the Endpoint of the HDFS Service.
NoteWe recommend that you set the oss.endpoint parameter to the Virtual Private Cloud (VPC) endpoint of OSS. For example, if you select the China (Hangzhou) region, set oss.endpoint to oss-cn-hangzhou-internal.aliyuncs.com.
To access OSS across VPCs, see How do I access other services across VPCs?.
dlf.endpoint
The endpoint of the Alibaba Cloud DLF service.
Yes
NoteWe recommend that you set the dlf.endpoint parameter to the VPC endpoint of DLF. For example, if you select the China (Hangzhou) region, set the dlf.endpoint parameter to dlf-vpc.cn-hangzhou.aliyuncs.com.
To access DLF across VPCs, see Workspace management.
dlf.region-id
The region name of the Alibaba Cloud DLF service. This is the region where DLF resides.
Yes
NoteEnsure that the region is the same as the one selected for dlf.endpoint.
More Configurations
Other DLF configurations. To configure multiple DLF catalogs, separate them with line breaks.
No
Example:
dlf.catalog.id:my_catalog.Click OK.
After the catalog is created, it appears in the Metadata area.
SQL method
In the text editor on the Data Query page, enter the statement to create the DLF catalog.
CREATE CATALOG <yourcatalogname> WITH (
   'type' = 'dlf',
   'access.key.id' = '<YourAliyunAccessKeyId>',
   'access.key.secret' = '<YourAliyunAccessKeySecret>',
   'warehouse' = '<YourAliyunOSSLocation>',
   'oss.endpoint' = '<YourAliyunOSSEndpoint>',
   'dlf.region-id' = '<YourAliyunDLFRegionId>',
   'dlf.endpoint' = '<YourAliyunDLFEndpoint>'
);
Parameter
Description
Required
Remarks
yourcatalogname
A custom name for the DLF catalog.
Yes
Enter a custom name in English.
ImportantAfter you replace the parameter with your catalog name, remove the angle brackets (<>). Otherwise, a syntax error occurs.
type
The type.
Yes
The value is fixed to dlf.
access.key.id
The AccessKey ID of your Alibaba Cloud account.
Yes
For more information about how to obtain an AccessKey pair, see Obtain an AccessKey pair.
access.key.secret
The AccessKey secret of your Alibaba Cloud account.
Yes
For more information about how to obtain an AccessKey pair, see Obtain an AccessKey pair.
warehouse
The default OSS path where tables in the DLF catalog are stored.
Yes
Format: oss://<bucket>/<object>. Parameters:
bucket: The name of your OSS bucket.
object: The path where your data is stored.
NoteView your bucket and object names in the OSS console.
oss.endpoint
The endpoint of Alibaba Cloud OSS.
Yes
For more information, see Regions and endpoints.
NoteWe recommend that you set the oss.endpoint parameter to the VPC endpoint of OSS. For example, if you select the China (Hangzhou) region, set oss.endpoint to oss-cn-hangzhou-internal.aliyuncs.com.
To access OSS across VPCs, see Workspace management
dlf.endpoint
The endpoint of the Alibaba Cloud DLF service.
Yes
NoteWe recommend that you set the dlf.endpoint parameter to the VPC endpoint of DLF. For example, if you select the China (Hangzhou) region, set the dlf.endpoint parameter to dlf-vpc.cn-hangzhou.aliyuncs.com.
To access DLF across VPCs, see Workspace management.
dlf.region-id
The region name of the Alibaba Cloud DLF service.
Yes
NoteEnsure that the region is the same as the one selected for dlf.endpoint.
Select the statement and click Run.
The created catalog appears in the Metadata area on the left.
View a DLF catalog
After the DLF catalog is created, follow these steps to view the DLF metadata.
Go to the Data Management page.
Log on to the Realtime Compute for Apache Flink console.
Find the workspace that you want to manage and click Console in the Actions column.
Click Data Management.
On the Catalog List page, view the Catalog Name and Type.
NoteTo view the databases and tables in the catalog, click View.
Use a DLF catalog
Manage DLF databases
In the text editor on the Data Query page, enter and run the following statements. To run a statement, select it and click Run. After the database is created or deleted, you can view the result in the Metadata section on the left side of the SQL Development page.
Create a database
CREATE DATABASE dlf.dlf_testdb;Delete a database
DROP DATABASE dlf.dlf_testdb;
Manage DLF tables
Create a table
Create with a connector
SQL method
In the text editor on the Data Query page, enter and run the following statement. To run the statement, select it and click Run. After the table is created, you can view it in the Metadata section on the left side of the SQL Development page.
CREATE TABLE dlf.dlf_testdb.iceberg (
  id    BIGINT,
  data  STRING,
  dt    STRING
) PARTITIONED BY (dt) WITH(
  'connector' = 'iceberg'
);

CREATE TABLE dlf.dlf_testdb.hudi (
  id    BIGINT PRIMARY KEY NOT ENFORCED,
  data  STRING,
  dt    STRING
) PARTITIONED BY (dt) WITH(
  'connector' = 'hudi'
);
UI method
Go to the Data Management page..
Log on to the Realtime Compute for Apache Flink console.
Find the workspace that you want to manage and click Console in the Actions column.
Click Data Management.
Find the catalog that you want to manage and click View in the Actions column.
Find the database that you want to manage and click View in the Actions column.
Click Create Table.
On the Connect with Built-in Connector tab, select a table type from the Connection Method list.
Click Next.
Enter the table creation statement and configure the related parameters. Sample code:
CREATE TABLE dlf.dlf_testdb.iceberg (
  id    BIGINT,
  data  STRING,
  dt    STRING
) PARTITIONED BY (dt) WITH(
  'connector' = 'iceberg'
);

CREATE TABLE dlf.dlf_testdb.hudi (
  id    BIGINT PRIMARY KEY NOT ENFORCED,
  data  STRING,
  dt    STRING
) PARTITIONED BY (dt) WITH(
  'connector' = 'hudi'
);
Click OK.
Create a table that has the same schema as an existing table (This method applies only to Iceberg tables)
In the text editor on the Data Query page, enter the following statement. Select the statement and click Run.
CREATE TABLE iceberg_table_like LIKE iceberg_table;
Delete a table
DROP TABLE iceberg_table;
Modify an Iceberg table schema
In the text editor on the Data Query page, run the following statements. To run a statement, select it and click Run.
Operation | Sample code |
Change table properties | |
Rename | |
Change a column name | Note This operation is supported only by VVR 8.0.7 and later. |
Change a data type | The data type of a column can be changed based on the following rules:
Note This operation is supported only by VVR 8.0.7 and later. |
Write data
INSERT INTO dlf.dlf_testdb.iceberg VALUES (1, 'AAA', '2022-02-01'), (2, 'BBB', '2022-02-01');
INSERT INTO dlf.dlf_testdb.hudi VALUES (1, 'AAA', '2022-02-01'), (2, 'BBB', '2022-02-01');
Read data
SELECT * FROM dlf.dlf_testdb.iceberg LIMIT 2;
SELECT * FROM dlf.dlf_testdb.hudi LIMIT 2;
Delete a DLF catalog
Deleting a DLF catalog does not affect currently running jobs. However, jobs that use tables from the deleted catalog fail with a 'table not found' error if they are published or restarted. Perform this operation with caution.
You can delete a DLF catalog using the UI or by running SQL commands. We recommend that you use the UI.
UI method
Go to the Data Management page.
Log on to the Realtime Compute for Apache Flink console.
Click Console in the Actions column of the workspace that you want to manage.
Click Data Management.
On the Catalog List page, find the catalog that you want to delete and click Delete in the Actions column.
In the confirmation message that appears, click Delete.
Confirm that the catalog is deleted from the Metadata section on the left.
SQL method
In the text editor on the Data Query page, run the following statement.
DROP CATALOG ${catalog_name}catalog_name is the name of the DLF catalog that you want to delete. This name is displayed in the Realtime Compute for Apache Flink development console.
Select the statement that you use to delete the catalog, right-click the statement, and then select Run.
Confirm that the catalog is deleted from the Metadata area on the left.
References
For more information about how to use the Iceberg connector, see Iceberg.
For more information about how to use the Hudi connector, see Hudi (deprecated).
If the built-in catalogs cannot meet your business requirements, you can use custom catalogs. For more information, see Manage custom catalogs.