Column encryption, provided by Data Security Center (DSC), protects sensitive column data in ApsaraDB RDS for PostgreSQL by keeping it encrypted at the database level. Data owners can read their data in plaintext through an always-confidential client, while database administrators and cloud platform operators—even those with direct database access—see only ciphertext. This separation between who owns the data and who manages the database infrastructure is the core security guarantee of this feature.
Prerequisites
Before you begin, make sure you have:
-
An ApsaraDB RDS for PostgreSQL 16 instance with minor engine version 20250228 or later
-
An instance running in one of the supported regions:
-
The Chinese mainland: China (Qingdao), China (Beijing), China (Zhangjiakou), China (Hohhot), China (Hangzhou), China (Shanghai), China (Shenzhen), China (Guangzhou), China (Chengdu)
-
Outside the Chinese mainland: China (Hong Kong), Singapore, Malaysia (Kuala Lumpur), Indonesia (Jakarta), Germany (Frankfurt)
-
How it works
DSC uses the AES-256-GCM encryption algorithm with a local key encryption method. Sensitive columns are stored as ciphertext in the database. Database accounts fall into two permission types:
-
Plaintext Permission — the account can query encrypted columns and receive plaintext directly. Assign this to data owners who need to read sensitive data.
-
Ciphertext Permission (JDBC Decryption) — the account receives ciphertext and can decrypt it locally through the column encryption JDBC driver. This is the default for all accounts after encryption is enabled. Assign this to applications that access the database through Java code.
If the instance fails the encryption check in DSC, column encryption cannot be configured. Common causes are: the database major version is not PostgreSQL 16, the minor engine version is earlier than 20250228, or the instance is a read-only instance. See FAQ for resolution steps.
Set up column encryption
Setting up column encryption involves five steps: activating DSC, authorizing DSC to access cloud resources, authorizing the RDS instance, connecting to the database, and enabling encryption on specific columns.
Step 1: Activate or upgrade DSC
New DSC users
-
Go to the Data Security Center buy page.Data Security Center buy page
-
Select an edition and enable column encryption.

-
Click Buy Now and complete the payment.
Column encryption is available in the Free Edition, Premium Edition, Enterprise Edition, and Value-added Service Only Edition. The Free Edition, Enterprise Edition, and Value-added Service Only Edition each include one free encrypted column quota. Purchase additional capacity if you need to encrypt more columns.
After purchase, view your feature specifications on the Overview page of the DSC console.
Existing DSC users
Log on to the Data Security Center console and check two things on the Overview page:
-
DSC edition: Column encryption is available for the Free Edition, Enterprise Edition, and Value-added Service Only Edition.
-
Column encryption quota: Confirm the quota meets your business requirements.

If your edition is incompatible or you need a larger quota, upgrade your DSC service:
-
Free Edition: Purchase a paid edition (Enterprise Edition or Value-added Service Only Edition) while retaining your Free Edition resources.
-
Enterprise Edition or Value-added Service Only Edition: Request a refund, then purchase another edition. The original instance and its data will be released.
To upgrade:
-
Log on to the Data Security Center console.
-
On the Overview page, click Upgrade.
-
Adjust the specification—enable new features such as column encryption, or increase protection and encryption quotas.
-
Click Buy Now and complete the payment.
View the updated specifications on the Overview page.
Step 2: Authorize DSC to access cloud resources
Step 3: Authorize the RDS database instance
Step 4: Connect to the database and run a sensitive data identification task
-
Log on to the Data Security Center console. In the left-side navigation pane, choose Asset Center.
-
On the Authorization Management tab, click Account Logon in the Actions column of the target instance.
-
In the Account Logon panel, click Add Credential in the Actions column of the target database.
-
In the Add Credential dialog box, select a credential and configure the Scan assets and identify sensitive data now. option: If you have not created a credential yet, click the Create Credential tab and configure the Credential Name, Username, Password, and Credential Type, then click OK.
-
Selected: DSC creates and immediately runs a default identification task. The task reads from the database and may degrade read performance—run this during off-peak hours.
-
Cleared: Run the identification task manually later. Go to Classification and grading > Tasks, open the Identification Tasks tab, and click Rescan in the Default Tasks list.
ImportantThe database account set as the DSC credential must have Plaintext Permission. Without it, DSC cannot classify and grade the latest data in the database.
-
-
Click the
 icon on the left side of the database instance to view the connection status and feature status.
Step 5: Enable column encryption
-
Log on to the Data Security Center console. In the left-side navigation pane, choose Risk Governance > Column Encryption.
ImportantThe Encryption Check column must display Passed before you can enable and configure column encryption. If it displays Failed, see FAQ.
-
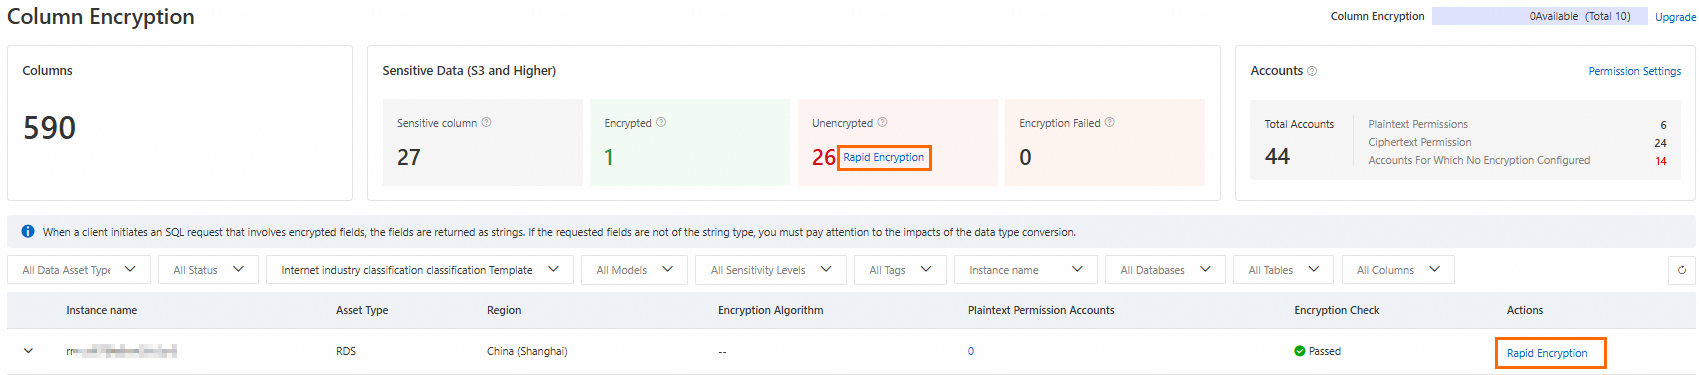
Click Rapid Encryption above the database instance list to configure encryption for all unencrypted columns across instances. Alternatively, click Rapid Encryption in the Actions column of a specific database instance to limit the scope to that instance.
-
In the Encryption Configuration panel, select the Asset Type, Instance name, Plaintext Permission Accounts, and the target Databases, Table, and Column, then click OK. Note the following:
-
RDS PostgreSQL supports only the AES-256-GCM algorithm and local encryption method.
-
After encryption is configured, all database accounts default to Ciphertext Permission (JDBC Decryption). Accounts with this permission access ciphertext by default and decrypt it locally using a JDBC client.
-
To grant an account direct plaintext access, add it under Plaintext Permission Accounts.
-
Modify the encryption configuration
Change the scope of encrypted columns
After enabling column encryption, adjust which columns are encrypted at any time.
-
Log on to the Data Security Center console. In the left-side navigation pane, choose Risk Governance > Column Encryption.
-
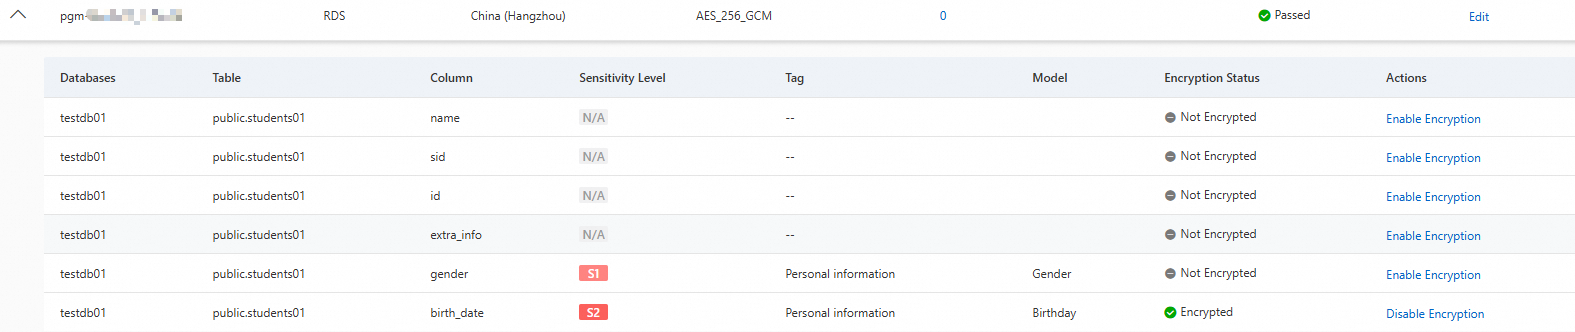
In the instance list, expand the target instance. Find the target Databases, Table, and Column, then click Enable Encryption or Disable Encryption.

Change account permissions
All accounts default to Ciphertext Permission (JDBC Decryption) unless explicitly set to Plaintext Permission. Change permissions based on the role of each account:
-
Plaintext Permission: For data owners who need to read sensitive data directly through the console or DMS.
-
Ciphertext Permission (JDBC Decryption): For applications and administrators who access the database through JDBC and decrypt locally.
To change permissions:
-
Log on to the Data Security Center console.
-
On the Risk Governance > Column Encryption page, click Accounts in the Permission Settings section. Alternatively, click Edit in the Actions column of an instance, then click Account Permissions in the Configure panel.
-
In the Permission Settings panel, search for the target instance and account to view the current permission.
Note If a newly added database account is not listed, run Asset synchronization first and then check again. -
Click Modify Permissions in the Actions column of the target account. To update multiple accounts with the same permissions at once, select them and click Batch Modify Permissions.
-
In the Modify Permissions dialog box, select the target permission and click OK.
Verify column encryption
This example uses the birth_date column in the students01 table. One database account has Plaintext Permission; another has Ciphertext Permission (JDBC Decryption).
-
Connect an RDS PostgreSQL 16 instance to DSC, complete sensitive data classification, and enable column encryption on the target column. Set one account to Plaintext Permission and keep the other at Ciphertext Permission (JDBC Decryption).
-
Log on to Data Management Service (DMS) with the account that has Ciphertext Permission (JDBC Decryption). Run
SELECT * FROM students01;. The encrypted column returns ciphertext.
-
Log on to Data Management Service (DMS) with the account that has Plaintext Permission. Run
SELECT * FROM students01;. The encrypted column returns plaintext.
Access encrypted columns from applications
For accounts with Ciphertext Permission (JDBC Decryption), use the column encryption driver (JDBC) to access encrypted column data from Java applications. The driver decrypts ciphertext automatically before returning results, making the process transparent to the application.
FAQ
What do I do if the RDS instance fails the encryption check?
The Encryption Check column shows Failed when the database version is not PostgreSQL 16, the minor engine version is earlier than 20250228, or the instance is a read-only instance.
Database version not supported
Go to the RDS instance list, find the target instance, and upgrade the database version. For details, see Upgrade the major engine version.
Minor engine version not supported

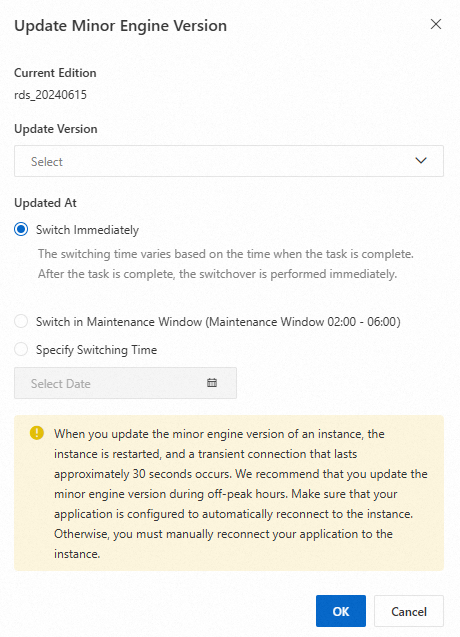
Click Update Minor Engine Version, select Latest Version and an Update Time, then click OK. For details, see Update the minor engine version. Column encryption can be enabled only after the minor engine version is updated.
Read-only instance
Read-only instances replicate data from the primary instance and do not support column encryption. Enable column encryption on the primary instance instead.
After upgrading the version, sync the latest instance information in DSC:
-
In the left-side navigation pane, choose Asset Center. On the Authorization Management tab, click Asset Authorization Management.
-
In the left-side navigation pane of the Asset Authorization Management panel, select the type of the target instance.
-
Click Asset Synchronization.
What's next
-
For the architecture and principles behind column encryption, see Column encryption overview.
-
If sensitive column data changes after authorization, rescan the database. For details, see Scan sensitive data through detection tasks.