All Products
Search
Document Center

:Use a CLB instance to forward requests to an RDS Custom instance

Last Updated:Dec 03, 2025

You can use Classic Load Balancer (CLB) to efficiently forward access requests to an RDS Custom instance to achieve load balancing. This solution lets you connect to your RDS Custom instance over the Internet. It effectively protects the security of your internal network and improves service availability and scalability.

Prerequisites

An application is deployed on the RDS Custom instance. In this example, NGINX is deployed. Deployment commands:

yum install -y nginx
systemctl start nginx.service
cd /usr/share/nginx/html/
echo "Hello World ! this is RDS Custom." > index.html

Step 1: Obtain ENI information about the RDS Custom instance

Call the DescribeNetworkInterfaces operation to obtain elastic network interface (ENI) information about the RDS Custom instance. The following table describes the request parameters in the operation. The VpcId, VSwitchId, and PrimaryIpAddress parameters are optional. You can use these parameters to quickly obtain ENI information about the RDS Custom instance.

Parameter

Description

Example

RegionId

The ID of the region in which the RDS Custom instance resides.

cn-hangzhou

ServiceManaged

In this topic, you need to query the ENI attached to the RDS Custom instance. Set this parameter to true.

true

VpcId

The ID of the virtual private cloud (VPC) to which the ENI belongs, which is the same as the VPC ID of the RDS Custom instance.

Note

You can view network information about the RDS Custom instance in the Basic Information section of the Configuration Information page.

vpc-bp16sm1hwzyutuohe****

VSwitchId

The ID of the vSwitch to which the ENI belongs, which is same as the vSwitch ID of the RDS Custom instance.

vsw-bp1nb3pv03878tgnj****

PrimaryIpAddress

The primary private IP address of the ENI, which is the same as the private IP address of the RDS Custom instance.

172.16.XX.XX

In the response, the PrivateIpAddress parameter indicates the ENI IP address, and the NetworkInterfaceId parameter indicates the ENI ID. Example:

{
  ...
    "NetworkInterfaceSets": {
      "NetworkInterfaceSet": [
        {
          ...
          "PrivateIpAddress": "172.16.XX.XX",   //ENI IP address
          "ServiceManaged": true,
          "DeleteOnRelease": true,
          "ResourceGroupId": "",
          "Attachment": {},
          "NetworkInterfaceId": "eni-bp1j7sqxlbjnnccf****",  //ENI ID
          ...
        }
      ]
    }
  }

Step 2: Create an Internet-facing CLB instance

  1. Log on to the CLB console. In the top navigation bar, select the region in which the RDS Custom instance resides.

  2. Click Create CLB. On the buy page, select a region and zone for the CLB instance and specify an instance name.

    Important parameters and configuration recommendations

    Parameter

    Description

    Recommendation

    Region And Primary Zone

    The region in which you want to create the CLB instance and the zone that you want to use to distribute network traffic.

    • You must select a region that supports multi-zone deployment.

    • The CLB and RDS Custom instances must reside in the same region.

    Zone Type

    Specifies whether the CLB instance is deployed in one zone or across multiple zones.

    • Single zone: The CLB instance is deployed only in one zone.

    • Multi-zone: The CLB instance is deployed across multiple zones. By default, network traffic is distributed to the primary zone. If the primary zone fails, the system automatically switches network traffic to the secondary zone to provide load balancing services. For more information, see Implement zone-disaster recovery (multi-zone disaster recovery).

    Instance Billing Method

    • Pay-By-CLCU: suitable for business testing or scenarios in which workloads significantly fluctuate. If you use the pay-by-CLCU billing method, you do not need to specify a specification for the CLB instance. The CLB instance automatically adds or releases resources on demand.

    • Pay-By-Specification: suitable for scenarios in which workloads are stable. You are charged based on the specification of your CLB instance.

    Pay-As-You-Go

    Instance Type

    • Internet: A public IP address is allocated to the CLB instance. In this case, the CLB instance can provide services over the Internet.

    • Intranet: A private IP address is allocated to the CLB instance. In this case, the CLB instance cannot forward requests that are sent from the Internet.

    In this example, Intranet is used.

    VPCId and VswitchId

    The VPC and a vSwitch of the CLB instance.

    The VPC and vSwitch of the CLB instance must be the same as those of the RDS Custom instance.

    IP Version

    The IP version of the CLB instance.

    • IPv4: The CLB instance uses only IPv4 addresses to provide services.

    • IPv6: The CLB instance uses only IPv6 addresses to provide services.

    IPv4

    Internet Data Transfer Fee

    Internet data transfer fees are generated only for Internet-facing CLB instances.

    • By traffic: suitable for scenarios in which workloads significantly fluctuate.

    • By bandwidth: suitable for scenarios in which workloads are stable.

    By traffic

    For more information about CLB billing, see Pay-as-you-go.

  3. Complete the payment. The newly created CLB instance is displayed on the CLB console page.

Step 3: Create a vServer group

  1. On the Instances page of the CLB console, click the ID of the CLB instance to go to the instance details page.

  2. Click the vServer Groups tab. Then, click Create VServer Group.

    image

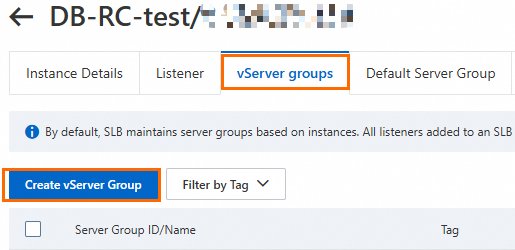
  3. Enter a name for the vServer group and click Create.

Step 4: Add the RDS Custom instance to the vServer group

Call the AddVServerGroupBackendServers operation to add the RDS Custom instance to the vServer group. The following table describes the request parameters in the operation. You must set the ServerId and ServerIp parameters to the ID and IP address of the ENI attached to the RDS Custom instance that you obtained in Step 1.

Parameter

Description

Example

RegionId

The ID of the region in which the CLB instance resides.

cn-hangzhou

VServerGroupId

The ID of the vServer group.

rsp-bp1zgr6ci****

BackendServers

The backend servers that you want to add. The value consists of the following fields:

  • ServerId: The ENI ID of the RDS Custom instance.

  • Weight: The weight of the backend server. Valid values: 0 to 100. Default value: 100. If you set the weight of a backend server to 0, no requests are forwarded to the backend server.

  • Type: The type of the backend server. In this topic, this field is set to eni.

  • ServerIp: The IP address of the ENI attached to the RDS Custom instance.

  • Port: The port that is used to receive requests.

  • Description: Optional. The description of the backend server. The description must be 1 to 80 characters in length and can contain letters, digits, hyphens (-), forward slashes (/), periods (.), and underscores (_).

The value is in the following format: [{ "ServerId": "eni-****", "Weight": "100", "Type": "eni", "ServerIp": "192.168.XX.XX", "Port":"80","Description":"test-112" }]

[{
  "ServerId": "eni-bp1j7sqxlbjnnccf****",
  "Weight": "100",
  "Type": "eni",
  "ServerIp": "172.16.XX.XX",
  "Port": "80",
  "Description": "test-RC"
}]

Step 5: Configure a listener for the CLB instance

  1. On the Instances page of the CLB console, find the required CLB instance and click Configure Listener in the Actions column.

  2. Configure the listener protocol and port. Then, click Next.

    Important parameters and configuration recommendations

    Options

    Description

    Recommendation

    Select Listener Protocol

    The protocol used by the CLB instance to provide services.

    • TCP and UDP: Layer 4 listener protocols.

    • HTTP and HTTPS: Layer 7 listener protocols.

    Note

    Listener working principles:

    • Layer 4 listeners: directly forward requests to backend servers. For example, for TCP listeners, when a CLB instance receives a request, the CLB instance modifies the destination IP address and destination port of the data packet based on the listener port. Then, the CLB instance forwards the request to a backend server.

    • Layer 7 listeners: serve as reverse proxies. When a CLB instance receives a request, the CLB instance establishes a new TCP connection to a backend server over HTTP, instead of directly forwarding the request to the backend server.

    For more information, see Service architecture.

    In this example, TCP is used.

    Listener Port

    The port used by the CLB instance to provide services.

    80

    For more information about parameter configurations, see CLB listeners.

  3. Configure a backend server group. Specifically, select an existing vServer group, confirm the ENI information about the RDS Custom instance, and then click Next.

  4. Perform a health check. We recommend that you use the default health check configuration.

    Suggestions on the CLB health check configuration

    A CLB instance performs health checks to check the availability of backend servers.

    After health checks are enabled for a CLB instance, if a backend server is declared unhealthy, the CLB instance automatically forwards requests that are destined for the unhealthy backend server to other healthy backend servers. When the unhealthy backend server recovers, the CLB instance automatically forwards requests back to the backend server.

    Health checks improve the availability of applications because health checks can prevent single points of failure (SPOFs).

    Important

    If your workloads are highly sensitive, frequent health checks may affect the availability of your workloads. To reduce the adverse impacts of health checks on your workloads, you can reduce the health check frequency, increase the health check interval, or change Layer 7 health checks to Layer 4 health checks. To ensure business continuity, we recommend that you enable the health check feature.

    For more information, see CLB health checks.

  5. Confirm the configuration and click Submit.

    If Configuration Successful is displayed, the listener is configured.

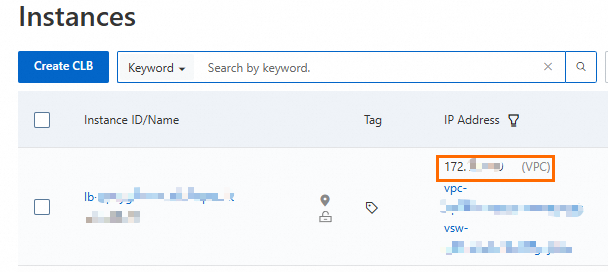
Step 6: Verify the result

  1. On the Instances page of the CLB console, obtain the IP Address of the CLB instance.

    image

  2. Run the following telnet command on an Elastic Compute Service (ECS) instance that resides in the same region and VPC as the RDS Custom instance to verify the forwarding result. In this example, an ECS instance running CentOS 7 is used.

    Note

    If Telnet is not installed, you must run the yum install -y telnet command to install Telnet.

    telnet <Destination address> <Listener port>
    • Destination address: the service address of the CLB instance or the private IP address of the RDS Custom instance.

    • Listener port: the listener port configured for the CLB instance. In this example, port 80 is used.

    In this example, the service address of the CLB instance is used. Sample command:

    telnet 172.16.XX.XX 80

    If the following command output is returned, the CLB instance can forward requests to the backend server:

    Trying 172.16.XX.XX...
    Connected to 172.16.XX.XX.
    Escape character is '^]'.
  3. Run the curl command to access the default web page of the NGINX service on the RDS Custom instance.

    curl http://172.16.XX.XX

    The following information is returned:

    Hello World ! this is RDS Custom.

(Optional) Use an Internet-facing CLB instance to forward requests to an RDS Custom instance

  1. Create an Internet-facing CLB instance and set the Instance Type parameter to Internet.

  2. Create a vServer group.

  3. Add the RDS Custom instance to the vServer group.

  4. Configure a listener for the instance.

  5. Verify the result.

    Use a browser to access http://<Service address of the CLB instance>. The web page loads normally and displays Hello World ! this is RDS Custom..

References