Restore an ApsaraDB RDS for MySQL instance to a new RDS instance using data backup files and log backup files. Use this approach to analyze historical data or recover from unintended operations without affecting your production instance.
Prerequisites
Before you begin, ensure that:
-
The original RDS instance is in the Running state and is not locked
-
No migration tasks are in progress on the original RDS instance
-
At least one data backup has completed (ApsaraDB RDS performs automatic backups by default — see Overview of backup methods)
-
(Required for point-in-time restore) Log backup is enabled — see Use the log backup feature for an ApsaraDB RDS for MySQL instance
-
(Required for restore from backup set) At least one physical backup has completed — see Automatic backup
How it works
Full data restoration creates a new RDS instance from your backup data. The original instance is unaffected throughout the process.

| Item | Description |
|---|---|
| Restoration range | The entire RDS instance is restored. |
| Specifications of the new RDS instance | Inherits the whitelist configurations, backup configurations, and parameter configurations of the original instance. |
| Account information | Includes account information at the point of restoration, plus account information from the selected backup file. |
| Data | Matches the data in the specified backup file of the original RDS instance. |
| Restore point | Depends on which backup features are enabled: log backup disabled — restore only to the backup creation time; log backup enabled — restore to any point within the log backup retention period; point-in-time recovery (PITR) enabled — restore to any point based on the Time Range of Specific Points in Time for Restoration parameter. For differences between PITR and log backup, see Differences between the PITR and log backup features. |
Limitations
-
You cannot restore downloaded backup files directly to an existing RDS for MySQL instance. Restore to a new instance first, verify the data, and then migrate data to the existing instance.
-
Restoration may fail if the new RDS instance runs an earlier database engine version than the original instance.
-
Restoration may fail if table names or column names contain Chinese characters or special characters.
-
Restoration may fail if binary logs on the original RDS instance have been deleted.
-
Tables without primary keys cannot be restored if
implicit_primary_keyis set tooffon the original RDS instance.
Billing
Charges for the new RDS instance begin as soon as it is created. Review the price during instance configuration before you confirm the order.
For temporary use, create a pay-as-you-go or serverless RDS instance. After verifying and migrating the data back to the original instance, release the new instance to stop charges. See Migrate data between ApsaraDB RDS instances and Release or unsubscribe from an ApsaraDB RDS for MySQL instance.
Restore a full instance
Full data restoration is enabled by default. ApsaraDB RDS automatically performs periodic backups, and you can use the generated backup files and log files to restore data at any time.
-
Go to the Instances page. In the top navigation bar, select the region where the RDS instance resides. Find the instance and click its ID.
-
In the left-side navigation pane, click Backup and Restoration.
-
Click Restore Database.
NoteAlternatively, click Restore Instance in the Instance Distribution section of the Basic Information page.


-
On the Restore Instance page, select a restore point or backup set, then configure the instance parameters.
Parameter Description Billing Method -
Subscription: Pay upfront for long-term use at lower per-unit cost.
-
Pay-as-you-go: Billed per hour based on actual usage; release the instance when no longer needed.
Restoration Mode By Backup Set: Restore from a specific physical backup. Logical backup files are not supported. By Point in Time: Restore to any point within the log backup retention period. Available only when log backup is enabled. Product Type Not displayed for Basic Edition. For High-availability Edition: ESSD or Premium ESSD storage supports Standard and YiTian product types; Premium Local SSD storage supports Standard only. For Cluster Edition: Standard and YiTian product types are available. See Product types. Zone of primary node and Zone of secondary node Single-zone deployment: Primary and secondary nodes are in the same zone. Multi-zone deployment: Primary and secondary nodes are in different zones for zone-disaster recovery. Multi-zone deployment is recommended. After creation, view zone details on the Service Availability page. Basic Edition supports single-zone deployment only. Instance Type -
General-purpose instance types: Dedicated memory and I/O; shared CPU and storage with other instances on the same host.
-
Dedicated instance types: Dedicated CPU, memory, storage, and I/O resources exclusive to your instance. For supported cores, memory, connections, and IOPS per instance type, see Primary ApsaraDB RDS instance types.
NoteEach instance type supports a specific number of cores, memory capacity, maximum connections, and maximum IOPS. For more information, see Primary ApsaraDB RDS instance types.
Storage Capacity Maximum storage for data files, system files, binary log files, and transaction files. Adjustable in 5 GB increments. -
-
Click Next: Instance Configuration and configure the network settings.
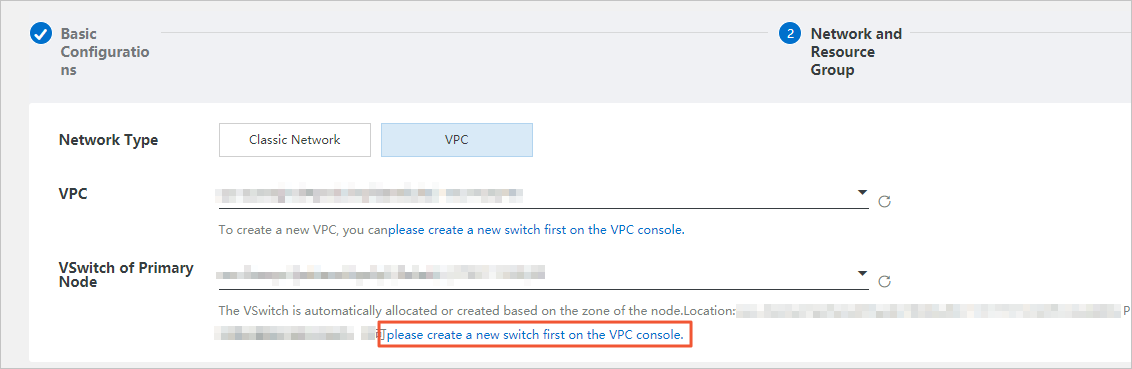
Parameter Description Network Type Classic network: Traditional network type. VPC: Recommended. A virtual private cloud (VPC) provides higher security and performance. When selecting VPC, configure the VPC and vSwitch of Primary Node parameters. For multi-zone deployment, also configure vSwitch of Secondary Node. The new RDS instance and your Elastic Compute Service (ECS) instance must be in the same network type — and the same VPC if both use VPC — to communicate over an internal network. Resource Group Assign the instance to a resource group for simplified management of resources and permissions. Select an existing group or create one. If grouping is not needed, select Default Resource Group. -
Click Next: Confirm Order.
-
Review the Parameter Configuration section, set Quantity and Subscription Duration (subscription billing only), click Confirm Order, and complete payment.
NoteFor subscription instances, enable Auto-renew to avoid manual renewals and service interruptions from overdue payments.
-
(Optional) Log in to the new RDS instance and verify the data.
Migrate restored data back to the original instance
After verifying the data on the new RDS instance, use Data Transmission Service (DTS) to migrate some or all databases and tables back to the original instance.
Set the new RDS instance as the source database and the original RDS instance as the destination database. Set Access Method to Alibaba Cloud Instance for both. See Migrate data between ApsaraDB RDS for MySQL instances.
Depending on your goal, choose the right approach after restoration:
-
Replace the original instance's data: Migrate all data from the new instance to the original instance.
-
Recover specific data: Write and run a migration task that extracts only the affected databases or tables and applies them to the original instance.
Restoration methods by destination
| Destination | Available methods |
|---|---|
| Original RDS instance | Method 1: Restore to a new instance, verify, then migrate selected data back to the original instance. Method 2: Use the database and table restore feature to restore directly. Method 3: Use Database Backup (DBS) to create a logical backup, then restore using the logical backup file — see Restore a MySQL database from a logical backup. |
| Another existing RDS instance | Method 1: Restore to a new instance, verify, then migrate the data to the target instance. Method 2: Use DBS to create a logical backup and restore — see Restore a MySQL database from a logical backup. |
| Self-managed database | Method 1: Restore to a new instance, verify, then migrate the data. Method 2: Use DBS to create a logical backup and restore — see Restore a MySQL database from a logical backup. Method 3: Download a backup file and restore from it — see Restore from a physical backup, Restore from a logical backup, or Restore using snapshot backup files. |
For restoration guidance for other database engines, see Restore SQL Server data, Restore the data of an ApsaraDB RDS for PostgreSQL instance, and Restore the data of an ApsaraDB RDS for MariaDB instance.
FAQ
No vSwitches exist in the zone selected in the previous step. Click the link in the drop-down list to go to the VPC console, create a vSwitch in the required zone, and then return to select it.
What's next
-
To restore individual databases or tables instead of the entire instance, see Restore individual databases and tables of an ApsaraDB RDS for MySQL instance.
-
For an overview of all restoration options, see Overview of data restoration methods.