Serverless ApsaraDB RDS for MySQL instances have no fixed specifications. Compute resources scale automatically within a specified range based on workload, and storage expands as data grows—minimizing idle resources and reducing O&M costs. These instances also support automatic start and stop. While stopped, you are charged only for storage, not for compute.
Feature overview
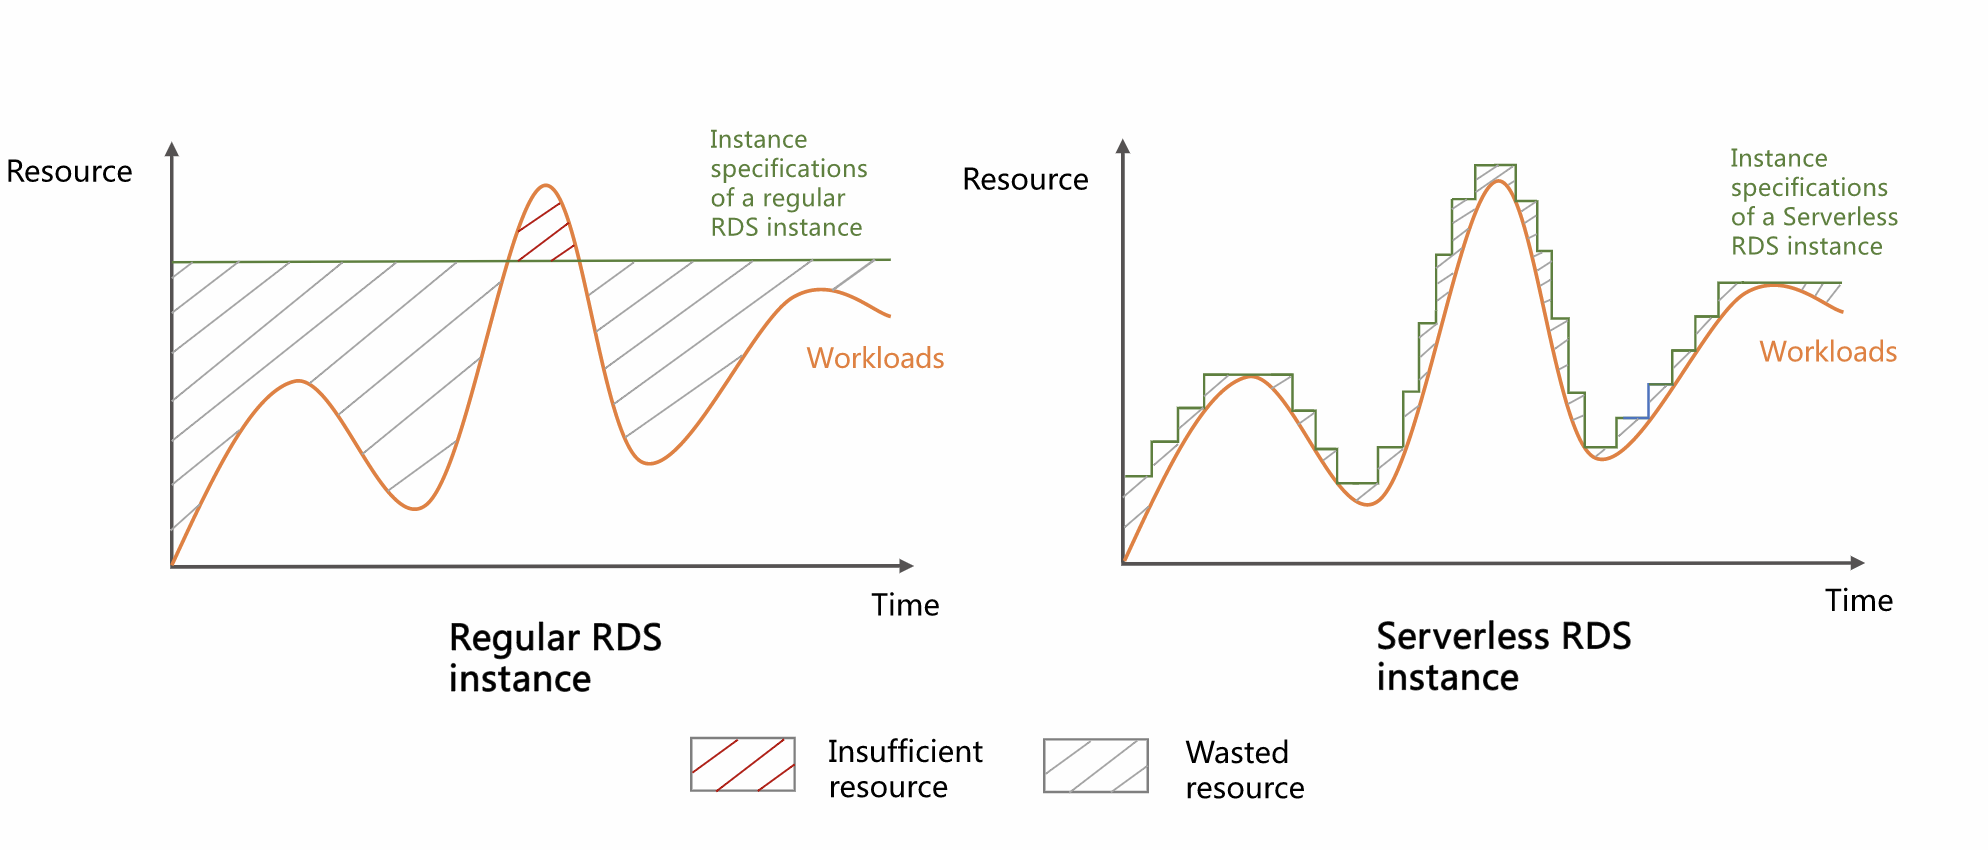
Unlike standard instances with fixed specifications, serverless instances offer automatic scaling and automatic start and stop. Performance adjusts in response to workload fluctuations, and the instance pauses after prolonged inactivity—meeting peak demand while maximizing resource utilization.
Automatic scaling
Automatic scaling includes compute resource scaling in response to load changes and automatic storage expansion as data grows.
Compute resources
Serverless instances use RDS Capacity Unit (RCU) as the compute measurement unit. One RCU is approximately equivalent to one CPU core and 2 GB of memory. You define upper and lower RCU limits, and the instance adjusts performance within that range based on workload. The benefits are most pronounced when workload varies significantly:
-
Standard instances (fixed specifications): Resources remain idle during off-peak periods and become insufficient during peak periods.
-
Serverless instances (no fixed specifications): Performance closely tracks workload fluctuations. During peak periods, it scales up to improve stability. During off-peak periods, it scales down to reduce costs.
Storage resources
-
Automatic expansion: When available storage is insufficient, the system expands capacity automatically—no manual intervention required.
-
Manual scale-in: Serverless instances do not support automatic scale-in to ensure stability and data security. You can manually reduce storage as needed.
Automatic start and stop
If your database has periods without requests, you can enable automatic start and stop (disabled by default). The instance pauses when no connections exist and resumes upon receiving a request—reducing costs. The rules are as follows:
-
Automatic pause: The instance pauses automatically after 10 minutes of inactivity.
-
Automatic start: The instance starts upon any connection request. Startup takes approximately 6 to 40 seconds depending on the status of databases and tables. The instance is unavailable during startup.
-
While the instance is stopped, you are charged only for storage resources—not for compute resources.
Scenarios
-
Workloads with significant peaks and troughs.
-
Scenarios where a database is used infrequently, such as in a staging environment.
-
Intermittent scheduled tasks, such as school teaching or student experiments.
-
Unpredictable workloads, such as Internet of Things (IoT) and edge computing applications.
Limits
-
Region limit: Serverless instances are supported only in the following regions:
China (Hangzhou), China (Shanghai), China (Qingdao), China (Beijing), China (Zhangjiakou), China (Hohhot), China (Ulanqab), China (Shenzhen), China (Heyuan), China (Guangzhou), China (Chengdu), China (Hong Kong), Singapore, US (Virginia), US (Silicon Valley), Germany (Frankfurt), UK (London), Thailand (Bangkok), South Korea (Seoul), Philippines (Manila), Japan (Tokyo), Malaysia (Kuala Lumpur), Indonesia (Jakarta)
-
Series limit: Only Basic series and High-availability series are supported.
-
Storage type limit: Only PL1 ESSDs are supported.
-
RCU limit: Minimum is 0.5 RCU, maximum is 32 RCU, and scaling granularity is 0.5 RCU.
-
Storage capacity limit: Minimum is 20 GB; maximum is 32 TB.
-
Storage capacity reduction limit: Manual reduction only. After reduction, minimum capacity must be at least
min{Data volume × 1.3, Data volume + 400 GB}, and cannot fall below the instance type’s minimum storage capacity. -
Instance start and stop limit: After enabling automatic start and stop, automatic pause and start are supported, and manual start is supported. Manual pause is not supported.
Billing
Serverless instances are billed hourly. View billing details on the Expenses and Costs page.
Cost breakdown
-
Total fee formula:
Total fee for a serverless instance = Fee per node × Number of nodes -
Number of nodes: The Basic series has one node; the High-availability series has two nodes.
-
Fee per node: Includes fees for compute resources and storage resources.
Compute resource fee
-
Billing formula:
Hourly compute resource fee = Unit price of compute resources × Hourly RCU usage -
Hourly RCU usage: The average number of RCUs used per second over the hour.
-
Unit price of compute resources: Pricing varies by region. For example, in Singapore, the RCU unit price is
USD 0.07455/RCU-hour. For other regions, see the ApsaraDB RDS purchase page.
Storage resource fee
-
Billing formula:
Hourly storage resource fee = Unit price of storage resources × Storage capacity -
Storage capacity: View this on the instance details page under .
-
Unit price of storage resources: Pricing varies by region. For example, in Singapore, the storage unit price is
USD 0.0004/GB-hour. For other regions, see the ApsaraDB RDS purchase page.
-
How instance states affect billing
When automatic start and stop is enabled, the instance pauses and resumes based on activity, and billing changes accordingly. The following shows the status and billing behavior across a full start-stop cycle:
-
The instance runs normally. Status: Running.
-
If no connections occur within 10 minutes, the instance begins pausing. Status: Pausing.
-
The instance completes pausing. Status: Paused.
-
A database request arrives, and the instance begins starting. Status: Starting.
-
The instance fully resumes normal operation. Status: Running.
|
Instance status |
Compute resource fee |
Storage resource fee |
|
Pausing |
Billed |
Billed |
|
Paused |
Not billed |
Billed |
|
Starting |
Not billed |
Billed |
|
Running |
Billed |
Billed |
Billing example
Background: A user purchases a serverless Basic series (single-node) instance in the Singapore region. Compute resource scaling range is 0.5 RCU to 8 RCU, and storage capacity is 20 GB. Over one day (24 hours), the instance experiences one hour of peak business using 8 RCUs, and uses 1 RCU for the remaining 23 hours.
Unit price: Compute and storage unit prices for the Singapore region are shown in the following tables:
|
Billable item |
Region |
Standard unit price |
|
RCU |
Singapore |
USD 0.07455/RCU-hour |
|
Storage |
USD 0.0004/GB-hour |
Compute and storage resource fees (1 day):
-
RCU fee: (0.07455 × 8 × 1) + (0.07455 × 1 × 23) = USD 2.31105
-
Storage fee: 0.0004 × 20 × 24 = USD 0.192
Total fee: USD 2.31105 + USD 0.192 = USD 2.50305.
Create a serverless instance
You can convert an existing pay-as-you-go instance to a serverless instance. Subscription instances must first be converted to pay-as-you-go before conversion to serverless. Alternatively, create a new serverless instance by following these steps.
-
Go to the ApsaraDB RDS purchase page and set Billing Method to Serverless.
-
Configure basic instance information
-
Select a Region. Region selection is final after purchase—select carefully.
-
To connect from an ECS instance, select the same region to enable service interconnection.
-
To connect from other devices, select a region close to the device to minimize network latency. You can then access the instance over the Internet.
-
-
Select an Engine and version. Choose MySQL. Only major versions 8.0 or 5.7 are supported.
-
-
Configure instance architecture and storage
-
Select a Series:
-
Basic series: A single-node deployment, cost-effective and suitable for development, testing, or low-availability scenarios.
-
High-availability series: A primary/secondary dual-node deployment with automatic failover, suitable for production environments.
-
-
Select a Storage Type. Options include PL1 ESSD.
-
-
Configure automatic scaling
-
Select a Resource Scaling Range (RCU). The instance automatically scales within your defined RCU range based on workload fluctuations.
-
Select an Elastic Policy. RCU scaling usually takes effect immediately and does not affect your business. In rare cases where smooth scaling is not possible, choose:
-
Force Execution: Forces RCU scaling to maintain database performance. May trigger a switchover. Ensure your client application supports reconnection.
-
Do Not Force Execution: Temporarily defers RCU scaling to preserve active connections and requests.
-
-
Select Automatic Start/Stop. When enabled, the instance pauses and resumes automatically. You are charged only for storage while paused.
-
-
Configure network and zone
-
Select a VPC. If connecting from an ECS instance, select the same VPC to enable service interconnection.
-
Select whether to Add to Whitelist. When enabled, ECS instances in the same VPC can directly access the RDS instance.
-
Select a Primary Zone and Network. Zones within the same region are functionally equivalent. If you selected High-availability series, configure the secondary zone and network according to the Deployment Method (multi-zone or single-zone).
-
-
Configure the Storage Capacity. Minimum adjustment step size is 5 GB.
-
(Optional) Configure More Settings. If you have no special requirements, keep the default values.
-
Confirm the configuration and place the order
To create multiple serverless instances with identical configurations, specify the quantity in the top-right corner of the page. You can purchase up to 20 instances at once. Confirm the configuration and click Confirm Order.
-
View the instance
After successful payment, click Back to Console or go to the ApsaraDB RDS instance list. Select the region at the top of the page to locate your instance. Instance creation takes about 10 minutes. When the status changes to Running, creation is complete.
NoteThere may be a delay between successful payment and the instance appearing in the console. If it does not appear immediately, wait a moment and refresh.
View RCU usage and storage capacity changes
You can review RCU and storage capacity changes over the past 30 days to determine whether to adjust your scaling configuration.
-
Go to the ApsaraDB RDS instance list, select a region at the top, and click the target instance ID.
-
In the left navigation pane, click Monitoring and Alerts.
-
On the Standard Monitoring tab, click Old Version in the top-right corner.
-
On the Resource Monitoring tab, view changes in Database Capacity (RCUs) and Disk Space.
Adjust elastic scaling settings
Adjust the RCU scaling range and elastic policy
-
Go to the ApsaraDB RDS instance list, select a region at the top, and click the target instance ID.
-
In the Configuration Information section, click Adjust Elastic Settings.
-
Configure elastic scaling in the panel that appears:
-
Set RCU scaling range: Adjust the minimum and maximum RCU values to match changing business demands.
-
Set elastic policy: RCU scaling usually takes effect immediately and does not affect your business. In rare cases where smooth scaling is not possible, choose:
-
Force Execution: Forces RCU scaling to maintain database performance. May trigger a switchover. Ensure your client application supports reconnection.
-
Do Not Force Execution: Temporarily defers RCU scaling to preserve active connections and requests.
-
-
-
Click OK.
Manually adjust storage capacity
A serverless instance automatically expands storage when space is insufficient. Automatic storage reduction is not supported. You can manually adjust storage capacity as follows:
-
Go to the ApsaraDB RDS instance list, select a region at the top, and click the target instance ID.
-
On the instance’s Basic Information page, in the Instance Resources section, click Modify next to Storage Capacity.
-
In the panel that appears, increase or decrease storage capacity, click OK, and then click Confirm in the dialog box.
Because data copying is required for reduction, it takes slightly longer than expansion—typically a few minutes. During expansion or reduction, the instance status is Upgrading/Downgrading. After completion, it changes to Running.
Manage instance start and stop
Enable or disable automatic start and stop
After enabling automatic start and stop, the instance pauses after 10 minutes of inactivity and resumes upon receiving a database request. While paused, you are charged only for storage—not for compute resources.
-
Go to the ApsaraDB RDS instance list, select a region at the top, and click the target instance ID.
-
In the Configuration Information section, click Modify Scaling Settings.
-
Click Advanced Settings, select Enable or Disable from the Automatic Stop and Restart drop-down list, and click OK at the bottom of the page.
Instance startup takes approximately 6 to 40 seconds depending on the status of databases and tables. The instance is unavailable during startup.
Manually start an instance
A running serverless instance can only be paused through automatic start and stop. Manual pause is not supported. For a paused instance, you can start it manually if needed.
-
On the Instance List page:
Go to the ApsaraDB RDS instance list, select a region at the top, and in the Actions column for the target instance, click More, then click Start Instance in the drop-down list.
-
On the Instance Details page:
Go to the ApsaraDB RDS instance list, select a region at the top, and click the target instance ID. On the instance’s Basic Information page, in the Running Status section, click Start Instance.
View instance start and stop records
Go to the RDS console. In the left navigation pane, click Tasks to view automatic and manual start and stop records for the instance.
Upgrade from Basic series to High-availability series
When you need enhanced disaster recovery or additional features, you can upgrade a Basic series serverless instance to a High-availability series instance.
-
Go to the ApsaraDB RDS instance list, select a region at the top, and click the target instance ID.
-
In the Configuration Information section, click Adjust Elastic Settings.
-
In the panel that appears, select High-availability series next to Series, and click OK.
-
In the dialog box that appears, review pre- and post-upgrade information, and click Confirm. During the upgrade, the instance status is Upgrading/Downgrading. After completion, the status changes to Running.
Schedule RCU configuration
RCU scaling typically completes in seconds. In rare cases—such as cross-host scaling—it may take 3 to 5 minutes. If strict stability is required during a specific time window, you can schedule RCU configuration to proactively scale up. For more information, see Schedule the RCU configuration of a serverless instance.
FAQ
-
Q1: Why did my serverless instance not stop automatically? How do I check the current number of connections to my serverless instance?
-
The automatic start and stop feature is disabled by default and must be enabled manually.
-
If enabled, you can check the number of connections to the instance.
-
To view the number of connections, go to the instance details page, select Monitoring and Alerts in the left navigation pane, and view the Session Connections metric.
-
To see which connections exist, run
SHOW PROCESSLIST.
-
-
If you have assigned a public IP address and configured an open whitelist, external malicious scans may prevent automatic pausing. Release the public IP address or tighten the whitelist to resolve this.
-
-
Q2: How long does RCU scaling take? What are the trigger conditions for RCU elastic scaling?
-
Duration: RCU scaling is typically instantaneous. In rare cases—such as cross-host migration—it may take 3 to 5 minutes. High-availability series instances are less likely to require cross-host migration due to the secondary node.
-
Trigger conditions:
-
Scale-out trigger: Either CPU utilization or memory usage reaches the scale-out threshold.
-
Scale-in trigger: Both CPU utilization and memory usage fall to the scale-in threshold.
-
-
Threshold:
-
Default CPU scale-out threshold is 60%; scale-in threshold is 40%. These may be adjusted to ensure availability.
-
Default memory scale-out threshold is 90%; scale-in threshold is 80%. These may be adjusted to ensure availability.
-
-
-
Q3: How do I choose the RCU scaling range?
You can use one of the following methods:
-
Perform a stress test to determine the RCUs—or CPU cores—required for your lowest and highest workloads.
-
Estimate based on your business’s CPU core requirement. One RCU is approximately equal to one CPU core and 2 GB of memory.
-
-
Q4: Will I be charged if I am not using my serverless instance?
-
Automatic start and stop enabled: The instance pauses automatically after 10 minutes of inactivity. You are charged only for storage—not for compute.
-
Automatic start and stop not enabled: The instance remains running regardless of usage. You are charged for both storage and compute. Typically, compute charges are based on your configured minimum RCU.
-
-
Q5: Is a Serverless ApsaraDB RDS for MySQL High-availability series instance deployed in a single zone or multiple zones?
A High-availability series instance can be deployed in either a single zone or multiple zones, based on your requirements.