Quick BI provides the Quick engine to optimize dataset performance. The Quick engine supports four computation modes: direct connection, extraction acceleration, query result caching, and dimension value acceleration.
Prerequisites
The target data source is connected. Connect to a data source.
Limitations
-
Only users with the Developer user type and a workspace role that includes permissions to create or edit datasets can use the acceleration configuration feature.
-
Cross-data-source datasets do not support incremental updates.
-
Manually triggered acceleration tasks do not support incremental updates.
-
If a dataset contains placeholders, extraction acceleration supports only the Accelerated Placeholder type.
Direct connection mode
Direct connection mode is the default Quick engine mode. All queries run directly on the underlying database or data warehouse. All databases connected to Quick BI support this mode.
Log on to the Quick BI console.
-
On the Quick BI homepage, go to the dataset edit page.

-
On the dataset edit page, create a dataset. Create a dataset.

After you save the dataset, data analysis queries based on this dataset use the direct connection mode by default.
Extraction acceleration
When direct connection mode overloads the database due to high query volume or large data size, consider extraction acceleration. Key features:
-
Periodically extracts data into the Quick engine. Ideal for offline data with daily granularity.
-
Supports incremental and full updates in two modes: full table acceleration and pre-calculation.
-
Free extraction storage included:
-
Quick BI Enterprise Standard provides 2 GB of extraction acceleration capacity.
-
Quick BI Pro provides 10 GB of extraction acceleration capacity.
-
-
Single dataset extraction limit: 100 million rows.
-
You can expand extraction acceleration capacity for Quick BI Enterprise Standard and Quick BI Pro:
-
Storage must be purchased in 5 GB increments ($1,000/year), up to a maximum of 100 GB.
-
If you upgrade from Quick BI Enterprise Standard to Quick BI Pro after expanding capacity, the paid capacity remains unchanged, and the free capacity increases from 2 GB to 10 GB.
-
-
Only Quick BI Enterprise Standard and Quick BI Pro support extraction acceleration. Supported data sources are listed in Data source feature list. Acceleration dependencies are available only in Quick BI Pro.
-
Configuring extraction acceleration for a MaxCompute data source connects over the public internet, which may incur download fees. Modify the database address in the data source settings to avoid this.
-
Queries involving more than three logical tables bypass the acceleration engine and run in direct connection mode. Logical tables are explained in Key concepts: Understand the relational model.
Configuration steps
-
An organization administrator enables extraction acceleration.
Log on to the Quick BI console.
-
Enable the Extraction acceleration switch.

-
Click the
 icon to set the dataset extraction limit.Note
Set a maximum row limit per dataset. This applies to all datasets in the organization. If the row count exceeds this limit, the extraction task fails. Maximum: 100,000,000 rows.

-
A data developer enables and uses the extraction acceleration feature for a target dataset.
-
On the Quick BI homepage, go to the Datasets page.

-
In the dataset list, find the target dataset and click Acceleration Configuration.

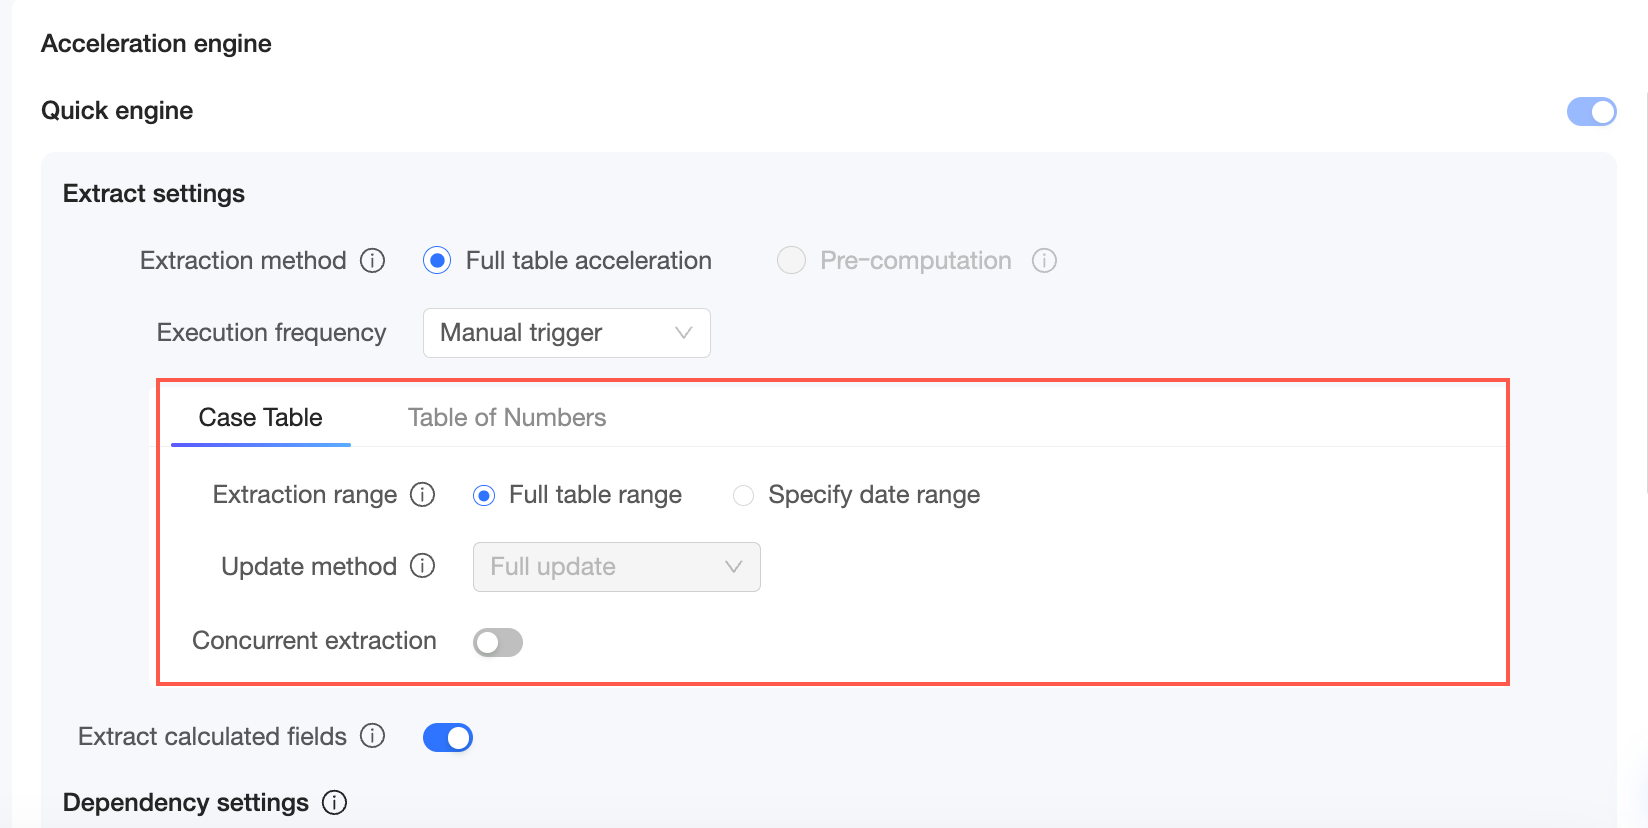
In the Acceleration Engine area, enable the Quick engine and configure the parameters:

If the dataset has multiple logical tables, switch between them to configure extraction scopes and update methods.
-
Extraction settings
Parameter
Description
Extraction mode
Supports two modes: Full table acceleration and Pre-calculation.
-
Full table acceleration: The system extracts and accelerates all data.
Accelerates all queries. Requires more storage. If storage is sufficient, select Full table acceleration.
-
Pre-calculation: The system extracts and accelerates a portion of the data.
Pre-calculates results for frequently run queries and returns them quickly on report access. For example, for a partitioned ODPS table, pre-calculation extracts only a portion of the data, saving storage and improving efficiency.
NotePre-calculation is not supported for datasets with multiple logical tables.
Execution frequency
Supports two methods: Manual trigger and Scheduled acceleration.
-
Select Manual trigger to run extraction acceleration tasks manually.
-
Select Scheduled acceleration and set a schedule. Extraction runs automatically on a monthly, weekly, daily, or hourly basis.
Extraction scope
You can extract data from the Full table or a Specified date range.
-
Full table: Updates the full table. The update method is full update.
-
Update by specified date range: You can set a date field, date range, and an update method to customize the date range for acceleration. The Quick engine retains data only within the selected date range, such as the last 365 days, to save storage space.

Date field
When the extraction scope is Update by specified date range, you can set the Date field. The date field and its format must match the field format in your database.

Date range
When the extraction scope is Update by specified date range, you can set the Date range. T represents the latest partition time for the data extracted on the current day. The current day is T-0, yesterday is T-1, and the day before yesterday is T-2.

Update method
For Full table scope, the update method is fixed to full update. For Update by specified date range, choose full update or incremental update.
-
Full update: Each acceleration extracts all data within the selected range.
-
Incremental update: The initial extraction covers all data in the selected range. Subsequent updates incrementally add data from the latest N partitions.
Update range preview
When the extraction scope is Update by specified date range, you can preview the update range.
-
If the update method is full update, the update range preview shows a full update.

-
If the update method is incremental update, the update range preview shows Existing data and Incremental update.

Number of incremental partitions
When the update method is incremental update, you can set the number of incremental partitions. Ensure the number of incremental partitions is within the specified date range.
Extract calculated fields
Select this option to extract calculated fields. This option is selected by default.
-
-
Dependency settings
Define dependencies for tables in the dataset by specifying the date field, date format, and offset. Updates trigger only when dependency conditions are met.
Note-
If you disable "Ignore Empty Extractions," acceleration tasks that extract zero rows will be marked as "Failed," and you cannot configure acceleration dependencies.
-
After you enable acceleration dependencies, if the upstream data is not updated, the Quick engine polls the upstream data status every 10 minutes for up to 2 hours.
-
Turn on the acceleration dependency switch.

-
Click the plus sign (+) on the right to add the required configurations.

Parameter
Description
Dependent table
Select a table from the current dataset. Search is supported.

Hover over a table name to view the corresponding data source name.

Date field
Select a date field from the current table.

Date format
You can select YYYY, YYYYMM, YYYY/MM, YYYY-MM, YYYYMMDD, YYYY-MM-DD, or YYYY/MM/DD.
Offset
Set the business date for the polling task to check. The range is from T-0 to T-10000.
-
Click the plus sign (+) on the right to add more dependencies.

-
You can delete a dependency setting.

-
-
Exception settings
NoteIf an acceleration task fails, the system automatically retries it three times at one-hour intervals.
Parameter
Description
Ignore Empty Extractions
If you enable this option, tasks that extract zero rows are marked as "Successful."
If you disable this option and a task extracts zero rows, the task is marked as "Failed," which can trigger a failure alert. You need to monitor the upstream data generation status.
Failure Alerts
When a task fails, you can configure the notification method and recipients for alerts.
-
The supported notification method is Email.
-
Recipients: You can select multiple recipients at a time. Recipients must be Alibaba Cloud accounts within the same organization.
If a recipient's name is grayed out, it indicates that no email address is configured for that account. Ensure the recipient has configured an email address. For instructions, see Configure recipient email addresses.
-
-
-
After you click Save, the Quick engine acceleration configuration is complete.
You can perform Data Backfill (①), Accelerate Now (②), View Logs (③), or Modify Configuration (④) for the dataset.

Parameter
Description
Data backfill
When the dataset schema changes, the system syncs the latest schema to the Quick engine automatically. Set the backfill range to Full backfill or Specified range.
-
Full backfill: Clears all existing data in the engine and re-extracts it.
-
Specified range backfill: Supports adding multiple date ranges.
 Note
NoteIf the dataset's extraction scope is set to the full table, you cannot backfill a specified range.
For datasets with multiple logical tables, backfill the entire dataset or specific logical tables.

-
If you select dataset, a full backfill is performed for the entire dataset by default.
-
If you select specific logical tables, you can select which logical tables to backfill and define their respective backfill ranges.
NoteFor logical tables where the date range is set to the full table, you cannot specify a custom range for backfilling.
Accelerate Now
Runs the acceleration task for the dataset immediately.
View Logs
View the execution logs for the dataset, including time, status, and duration.

Modify Configuration
Modify the existing configuration of the Quick engine. The changes take effect after you click Save.
While a task is running or pending, you can terminate the task.

-
-
-
Organization administrators and workspace administrators manage acceleration tasks. For more information, see Manage extraction acceleration tasks.
-
Data analysts create reports and analyze data.
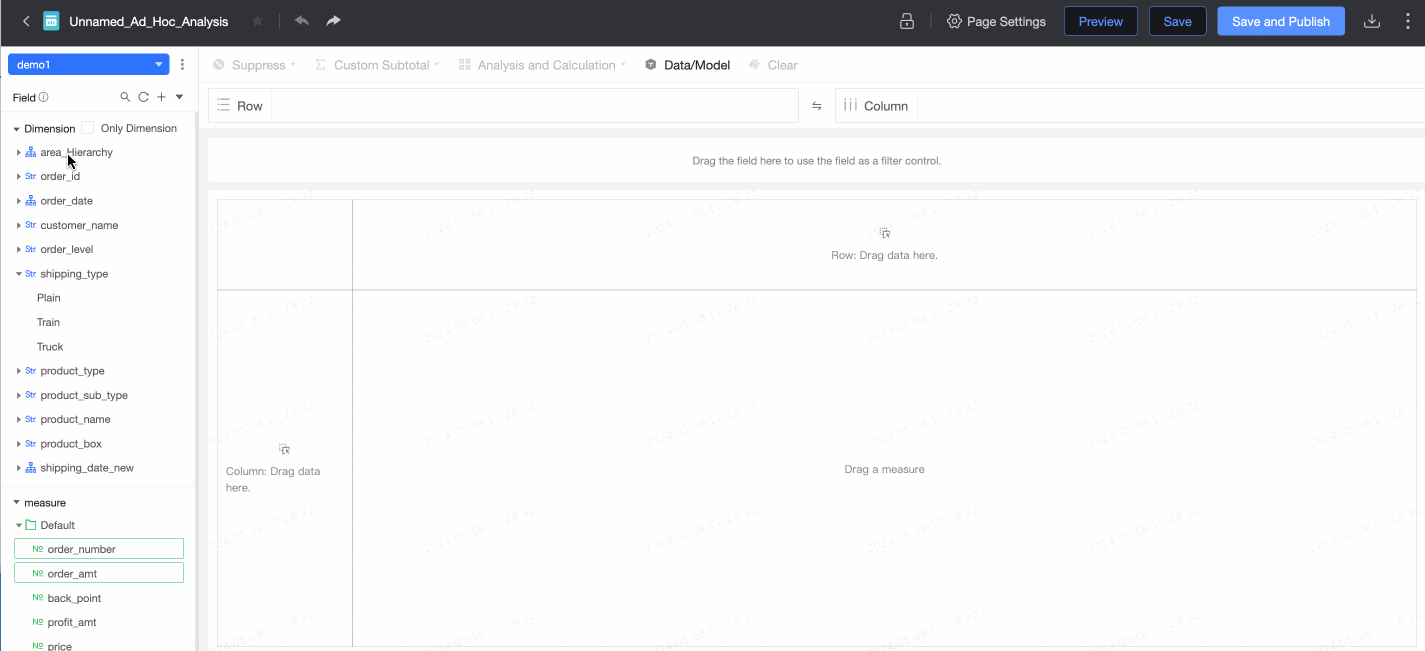
After configuration, create reports and perform data analysis, such as ad hoc analysis.
Manage extraction acceleration tasks
-
Organization-level extraction acceleration management
After an organization administrator enables the acceleration engine, they can view all datasets with the Quick engine enabled, check task status, and manage tasks centrally.
-
Overview
Shows workspace name and owner for all Quick engine datasets. Click
 to View Details.
-
The View Details page lists Quick engine datasets in the workspace. Available actions: View Logs, Terminate Task, Accelerate Now, Data Backfill, Modify Configuration, and Disable Extraction Acceleration.

-
View Logs
Click View Logs to view the execution logs for the dataset, including time, status, and duration.
-
Terminate Task
Terminates the current extraction task and clears data extracted during the current cycle.

-
Accelerate Now
Runs the acceleration task immediately. You can terminate the task while it runs.

-
Data backfill
Click Data Backfill and set the data range for backfilling to Full backfill or Specified range.

-
Full backfill: Clears all existing data and re-extracts it.
-
Specified range backfill: Allows for flexible settings and supports adding multiple date ranges.
After you click OK, the dataset will be backfilled within the specified data range. You can also terminate the task during this process.

-
-
Modify Configuration
Opens the dataset edit page to modify the Quick engine configuration.

-
Disable Extraction Acceleration
Disabling extraction acceleration clears all historical extracted data for the current dataset.
-
Switch workspace
On the workspace details page, click the Switch button next to a workspace to view it.

-
-
-
Running Tasks
Acceleration engine resources are shared across the organization. This page displays all running and pending tasks for administrators to manage.
-
You can search for tasks by dataset name.

-
You can filter tasks by Task Status, Creator, and Workspace.

-
The available actions are Terminate Task and Modify Configuration.

-
-
Failed Tasks
This page displays all failed tasks within the organization, allowing organization administrators to manage them.
-
You can search for tasks by dataset name.

-
You can filter tasks by Task Status, Creator, and Workspace.

-
The available actions are Rerun Task, View Logs, and Modify Configuration.

-
-
Workspace-level extraction acceleration management
Workspace administrators manage Quick engine datasets and task execution from this page.

-
You can search for tasks by dataset name.

-
You can filter dataset tasks by Task Status and Creator.

-
Available actions include View Logs, Terminate Task, Accelerate Now, Data Backfill, Modify Configuration, and Disable Extraction Acceleration.
Extraction acceleration FAQ
-
Will a task fail if the organization's remaining capacity is insufficient for the current dataset's extraction acceleration?
No. Quick BI ensures the task completes even with insufficient capacity. No extra fees apply for excess usage.
-
Why do I see a decrease in storage space used by some datasets after an extraction task completes?
The Quick engine automatically compresses data after extraction, reducing storage usage over time.
-
Does the Quick engine support automatic retries?
Yes. When a task status is "Failed," the system automatically retries it three times at one-hour intervals.
-
What causes the "Failed to create download session" error in the logs when creating an extraction acceleration task?
The session creation permission is not enabled. For ODPS data sources, the administrator must enable session creation permissions first.
-
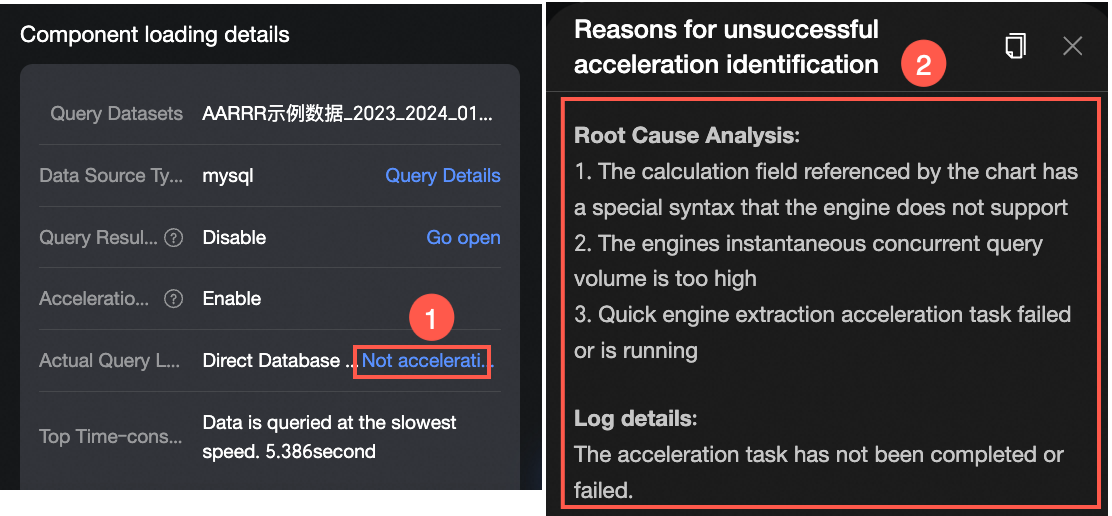
I configured dataset acceleration, but a dashboard component still queries the database directly. Why is this happening?
In the dashboard's performance diagnostics, you can click the relevant dashboard component to view the specific Reason for no acceleration.
-
Reason 1: Invalid aggregation function type
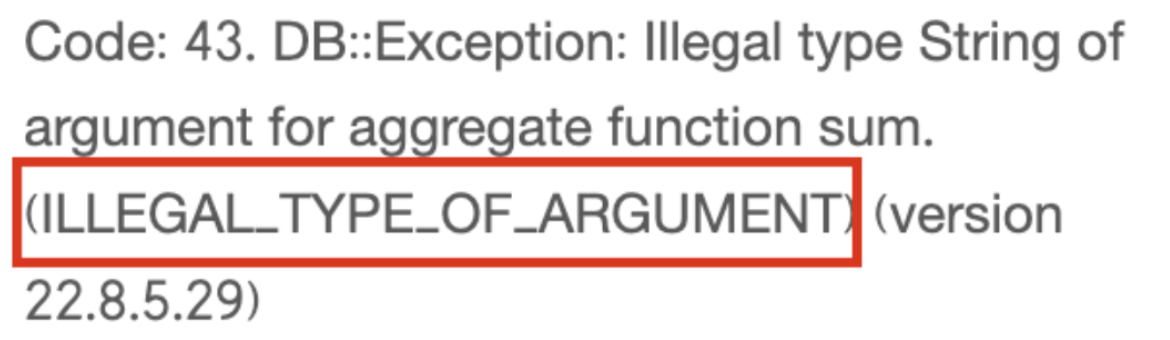
Root cause:
The original data type of the database field is string, and the acceleration engine does not support the SUM aggregation function on string-type fields.
Solution:
Create a calculated field using the
BI_TOINTfunction to convert the original string field to an integer, and then apply the SUM aggregation function. -
Reason 2: Missing space in a
CASE WHENexpression within a calculated fieldRoot cause:
A required space is missing in the calculated field configuration. This causes Quick BI to send malformed syntax that the acceleration engine cannot recognize.
Additional information:
Q: Why does the query work correctly when the acceleration engine is disabled?
A: Some data sources (such as ODPS) can automatically parse and correct this type of syntax before execution.
-
Query result caching
Dataset caching accelerates report access and reduces database load. With caching enabled, subsequent requests within the cache duration are served from cache without re-querying the database.
Query result caching works best for datasets with repeated queries, large data volumes, or slow database performance — especially dashboards with many repeated queries. Avoid this feature when data updates frequently and reports must show real-time data.
You can configure different cache durations. If hourly freshness is not required, a 12-hour duration is recommended.
Only Quick BI Enterprise Standard and Quick BI Pro support the dataset caching feature. This feature is compatible with all data sources that Quick BI can connect to.
Log on to the Quick BI console.
-
On the Quick BI homepage, go to the Datasets page.

-
In the dataset list, select the target dataset and configure its cache duration.

You can choose to Follow global caching policy or set a Custom cache duration.
-
When you create a new dataset, the cache configuration defaults to the global caching policy. For information on how to configure the global caching policy, see Global cache configuration.

-
You can also customize the caching policy for each dataset.

Supported cache durations: 1 minute, 5 minutes, 30 minutes, 1 hour, 2 hours, 4 hours, 8 hours, 12 hours, and 24 hours.
-
After the cache duration expires, a new cache generates on the next report query. Subsequent identical queries then use the new cache.
-
Caching operates at the dataset level. Clearing a dataset cache also clears all associated chart caches. After the cache duration expires, all chart caches for this dataset are automatically cleared.
-
If underlying data updates while the cache is still valid, manually clear the cache to retrieve the latest data.
-
-
-
Click Save for the query cache to take effect.
Clear the cache
-
Automatic cache clearing
The cache automatically expires after the configured duration.
-
Manual cache clearing
-
Clear the cache for a single dataset
On the acceleration configuration page, click the Clear Cache button next to Query Result Caching to clear the query result cache.

-
Clear the cache in batches
On the Datasets page, select the checkboxes next to the names of the datasets whose cache you want to clear, and then click the Clear Cache button to clear the cache for the selected datasets.

-
Dataset caching FAQ
-
Why do two charts in the same dashboard show different data even though they use the same dataset fields and query conditions?
This occurs when caching is enabled and charts were added at different times. The first chart uses cached data, while a newer chart loads fresh data from the database. To resolve this, disable caching or manually clear the dataset cache.
-
If I enable global caching, will it apply to existing datasets?
Yes. When you enable global caching, it applies to all existing datasets, which will then follow the global caching policy. New datasets will also have global caching enabled by default.
-
The data in the source database table for my Quick BI report has been updated, but the report is not showing the new data. Why?
Report data comes from a dataset, so first confirm that the dataset's data is up to date. If it is not, check whether the dataset is configured with query result caching or extraction acceleration. If either is enabled, queries will prioritize retrieving data from the cache or accelerated storage instead of connecting directly to the database.
Solutions
-
Disable query result caching to have all queries go directly to the database, which ensures data consistency.
-
Manually clear the dataset's result cache. The next query will fetch the latest data from the database and create a new cache.
-
Adjust the cache's automatic clearing time based on your business's data update frequency to ensure the latest data is fetched.
-
Rerun the extraction acceleration task or disable it, then refresh the dataset preview.
-
-
A dataset that used to load data in real time now requires me to manually clear the cache to see the latest data. What happened?
Your organization administrator likely enabled global caching, which caches all datasets without a custom policy. To resolve this, disable global caching or set a custom caching policy for the dataset.
-
Where is the dataset cache data stored?
The cache stores query results on Quick BI's in-memory servers.
Dimension value acceleration
Configure dimension value acceleration for dimension fields frequently used in query controls and ad hoc analysis. For example, to query transaction details by customer name and product name, configure acceleration for the "Customer Name" and "Product Name" fields in the Order Details Table dataset.
Assume these two fields exist in the database tables customer_info and product, with the corresponding field names user_name and product_name.
After you configure acceleration, queries for dimension values retrieve only the value of user_name from the customer_info table and the value of product_name from the product table. This eliminates the need for an aggregate query on the Order Details Table, improving query speed.
Only Quick BI Enterprise Standard and Quick BI Pro support the dimension value acceleration feature. This feature is compatible with all data sources that Quick BI can connect to.
Log on to the Quick BI console.
-
On the Quick BI homepage, go to the Datasets page.
-
In the dataset list, follow the steps in the figure to select the target dataset and configure dimension value acceleration.
After enabling dimension value acceleration, configure the fields you need. For the Order Details Table dataset, configure acceleration for customer name and product name.

Assume the customer name and product name fields exist in the database tables customer_info and product, with the corresponding field names
user_nameandproduct_name. In this case, the configuration would be:-
Dataset dimensions: Customer Name and Product Name.
-
Configuration tables: customer_info and product.
-
Table fields:
customerandproduct_name
-
Global cache configuration
Organization administrators of Quick BI Enterprise Standard and Quick BI Pro can configure a global caching policy. Global caching is disabled by default for new organizations.
-
You can navigate to the global cache configuration page as shown in the figure.

-
Enable global caching (①), then set the cache duration for identical queries (②) and the Auto Clear Time (③).
 Note
NoteThe cache duration for returning cached results for identical queries can be set to 1 minute, 5 minutes, 30 minutes, 1 hour, 2 hours, 4 hours, 8 hours, 12 hours, or 24 hours.
The cache is automatically cleared every 30 minutes.
-
Click Update Configuration to save the settings.