Quick BI provides AI functions in spreadsheets, allowing you to directly use capabilities like translation, classification, extraction, and summarization. These functions enable intelligent text processing without complex formulas, which simplifies data analysis and increases efficiency. This topic describes how to configure AI functions in a spreadsheet.
Before you Begin
To use AI functions, your organization administrator must first enable them on the organization management page. Otherwise, the AI function options will be disabled. For more information, see AI Feature Management.
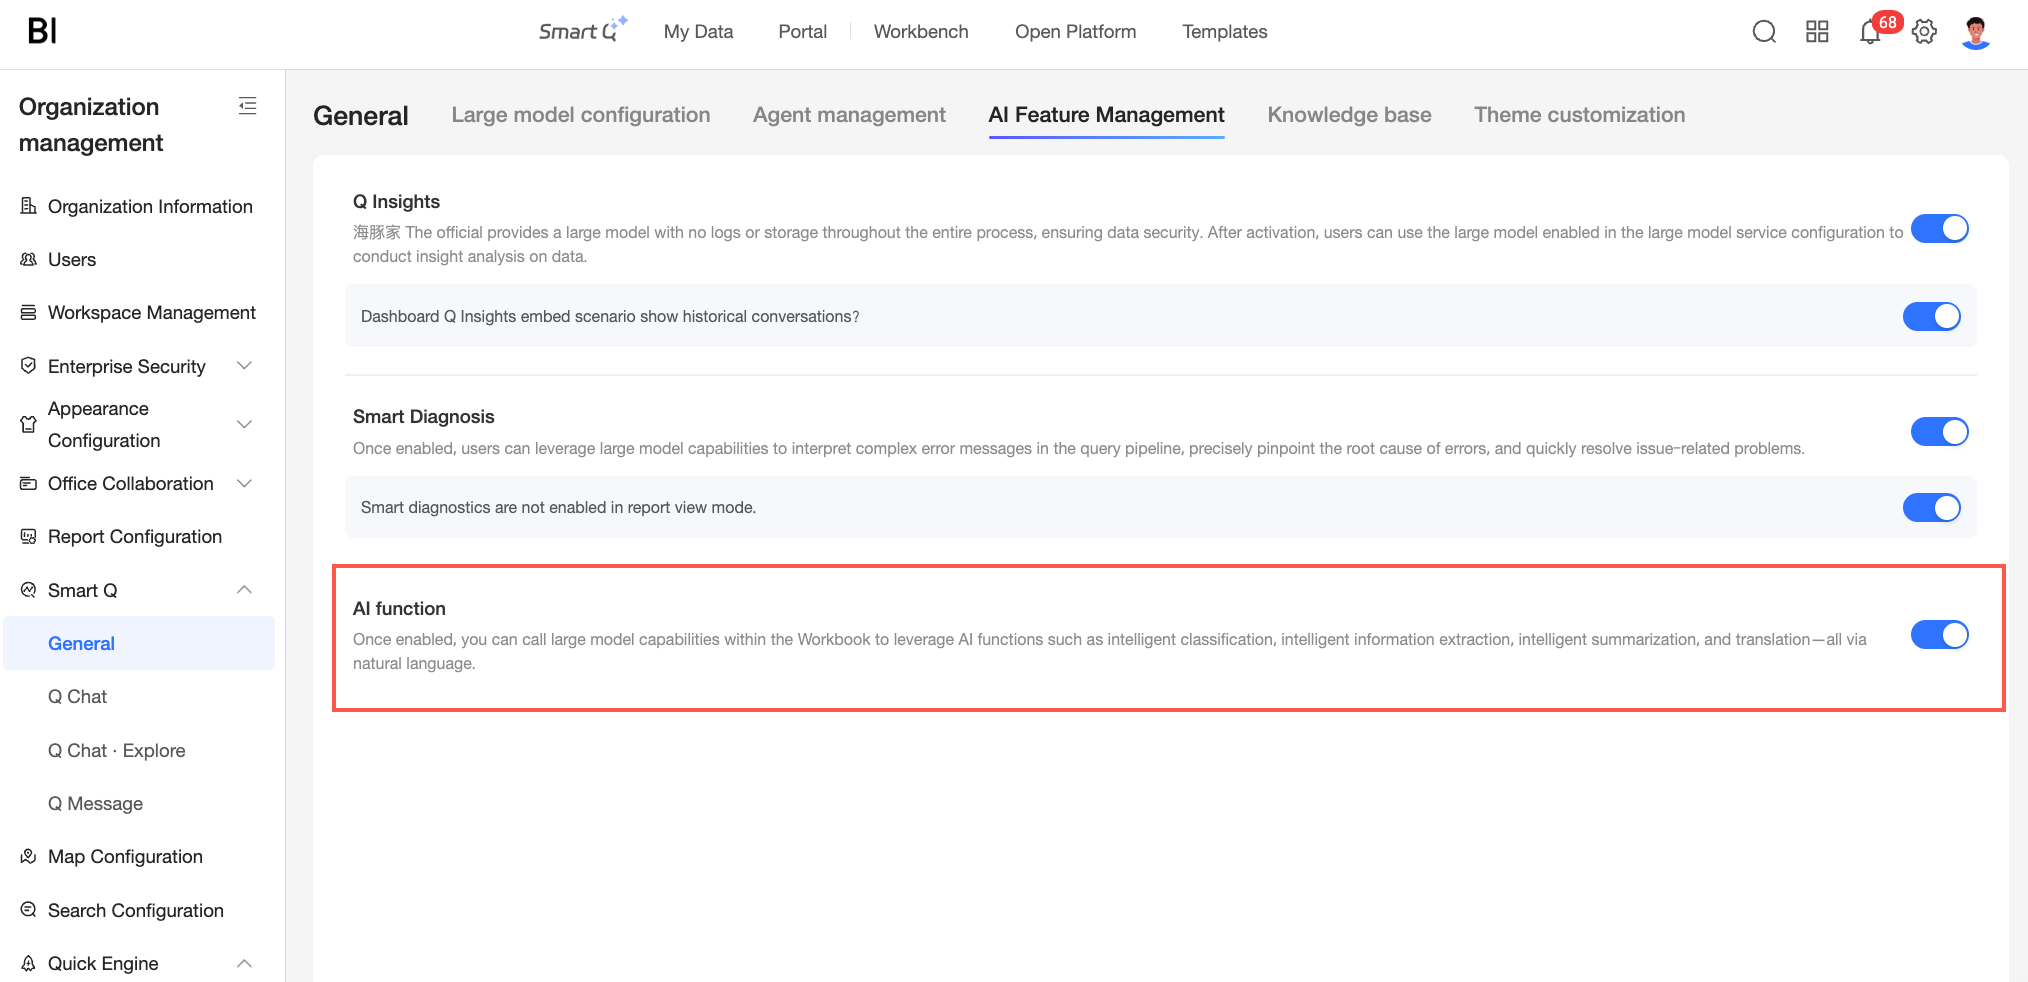
AI functions use the default model configured in organization management. To change the model, contact your organization administrator. For more information, see large model configuration.
Accessing the Feature
On the spreadsheet editing page, you can access AI functions in the following ways.
From the toolbar: Click the AI function icon (
 ) on the toolbar and select an AI capability from the drop-down list.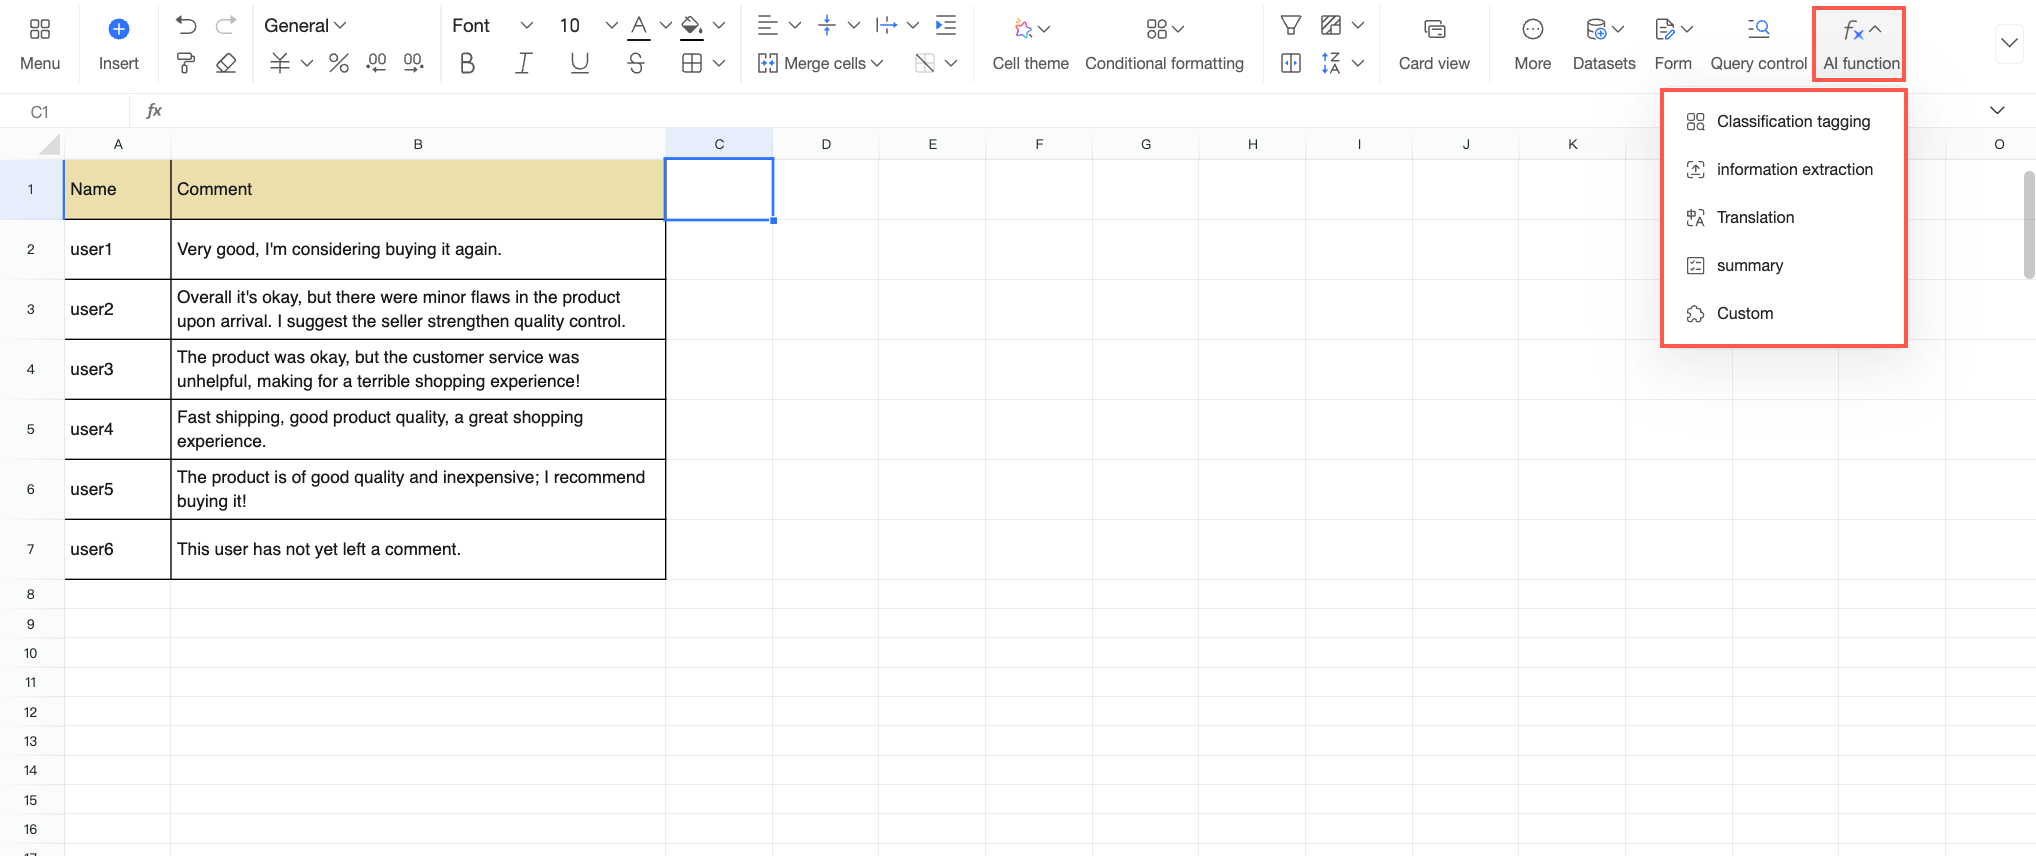
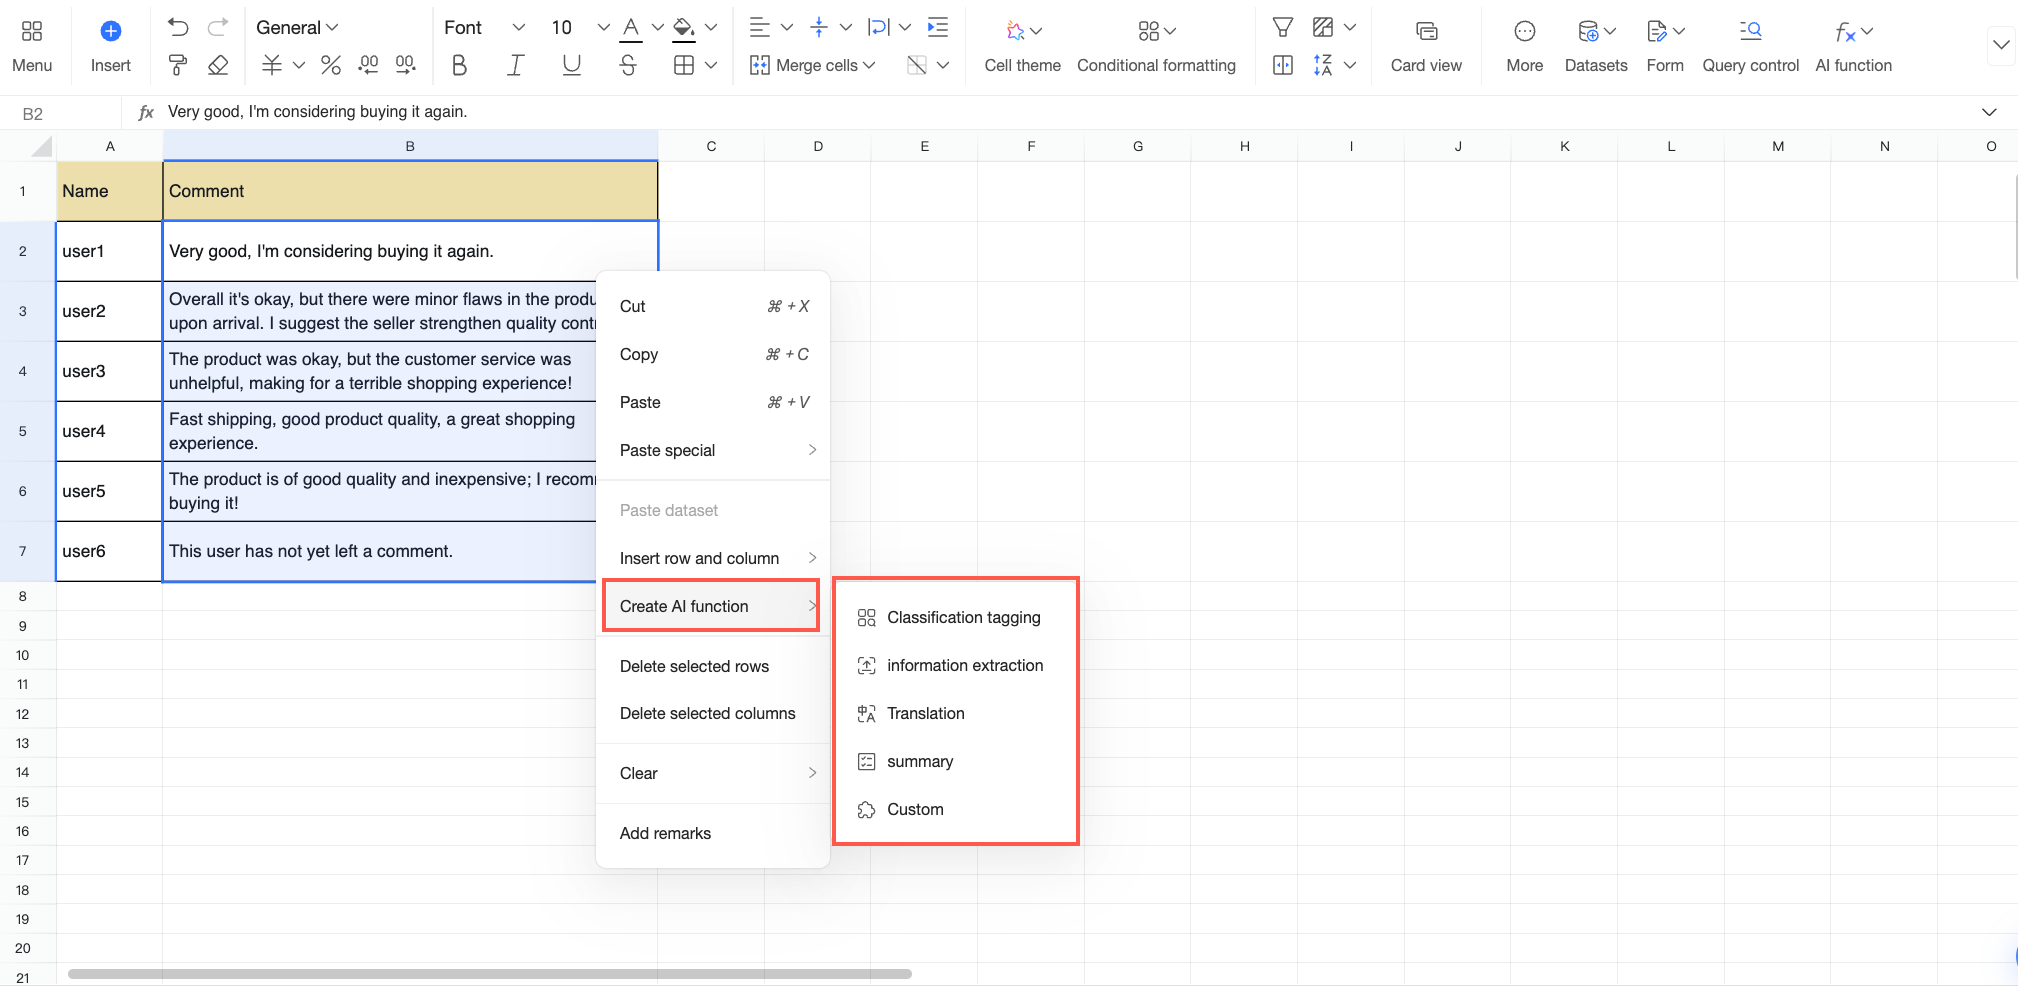
From a cell: Right-click a cell, hover over the Create AI Function option, and select an AI capability from the list on the right.
Procedure
Select an AI function from the list and configure its rules. You can use the built-in functions for classification and tagging, information extraction, translation, and summary. If the standard functions do not meet your analysis needs, you can also create a custom AI function based on your business requirements. The following sections describe each function and its configuration.
Classification and Tagging
The classification and tagging function automatically identifies and tags text with predefined categories. It is useful for scenarios that require rapid, standardized categorization of text data.
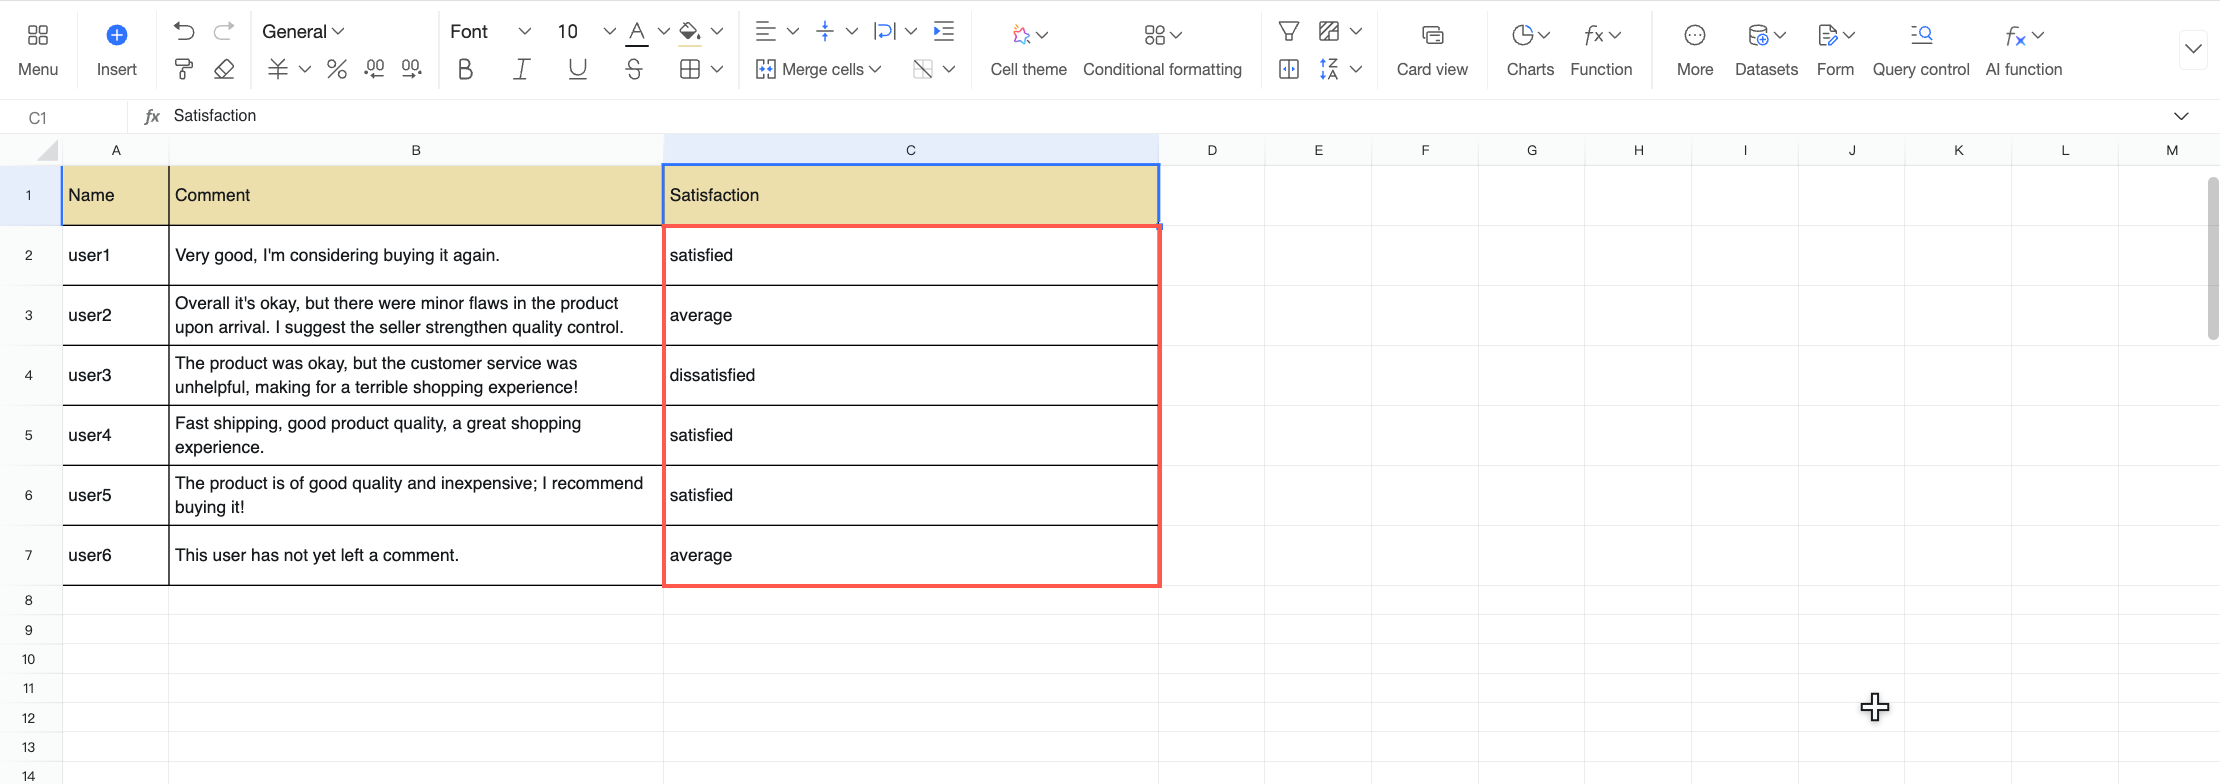
For example, when analyzing customer satisfaction, you can use this function to automatically categorize customer feedback, allowing you to understand customer sentiment more efficiently and intuitively. This section uses this example to explain how to configure the classification and tagging function.
In the Customer Feedback Information table, select the text area you want to classify and tag. Click the
icon on the toolbar and select Classification and Tagging.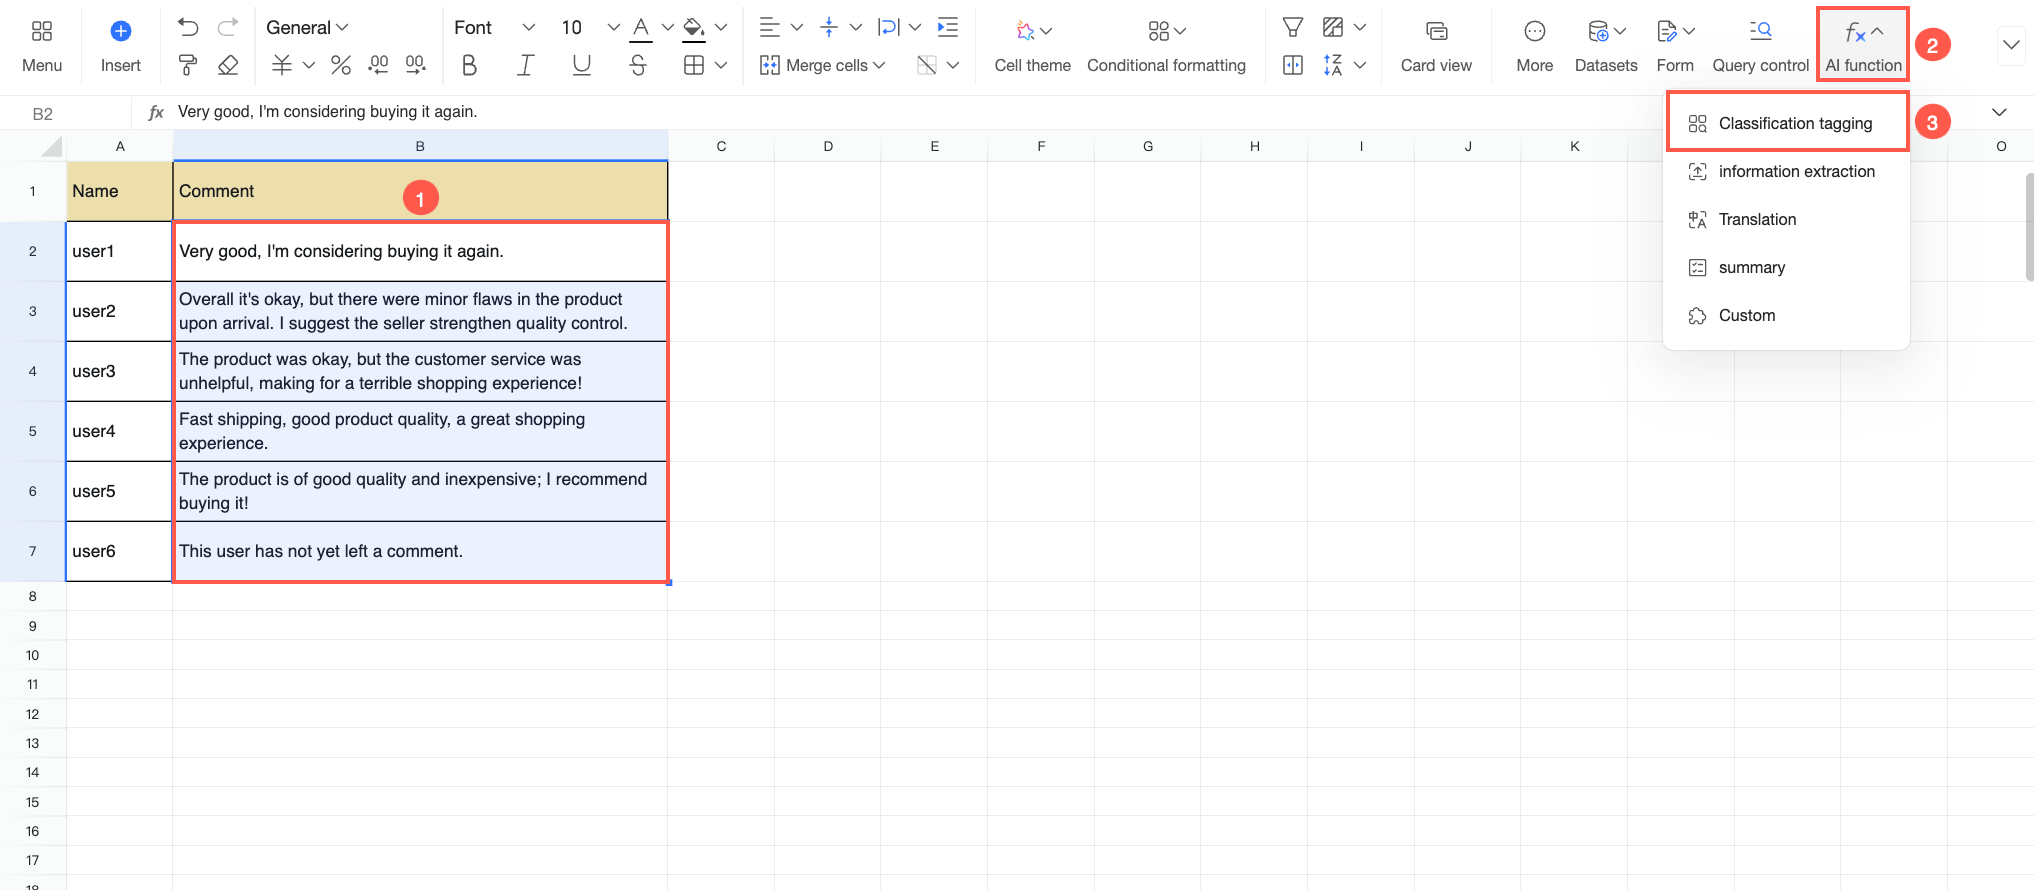
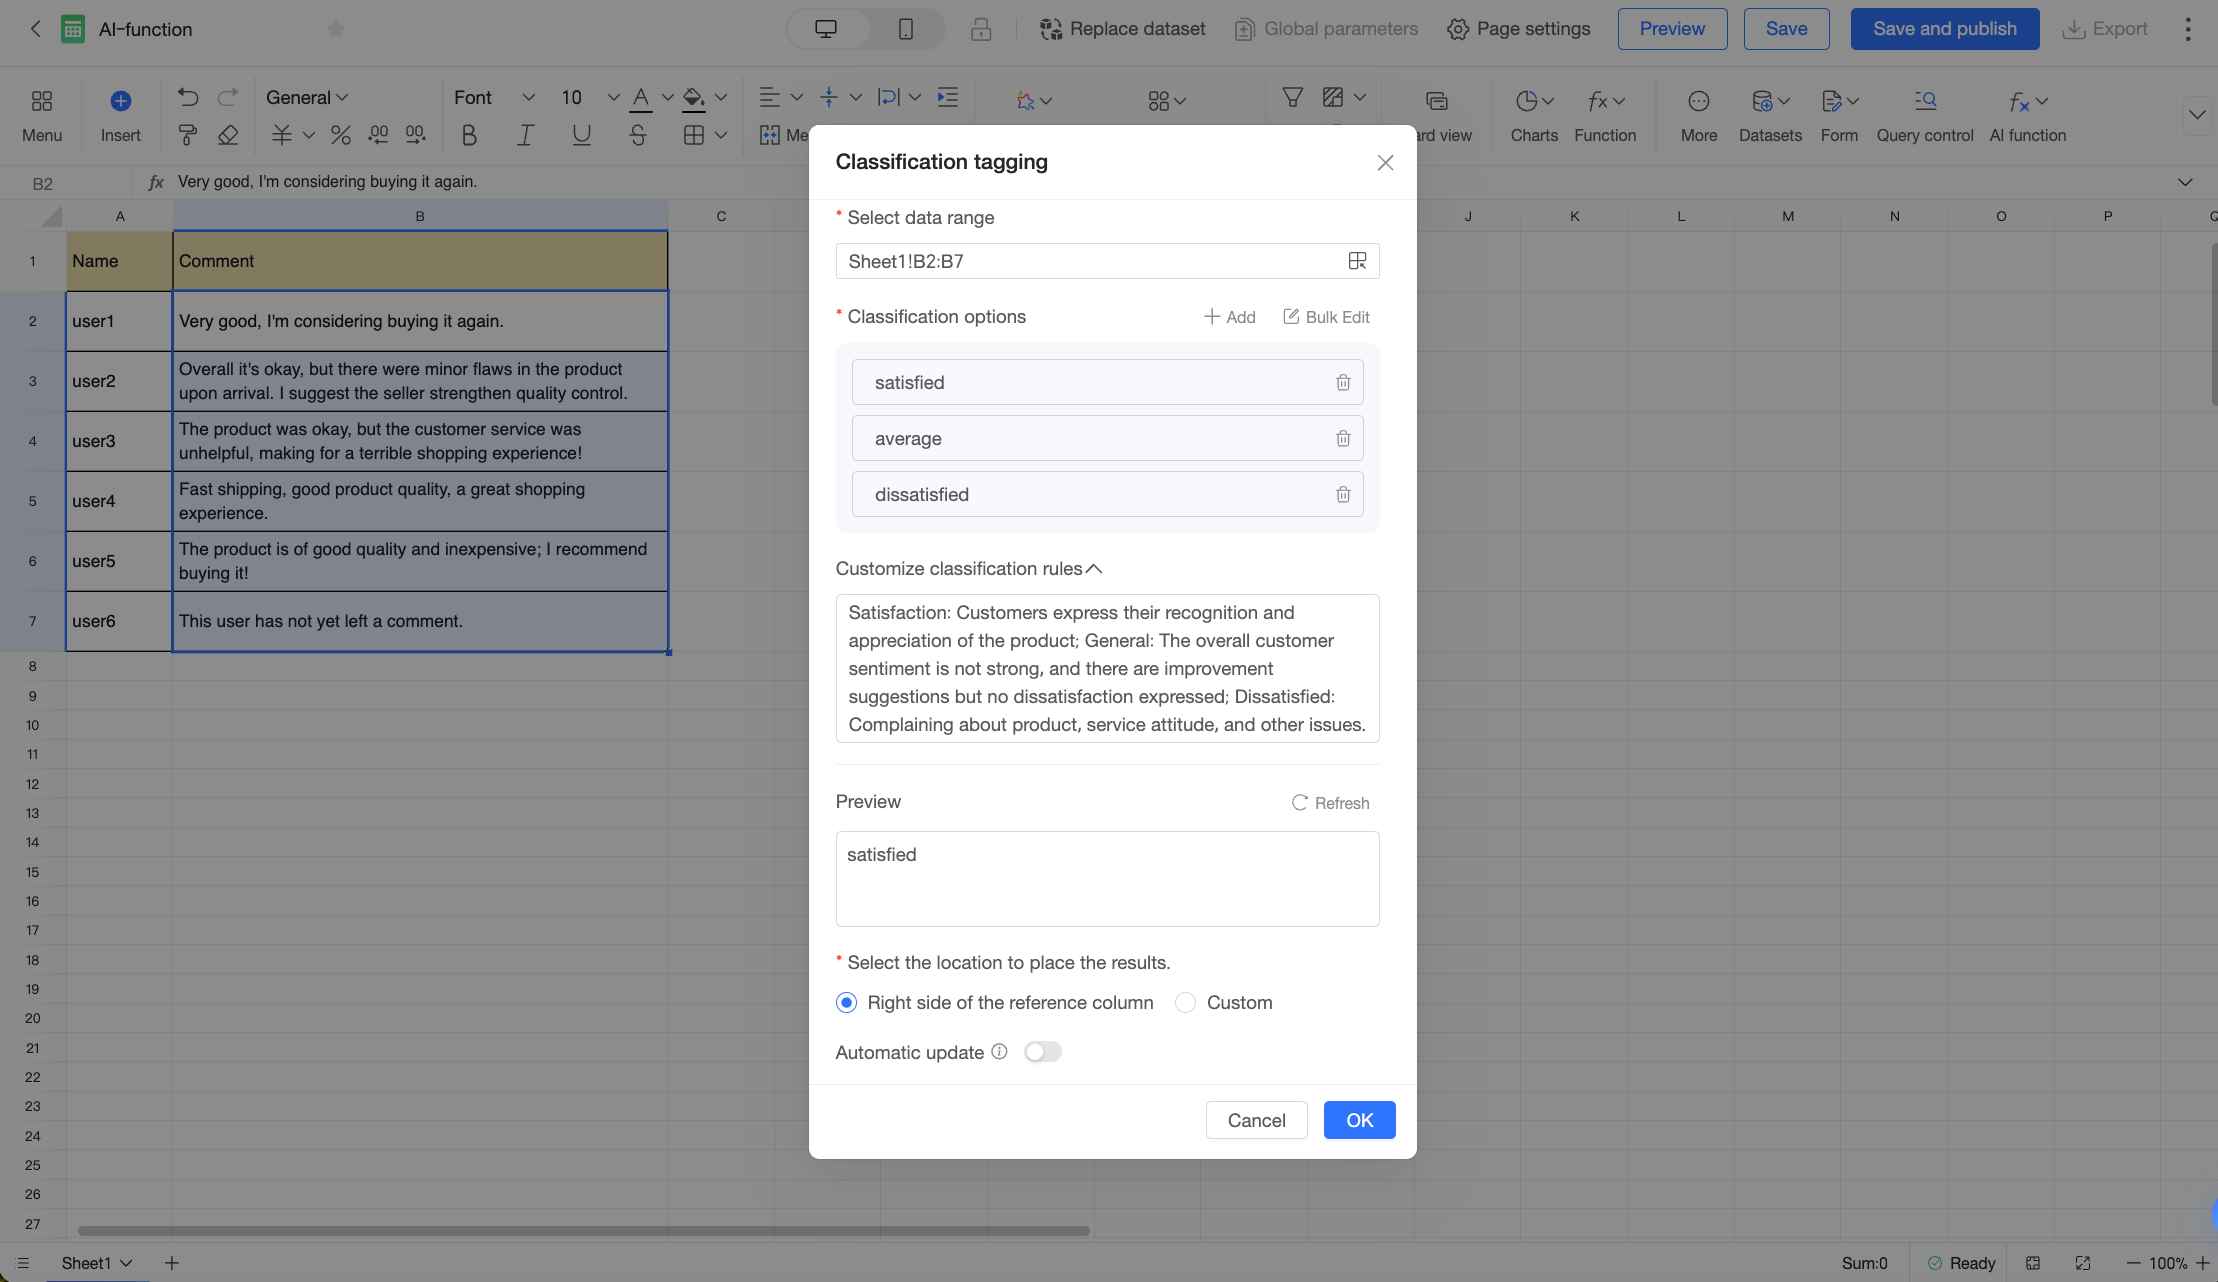
In the Classification and Tagging dialog box, configure the following parameters.
Parameter
Description
Select data range
Select the data range to process.
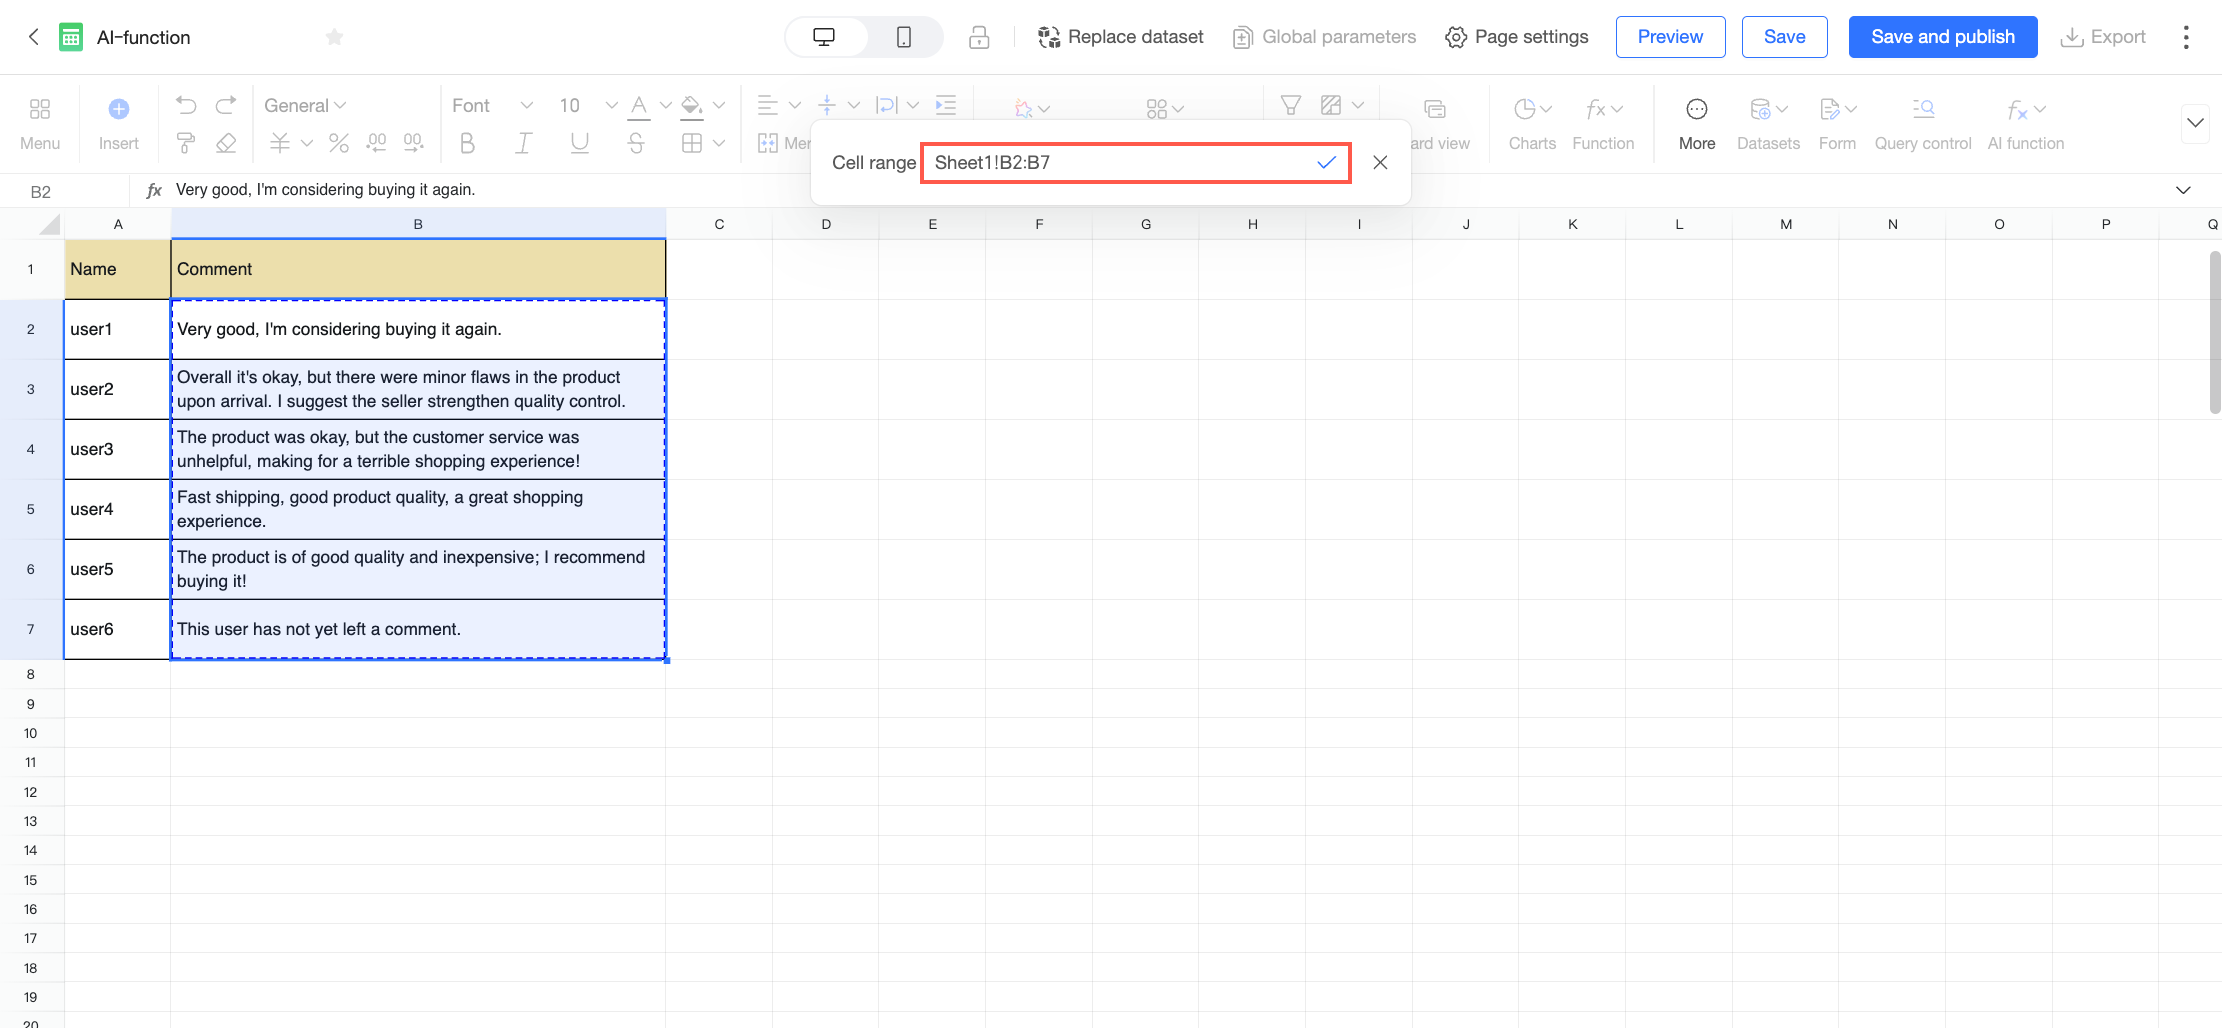
The range defaults to your current selection. To change the range, click the
 icon and drag to select a new range, or manually edit the formula in the Cell Range input box.
 Note
NoteThe selected range must be in a single column.
Classification options
Set the category tags for classification. A default tag is provided, which you can rename. You can also perform the following actions:
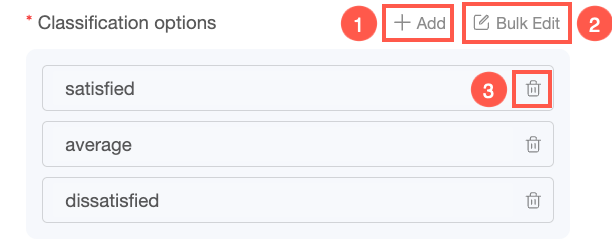
① Click Add to create a new tag option.
② Click batch edit to quickly import, delete, or modify multiple tags at once.
③ Click the Delete icon to remove an unneeded tag option.
Custom classification rules
Enter semantic rules for each category tag to help the AI classify text more accurately.
You should describe the meaning of each category tag, providing typical keywords or examples for the AI to learn from. For example:
Satisfied: Customer expresses approval or appreciation for the product; Neutral: Customer sentiment is not strong, suggests improvements but expresses no dissatisfaction; Dissatisfied: Complains about the product, service attitude, etc.Preview
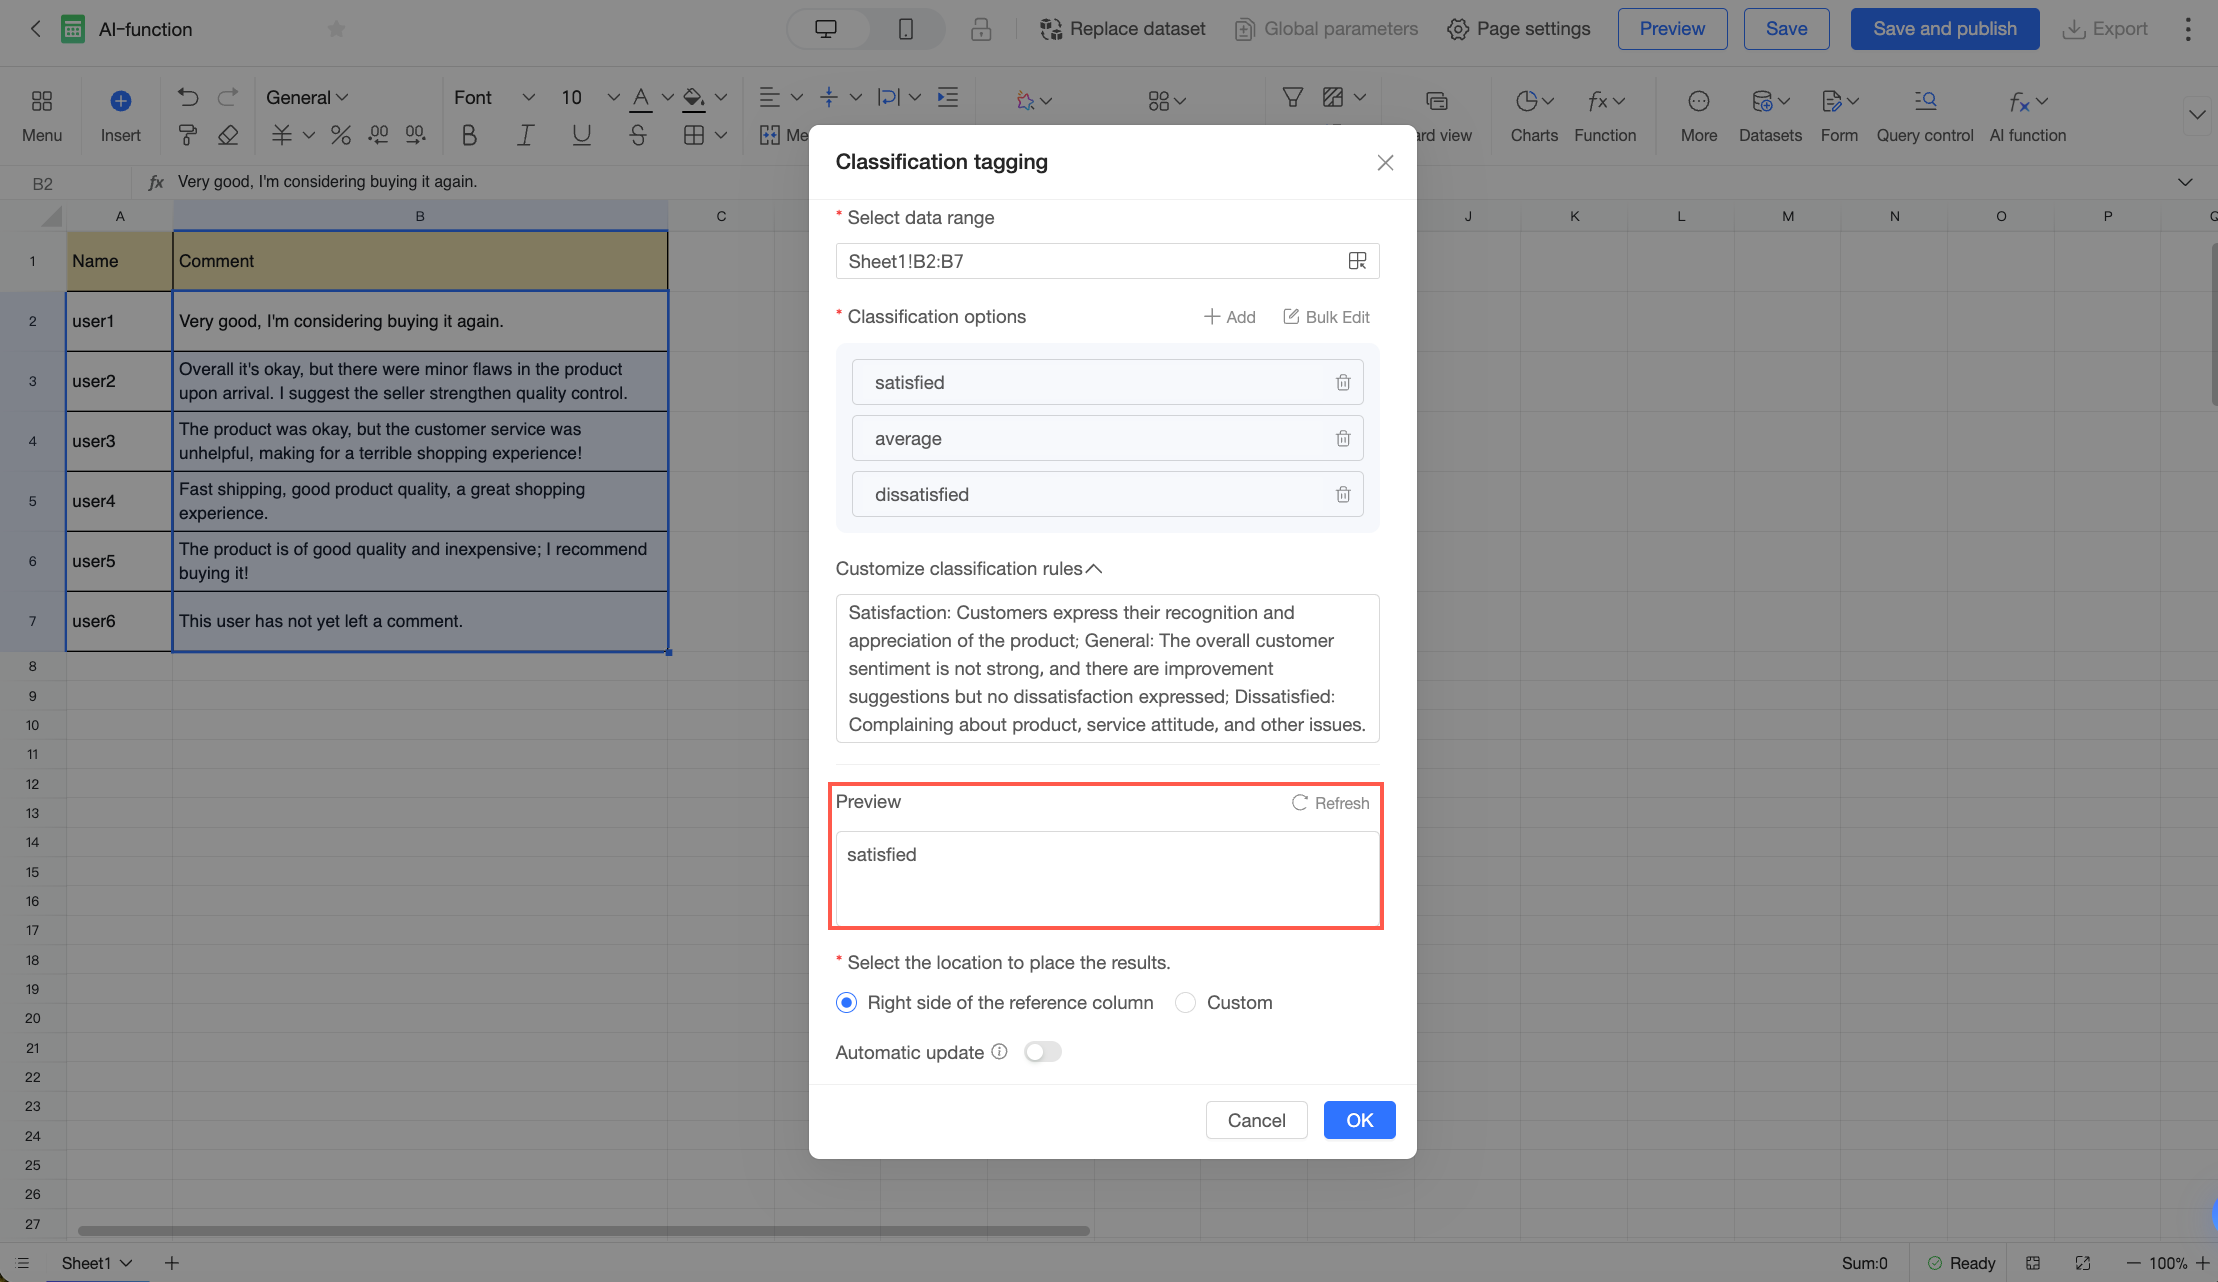
Preview the tagging result for the first data entry to quickly validate your rules.
Click preview. The system runs the classification and tagging function on the first row of your selected data range and displays the result in the preview box.
Select a location to place the results
Specify where to output the results. You can choose one of the following options.
To the right of the referenced column: Inserts the results in the column to the right of the source data column.
Custom: Manually select a location for the results.
Click the
icon and drag to select a new range, or manually edit the formula in the Cell Range input box.NoteEnsure the selected custom area is empty.
The output range must be the same size as the input range.
Auto-update
Specify whether the results automatically update when the source data changes.
This option is disabled by default. When disabled, the output does not change if the source data changes. If you enable this option, the system automatically reruns the AI function to update the output when the source data changes.
After you complete the configuration, click OK. The results appear in the spreadsheet once the AI processing is complete.
Information Extraction
The information extraction function intelligently reads and extracts specific information from text data. This is useful for scenarios that require quickly extracting key information from unstructured or semi-structured text.
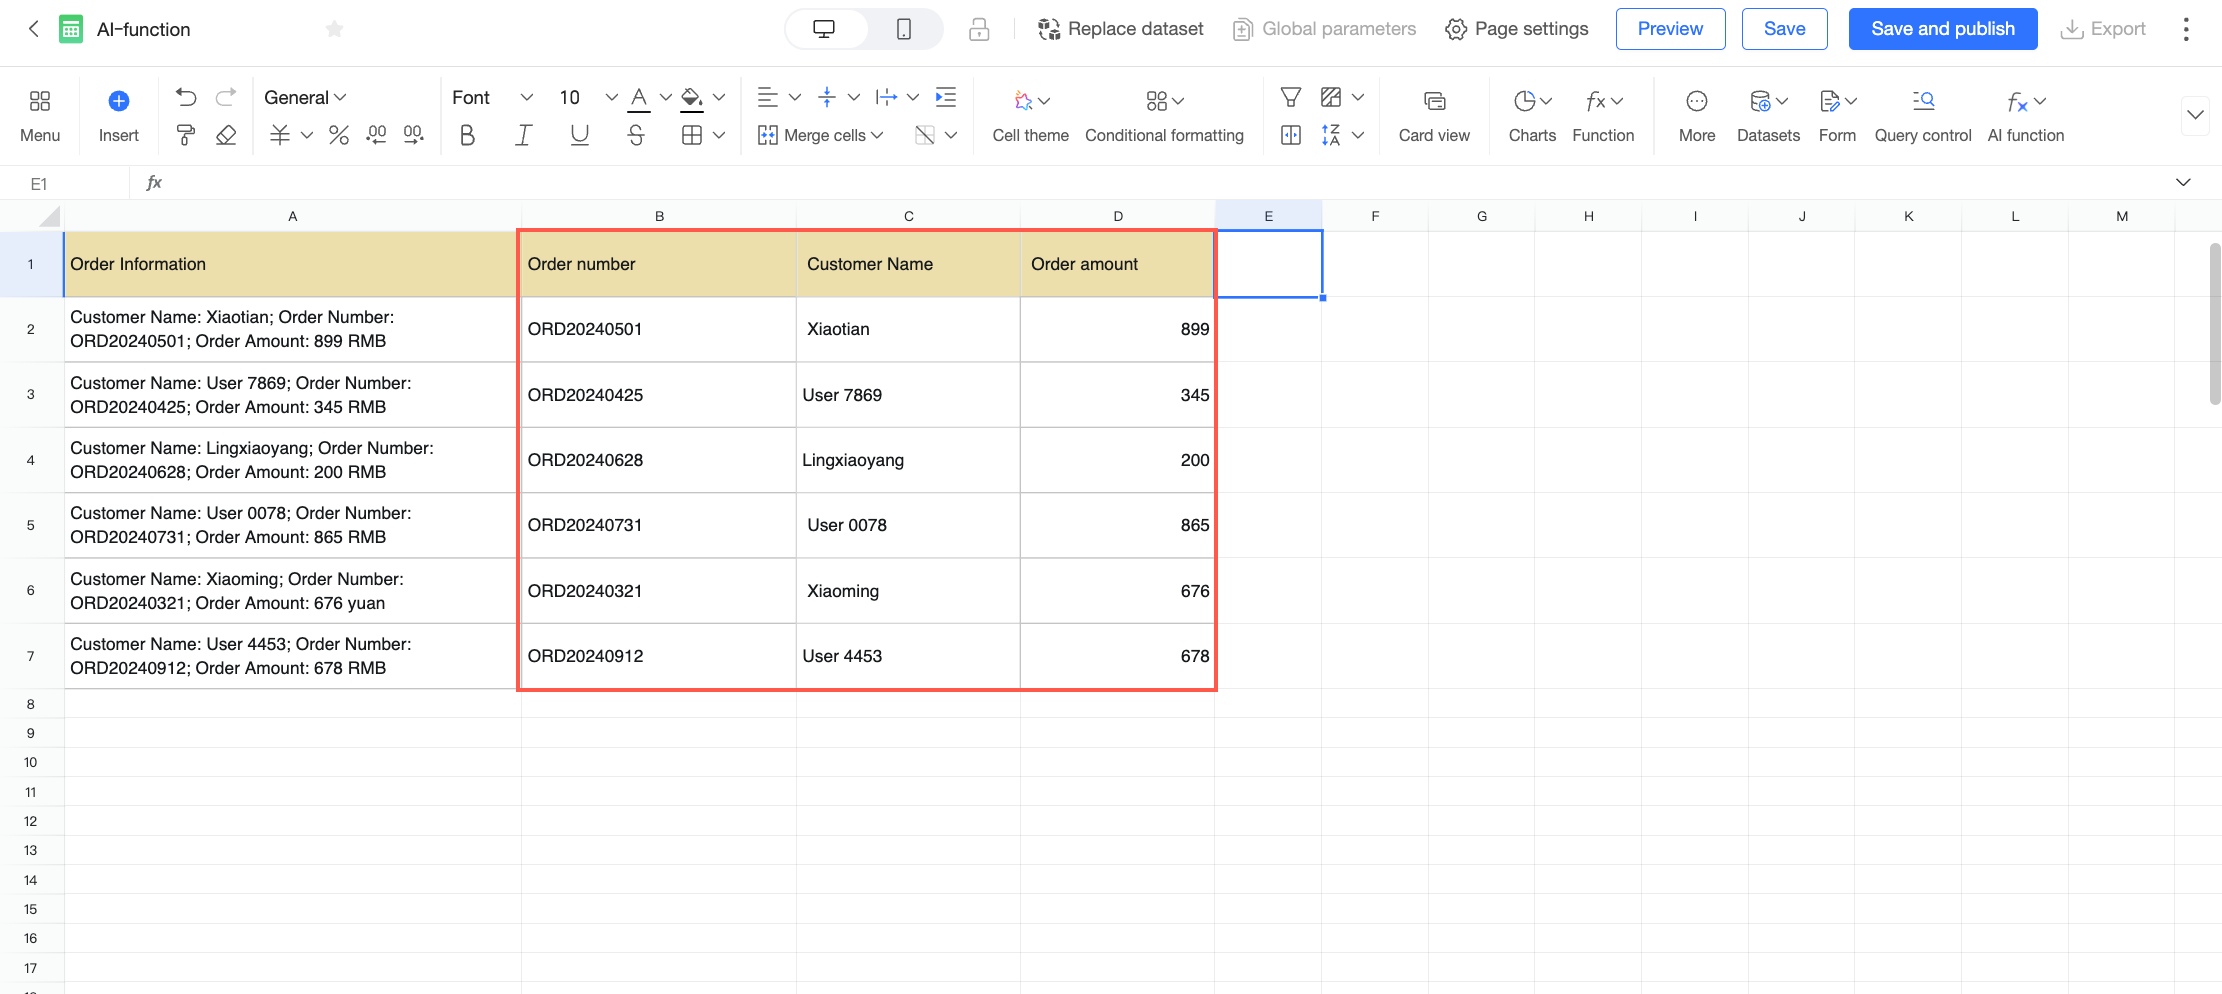
For example, when you export sales data from a business system, key information such as customer names and order numbers might be mixed within a block of text. You can use this function to intelligently extract these key fields to display the sales data in a clear, structured format. This section uses this example to explain how to configure the information extraction function.
In the Order Information table, select the text from which you want to extract information. Click the
icon on the toolbar and select Information Extraction.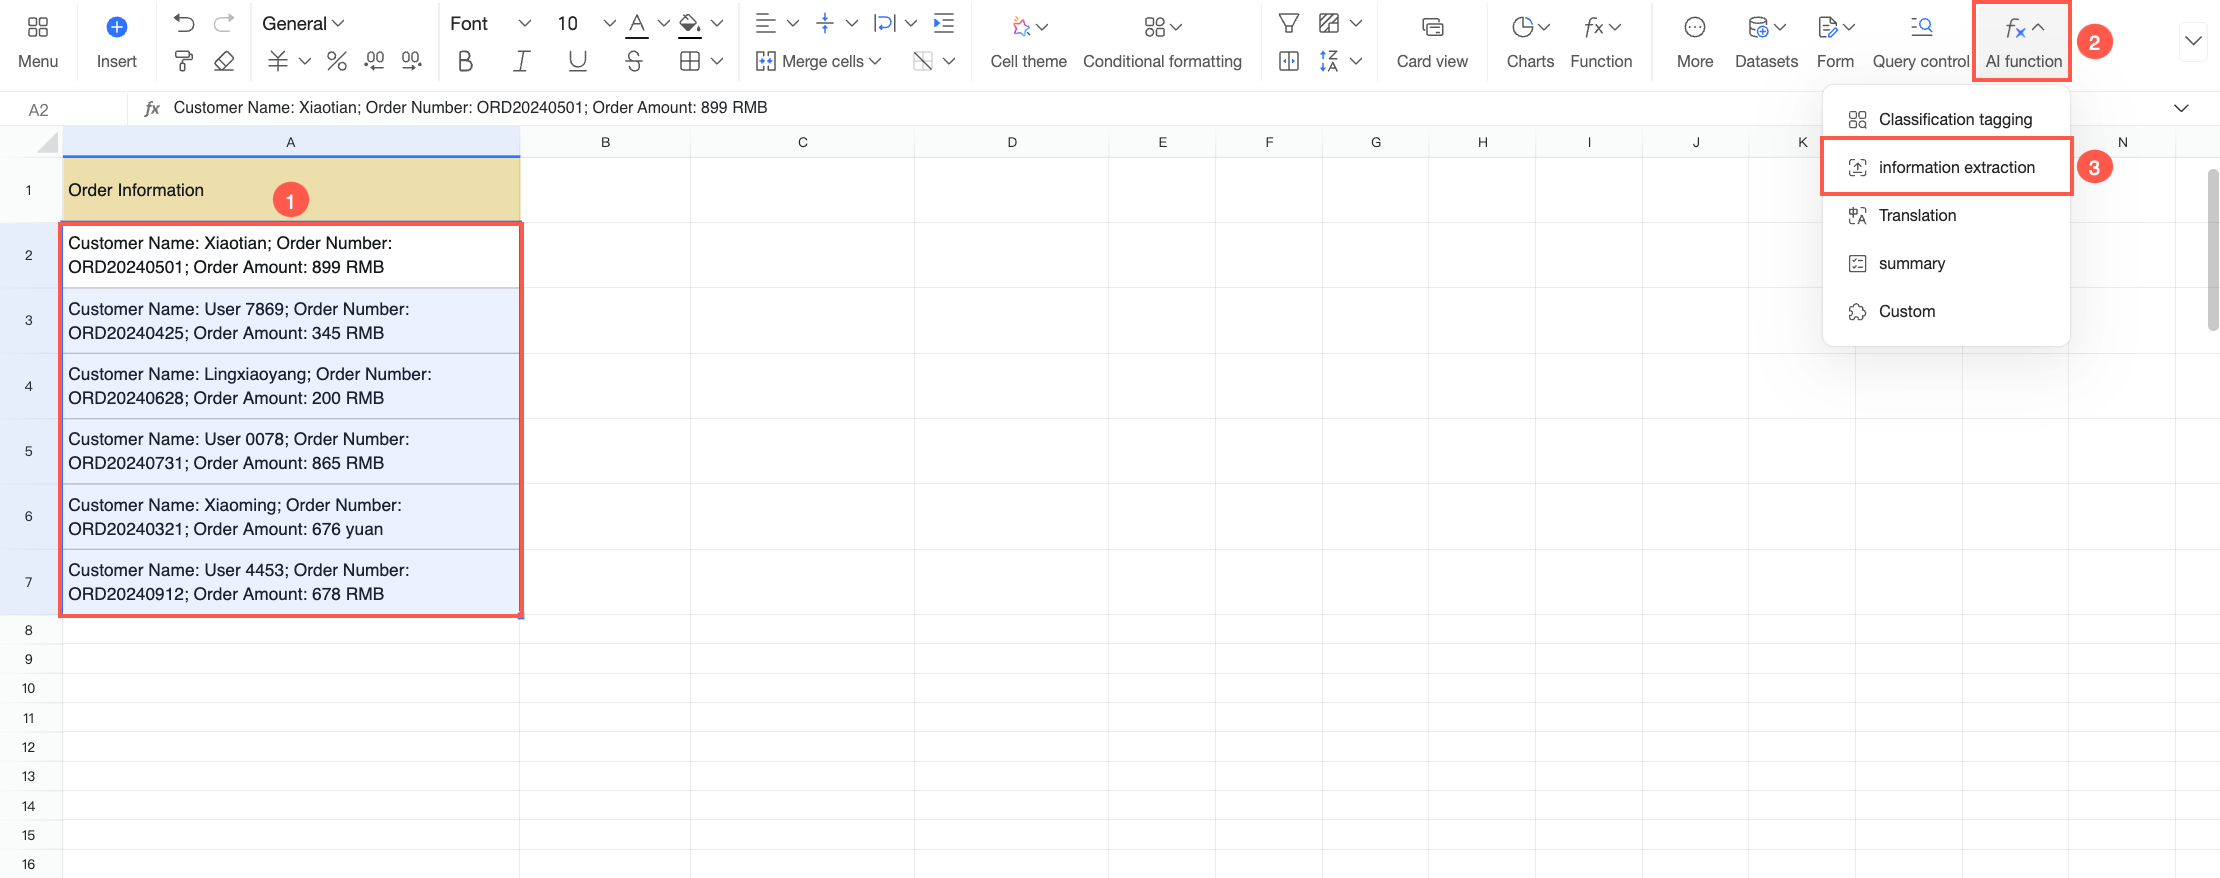
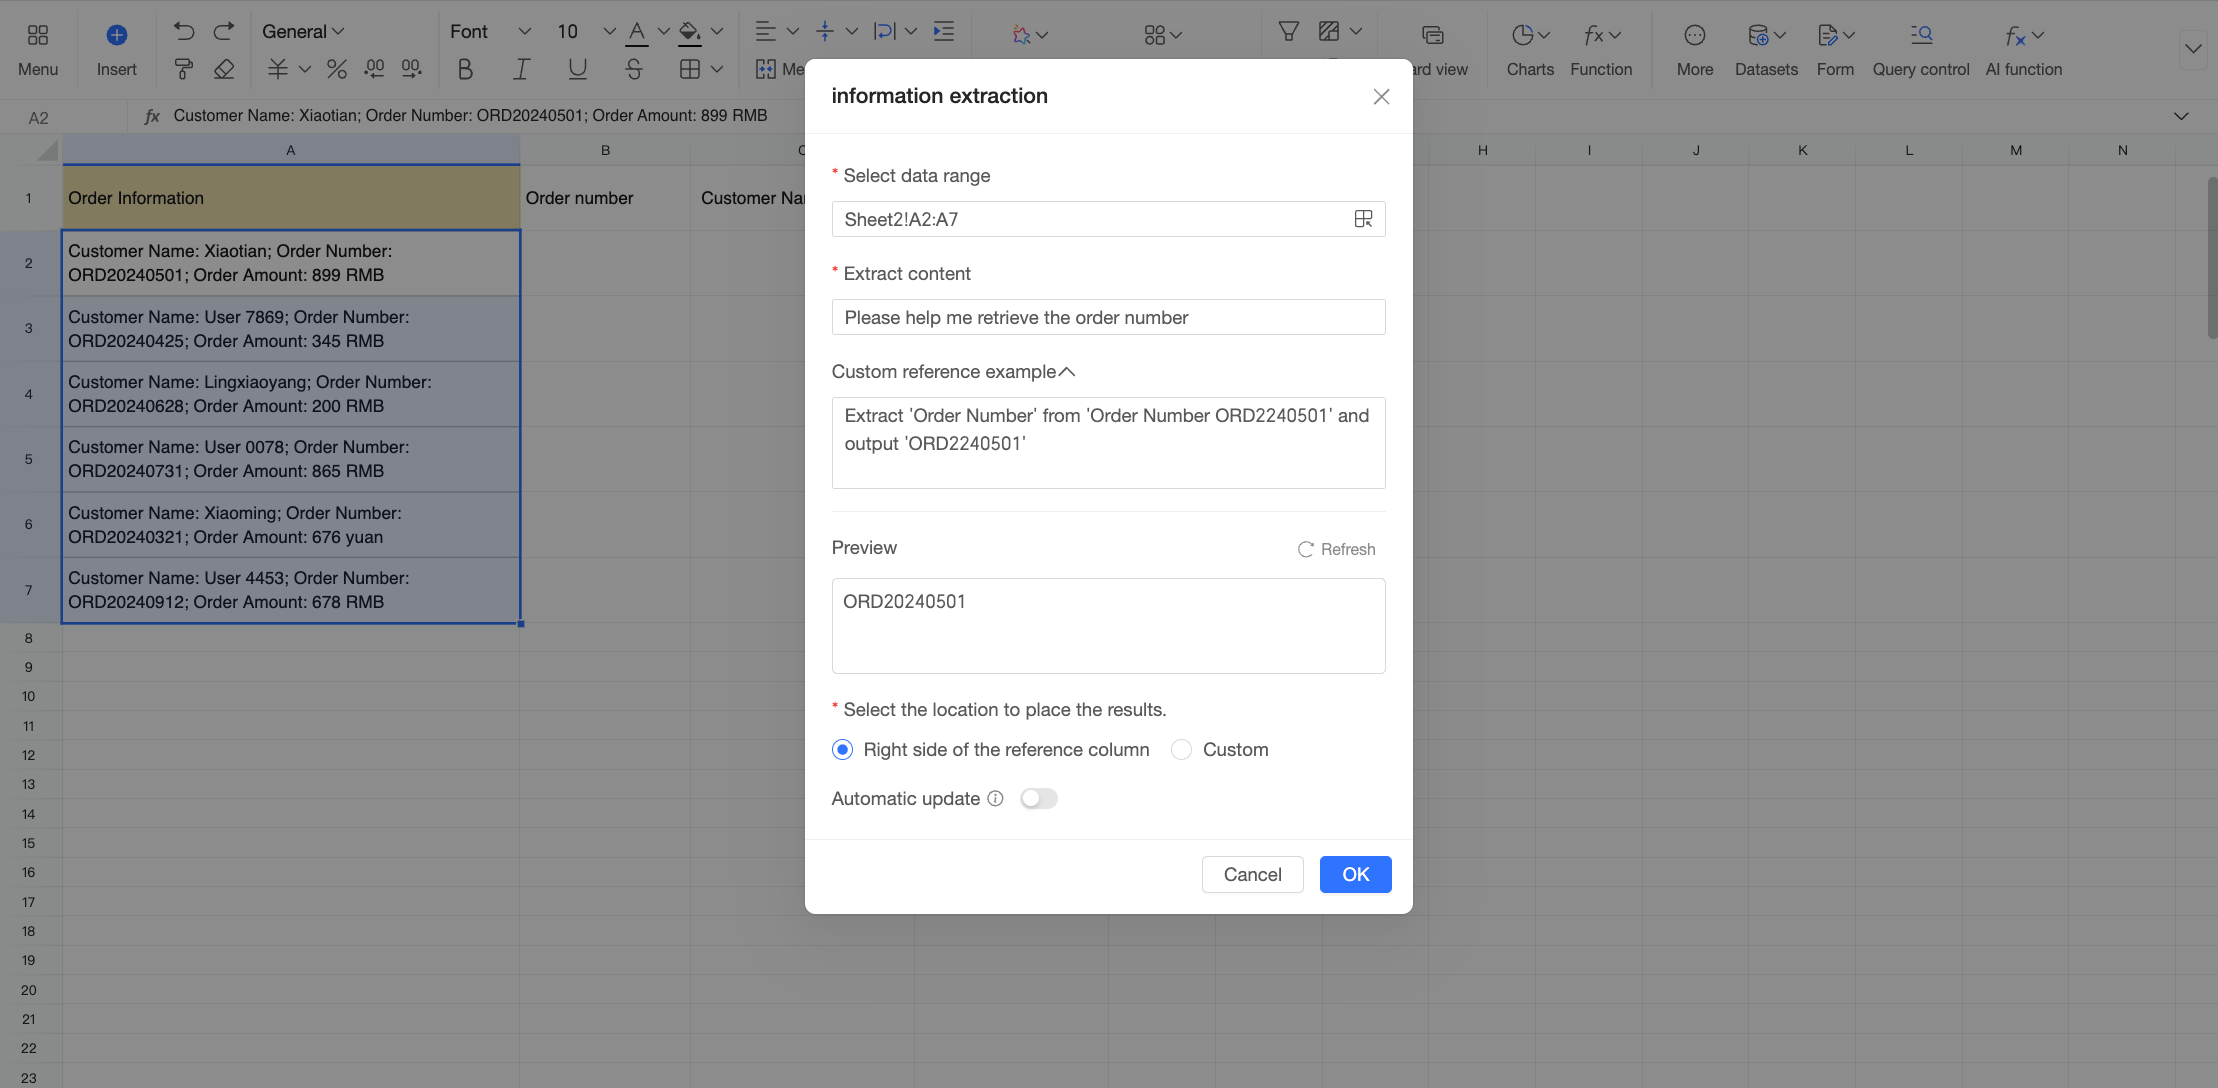
In the Information Extraction dialog box, configure the following parameters.
Parameter
Description
Select data range
Select the data range to process.
The range defaults to your current selection. To change the range, click the
icon and drag to select a new range, or manually edit the formula in the Cell Range input box.NoteThe selected range must be in a single column.
Content to extract
Describe the content you want the AI to extract. For example:
Extract the order number.Custom reference examples
Provide examples of source text and the desired output to improve the AI's extraction accuracy.
We recommend you follow the format provided in the system. For example:
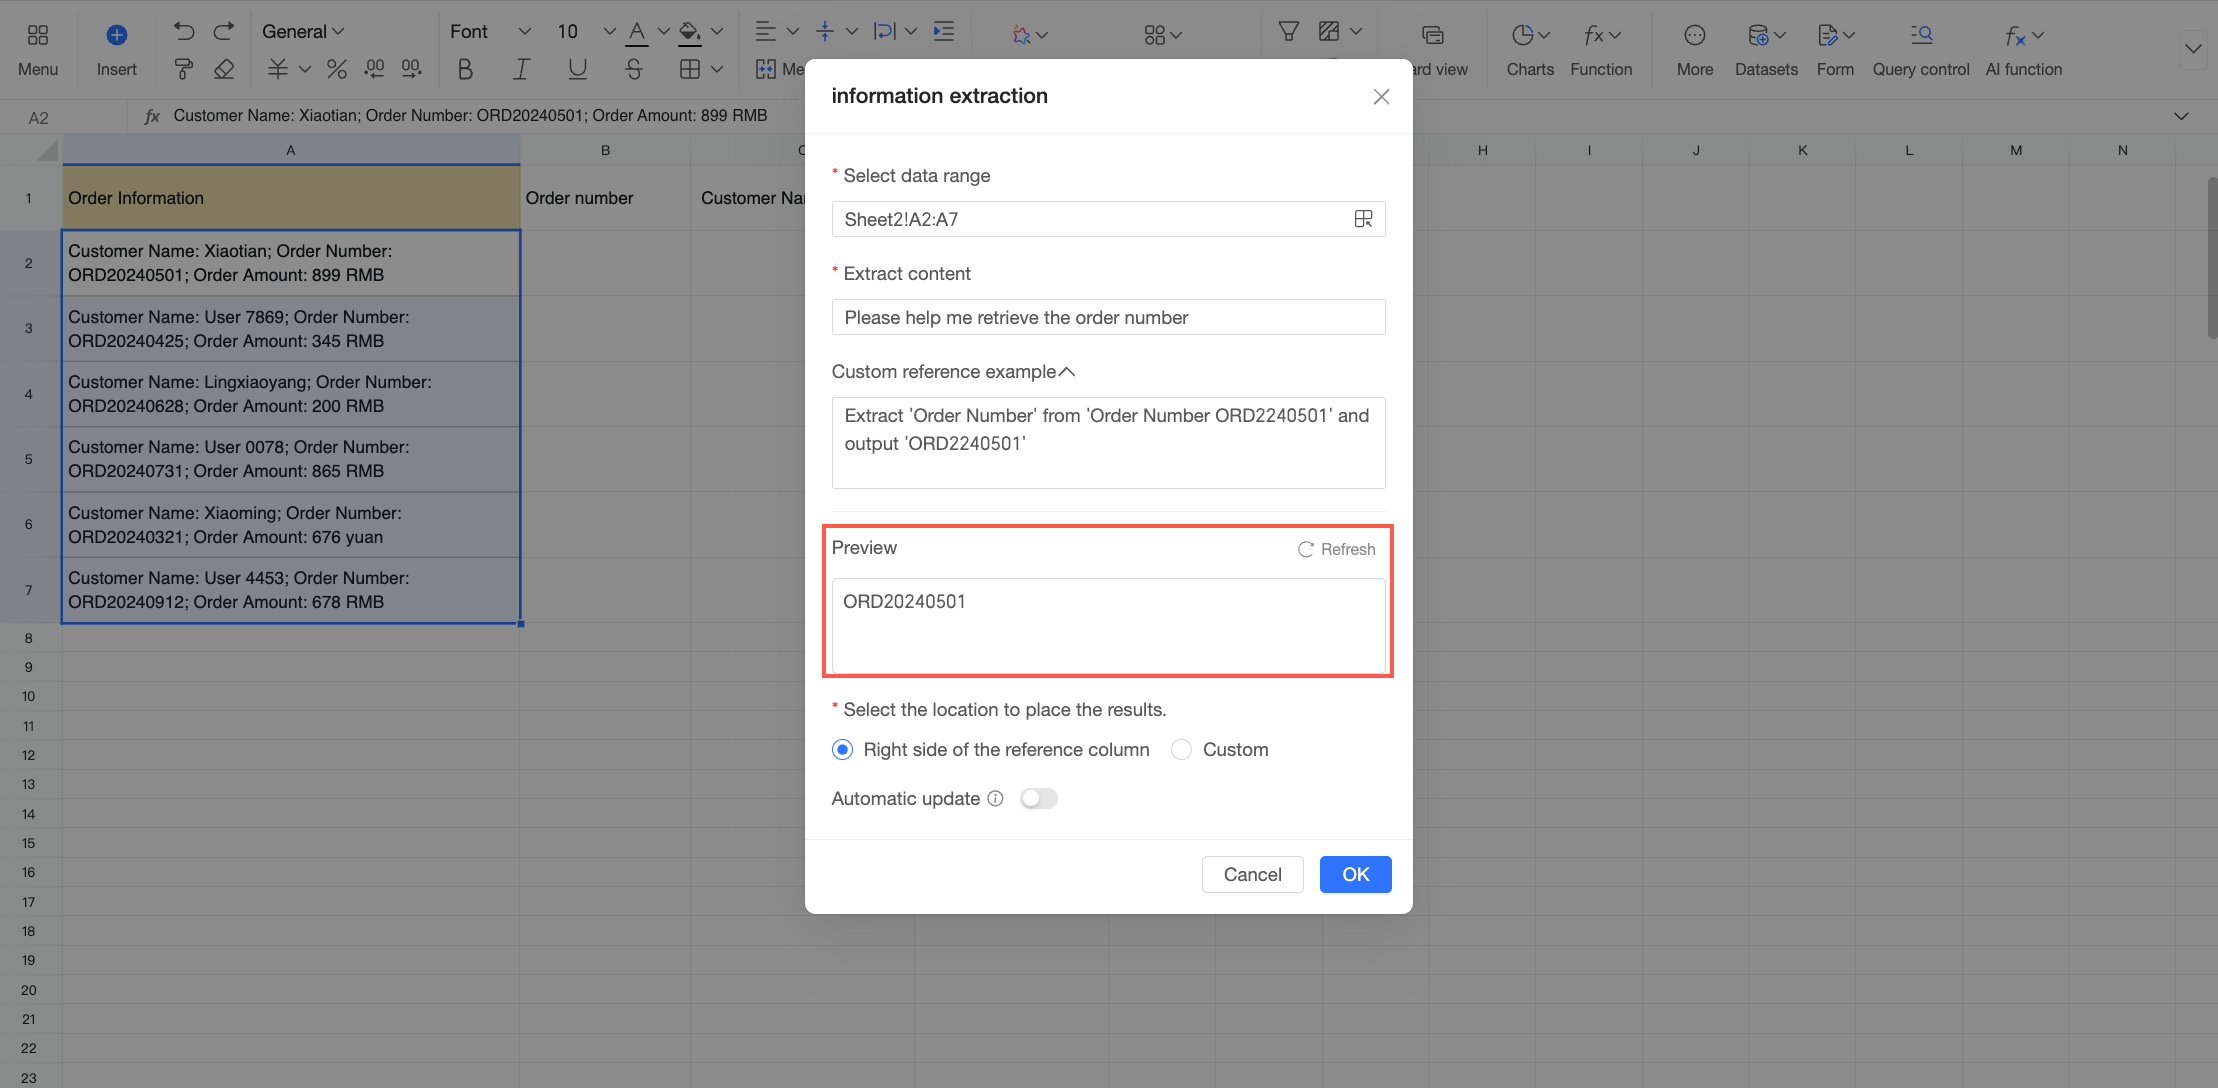
From "Order Number: ORD20240501", extract "order number" to get "ORD20240501".Preview
You can preview the extraction result for the first data entry based on the current configuration to quickly validate it.
Click preview. The system runs the information extraction function on the first row of your selected data range and displays the result in the preview box.
Select a location to place the results
Specify where to output the results. You can choose one of the following options.
To the right of the referenced column: Inserts the results in the column to the right of the source data column.
Custom: Manually select a location for the results.
Click the
icon and drag to select a new range, or manually edit the formula in the Cell Range input box.NoteEnsure the selected custom area is empty.
The output range must be the same size as the input range.
Auto-update
Specify whether the results automatically update when the source data changes.
This option is disabled by default. When disabled, the output does not change if the source data changes. If you enable this option, the system automatically reruns the AI function to update the output when the source data changes.
After completing the configuration, click OK. You can then repeat the process to extract other fields, such as the customer name and order amount. The final result is shown in the image below.
Translation
The translation function automatically translates text between languages. It is useful for scenarios that require processing multilingual information and facilitating cross-language collaboration.
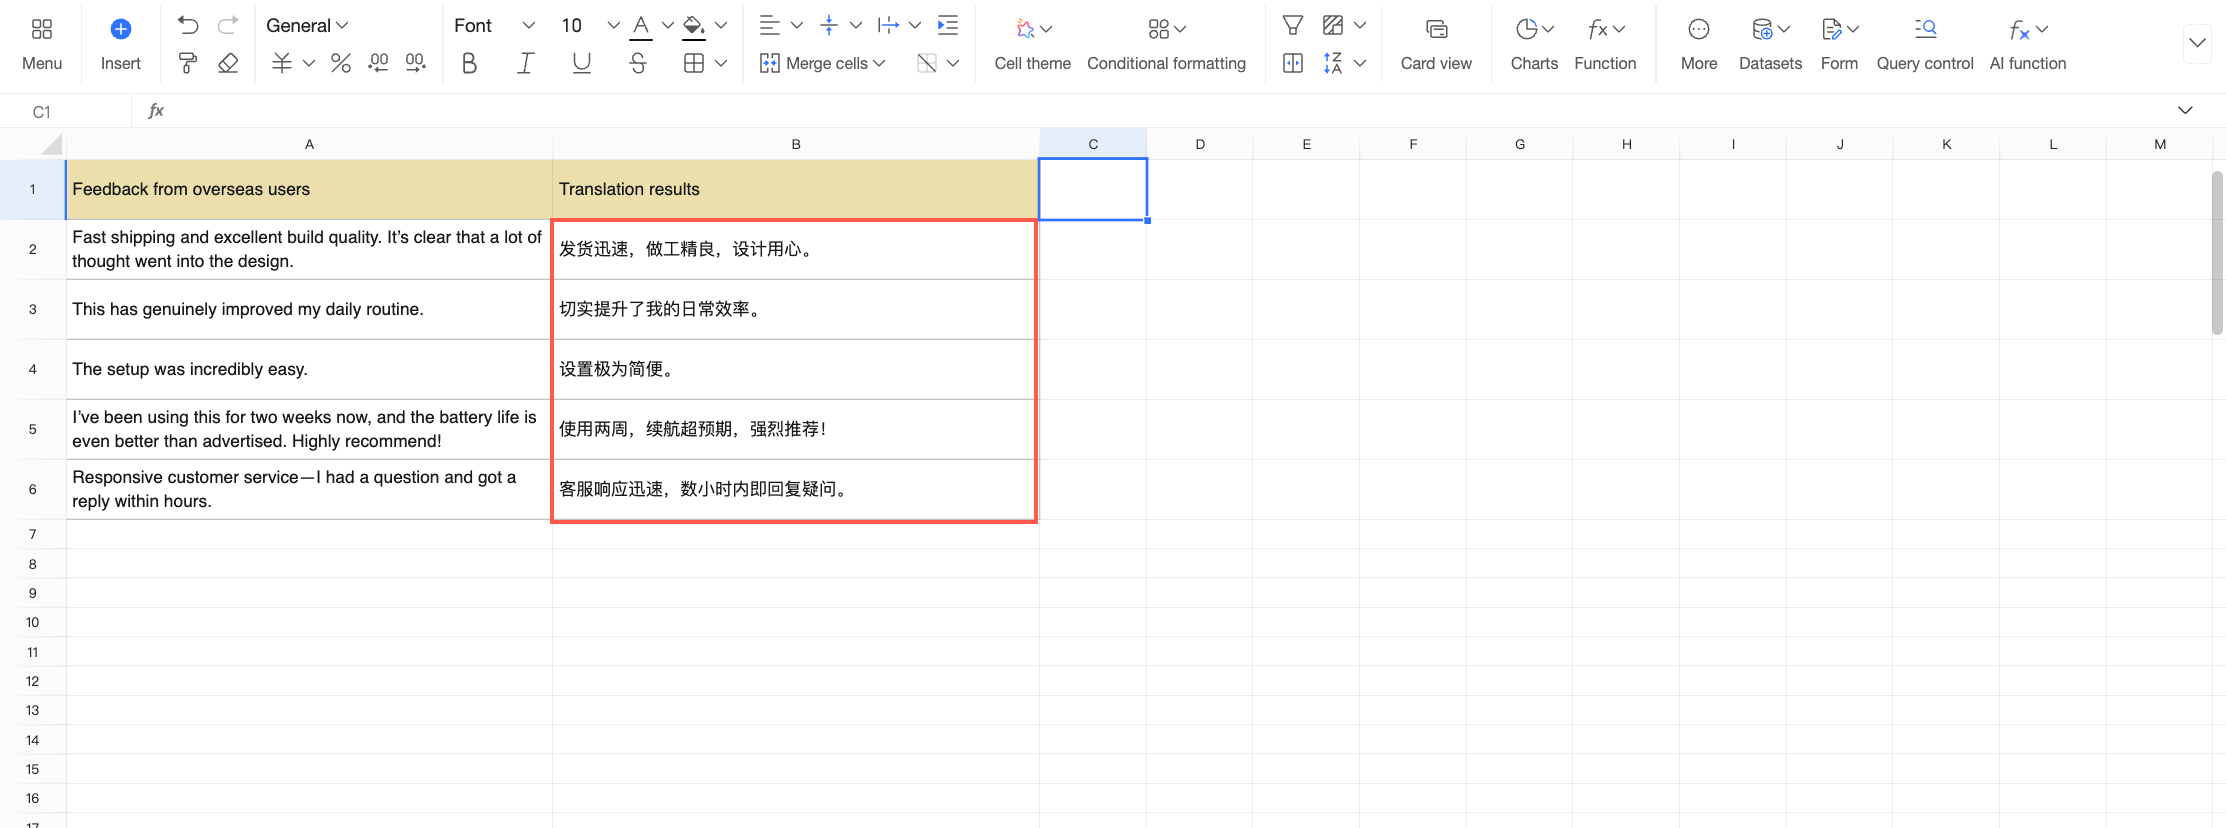
For example, after collecting feedback from overseas users, you can use the translation function to automatically translate English content into Chinese, allowing domestic business teams to efficiently understand user opinions. This section uses this example to explain how to configure the translation function.
In the Overseas User Feedback table, select the text you want to translate. Click the
icon on the toolbar and select Translation.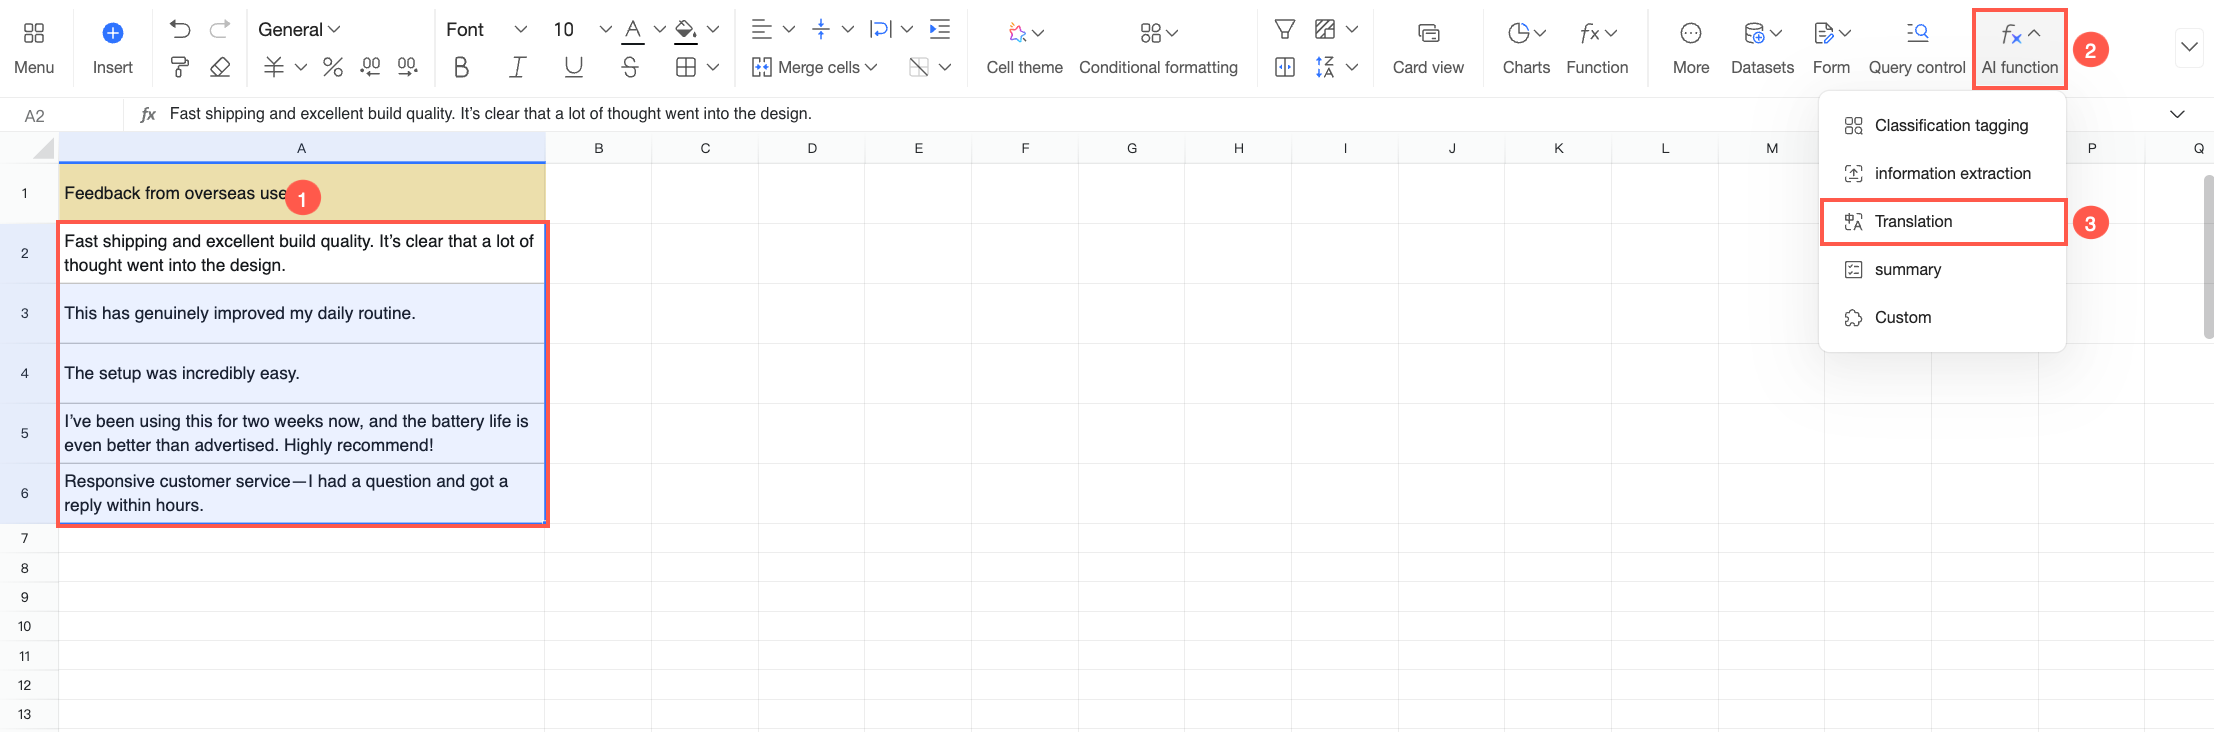
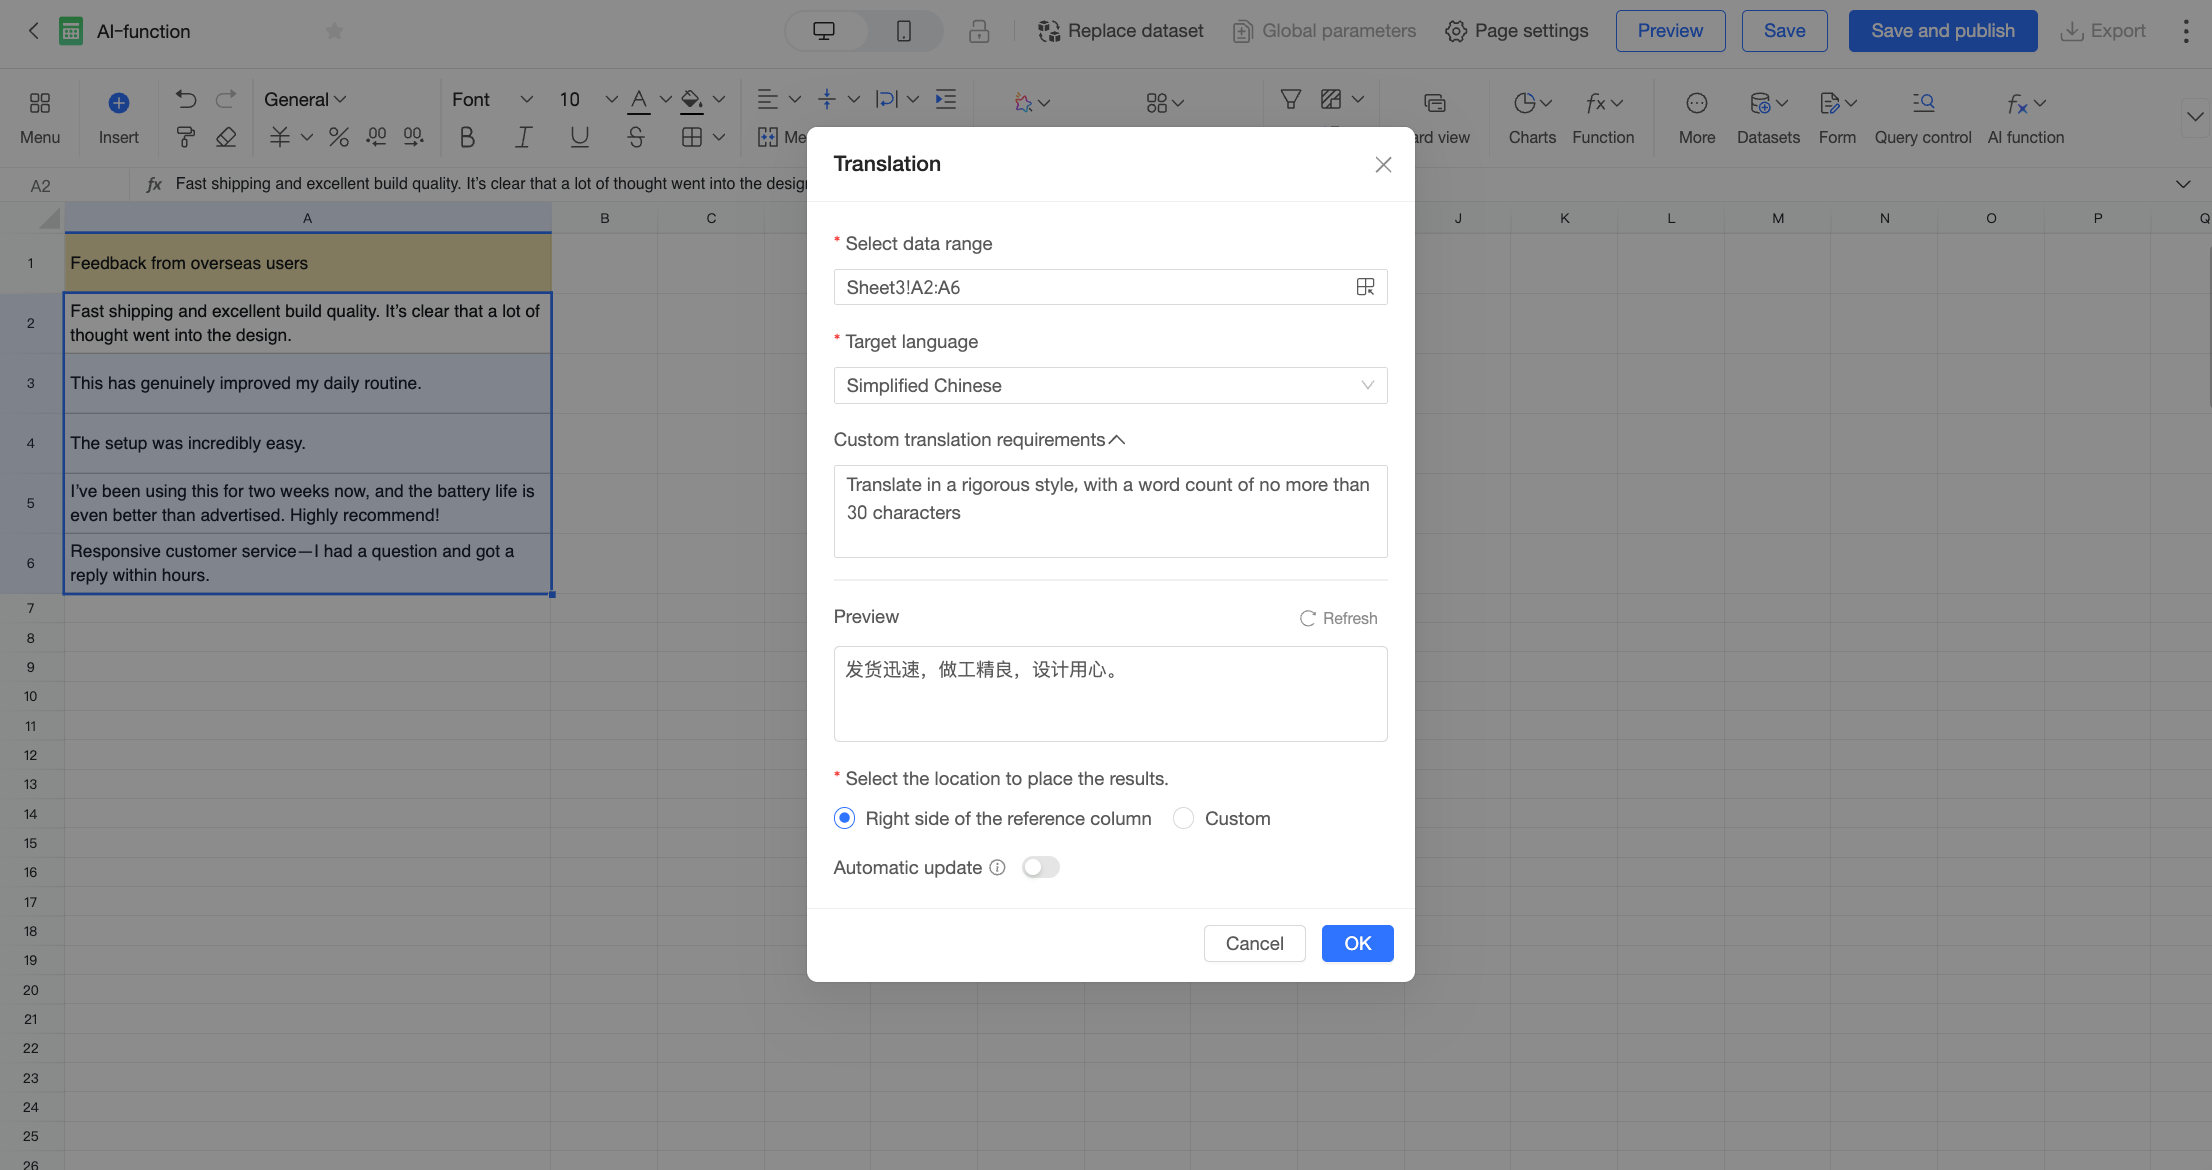
In the Translation dialog box, configure the following parameters.
Parameter
Description
Select data range
Select the data range to process.
The range defaults to your current selection. To change the range, click the
icon and drag to select a new range, or manually edit the formula in the Cell Range input box.NoteThe selected range must be in a single column.
Target language
Select the target language for the translation. Supported languages include English, Simplified Chinese, Traditional Chinese, and Japanese.
Custom translation requirements
Enter personalized requirements for translation style, wording, or text length to improve the quality and relevance of the translation. For example:
Translate in a formal style, limit to 30 characters.Preview
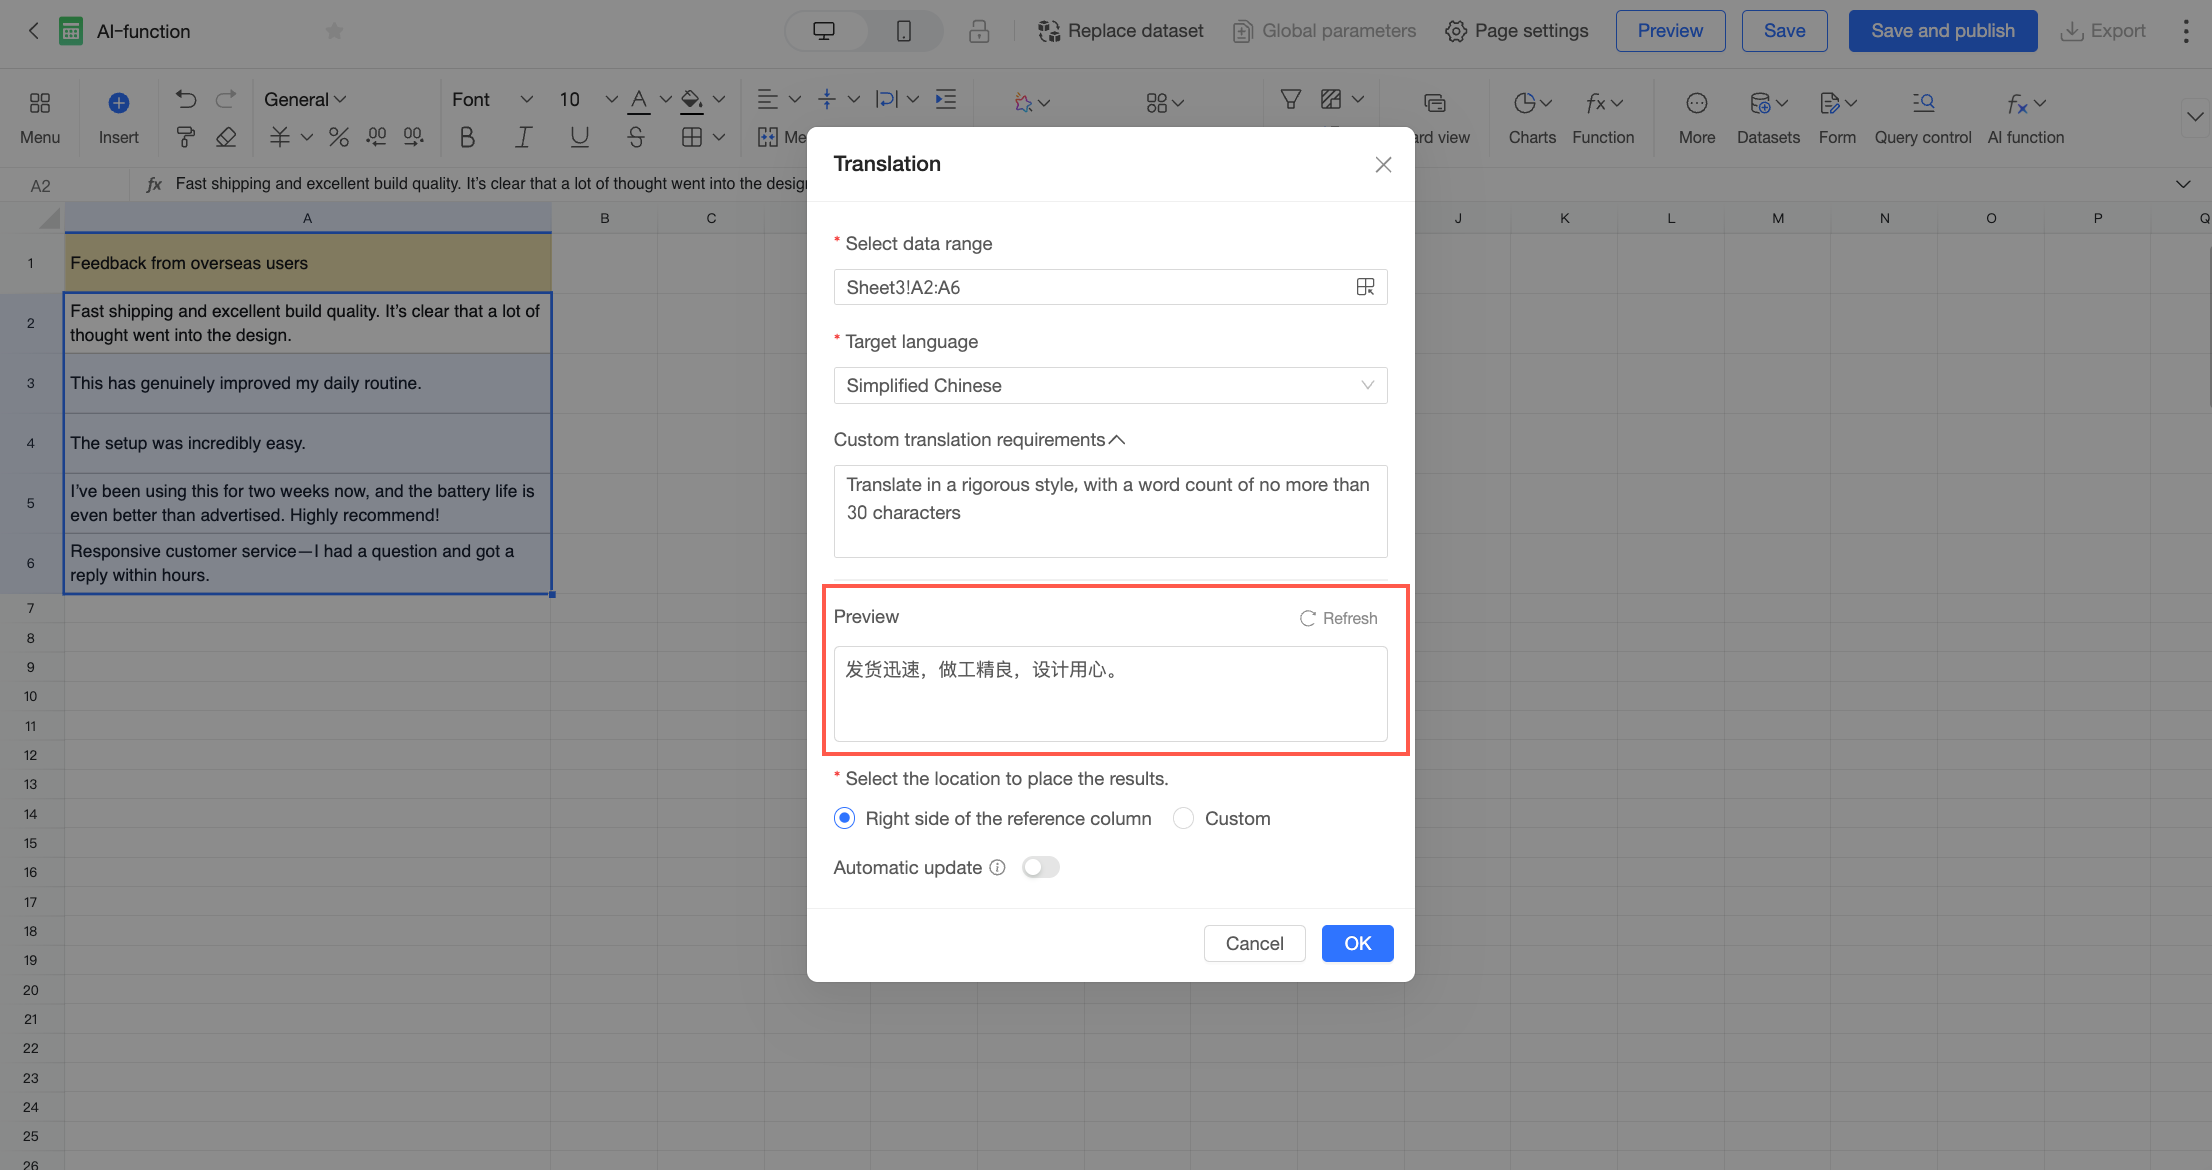
You can preview the translation result for the first data entry based on the current configuration to quickly validate it.
Click preview. The system runs the translation function on the first row of your selected data range and displays the result in the preview box.
Select a location to place the results
Specify where to output the results. You can choose one of the following options.
To the right of the referenced column: Inserts the results in the column to the right of the source data column.
Custom: Manually select a location for the results.
Click the
icon and drag to select a new range, or manually edit the formula in the Cell Range input box.NoteEnsure the selected custom area is empty.
The output range must be the same size as the input range.
Auto-update
Specify whether the results automatically update when the source data changes.
This option is disabled by default. When disabled, the output does not change if the source data changes. If you enable this option, the system automatically reruns the AI function to update the output when the source data changes.
After you complete the configuration, click OK. The results appear in the spreadsheet once the AI processing is complete.
Summary
The summary function intelligently condenses long text into key points. This is useful for scenarios that require quickly understanding the main idea of large amounts of text and improving information retrieval efficiency.
For example, when analyzing support tickets, you can use the summary function to summarize customer feedback, helping business teams quickly grasp core user needs and pain points. This section uses this example to explain how to configure the summary function.
In the Order Information table, select the text you want to summarize. Click the
icon on the toolbar and select Summary.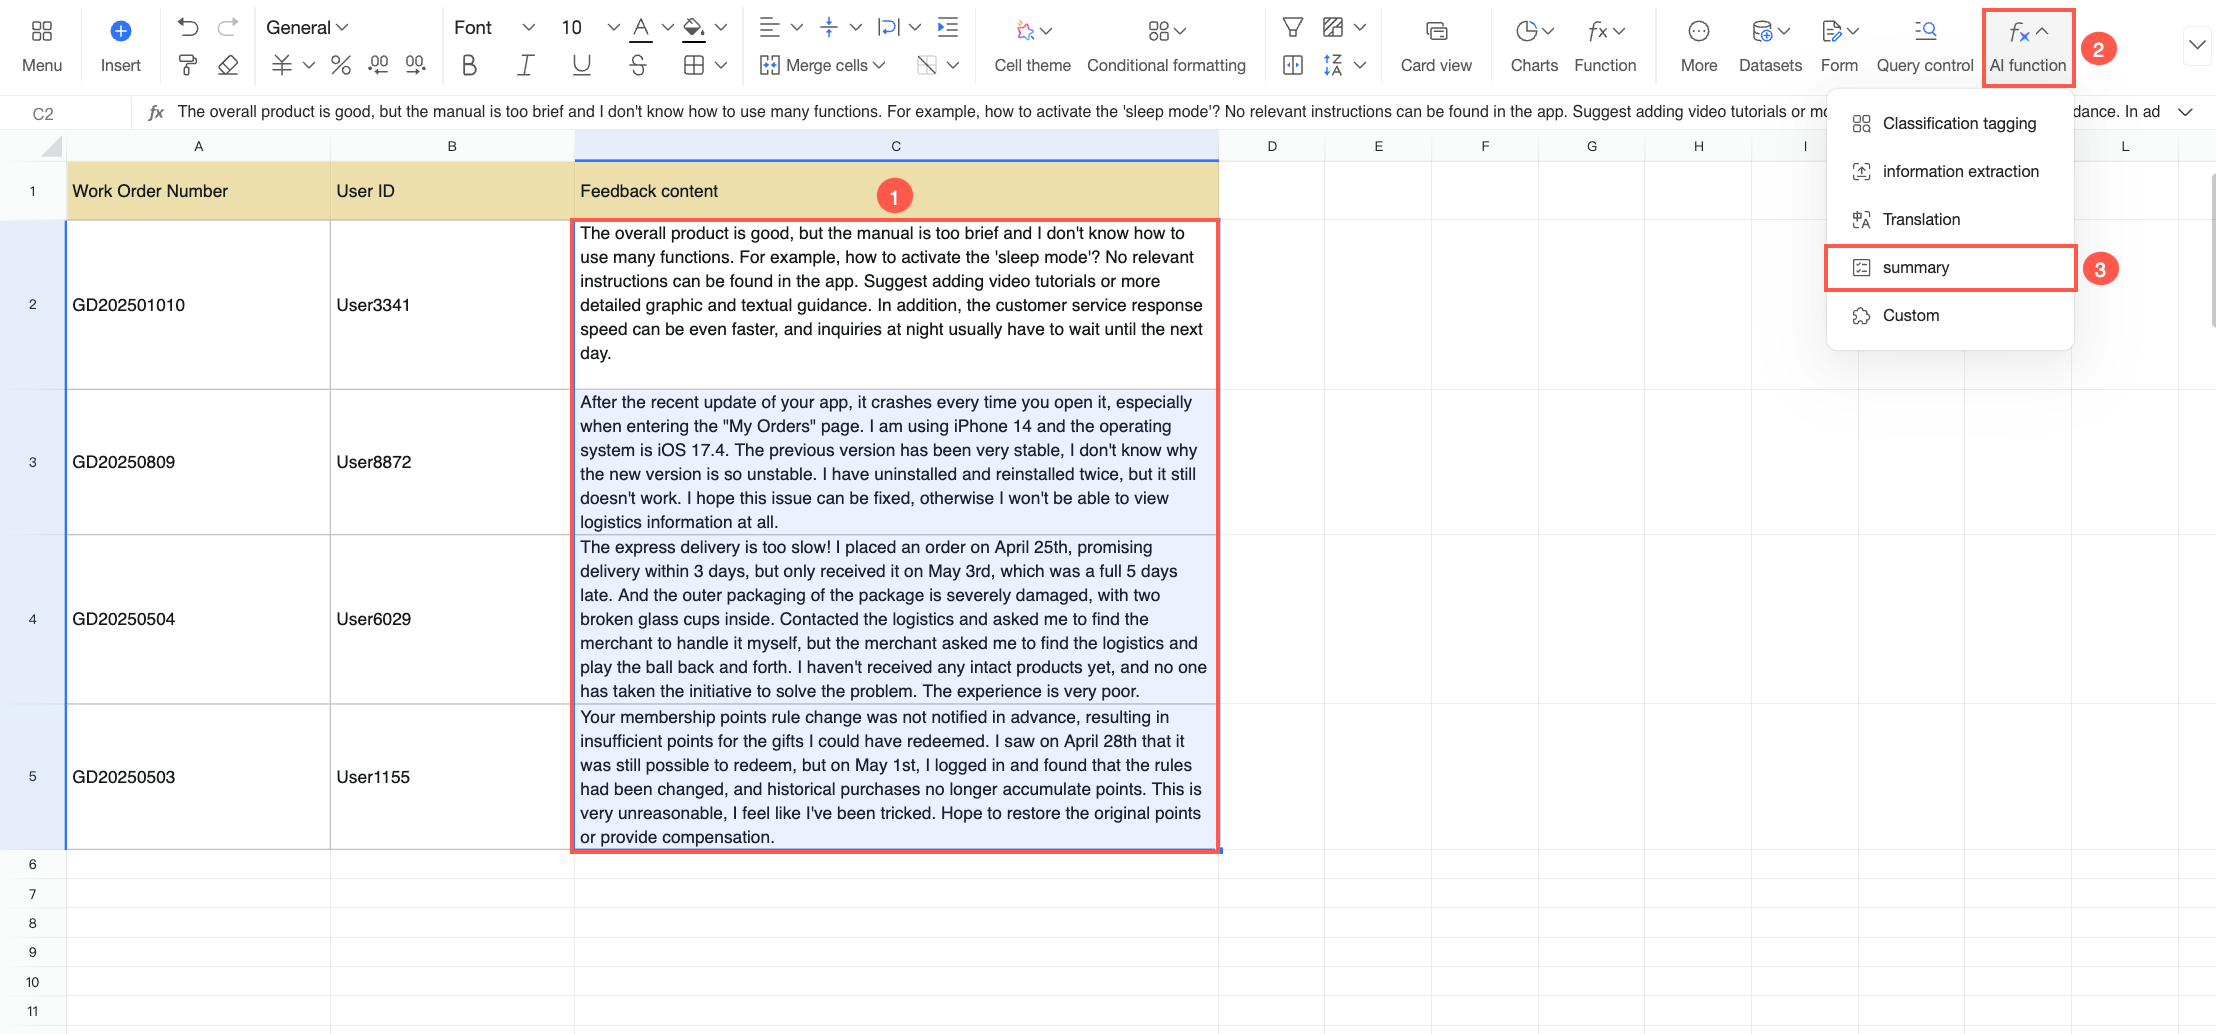
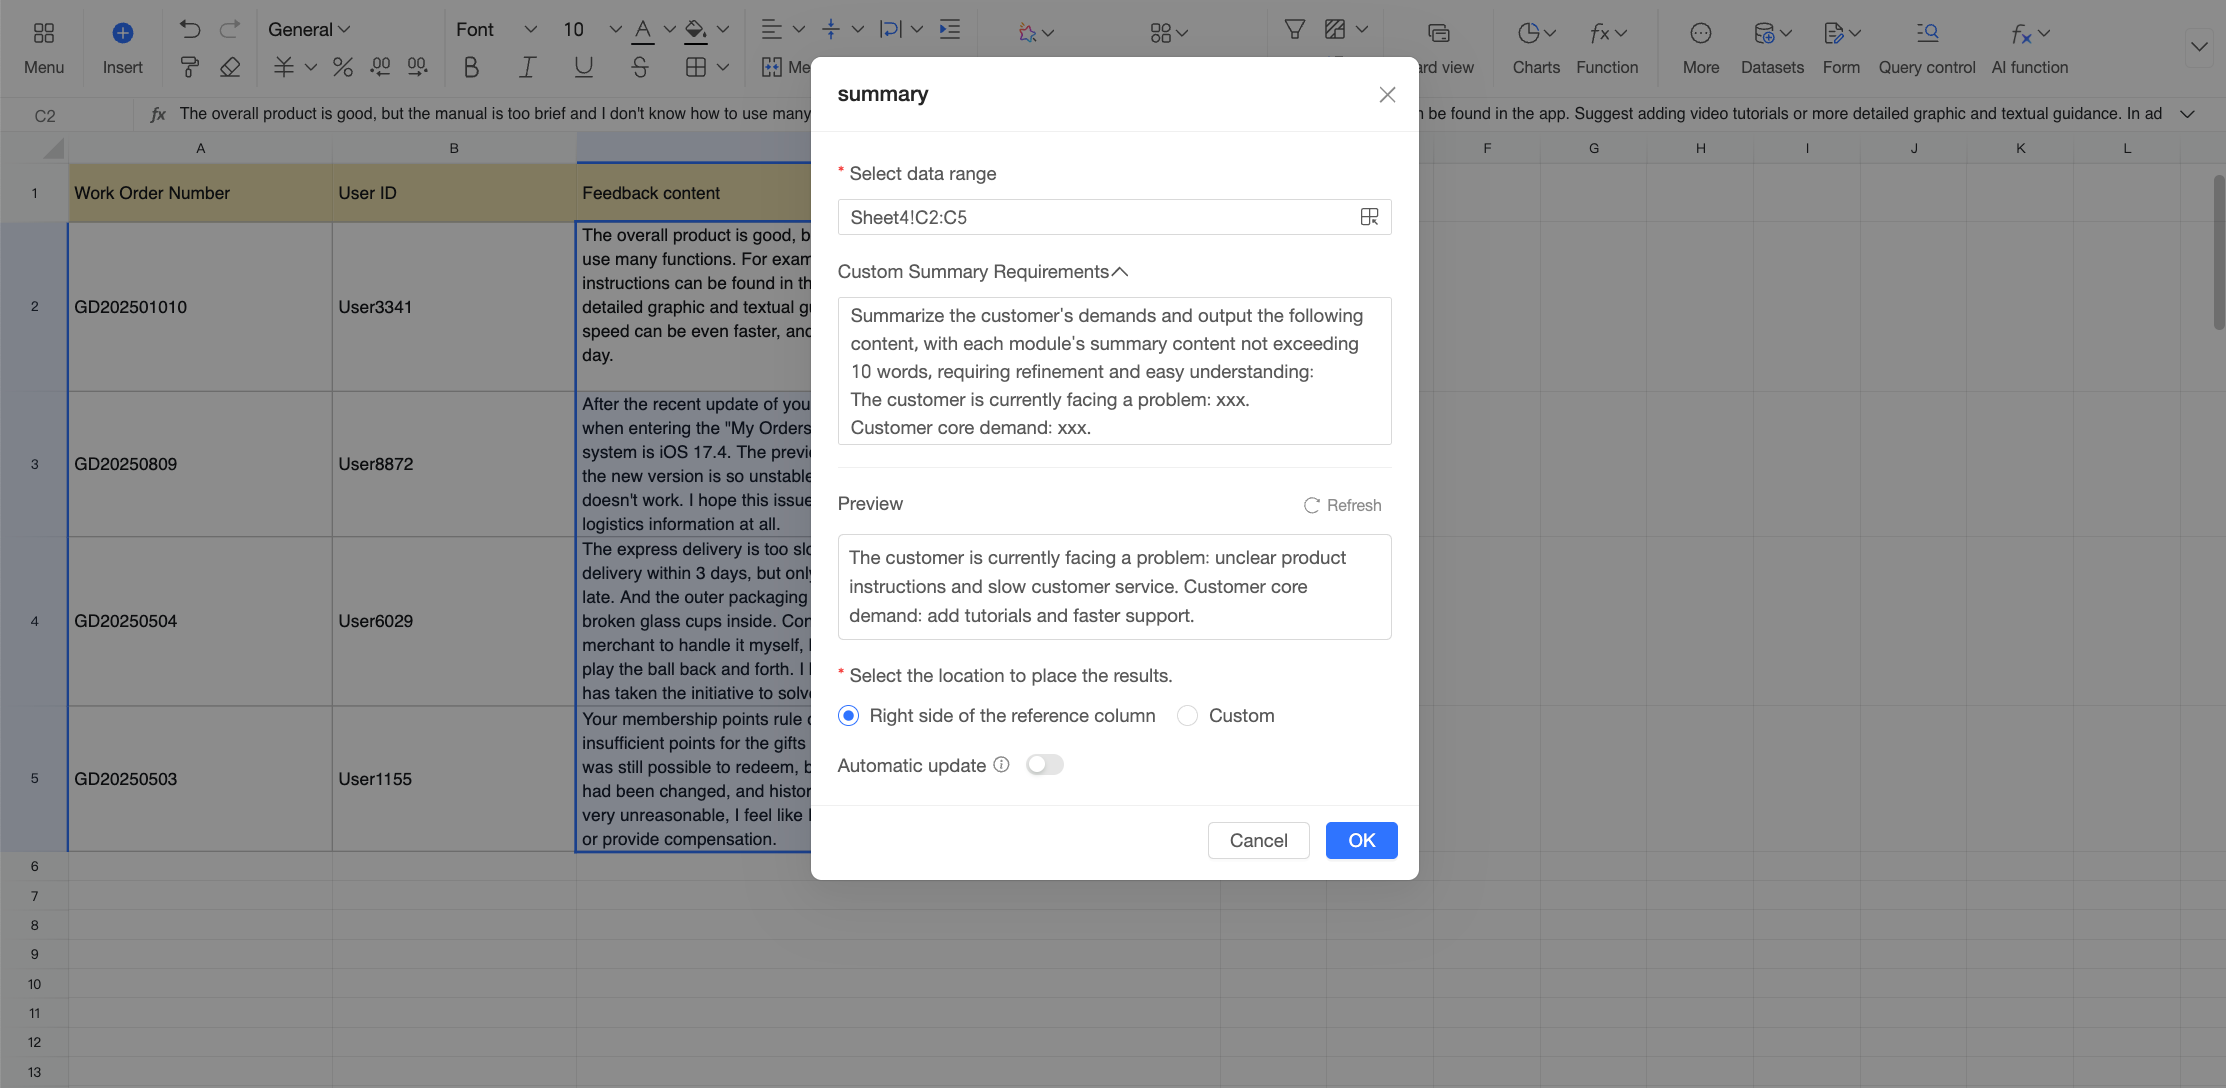
In the Summary dialog box, configure the following parameters.
Parameter
Description
Select data range
Select the data range to process.
The range defaults to your current selection. To change the range, click the
icon and drag to select a new range, or manually edit the formula in the Cell Range input box.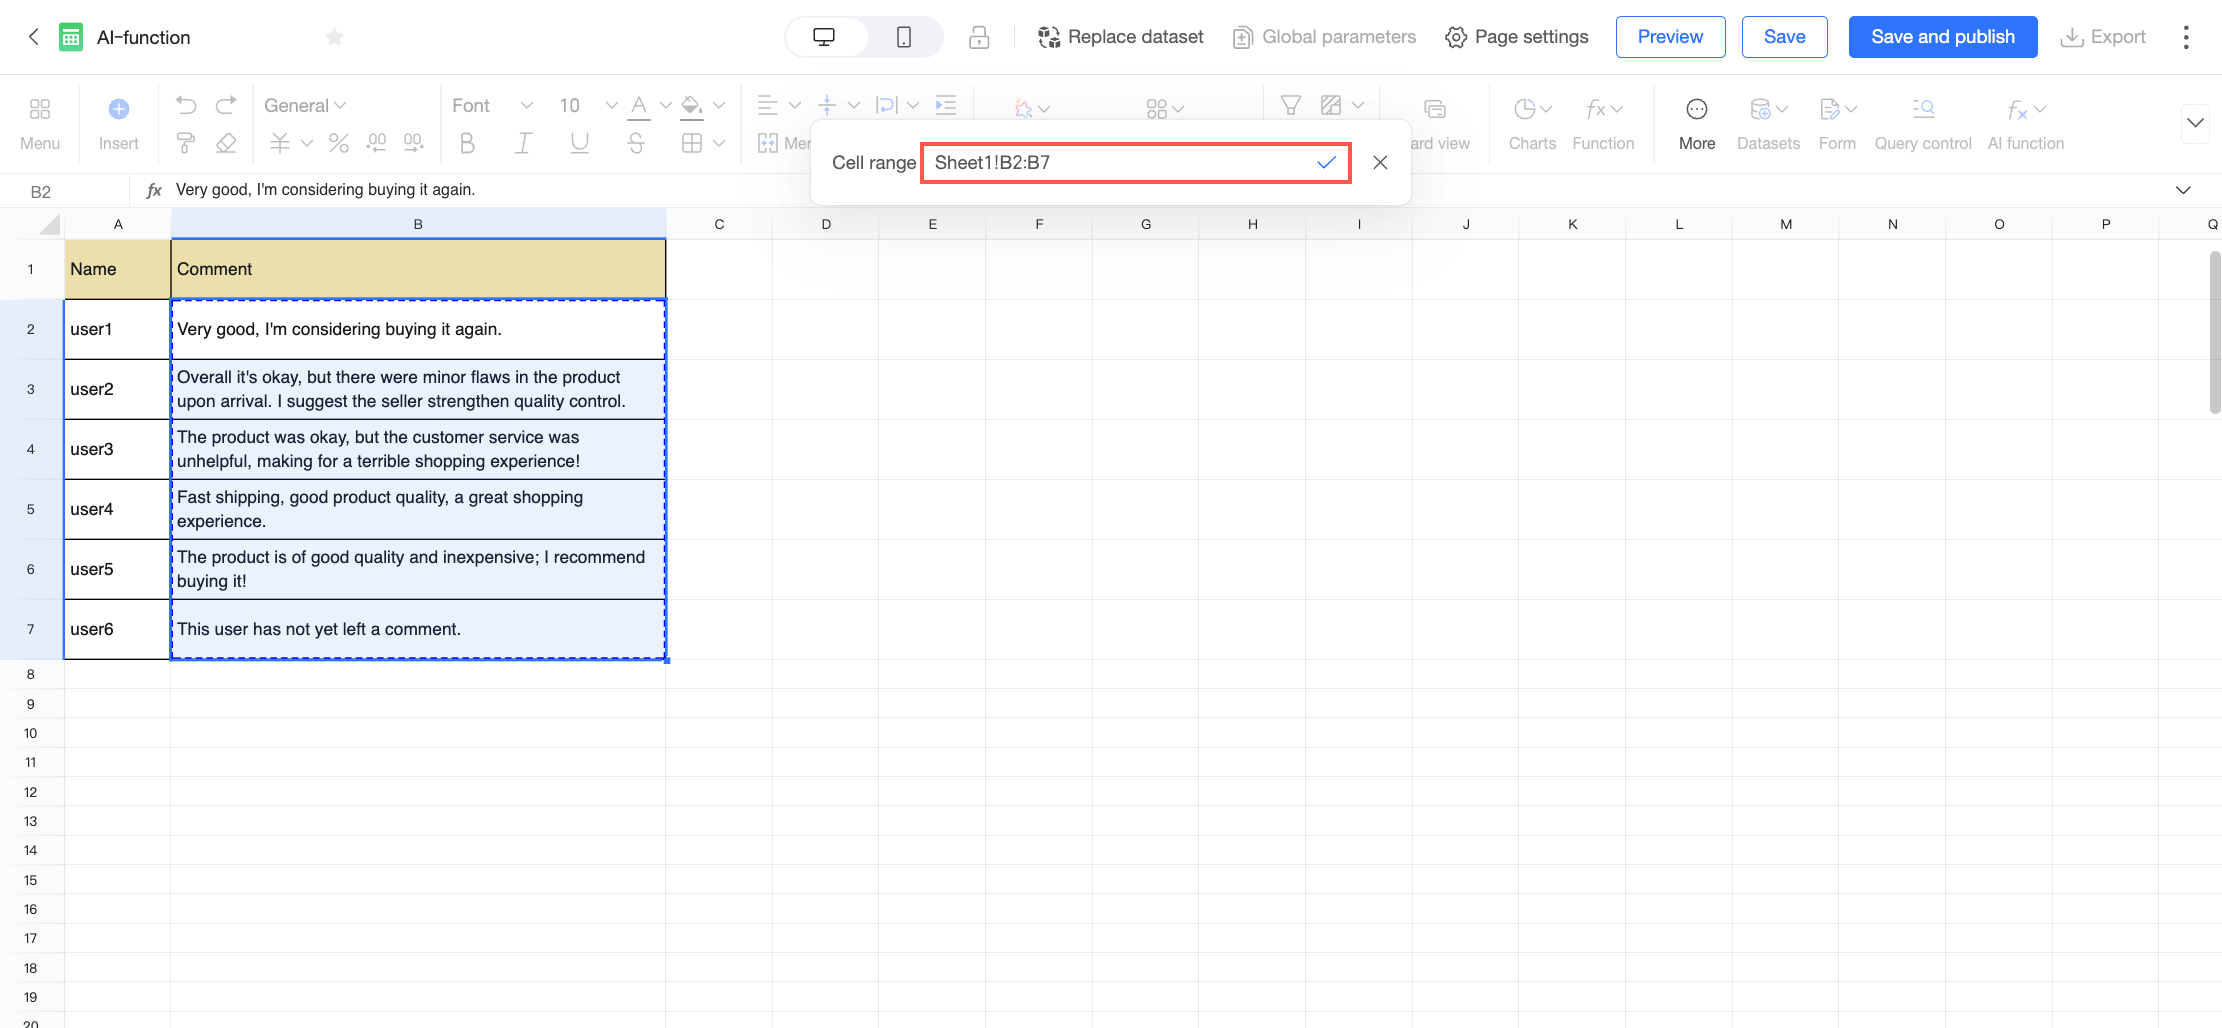 Note
NoteThe selected range must be in a single column.
Custom summary requirements
Enter personalized requirements for the summary's style, length, or focus to improve its usefulness and semantic consistency with the original text. For example:
Summarize in no more than 10 words, keep it concise and easy to understand.Preview
You can preview the summary for the first data entry based on the current configuration to quickly validate it.
Click preview. The system runs the summary function on the first row of your selected data range and displays the result in the preview box.
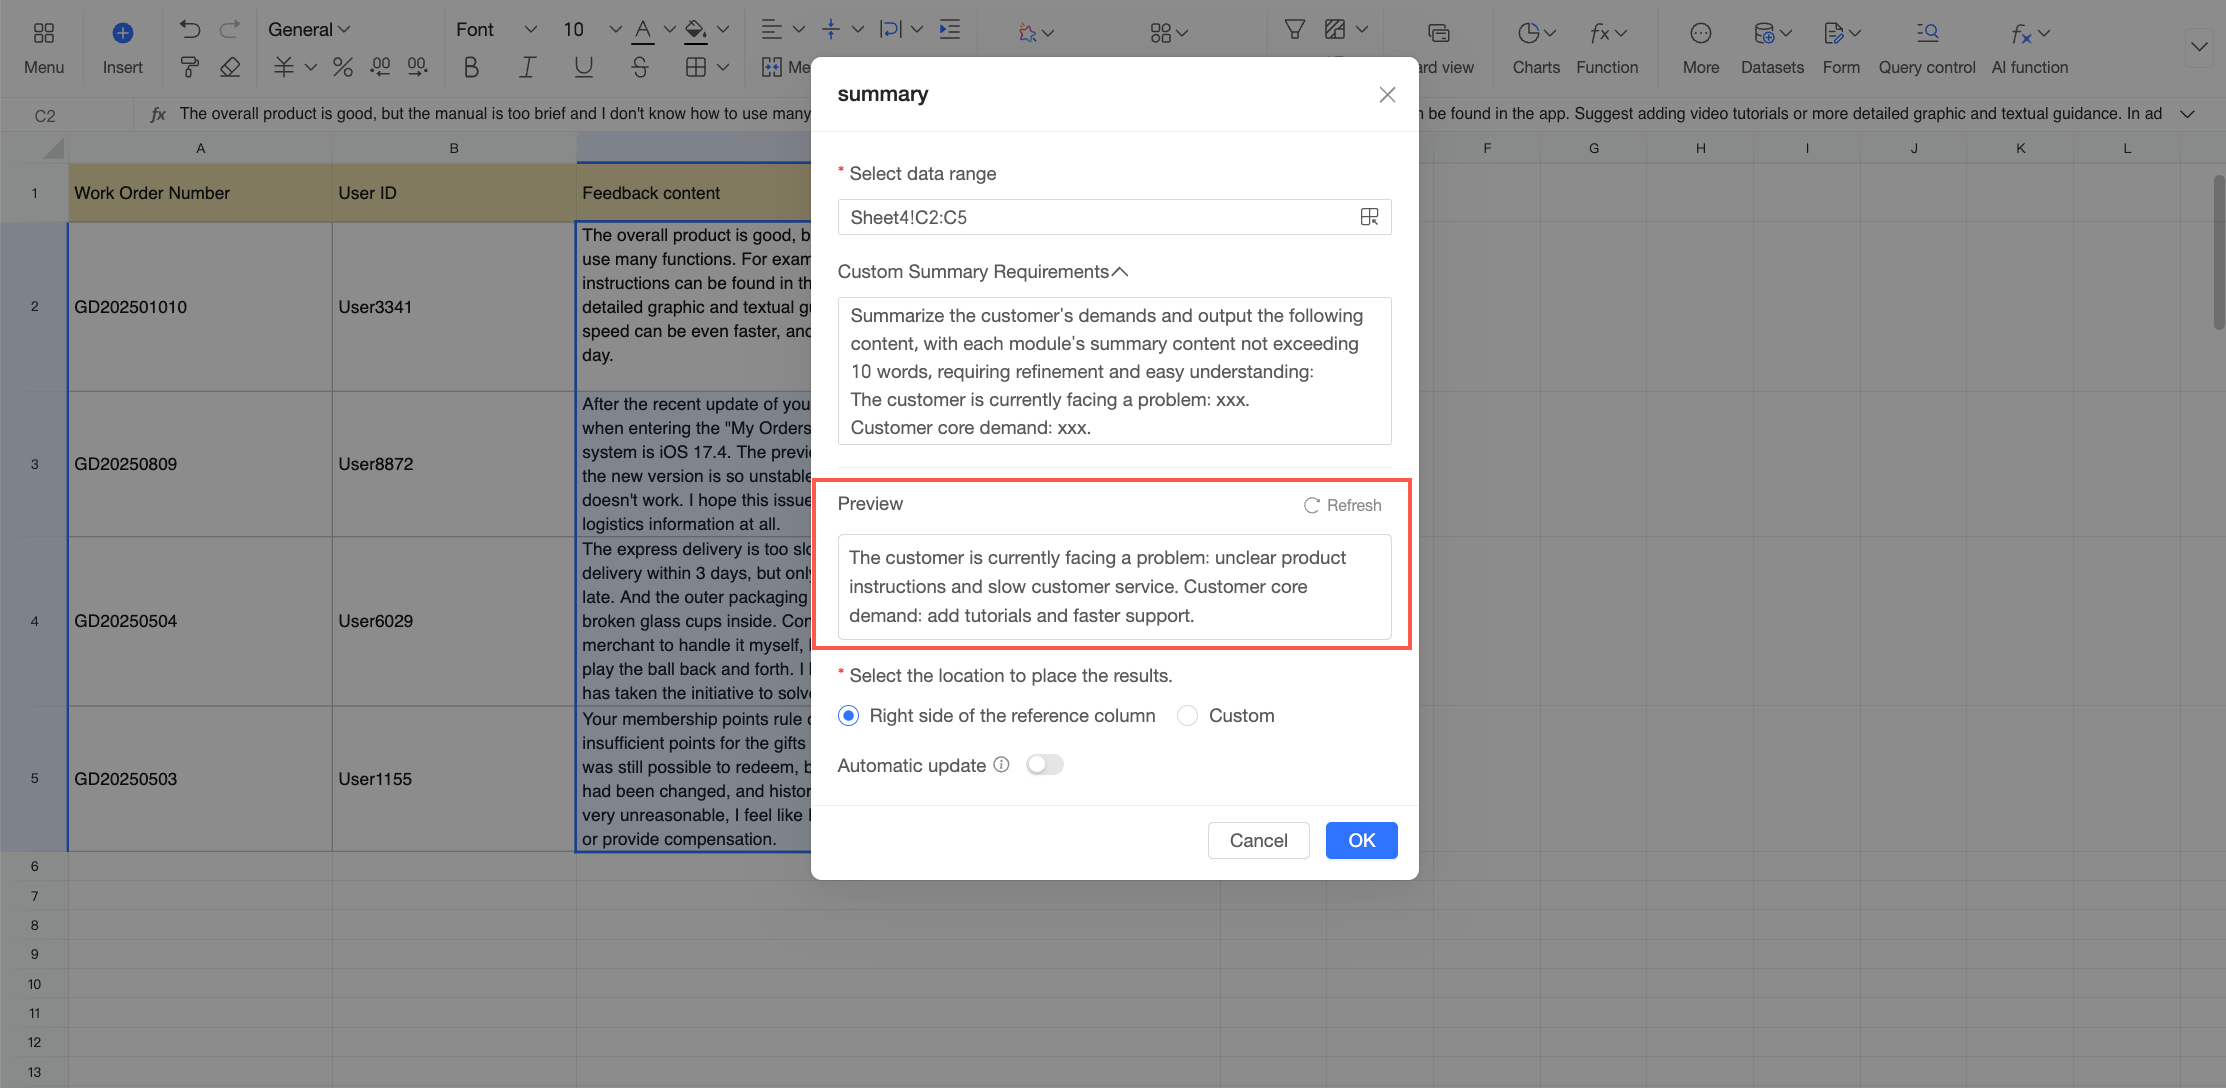
Select a location to place the results
Specify where to output the results. You can choose one of the following options.
To the right of the referenced column: Inserts the results in the column to the right of the source data column.
Custom: Manually select a location for the results.
Click the
icon and drag to select a new range, or manually edit the formula in the Cell Range input box.NoteEnsure the selected custom area is empty.
The output range must be the same size as the input range.
Auto-update
Specify whether the results automatically update when the source data changes.
This option is disabled by default. When disabled, the output does not change if the source data changes. If you enable this option, the system automatically reruns the AI function to update the output when the source data changes.
After you complete the configuration, click OK. The summary results appear in the spreadsheet once the AI processing is complete.
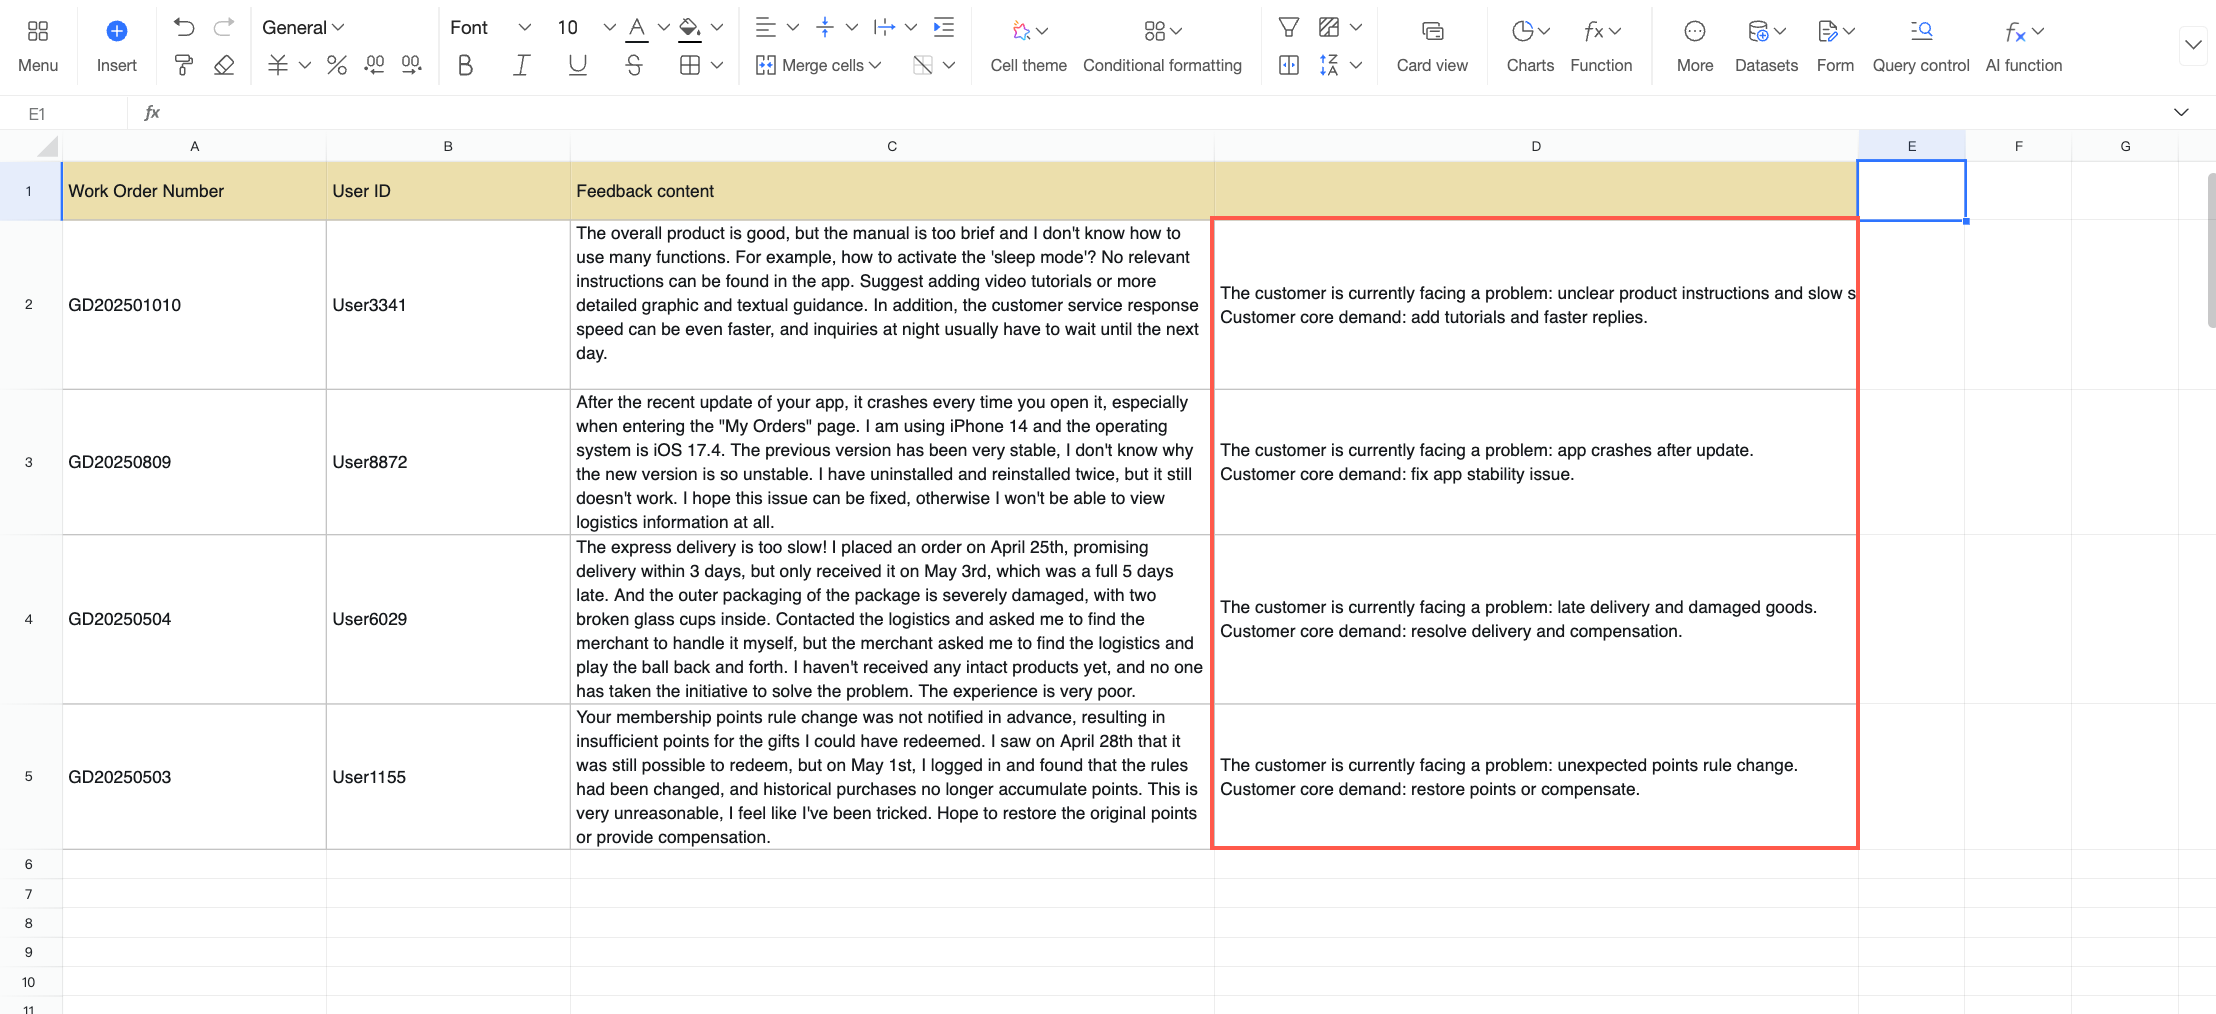
Custom AI function
When the standard AI capabilities in Quick BI do not meet your specific business needs, you can use natural language instructions to leverage the underlying large model and create custom analysis tasks.
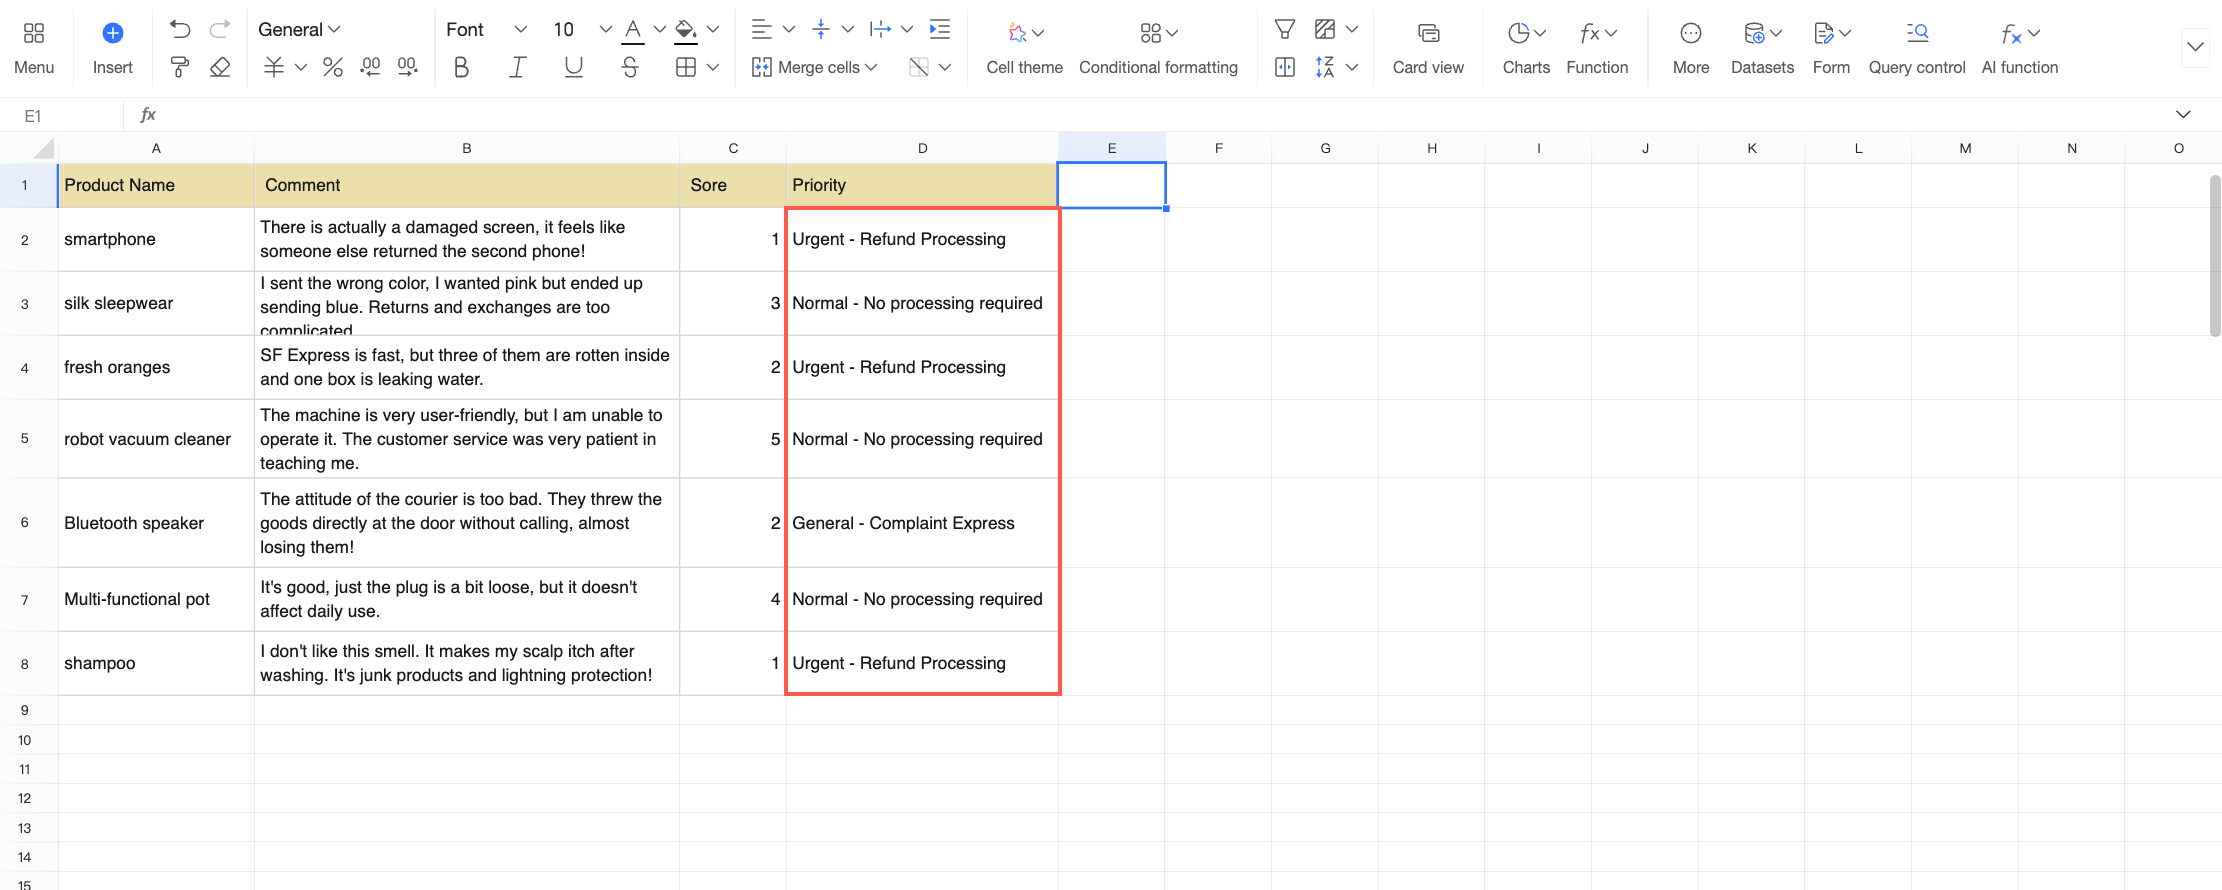
For example, after receiving after-sales reviews, the support team needs to quickly identify which feedback is high-priority based on the content and rating, which is a logistics issue that can be forwarded to the carrier, and which is routine feedback that can be handled later. In this case, you can use a custom AI function to set comprehensive rules that automatically determine the priority of each review. This section uses this example to explain how to configure a custom AI function.
In the Customer Information table, select the text area to be used as a function variable. Click the
icon on the toolbar and select Custom.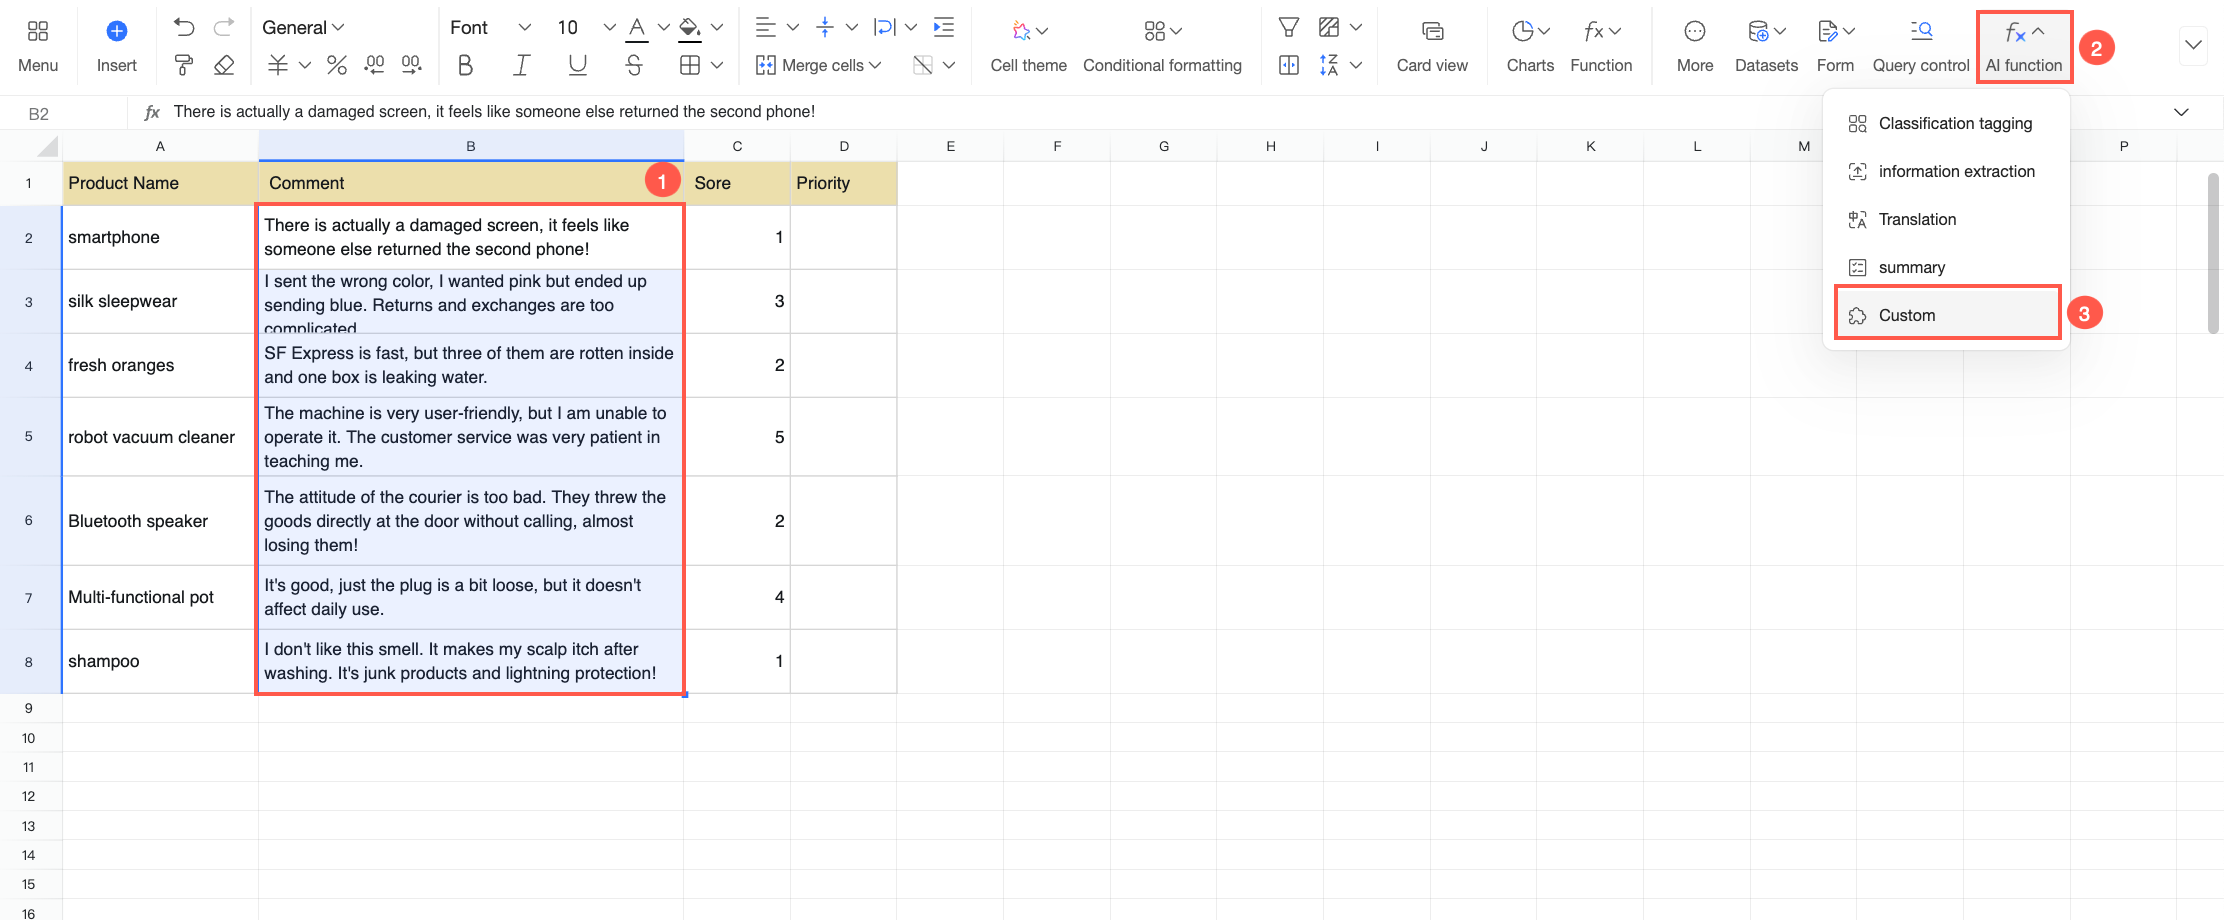
In the Custom AI Function dialog box, configure the following parameters.
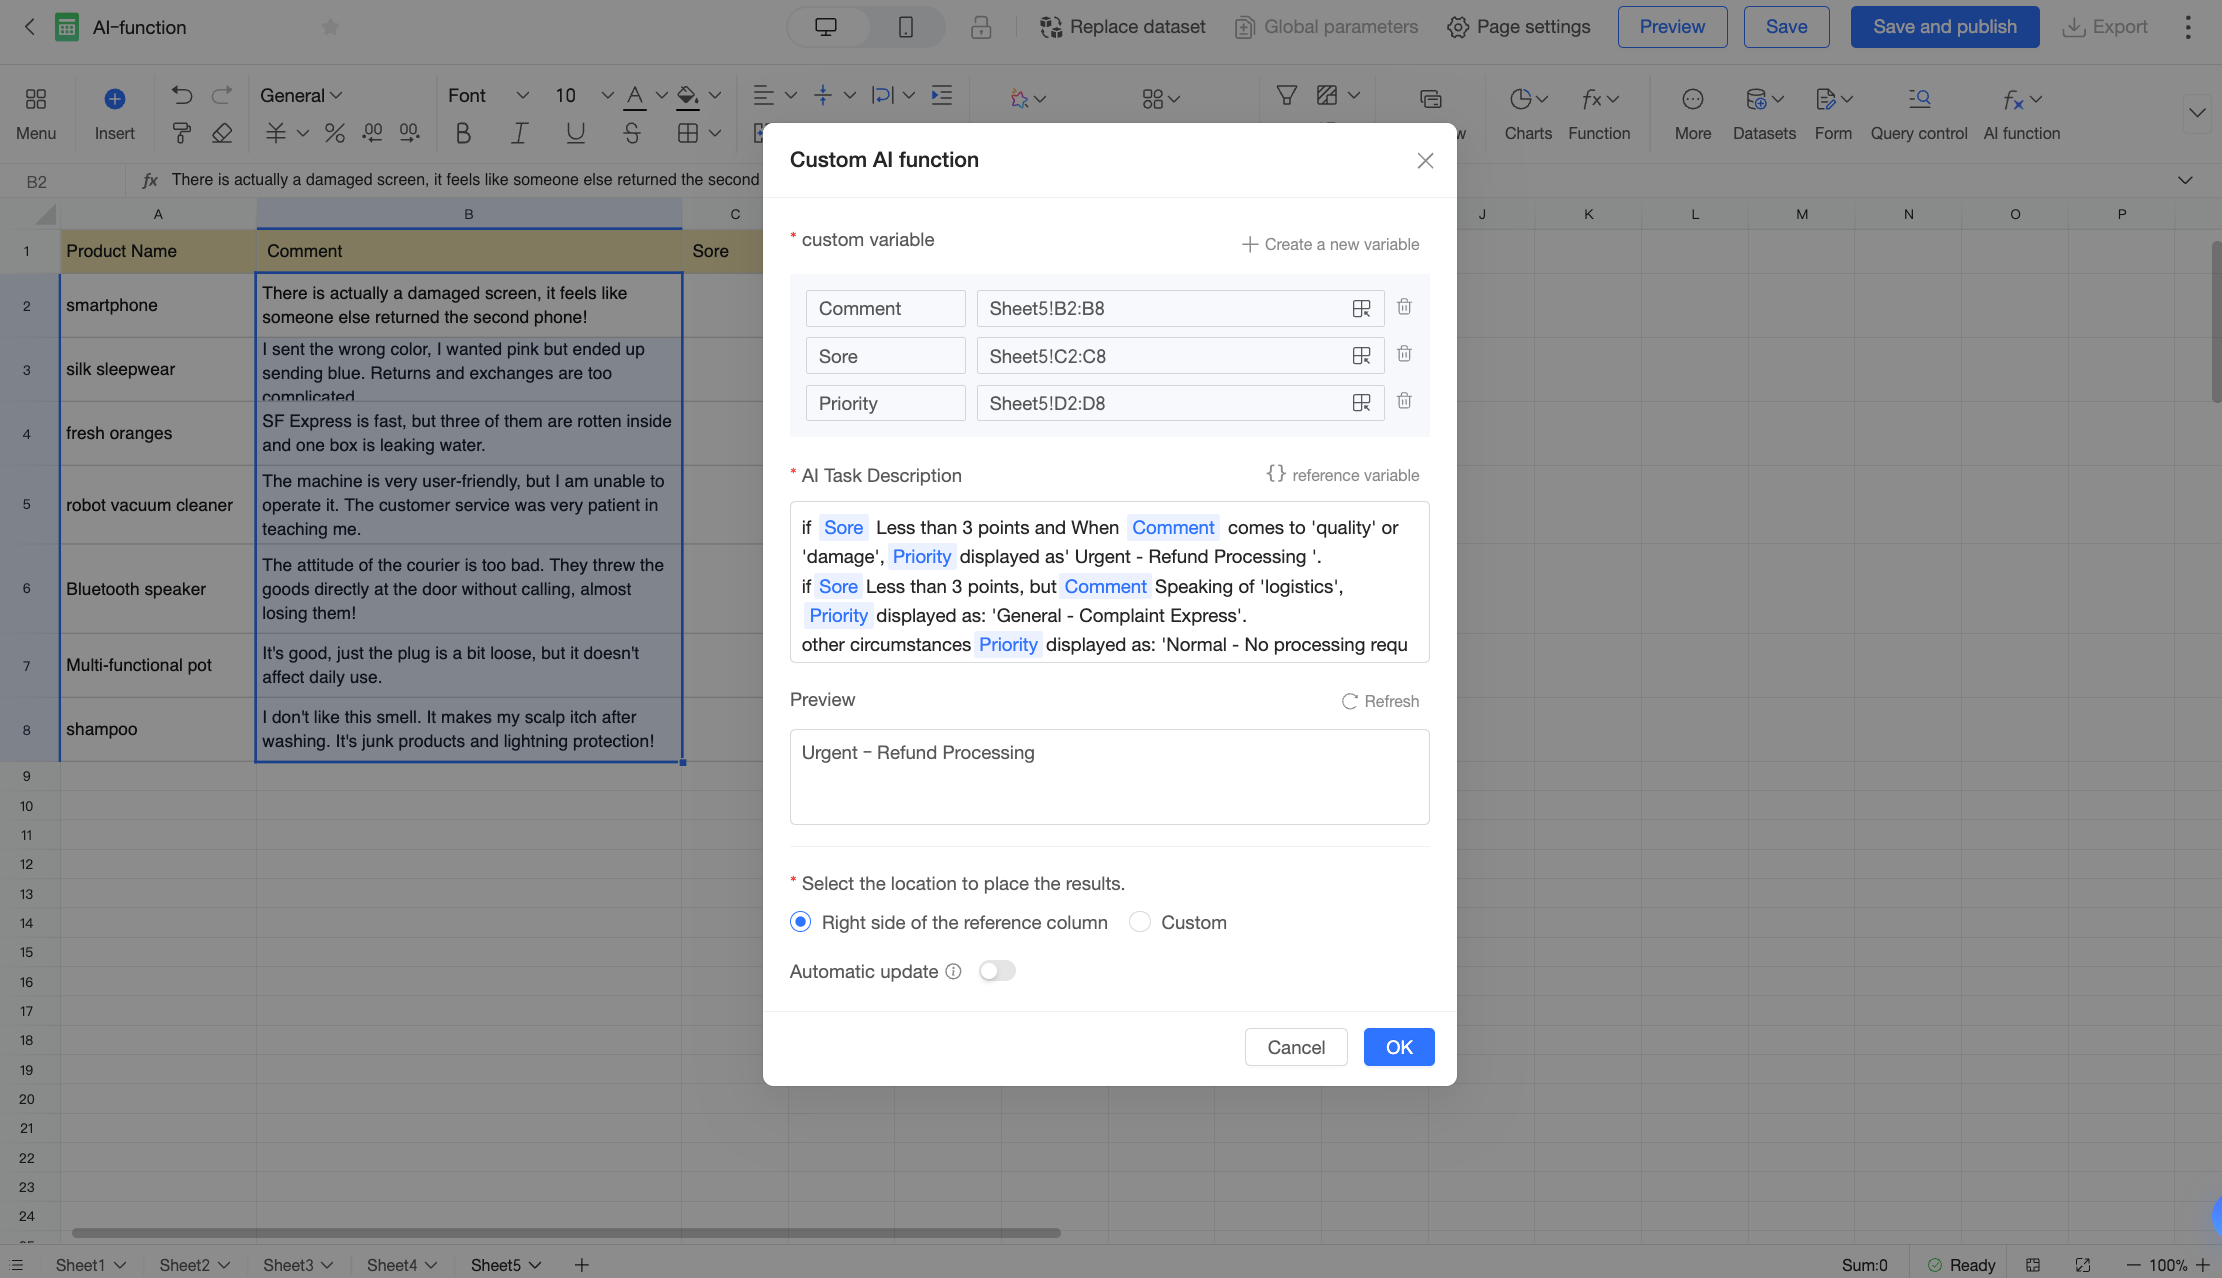
Parameter
Description
Custom variable
Define data variables that can be referenced in the AI task.
The selected data is added as Variable 1 by default. You can change its name as needed. You can also perform the following actions:
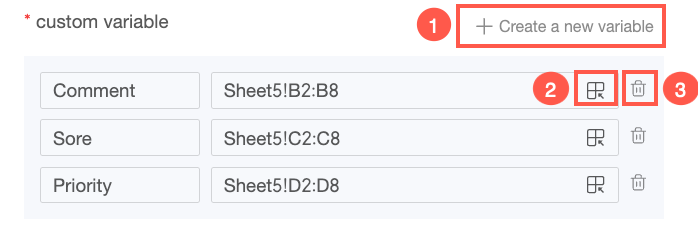
① Click New variable to add another variable.
② Click the
icon and drag to select a data range, or manually edit the formula in the Cell Range input box.NoteThe selected range must be in a single column.
③ Click the Delete icon to remove a variable you no longer need. If the variable is already referenced in the AI task description, the reference will become invalid after deletion.
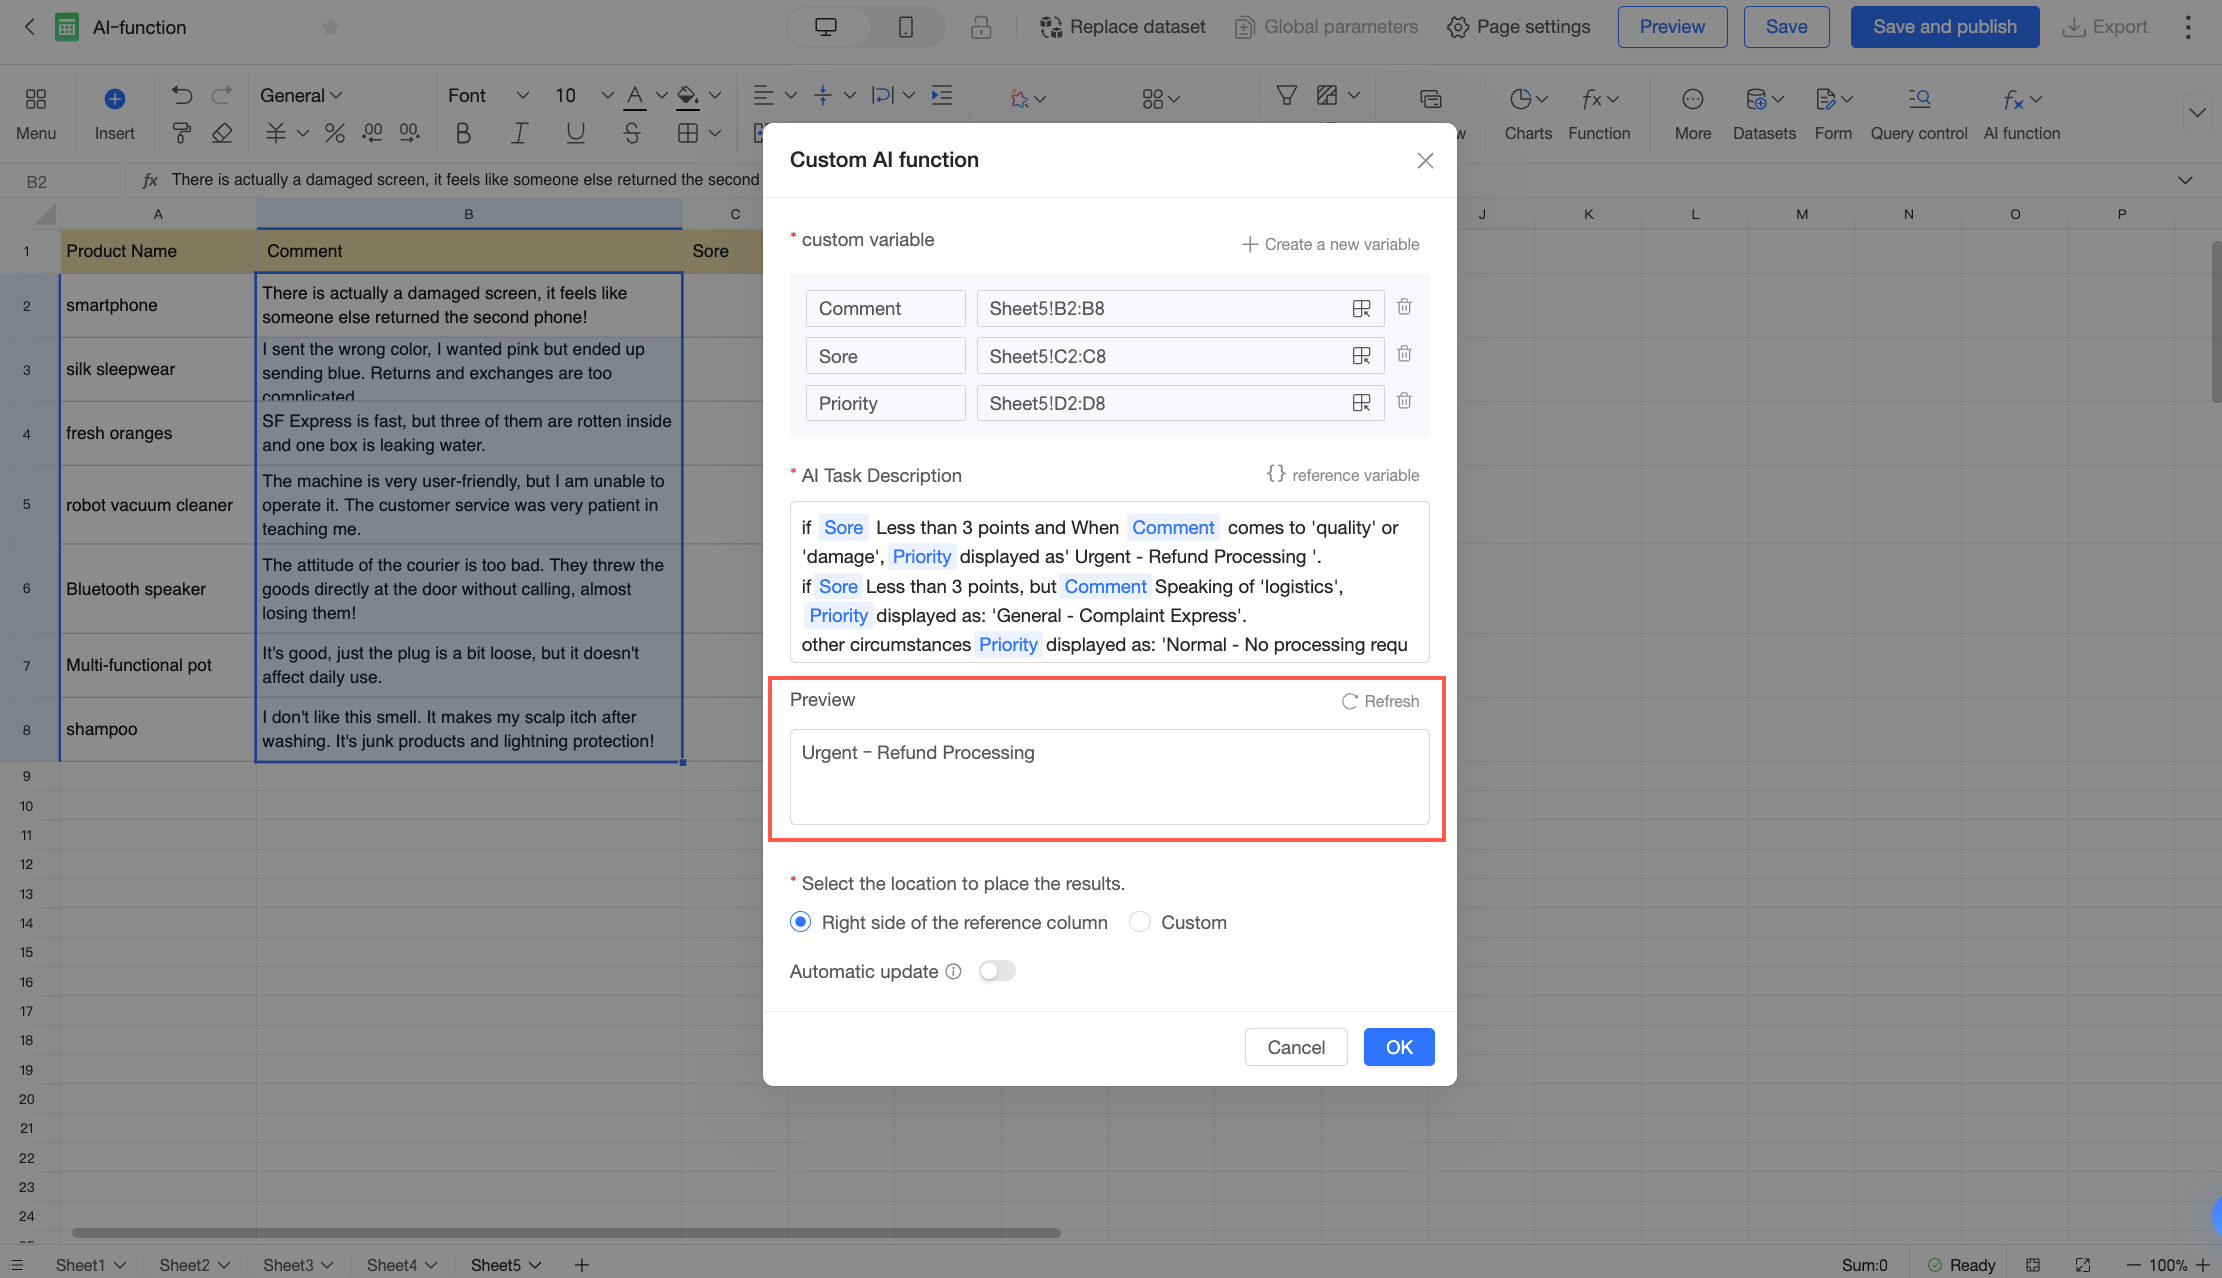
AI task description
Describe the specific task you want the AI to perform in natural language.
While writing, click Reference Variable to insert a variable that you have configured under Custom variable.
Preview
You can preview the output for the first data entry based on the current configuration to quickly validate it.
Click preview. The system runs the custom function on the first row of your selected data range and displays the result in the preview box.
Select a location to place the results
Specify where to output the results. You can choose one of the following options.
To the right of the referenced column: Inserts the task results to the right of the rightmost variable column on the spreadsheet. In this example, the results will be inserted next to the Cooperative Business column.
Custom: Manually select a location for the results.
Click the
icon and drag to select a data range, or manually edit the formula in the Cell Range input box.NoteEnsure the selected custom area is empty.
The output range must be the same size as the input range.
Auto-update
Specify whether the results automatically update when the source data changes.
This option is disabled by default. When disabled, the output does not change if the source data changes. If you enable this option, the system automatically reruns the AI function to update the output when the source data changes.
After you complete the configuration, click OK. The results of the custom function appear in the spreadsheet once the AI processing is complete.
Manage functions
After adding an AI function, you can manage it on the spreadsheet editing page with the following actions: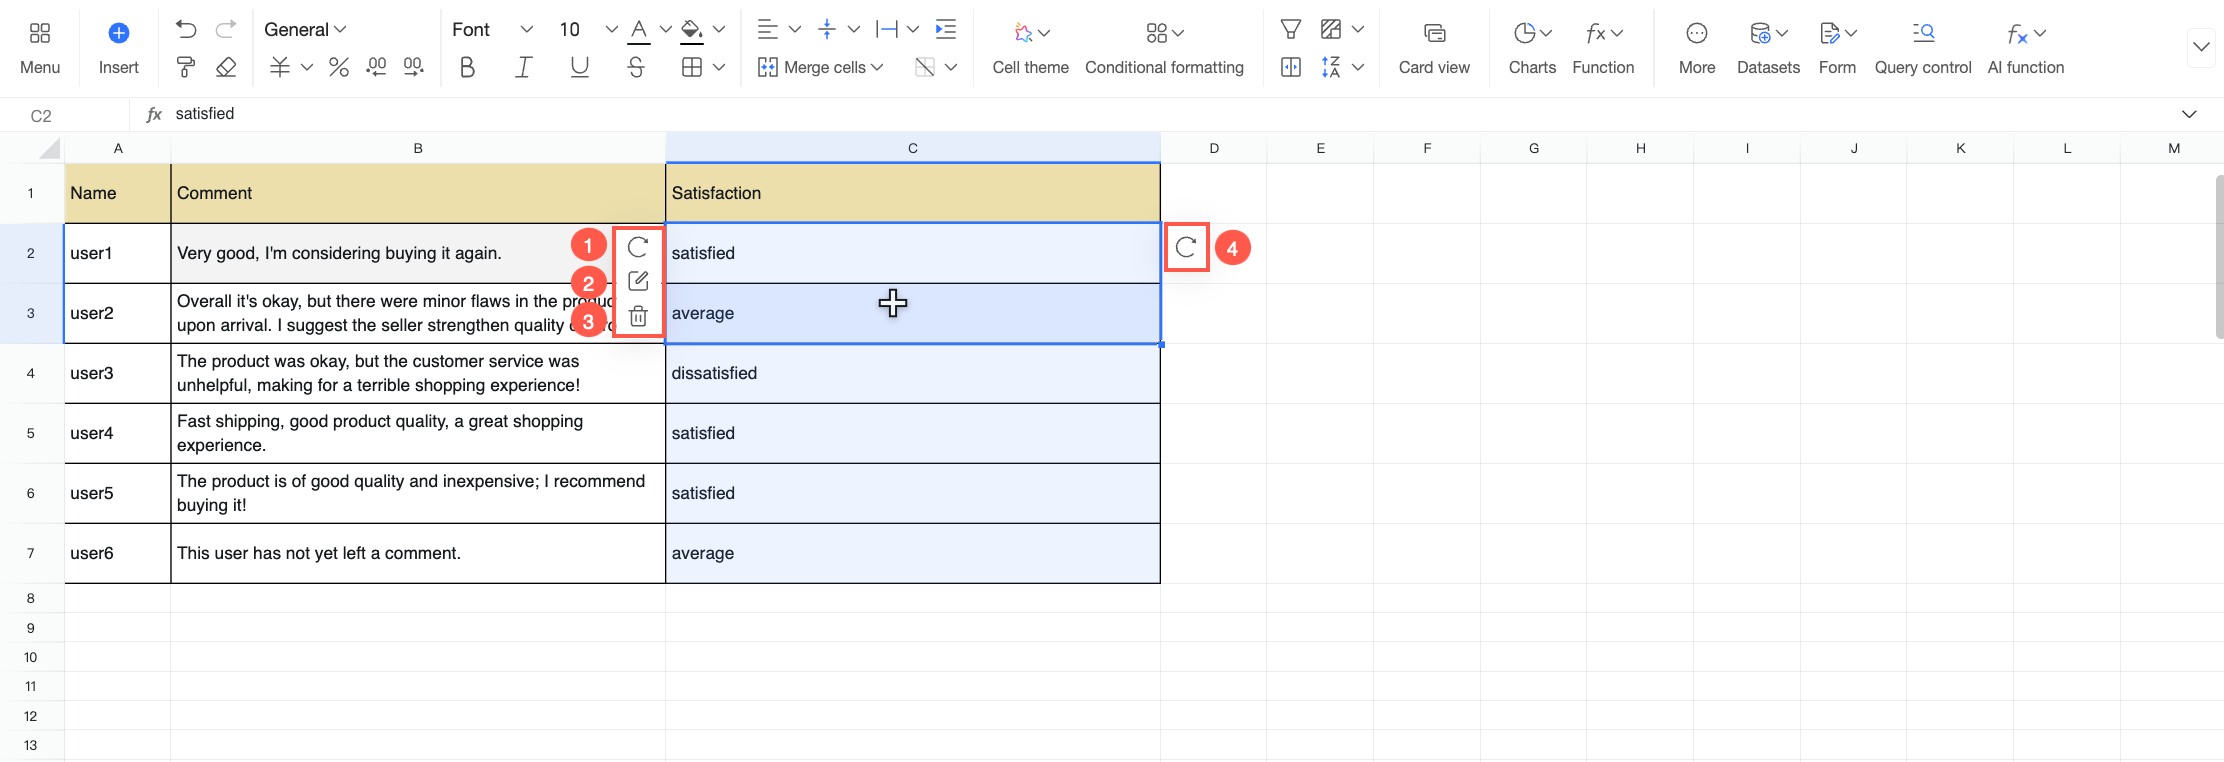
① Regenerate: Click the
 icon to regenerate the entire result area.
② Edit: Click the
 icon to open the editing dialog box and adjust the current function's configuration.
③ Delete: Click the
 icon and confirm your choice in the dialog box to delete the function's entire result column.
④ Update a specific cell: To regenerate a single cell's result without updating the entire column, select the cell and click the refresh icon (
) that appears on the right.
If the AI function fails, you can regenerate the results for the affected area.
Click the
 icon to regenerate all failed cells in the current result area.
To regenerate a single failed cell, hover over it and click Retry this cell in the tooltip. You can also click Retry failed items to regenerate all failed cells in the result area.