This tutorial demonstrates how to use PTS to build and run a multi-step stress testing scenario that simulates a typical online education workflow.
Scenario
An online education website needs to run stress testing on its course selection workflow. The workflow consists of three steps, each with specific requirements:
-
Log on to the online education system
-
Construct login requests with user information, such as usernames and passwords.
-
Pass the user's login information (cookie) to the following View course list and Submit course selection requests.
-
-
View course list
Pass the course ID to the Submit course selection request.
-
Submit course selection
-
Use the course ID from the previous request to construct the course submission request.
-
Verify whether the course submission is successful.
-
The basic setup for the stress testing scenario is as follows.
The session session1 is configured with three active APIs (3/3), all using the POST method: Login, Query, and Submit. These APIs correspond to the logon, course list query, and course selection submission steps.
Prerequisites
You have activated the PTS service.
Prepare a parameter file in
CSVformat. For more information about the requirements for parameter files, see Parameter file specifications.username,password user1,Password1 user2,Password2 user3,Password3
Step 1: Configure the stress testing scenario
-
Log on to the PTS console, choose , and then click PTS.
Add the parameter file to a data source.
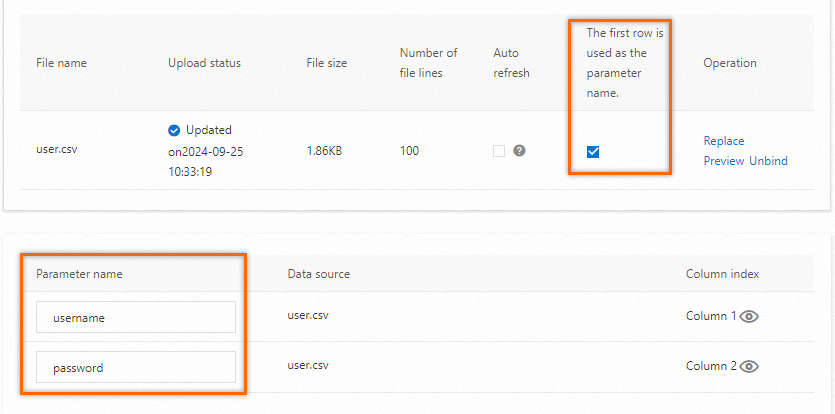
Click Data Sources. On the Files tab, click + Upload File and select an on-premises parameter file that you want to upload.
Select Use First Row as Parameter Name. After you select this option, you do not need to specify the parameter names. The data in the first row is used as the parameter names. When PTS reads the parameter file, PTS ignores the data in the first row. If the data in the first row of the parameter file is not parameter names, you must specify a parameter name for each column based on your business scenario.
Add a data configuration node.
On the Scenario Settings tab, add a stress testing API, click the drop-down arrow next to Add Instruction, and then select Parameter.
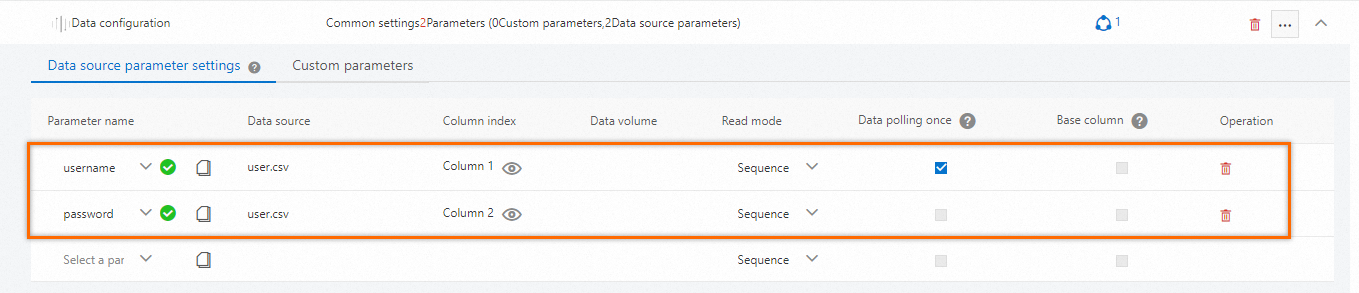
On the Data Source Parameters tab, select existing parameter names.
NoteIf you want to use each row only once to assemble requests, select Use Once. When the required data is polled once, the stress testing scenario stops generating new stress testing requests, regardless of the configured load level.
If you want to recycle parameters during a stress test, do not select Use Once.
You can select Use Once or Baseline Column, but not both for parameters. If you select Use Once, you cannot select Baseline Column.
-
Build the API sequence
-
Configure the login API
Stress Testing URL: Enter the URL to test. This example uses
http://web.example.com/login.Request Method: Select
POST.Body Definition: Set
Content-Typetox-www-form-urlencoded. Then, click Text Edit in the upper-right corner of the editing area and enter{"username":"${username}","password":"${password}"}.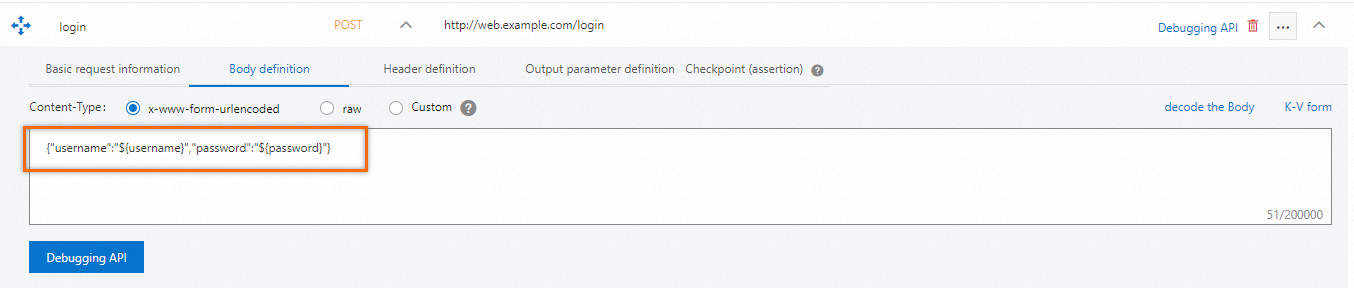 Note
NoteCookies from the current request, which contain user login information, are automatically shared with other APIs in this stress testing scenario. No manual configuration is needed.
-
Configure the view course list API
Click Add API and select HTTP to add a new API node. Then, configure the basic request information.
-
Test URL: Enter the URL to be tested. This example uses
http://web.example.com/mocks/online/list. -
Request method: Select
POST.
To pass a course ID to the next request, you must extract it from the response of the current API as an output parameter. Select the Output Parameter Definition tab and configure it as follows.
For Output Parameter Name, enter
ID. For Source, select Body: JSON. For parsing expression, enterschedule_list[1].ID.-
Output Parameter Name: Enter a custom parameter name.
-
Source: Select the parsing format for the body, such as JSON.
-
Parsing Expression: Enter a parsing expression based on the response details.
For example, to extract the second course ID from the following sample response body, set the parsing expression to
schedule_list[1].ID.{ "schedule_list": [ { "Name": "math", "ID": "001" }, { "Name": "english", "ID": "002" }, { "Name": "science", "ID": "003" } ] }NoteTo define and validate the parsing expression for an output parameter, use the expression debugging feature. After the expression is verified, you can apply it here. For more information, see Debug a scenario.
-
-
Configure the submit course selection API
Click Add API and select HTTP to add a new API node. Then, configure the basic request information.
-
Test URL: Enter the URL to be tested. This example uses
http://web.example.com/mocks/online/submit. -
Request method: Select
POST.
Select the Body Definition tab and use the course ID that you extracted from the previous API in the request
Body.-
Content-Type: Select the
x-www-form-urlencodedformat. -
Key: Enter a custom key, for example,
ID_from_last_api. -
Value: Click Parameters in the lower-left corner of the page to view session parameters, such as "ID". Click the copy icon and paste the value into the Value box.
Select the Output Parameter Definition tab and configure the following settings.
-
Output Parameter Name: Enter a custom parameter name, for example,
result. -
Source: Select a parsing format for the body, for example, Body: TEXT.
NoteFor the source, set the parsing format of the Body to TEXT. Similarly, you can also use the expression debugging feature in scenario debugging to debug your parsing expression.
-
Parsing Expression: Enter a parsing expression based on the response details. In this example, the response body is
result:success, so the parsing expression isresult:(.+).
On the Check Point (Assertion) tab, set a checkpoint for this API to verify whether the course submission is successful.
-
Check Point Type: Select output parameter.
-
Check Object: Select result.
-
Check Condition: Select Equal To.
-
Content to Check: Enter
success.
-
-
Step 2: Stress Mode Configuration
After building the scenario, select a stress mode and set the load level.
Pressure Source: Select Public Network. If you are testing a service in an Alibaba Cloud internal network, select Alibaba Cloud VPC Network.
Pressure Mode: Select Virtual User Mode. Stress testing in virtual user mode is more suitable for client-initiated scenarios. The RPS Mode measures system throughput from a server-side perspective.
Increment Mode: Select Manual Speed Control.
Maximum Virtual Users: In virtual user mode, enter the maximum number of virtual users, for example, 10.
Total Stress Testing Duration: For example, 1 minute.
You can keep the default values for other parameters.
Running a stress test incurs fees. Select a reasonable stress level. For more information, see Billing overview and Pressure mode and volume configuration.
Step 3: Debug and start the scenario
Debug the scenario to verify your configuration and prevent test failures. We recommend debugging the scenario first.
-
Click Save and Start. In the Note dialog box, select Execute Now, select the The test is permitted and complies with the applicable laws and regulations. checkbox, and then click Start Test.
Analyze the stress test results
After the stress test ends, the system automatically collects data, such as stress testing scenario metrics, business details, monitoring data, and API sampling logs, to generate a stress test report. You can view the report on the Stress Test Report page. For more information, see View a PTS stress test report.