Managed Service for Prometheus allows you to aggregate data from Prometheus instances across multiple Alibaba Cloud accounts through custom authentication, enabling unified metric monitoring, Grafana visualization, and alert management from a single account.
Background
Enterprises often manage multiple Alibaba Cloud accounts, which increases operational complexity. Managed Service for Prometheus provides the global aggregation instance feature to centralize monitoring data from different accounts, enabling unified metric queries, alert management, and streamlined observability.
Limitations
-
Global aggregation instances do not support aggregating data across super regions. The super regions are China, Southeast Asia and Middle East, Japan and South Korea, Europe and Russia, and Americas.
-
The cross-account aggregation feature is not supported for V2 Prometheus instances.
Prerequisites
-
You have at least two Alibaba Cloud accounts, for example, Account A and Account B. Managed Service for Prometheus is activated in each account. For more information, see Billing of Managed Service for Prometheus.
-
Monitoring data from both Account A and Account B has been ingested into their respective Prometheus instances. For more information, see Integration overview.
Usage notes
This topic uses two Alibaba Cloud accounts, Account A and Account B, as an example to demonstrate how to consolidate monitoring data from Account B into Account A through a global aggregation instance. After setup, Account A can centrally query data and manage alerts for both accounts.
Step 1: Create a global aggregation instance
Managed Service for Prometheus supports cross-account aggregation through the following two methods:
Method 1: Resource directory
-
Set up a multi-account structure for your enterprise by using a resource directory. For more information about resource directory, see What is Resource Directory?.
-
Set a delegated administrator for the trusted service by using one of the following methods.
Console
-
Log on to the Resource Management console with your management account.
-
In the navigation pane on the left, choose .
-
On the Trusted Services page, find the trusted service and click Manage in the Actions column.
-
In the Delegated administrator accounts section, click Add. Select the Alibaba Cloud account that you will use to create the global aggregation instance and set it as the delegated administrator.
NoteIn this example, Account A is the delegated administrator account.
-
Click OK.
You can now access the multi-account management module of the trusted service and perform administrative operations across your organization.
API
-
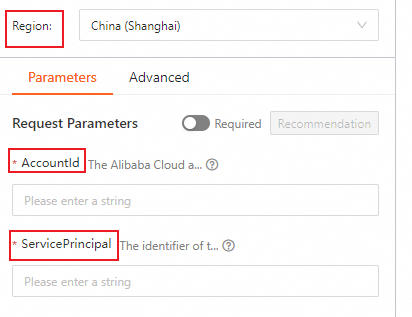
Use the management account of your resource directory or a RAM role with administrator permissions to call the RegisterDelegatedAdministrator API operation to assign the delegated administrator role to the member account where you will create the global aggregation instance. Configure the following parameters:
Parameter
Description
Endpoint
-
Chinese mainland: Select China (Shanghai).
-
Other regions: Select Singapore.
AccountId
Enter the ID of the member account for which you want to create the cross-account global aggregation instance.
ServicePrincipal
Enter prometheus.aliyuncs.com.
-
-
Click Initiate Call.
-
-
Aggregate data.
-
Use Alibaba Cloud account A to log on to the Prometheus console.
-
In the navigation pane on the left, choose to open the instance list for Managed Service for Prometheus.
-
Click Create Prometheus Instance. On the Create Instance page, configure the parameters as described in the following table, and then click Create Now.
Parameter
Description
Instance Type
Select Global Aggregation Instance.
Instance Name
Enter a name for the global aggregation instance.
Resource Group
Select a resource group for the instance.
Tag
Tags are case-sensitive key-value pairs. You can add up to 20 tags.
Endpoint
The endpoint determines the access point for requests and the region where alerts are configured. Select the region with the most instances. Selecting a different region may affect access speed and system stability.
Select the instances to be aggregated
Select Other Accounts (Resource Directory), select a Resource Directory Member Account, and add the target Prometheus instance.
Note-
After you select another account (resource directory), Managed Service for Prometheus will set the status of the trusted service in the resource directory to enabled.
-
You can select instance names from different regions to aggregate instances across regions. Before you select an instance, you must specify the access endpoint in the Endpoint section.
NoteYou can edit a global aggregation instance by clicking Edit in the Operation column. Do not change the endpoint after creation. Changing it invalidates alert rules configured for the original endpoint.
-
-
Method 2: Custom authentication
-
Use Account B to create a RAM role.
-
Log on to the RAM console by using Account B.
-
In the left-side navigation pane, choose .
-
On the Roles page, click Create Role.
-
On the Create Role page, set Principal Type to Cloud Account, specify the details of the Alibaba Cloud account, and then click OK.
-
On the Configure Role step, set Role Name to
AliyunPrometheusQueryRole. For Select Trusted Alibaba Cloud Account, select Other Alibaba Cloud Account and enter the ID of Account A. Then, click Finish. -
Click the name of the role you just created. On the role details page, click the Trust Policy tab. Click Edit Trust Policy and modify the policy to grant trust to Account A.
 Note
NoteThe trusted accounts are specified in an array, so you can grant trust to multiple accounts at the same time.
-
-
Grant the
AliyunRAMReadOnlyAccessandAliyunARMSReadOnlyAccesspermissions to theAliyunPrometheusQueryRolerole.-
In the left-side navigation pane, choose Identities > Role. Find the target role and click Create Authorization in the Operation column.
-
In the Create Authorization panel, in the Policy section, search for
AliyunRAMReadOnlyAccessandAliyunARMSReadOnlyAccess, select them, and then click OK.
-
-
(Optional) Create a RAM user for Account A.
Note-
If you are using the root account (Account A) for aggregation, you must create a RAM user within Account A first.
-
If your aggregating account is already a RAM user, you can skip this step and use the existing RAM user to aggregate data from Account B.
-
Log on to the RAM console by using Account A.
-
In the left-side navigation pane, choose Identities > Users. On the Users page, click Create User.
-
On the Create User page, configure the user's basic information.
-
Logon Name: Can contain letters, digits, periods (.), hyphens (-), and underscores (_). The name can be up to 64 characters in length.
-
Display name: Can contain up to 128 characters.
NoteClick Create User to create multiple RAM users at a time.
-
Access Method: For security, we recommend that you select only one access mode to separate human users from application users.
-
Console Access
If the RAM user represents a person, we recommend enabling console access. This allows the user to access Alibaba Cloud with a username and password. Configure the following parameters:
-
Console password: You can choose to automatically generate a password or set a custom password. A custom password must meet the configured password complexity rules. For more information, see Set a password policy for RAM users.
-
Password reset policy: Choose whether the RAM user must reset their password upon the next logon.
-
Multi-factor authentication (MFA): Choose whether to enable MFA for the RAM user. If you enable MFA, an MFA device must be bound. For more information, see Bind an MFA device for a RAM user.
-
-
Using permanent AccessKey to access
If the RAM user represents an application, you can use a permanent AccessKey pair to access Alibaba Cloud. When enabled, the system automatically generates an AccessKey ID and AccessKey secret. For more information, see Create an AccessKey pair.
Important-
The AccessKey secret is displayed only once upon creation and cannot be retrieved later. Make sure to save it securely.
-
An AccessKey pair is a long-term credential. If compromised, it poses a security risk to all resources under the account. We recommend using temporary credentials such as Security Token Service (STS) tokens to reduce the risk of credential leakage. For more information, see Best practices for using access credentials to call Alibaba Cloud APIs.
-
-
-
-
Click OK.
-
Complete the security verification as prompted.
-
-
Grant permissions to the RAM user of Account A.
-
Click the name of the target RAM user, and then click the Permission Management tab.
-
Click Create Authorization. In the panel that appears, on the Policy tab, search for and select the
AliyunSTSAssumeRoleAccessandAliyunARMSFullAccesspolicies. Then, click OK.
-
-
Aggregate Prometheus instance data.
-
Log on to the Managed Service for Prometheus console as the RAM user of Account A.
-
In the left-side navigation pane, click Instances.
-
Find the target global aggregation instance and click Edit in the Operation column. In the Step 3 section, for Select instances to aggregate, select Other Accounts (Custom Authentication).
-
In the search box next to Alibaba Cloud Account, search for Account B and click Confirm. The system filters and displays all Prometheus instances that belong to Account B. Select the instances you want to aggregate, and then click Edit Aggregation Instance.
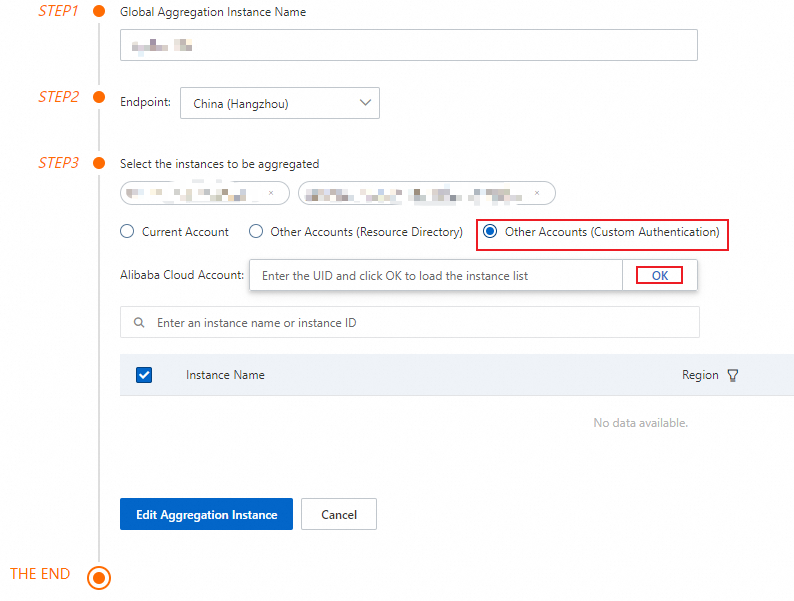 Note
NoteOnly an authorized RAM user can edit and save the configuration for cross-account monitoring with custom authentication. The main Alibaba Cloud account does not have this permission.
-
Step 2: Query data
After aggregating the Prometheus instances from Account B into the global aggregation instance under the RAM user of Account A, you can view performance metrics in the pre-built Grafana dashboards.
On the Instances page, click the name of your target Prometheus instance. In the left-side navigation pane, click Dashboards.
Step 3: Create an alert rule
-
On the Instances page, click the name of your target Prometheus instance. In the left-side navigation pane, click Alarm Rules.
-
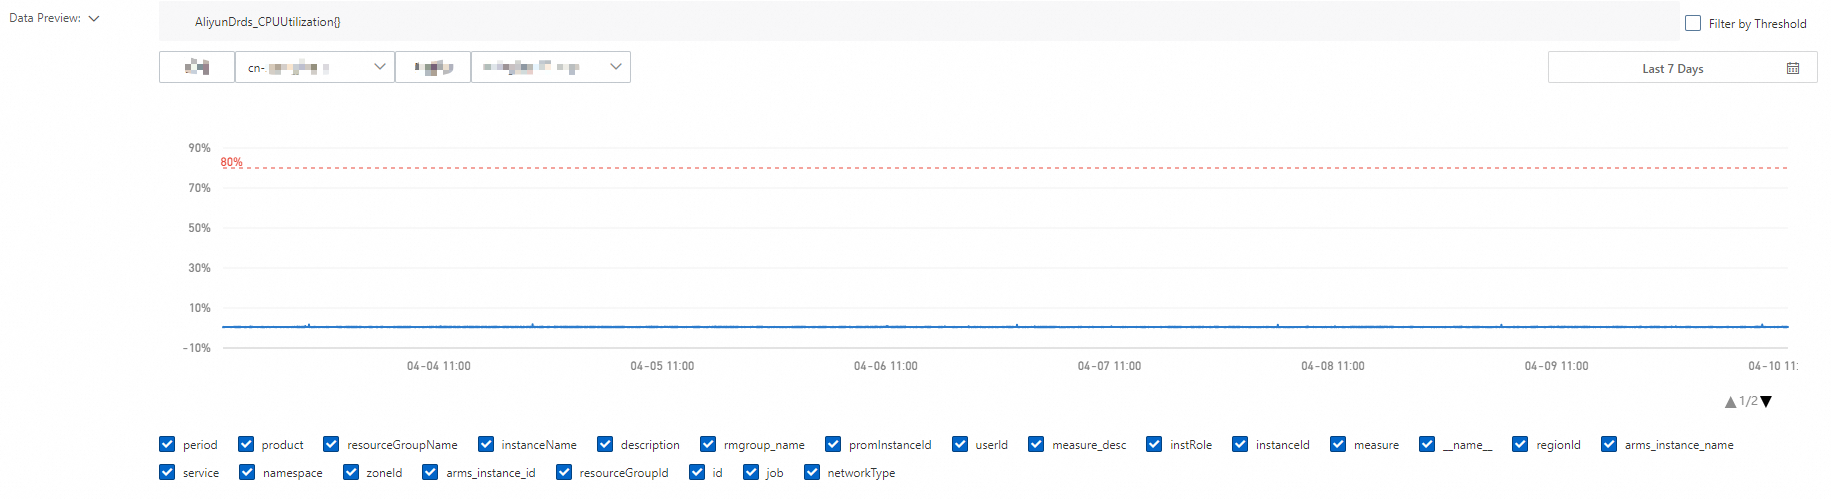
On the Prometheus Alert Rules page, click Create Prometheus Alert Rule and configure the alert rule as prompted. For more information, see Create a Prometheus alert rule.
NoteIn the Data Preview section of the Create Prometheus Alert Rule page, the global aggregation instance provides the unique_cluster_id (the unique ID of the instance) and unique_cluster_name (the name of the instance) labels. These labels help you quickly identify which instance triggered an alert.
Related operations
Edit a global aggregation instance
On the Instances page, find the global aggregation instance that you want to modify and click Edit in the Operation column. Do not change the endpoint after creation. Changing it invalidates alert rules configured for the original endpoint.
Uninstall a global aggregation instance
If you no longer need the global aggregation instance, you can uninstall it.
On the Instances page, find the Prometheus instance, and click Uninstall in the Actions column. In the message that appears, click OK. After the Prometheus instance is uninstalled, it is no longer displayed on the Instances page.
FAQ
Is there an additional charge for global aggregation instances?
Global aggregation instances are currently in public preview and are free of charge.
Does a global aggregation instance consolidate data from all aggregated instances into a single instance?
A global aggregation instance does not store a copy of the data from aggregated instances. Instead, it acts as a query proxy that forwards requests to the source instances in real time.