This guide walks you through the essential steps to get started with a PolarDB for MySQL edge cluster: creating a network, creating a cluster, creating a database account, and connecting to the database.
Supported edge regions
Currently, PolarDB for MySQL edge clusters are available only in Haikou Telecom, Türkiye (Istanbul)-1, Macao (China)-2, and Vietnam (Hanoi)-3.
1. Create an ENS network
Create a network in the region where you plan to deploy your cluster.
If you are new to ENS, you must first activate the service.
-
Navigate to the ENS console. In the left-side navigation pane, choose , and then click Create Network.
-
On the Create Network page, create the required network (VPC and vSwitch) in one of the supported edge regions.
2. Create an edge cluster
Navigate to the PolarDB edge cluster purchase page to create a PolarDB for MySQL edge cluster. Configure the following parameters and leave the other parameters at their default settings.
|
Parameter |
Description |
|
Billing Method |
Edge clusters support only the subscription billing method. Note
The subscription method is a prepaid model where you choose a fixed resource specification and pay in advance. Longer subscription periods offer greater discounts. This model is ideal for stable, long-term workloads. |
|
Edge Primary Data Center |
Select the edge node for your cluster. Note
Ensure that your PolarDB cluster and the ENS instance you want to connect to are in the same region. Otherwise, they cannot communicate over the private network. |
|
Compatibility |
Select the MySQL-compatible version for your cluster.
|
|
Database Edition |
Choose between Dedicated and General-purpose editions:
For a detailed comparison, see How to choose between General-purpose and Dedicated specifications. |
|
Network |
Select the ENS network that you created in Step 1. If you have already created an ENS instance and the VPC where the instance resides meets your requirements, you can select that VPC and vSwitch. |
|
Specification |
Select the specifications for your nodes. Different specifications offer varying levels of CPU, memory, maximum storage space, and IOPS. Choose the one that best fits your business needs. |
|
Nodes |
The default is two nodes: one read/write node and one read-only node. You can configure the number of nodes based on your workload. Note
|
|
Storage type |
PolarDB for edge clusters uses ENS Cloud Disk, a block storage product for ENS that offers low latency, high performance, durability, and high reliability. Two performance levels are available:
|
|
Storage capacity |
Set the initial storage capacity for your cluster. The default is 100 GB. |
3. Create a database account
Navigate to the PolarDB console for edge clusters and click the ID of your target cluster to open its details page. In the left-side navigation pane, choose . Click Create Account. In the dialog box, enter a database account name, select an account type, set and confirm a password, and then click OK.
You can create either a Privileged Account or a Standard Account. These account types have different permissions. Choose the one that fits your business needs. For more information, see Account privileges.
4. Get the cluster endpoint
Navigate to the PolarDB console for edge clusters and click the ID of your target cluster to open its details page. In the left-side navigation pane, click Database Connections. On the Database Connections page, find the Cluster Endpoint [Recommended] card and click Copy on the private network row to get the private endpoint for the cluster.
-
The private network endpoint is an IP address in your ENS VPC. The system uses a load balancer to route traffic across the compute nodes.
-
We recommend using the Cluster Endpoint. The default port is 3306.
5. Connect to the database
Choose a connection method that suits your needs:
Use a client to connect to the cluster
You can use any MySQL-compatible client to connect to a PolarDB cluster. The following example uses MySQL Workbench 8.0.29.
Download and install MySQL Workbench.
Open MySQL Workbench and choose .
Enter the connection information and click OK.
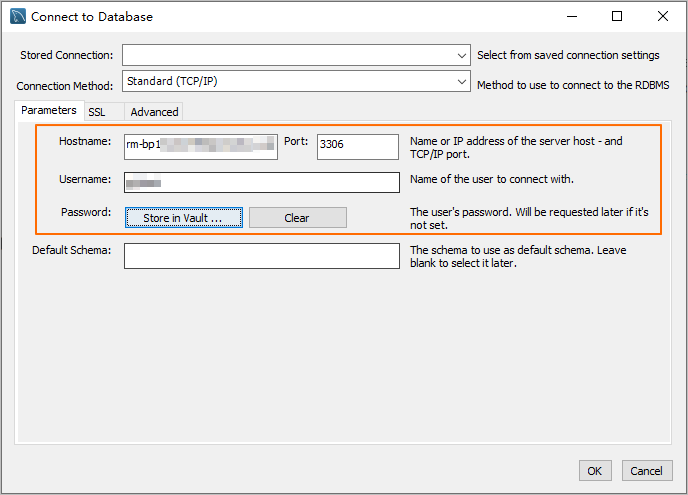
Parameter
Description
Example
Hostname
The database endpoint.
pc-2***.rwlb.rds.aliyuncs.com
Port
The port number of the database endpoint.
NoteThe default port is 3306.
3306
Username
The database account.
polardb_mysql_user
Password
The password of the database account.
Pass***233
Use the command line to connect to the cluster
If a MySQL client is installed on your server, run the following command to connect to the PolarDB for MySQL cluster.
Syntax:
mysql -h<endpoint> -P<port> -u<database_username> -p<database_user_password>Example:
mysql -h pc-2***.rwlb.rds.aliyuncs.com -P3306 -upolardb_mysql_user -pPass***233Parameter | Description | Example |
-h | The database endpoint. | pc-2***.rwlb.rds.aliyuncs.com |
-P | The port number of the database endpoint. Note
| 3306 |
-u | The database account. | polardb_mysql_user |
-p | The password of the database account. Note This parameter is required.
| Pass***233 |
Use an application to connect to the cluster
Connecting to a PolarDB for MySQL cluster is the same as connecting to any MySQL database. Replace the endpoint, port, account, and password with your PolarDB cluster values. Examples by language:
Java
Use the MySQL JDBC driver in a Maven project to connect to a PolarDB for MySQL cluster.
Add the MySQL JDBC driver dependency to your pom.xml file:
<dependency>
    <groupId>mysql</groupId>
    <artifactId>mysql-connector-java</artifactId>
    <version>8.0.27</version>
</dependency>
Connect to the cluster. Replace
<HOST>,<USER>,<PASSWORD>,<DATABASE>,<YOUR_TABLE_NAME>, and<YOUR_TABLE_COLUMN_NAME>with your actual values.import java.sql.Connection; import java.sql.DriverManager; import java.sql.ResultSet; import java.sql.Statement; public class DatabaseConnection { public DatabaseConnection() { } public static void main(String[] args) { // The endpoint, port, and name of the database to connect to. String url = "jdbc:mysql://<HOST>:3306/<DATABASE>?useSSL=false&serverTimezone=UTC"; // The database account. String user = "<USER>"; // The password of the database account. String password = "<PASSWORD>"; try { Class.forName("com.mysql.cj.jdbc.Driver"); Connection conn = DriverManager.getConnection(url, user, password); Statement stmt = conn.createStatement(); // The name of the data table to retrieve. ResultSet rs = stmt.executeQuery("SELECT * FROM `<YOUR_TABLE_NAME>`"); while(rs.next()) { // The name of the column in the data table to retrieve. System.out.println(rs.getString("<YOUR_TABLE_COLUMN_NAME>")); } rs.close(); stmt.close(); conn.close(); } catch (Exception var7) { var7.printStackTrace(); } } }
Python
Use the PyMySQL library with Python 3 to connect to a PolarDB for MySQL cluster.
Install the PyMySQL library:
pip3 install PyMySQLConnect to the cluster. Replace
<HOST>,<USER>,<PASSWORD>,<DATABASE>, and<YOUR_TABLE_NAME>with your actual values.import pymysql # Database connection parameters host = '<HOST>' # The endpoint of the PolarDB cluster port = 3306 # The default port is 3306 user = '<USER>' # The database account password = '<PASSWORD>' # The password of the database account database = '<DATABASE>' # The name of the database to connect to try: # Create a database connection connection = pymysql.connect( host=host, port=port, user=user, passwd=password, db=database ) # Get the cursor with connection.cursor() as cursor: # Execute an SQL query sql = "SELECT * FROM `<YOUR_TABLE_NAME>`" # The name of the data table to retrieve cursor.execute(sql) # Get the query results results = cursor.fetchall() for row in results: print(row) finally: # Close the database connection if 'connection' in locals() and connection.open: connection.close()
Go
Use the database/sql package and go-sql-driver/mysql driver (Go 1.23.0) to connect to a PolarDB for MySQL cluster.
Install the
go-sql-driver/mysqldriver:go get -u github.com/go-sql-driver/mysqlConnect to the cluster. Replace
<HOST>,<USER>,<PASSWORD>,<DATABASE>, and<YOUR_TABLE_NAME>with your actual values.package main import ( "database/sql" "fmt" "log" _ "github.com/go-sql-driver/mysql" ) func main() { // Database connection parameters dbHost := "<HOST>" // The endpoint of the PolarDB cluster dbPort := "3306" // The default port is 3306 dbUser := "<USER>" // The database account dbPass := "<PASSWORD>" // The password of the database account dbName := "<DATABASE>" // The name of the database to connect to // Build the Data Source Name (DSN) dsn := fmt.Sprintf("%s:%s@tcp(%s:%s)/%s?charset=utf8mb4&parseTime=True&loc=Local", dbUser, dbPass, dbHost, dbPort, dbName) // Open a database connection db, err := sql.Open("mysql", dsn) if err != nil { log.Fatalf("Failed to connect to database: %v", err) } defer db.Close() // Test the connection err = db.Ping() if err != nil { log.Fatalf("Failed to ping database: %v", err) } // Create a cursor var result string err = db.QueryRow("SELECT VERSION()").Scan(&result) if err != nil { log.Fatalf("Failed to execute query: %v", err) } // Print the database version fmt.Printf("Connected to database, version: %s\n", result) // Execute an SQL query rows, err := db.Query("SELECT * FROM `<YOUR_TABLE_NAME>`") // The name of the data table to retrieve if err != nil { log.Fatalf("Failed to execute query: %v", err) } defer rows.Close() }