PolarDB is a next-generation, cloud-native, and distributed relational database developed by Alibaba Cloud. It is fully compatible with MySQL and offers benefits such as ease of use, high performance, high reliability, and high availability. You can use Data Transmission Service (DTS) to migrate your self-managed MySQL database to PolarDB for MySQL.
Prerequisites
-
Your self-managed MySQL database runs version 5.1, 5.5, 5.6, 5.7, or 8.0.
-
Create a destination PolarDB for MySQL cluster. For more information, see Create a pay-as-you-go cluster and Create a subscription cluster.
-
If your MySQL database is on-premises, add the DTS server IP addresses to your database's IP address whitelist to allow remote connections. For more information, see Add the CIDR blocks of DTS servers to an IP address whitelist.
Usage notes
-
During a full data migration, DTS consumes read and write resources on the source and destination databases, increasing their load. If your databases have poor performance, low specifications, or high workloads (for example, if the source database has many slow SQL queries or tables without primary keys, or if deadlocks occur in the destination database), the increased load can strain your databases or even cause service interruptions. Perform the data migration during off-peak hours, such as when the CPU utilization of both databases is below 30%.
-
If a source table has no primary key or unique constraint, and none of its columns are unique, the migration may result in duplicate data in the destination database.
-
For columns of the FLOAT or DOUBLE data type, DTS reads the values by using
ROUND(COLUMN,PRECISION). If precision is not explicitly defined, DTS migrates FLOAT values with a precision of 38 digits and DOUBLE values with a precision of 308 digits. Verify that this precision meets your business requirements. -
If a migration task fails, DTS attempts to resume it automatically. Before you switch your business to the destination cluster, stop or release the migration task. This prevents the task from resuming automatically and overwriting data in the destination cluster.
Migration types
DTS supports schema migration, full data migration, and incremental data migration. For more information, see Key concepts.
By using all three migration types together, you can achieve a smooth, zero-downtime database migration.
Billing
|
Migration type |
Task configuration fee |
Internet traffic fee |
|
Schema migration and full data migration |
Free of charge. |
DTS charges an Internet traffic fee when the Access Method of the destination database is set to Public IP Address. Billing overview. |
|
Incremental data migration |
Charged. Billing overview. |
SQL operations for incremental migration
|
Operation type |
SQL statement |
|
DML |
INSERT, UPDATE, DELETE, and REPLACE |
|
DDL |
|
Database account privileges
|
Database |
Schema and full migration |
Incremental migration |
|
Self-managed MySQL database |
SELECT privileges |
REPLICATION CLIENT, REPLICATION SLAVE, SHOW VIEW, and SELECT privileges |
|
PolarDB cluster |
Read and write privileges |
Read and write privileges |
To create a database account and grant privileges:
-
For a self-managed MySQL database, see Create a database account for a self-managed MySQL database and configure binlog settings.
-
For a PolarDB cluster, see Create and manage database accounts.
Before you begin
Create a database account for a self-managed MySQL database and configure binlog settings
Procedure
-
Log on to the DTS console.
NoteIf you are automatically redirected to the Data Management (DMS) console, you can click the
 icon in the lower-right corner and then click
  to return to the classic DTS console.
 -
In the left-side navigation pane, click Data Migration.
-
At the top of the Migration Tasks page, select the region of the destination cluster.
-
In the upper-right corner of the page, click Create Data Migration Task.
-
Configure the connection settings for the source and destination databases.
Category
Configuration
Description
N/A
Task Name
DTS automatically generates a task name. We recommend that you specify a descriptive name for easy identification. The name does not have to be unique.
Source Instance
Instance Type
Select the instance type based on where your source database is deployed. This topic uses Self-managed Database with Public IP as an example.
NoteIf your self-managed database is of a different instance type, you may need to complete additional preparations. For more information, see Preparations for data migration.
Instance Region
When you select Self-managed Database with Public IP for the Region, you do not need to set the Instance Region.
NoteIf your self-managed MySQL database has an IP address whitelist configured for security, click Obtain DTS IP CIDR Block next to Region to get the DTS server IP addresses. Then, add these IP addresses to your database's IP address whitelist.
Database Type
Select MySQL.
Hostname or IP Address
Enter the endpoint of the self-managed MySQL database. In this example, enter the public endpoint.
Port
Enter the port number used to connect to the self-managed MySQL database. The default port is 3306.
Database Account
Enter the account for the self-managed MySQL database. For information about the required privileges, see Privileges required for database accounts.
Database Password
Enter the password for the database account.
NoteAfter you enter the Source Instance information, you can click Test Connectivity next to Database Password to verify the information. If the test is successful, a Test Passed message is displayed. If the test fails, a Test Failed message is displayed. Click Diagnostics next to Test Failed and adjust the Source Instance information as prompted.
Destination Instance
Instance Type
Select PolarDB.
Instance Region
Select the region where the destination PolarDB cluster is located.
PolarDB Instance ID
Select the ID of the destination PolarDB cluster.
Database Account
Enter the account for the destination PolarDB cluster. For information about the required privileges, see Privileges required for database accounts.
Database Password
Enter the password for the database account.
NoteAfter you enter the destination database information, you can click Database Password next to Test Connectivity to verify that the information is correct. If the information is correct, a Test Passed message is displayed. If a Test Failed message is displayed, click Diagnostics next to the Test Failed message and adjust the destination database information as prompted.
-
After you complete the configuration, click Set Whitelist and Next in the lower-right corner of the page.
NoteThis step automatically adds the IP addresses of the DTS servers to the IP address whitelist of the destination PolarDB for MySQL cluster. This ensures that the DTS servers can connect to the destination cluster.
-
Select the migration types and objects.
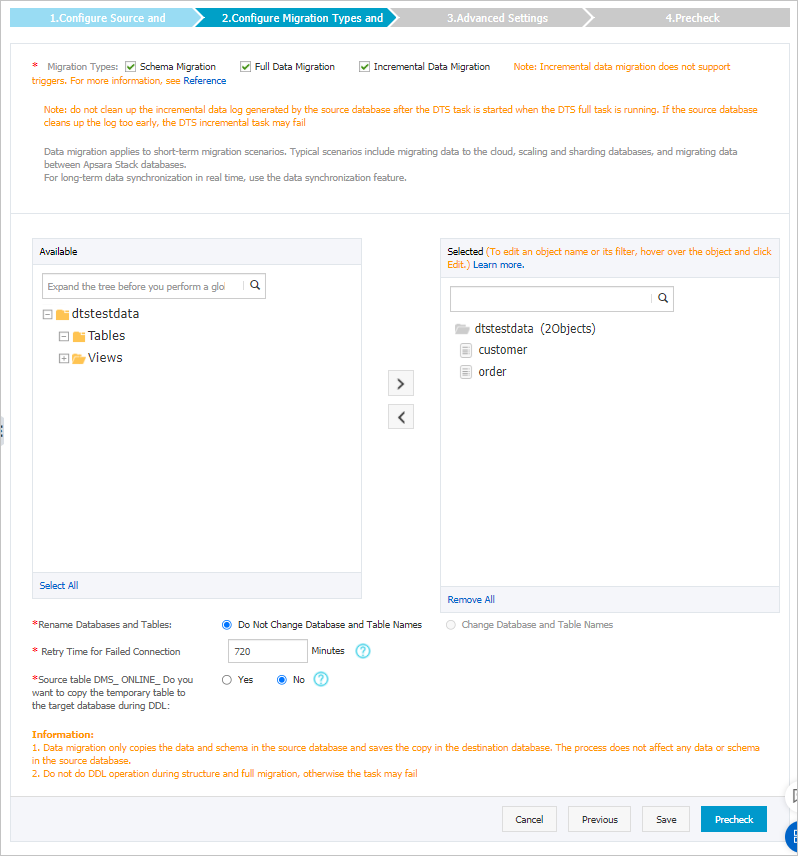
Setting
Description
Migration types
-
To perform only a full migration, select both Schema Migration and Full Data Migration.
-
To perform a zero-downtime migration, select Schema Migration, Full Data Migration, and Incremental Data Migration.
ImportantIf you do not select Incremental Data Migration, do not write new data to the source database during the full data migration to ensure data consistency.
Migration objects
In the Available box, click the objects that you want to migrate and click the
 icon to move them to the Selected Objects box.Important
-
You can select objects to migrate at the database, table, and column levels.
-
By default, object names are retained after migration. If you need to rename an object in the destination database, use the object name mapping feature. For more information, see Object name mapping.
-
If you rename an object by using the object name mapping feature, other objects that depend on it may fail to migrate.
Object name mapping
If you need to rename a migrated object in the destination instance, use the object name mapping feature. For more information, see Object name mapping.
Connection retry duration
If a connection to the source or destination database is interrupted, DTS retries to connect for a default of 720 minutes (12 hours). You can customize this duration. If DTS successfully reconnects within the specified time, the migration task resumes. Otherwise, the task fails.
NoteYou are charged for the DTS instance while it attempts to reconnect. To avoid unnecessary charges, set an appropriate retry duration or release the DTS instance promptly if the source and destination databases are released.
Replicate temporary tables created during online DDL operations in DMS
If you use Data Management (DMS) to perform online DDL operations on the source database, you can choose whether to migrate the temporary tables that are generated.
-
Yes: Migrates the data in the temporary tables that are generated by online DDL operations.
NoteIf a large amount of temporary table data is generated by online DDL operations, the migration task may experience high latency.
-
No: Does not migrate the data in the temporary tables. Only the original DDL data from the source database is migrated.
NoteThis option may cause table locks on the destination database.
-
After you complete the configuration, click Precheck and Start in the lower-right corner of the page.
Note-
Before the migration task starts, DTS runs a precheck. The task can start only after it passes the precheck.
-
If the precheck fails, click the
 icon next to the failed item to view details.
-
Fix the issues as prompted and run the precheck again.
-
If you do not need to fix the warning items, you can select Ignore and then click Ignore Warnings and Rerun Precheck to run the precheck again.
-
-
-
After the task passes the precheck, click Next.
-
In the Confirm Settings dialog box that appears, select a Instance Class and select the Data Transmission Service (pay-as-you-go) Service Terms checkbox.
-
Click Buy and Start to begin the migration.
-
Schema migration + Full data migration
Allow the task to complete automatically. Stopping it manually may result in incomplete data.
-
Schema migration + Full data migration + Incremental data migration
The migration task does not stop automatically. You must stop it manually.
ImportantChoose an appropriate time to stop the task manually, such as during off-peak hours or when you are ready to switch your business to the destination cluster.
-
Wait until the migration task enters the Incremental Data Migration phase and the status shows Undelayed. Then, stop writing data to the source database for several minutes. During this time, the status of Incremental Data Migration may show a latency.
-
Wait for the Incremental Data Migration status to show Undelayed again. Then, manually stop the migration task.

-
-
-
Switch your business to the PolarDB for MySQL cluster.