This topic describes how to use LangStudio in the PAI console to quickly build a smart chat application with web search capabilities. This tutorial guides you through the entire development process, from creating an application and building a workflow to evaluating performance, deploying it as an online service, and monitoring its operation.
Step 1: Create an application and a runtime
First, you need to create an application and prepare a runtime environment for development and debugging.
Log on to the PAI console. At the top of the page, select a destination region, such as China (Hangzhou).
In the navigation pane on the left, choose Model Application > Application Development (LangStudio) and enter the target workspace.
On the Applications tab, click Create Application and select Workflow from the drop-down list.
On the Create Application page, configure the following parameters:
Creation Method: Select Create by Type and choose Chat Type.
Name: Enter a name for the application. For example, WebSearchChatbot.
Select Runtime: The runtime is the computing environment required to execute and debug the workflow. This is a required step for debugging.
Existing runtime: Select one from the drop-down list.
No available runtime: Click New Runtime to create one with the default configurations. The runtime is used only for development and debugging and is separate from the final deployed service.
Working Path: This path is an OSS Bucket path that stores workflow configurations, logs, and temporary files generated during debugging. After you select a runtime, its working directory is automatically loaded.
Description (Optional): Enter a description of the application's purpose.
Click Confirm. The system automatically directs you to the workflow editing canvas.
Step 2: Build the workflow
When you enter the canvas, you will see a default workflow that consists of a Start Node, an LLM Node, and an End Node. To add web search capabilities to the application, you must add a search node.
A workflow is a series of connected nodes. Each node performs a specific task.
2.1 Add and connect nodes
Below the canvas, click the add node icon and select Serp Search.
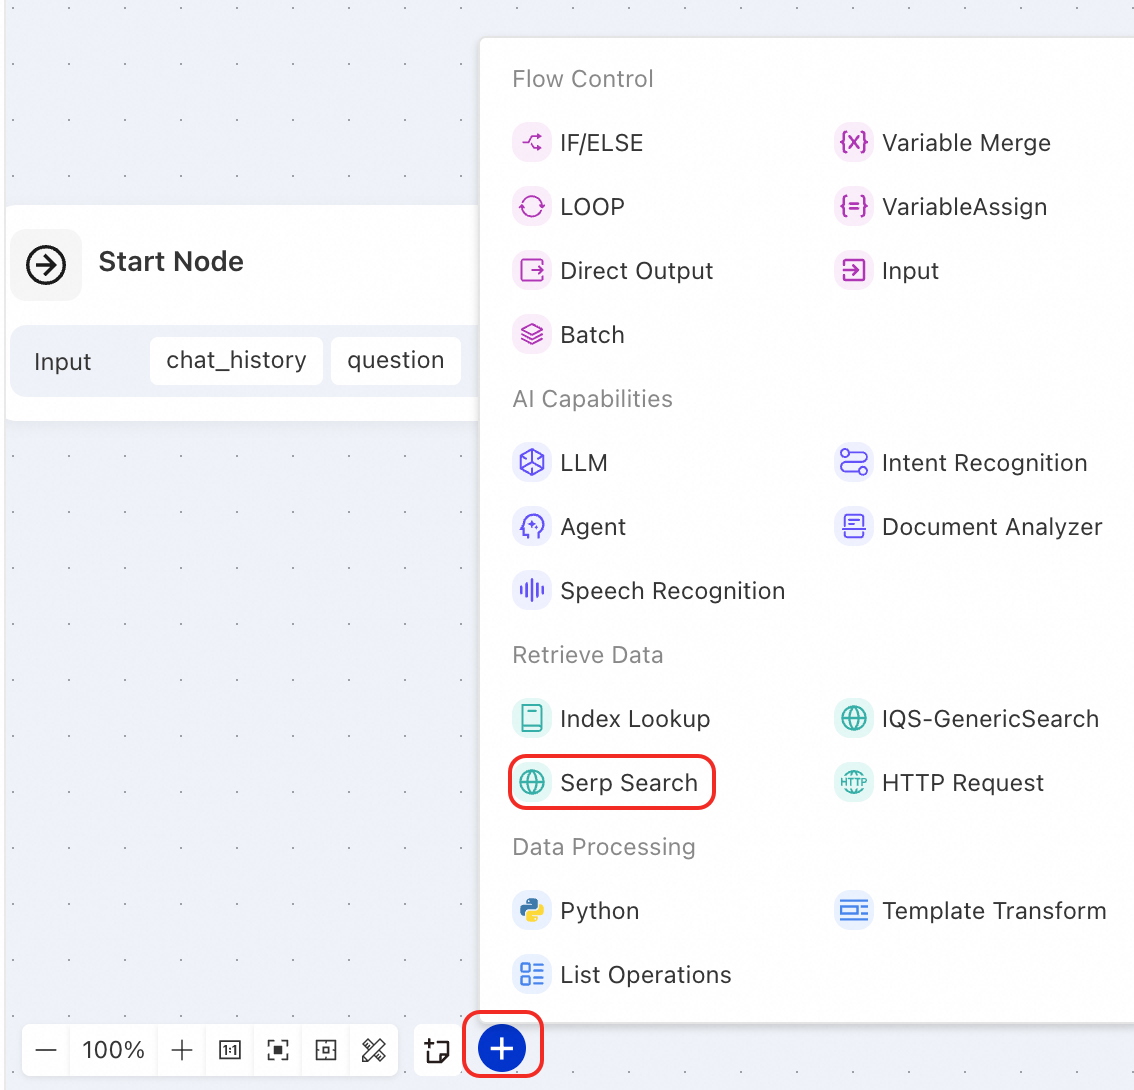
Delete the connection between the Start Node and the LLM Node.
Connect the nodes in the following order: Start Node -> Serp Search -> LLM Node.
2.2 Configure the nodes
Start Node: The entry point of the workflow. This node requires no special configuration and, by default, provides two input parameters: chat history (
chat_history) and the current question (question).Serp Search: Receives the user's question as a keyword, calls SerpAPI to perform a web search, and passes the search results to the next node.
SerpApi Connection: Select a pre-configured connection. If no connection is configured, select . Then, set Custom Key to
api_key, set Custom Value to the API key from SerpAPI, and select Private for secure storage.SerpAPI provides a free quota. If you do not have an account, you can register for one.

Search query: Select the
questionvariable from the start node.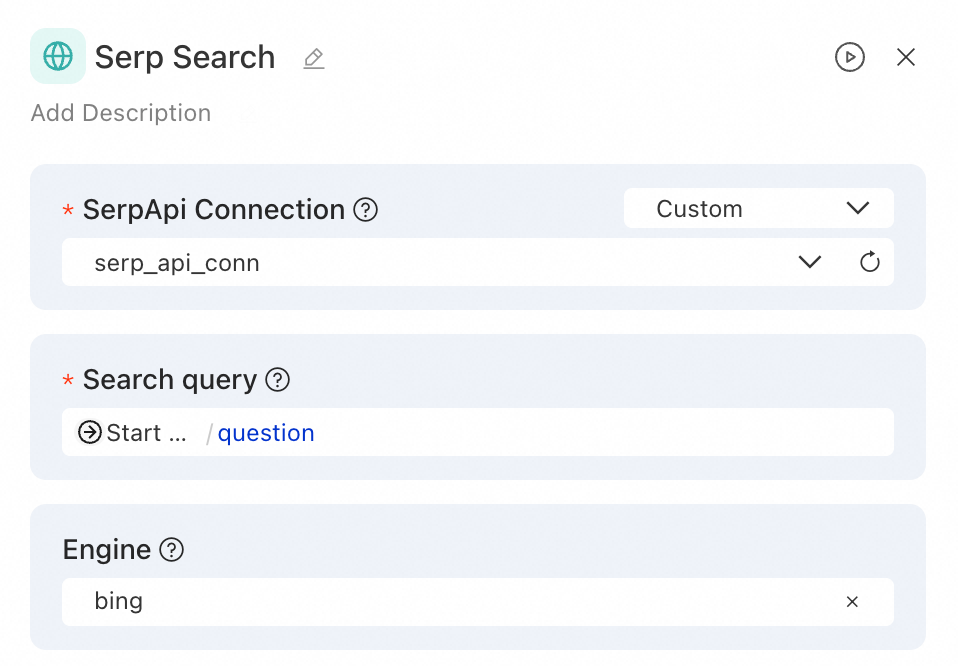
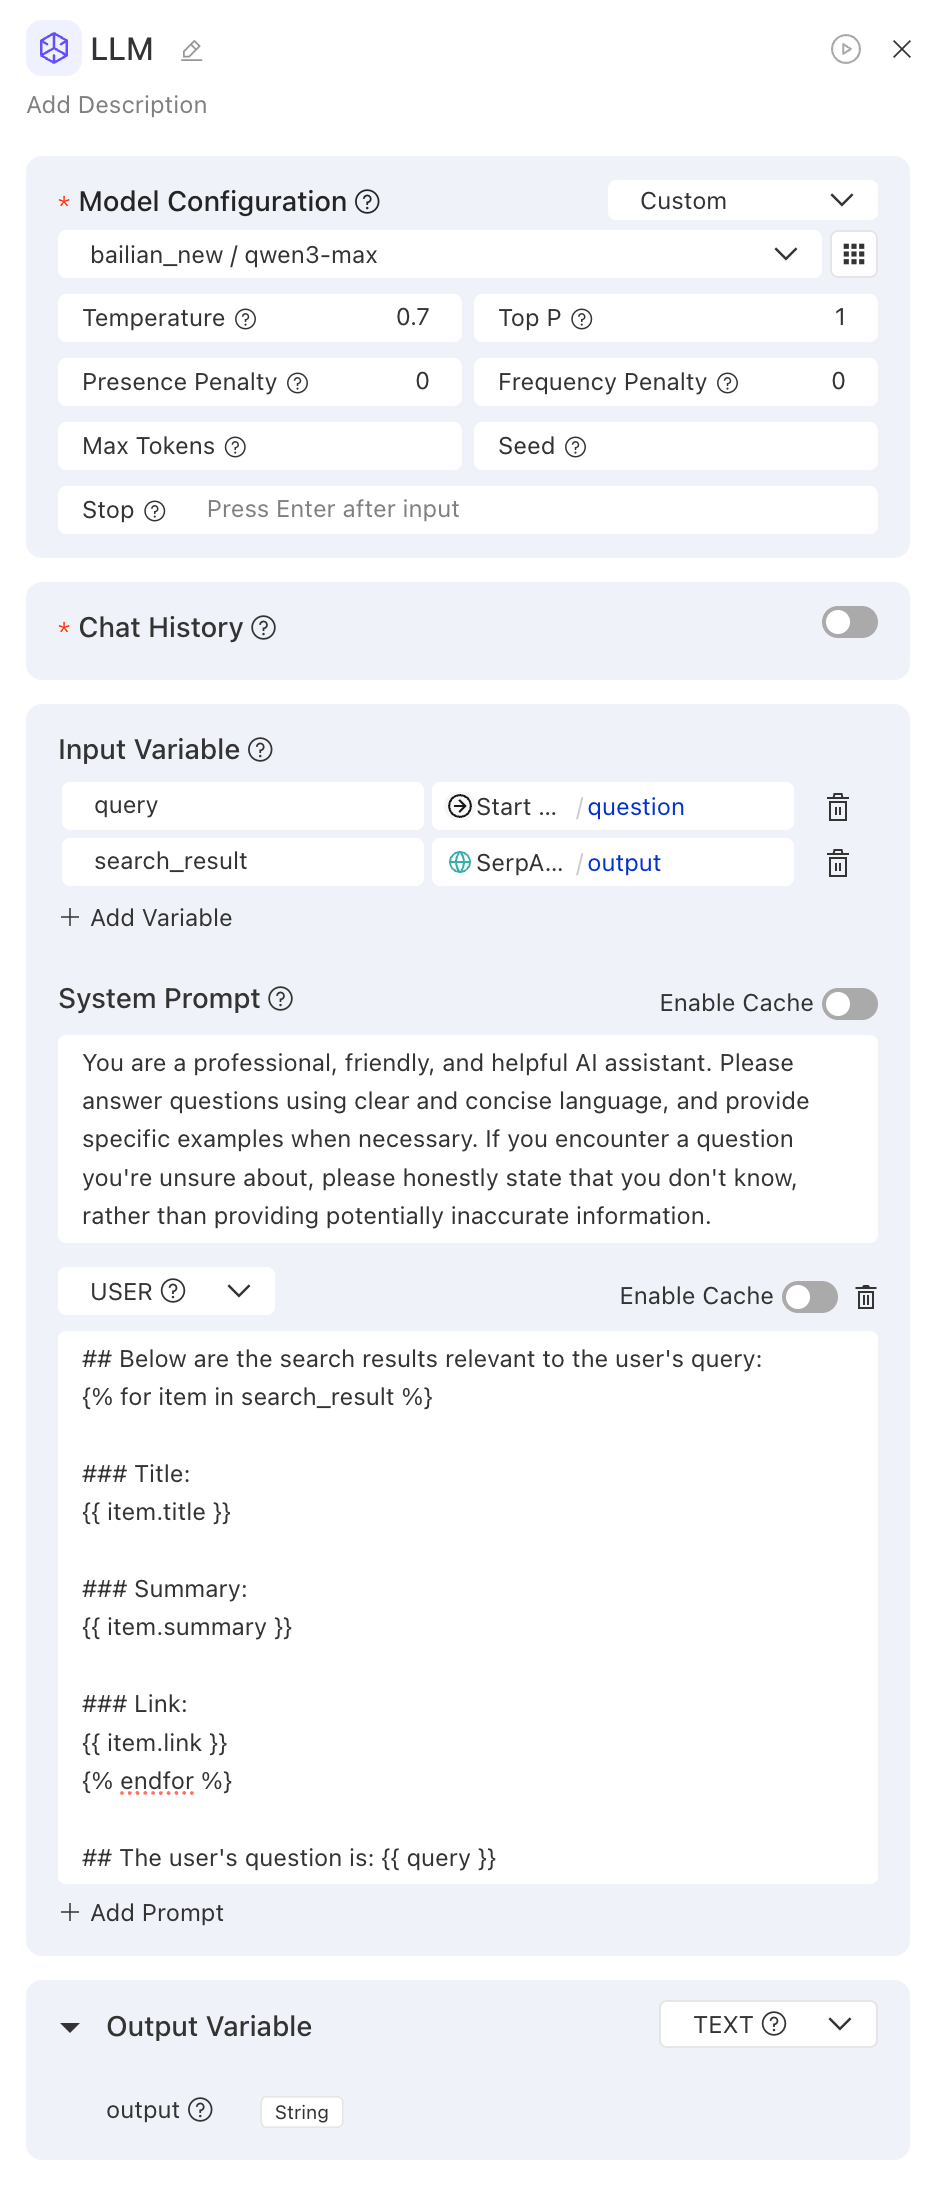
LLM: This node receives the original question and the search results. It uses a well-designed prompt to generate more accurate and timely answers.
Model Configuration: Select a model service, such as
qwen3-maxfrom Alibaba Cloud Model Studio.NoteA Connection securely stores and manages the credentials required to access external services, such as LLM APIs. If you have not configured a connection, you must create one. For more information, see Connection configuration.
Input Variable: Click Add Variable, and set the variable name to
search_resultand the variable value to the output variableoutputof the SerpAPI-Web Search node.System Prompt: Modify the
userprompt template to include the output from the search node.ImportantThe prompt template must use the input variables defined in the LLM node.
## The following are search results related to the user's question:
{% for item in search_result %}
### Title:
{{ item.title }}
### Content:
{{ item.summary }}
### Link:
{{ item.link }}
{% endfor %}

## The user's question is: {{ query }}
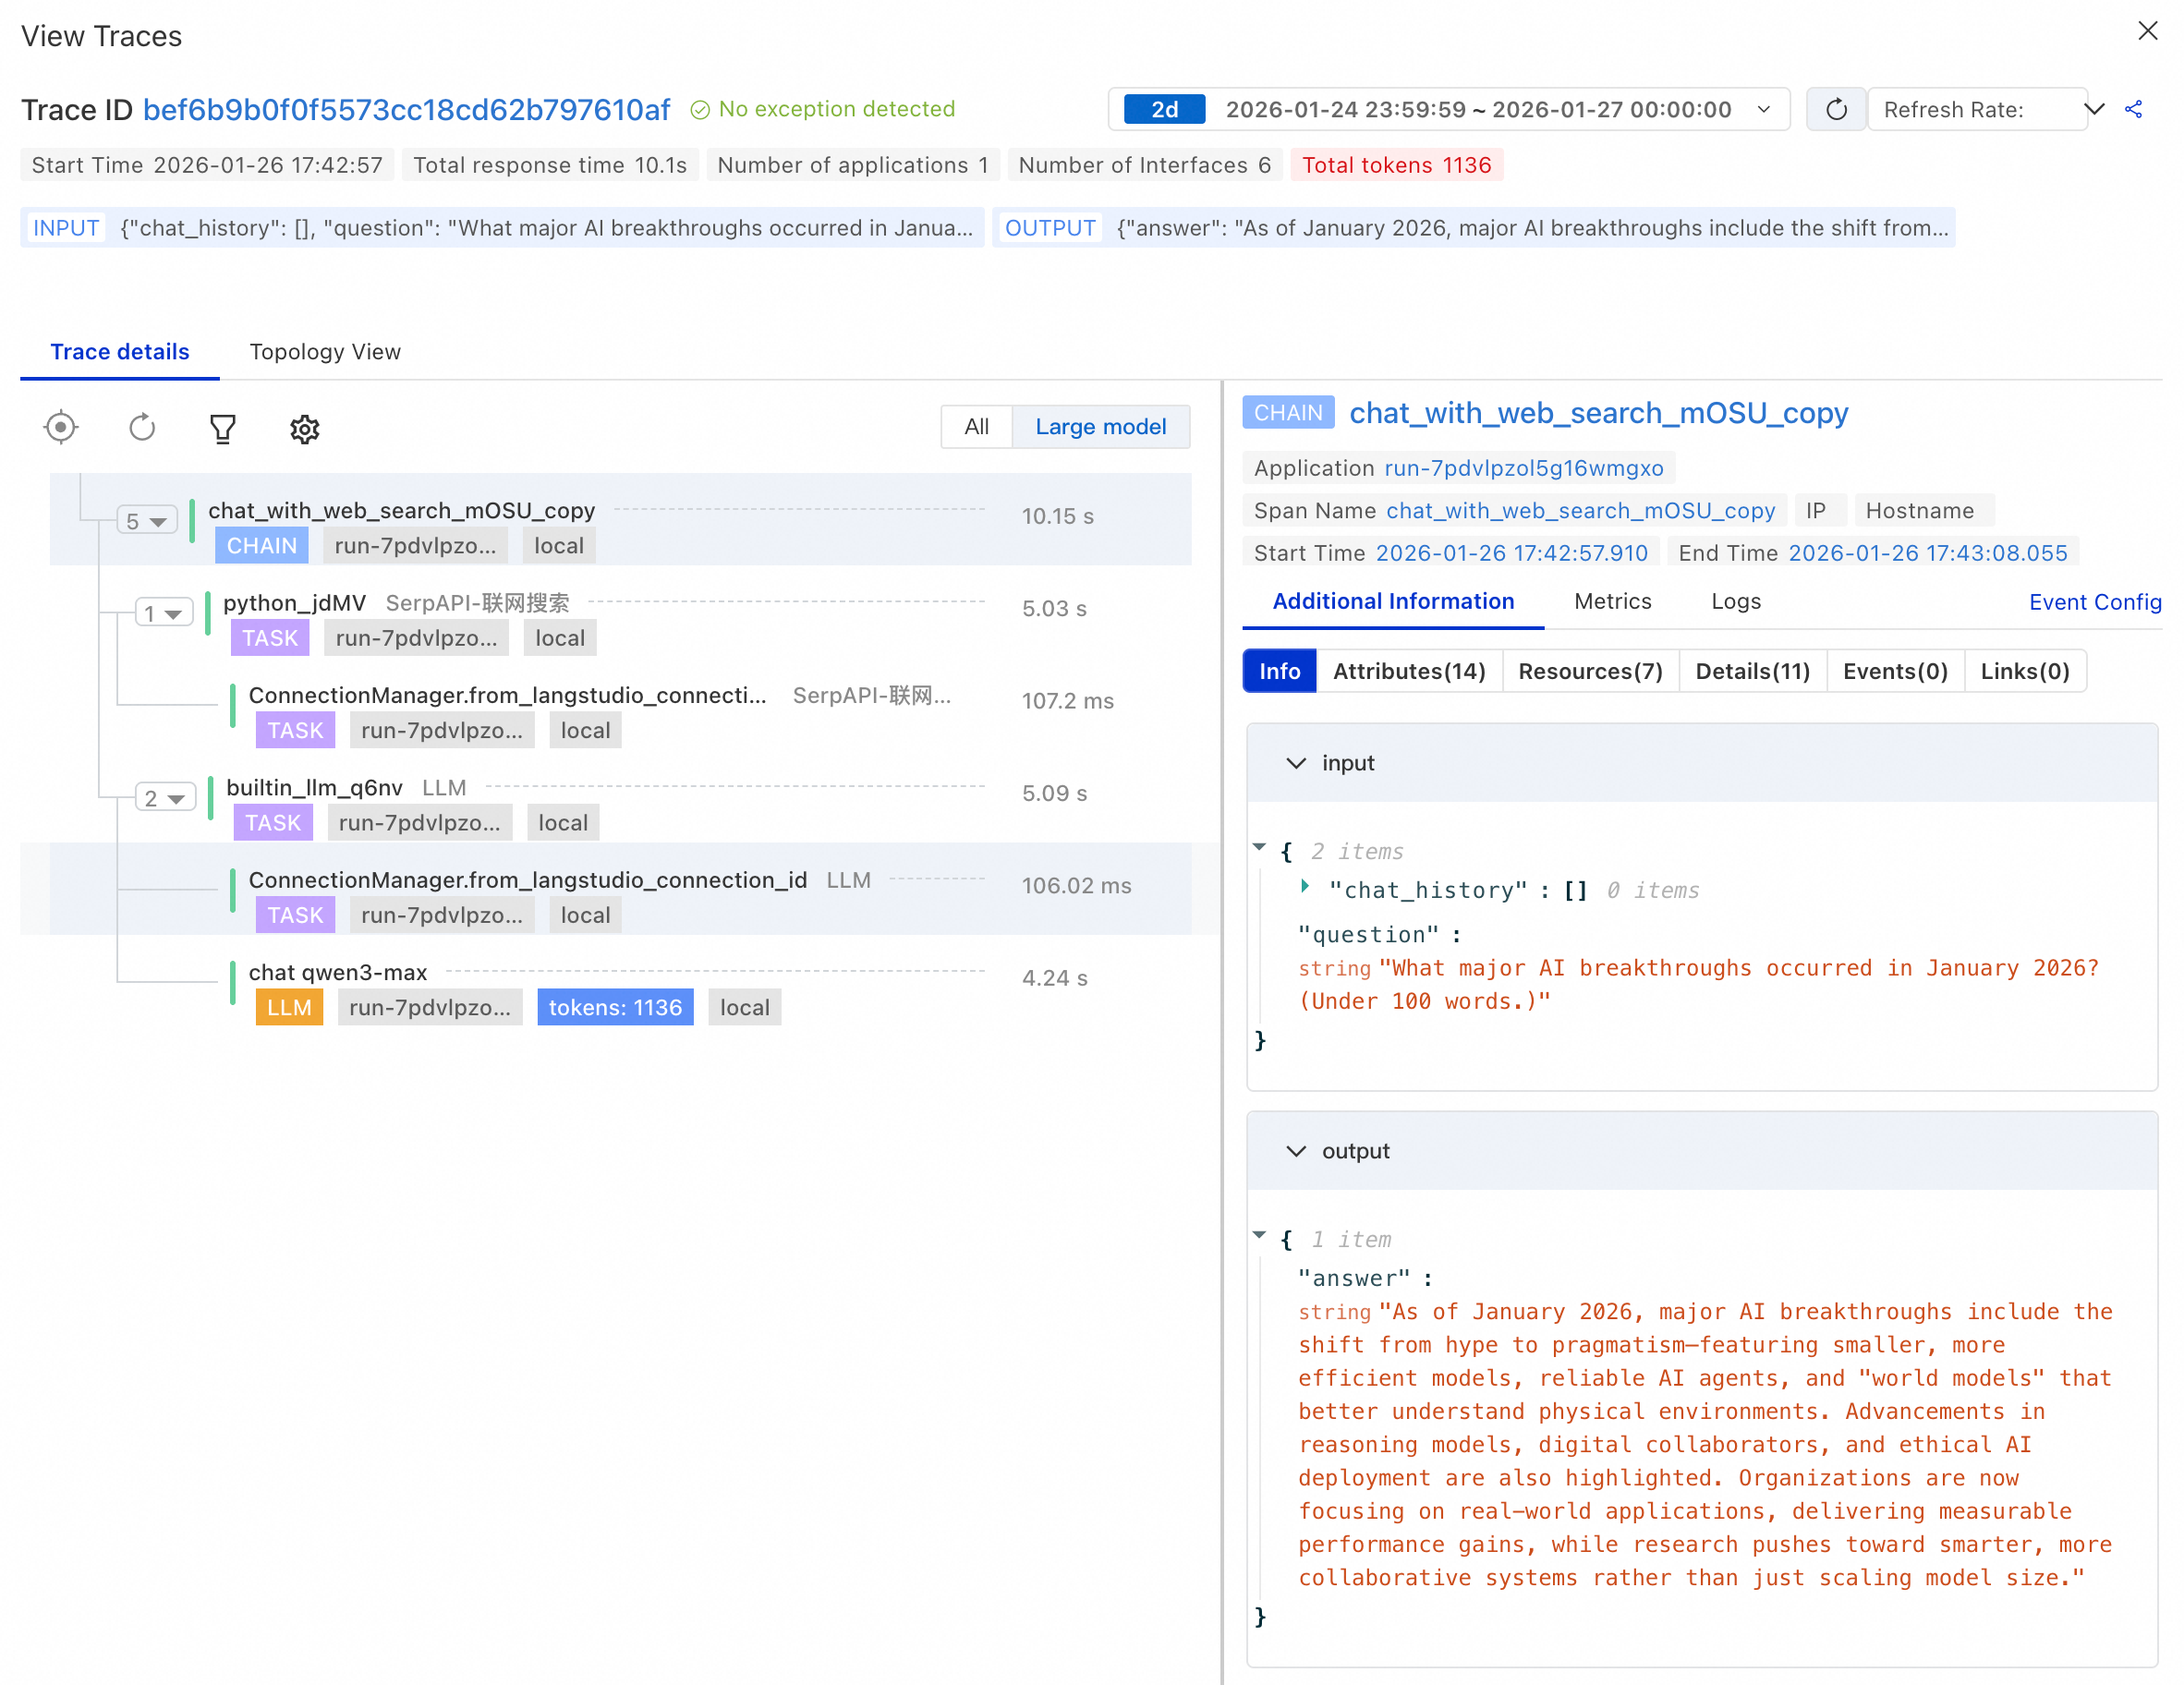
Step 3: Debug and view the trace
After you build the workflow, you can use the debugging feature to verify that it runs as expected. You can also use Tracing Analysis to examine the execution process.
In the upper-right corner of the application flow canvas, click Run to open the debugging panel.
In the debugging panel, enter a question and send it. For example: What were the major AI breakthroughs in January 2026? Answer in under 100 words.
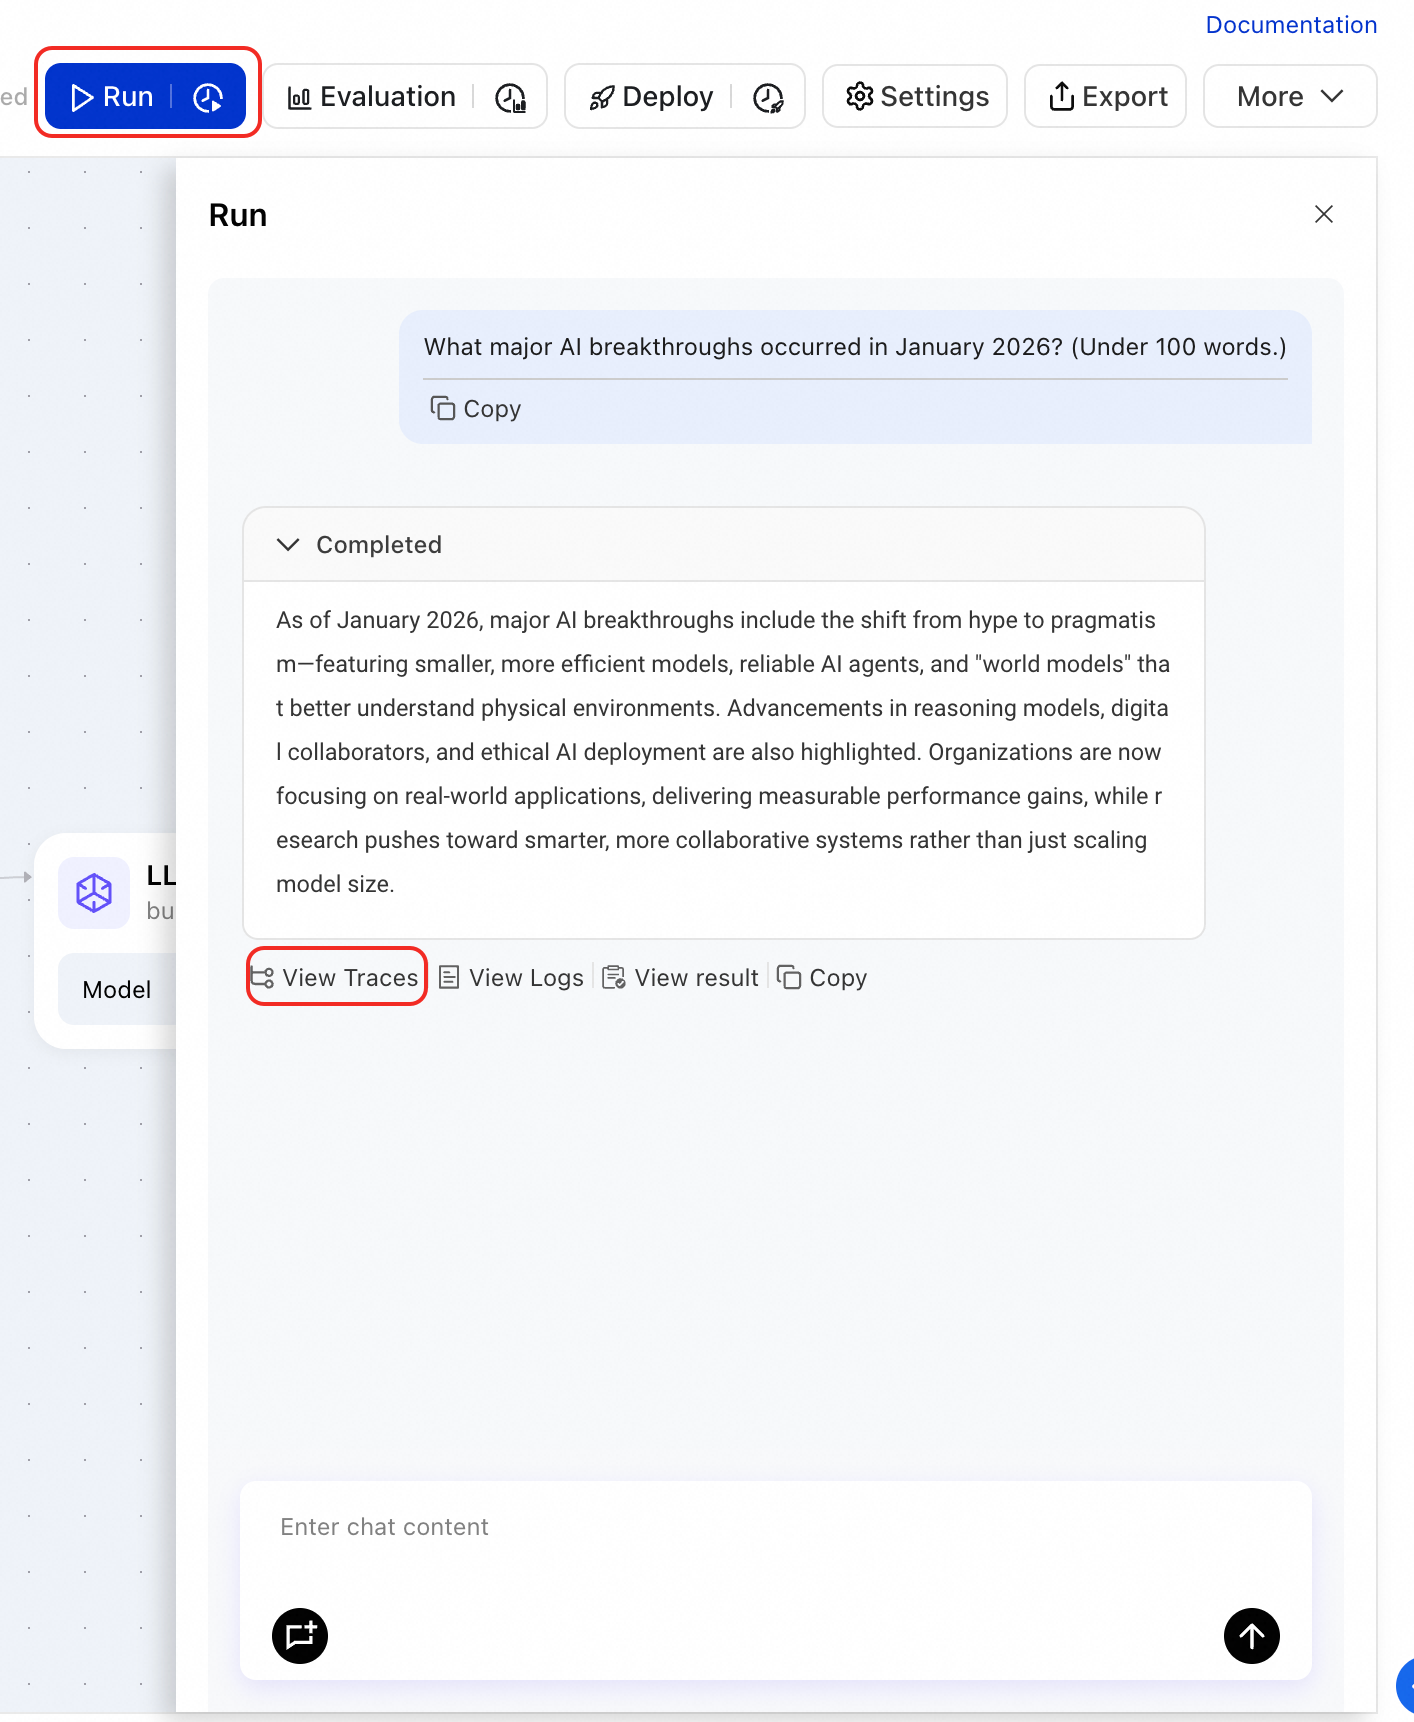
After the answer is generated, click View Traces below the answer to view the trace details or topology view. On the trace details page, you can analyze the complete execution process of the workflow:
Check node inputs and outputs: Expand each node to view its specific input and output content.
Debugging tip: Expand the details of the LLM node to see the rendered prompt. This is the complete request content sent to the LLM after variable substitution. Checking this content is the most effective way to troubleshoot prompt issues.
Analyze performance: View the execution duration of each node to identify performance bottlenecks.
Troubleshoot errors: Check for any errors or exceptions during the workflow execution.
Step 4: Evaluate performance
To objectively evaluate the application's performance, you can use the evaluation feature. This feature lets you quantify performance by running batch tests and calculating evaluation metrics.
Prepare an evaluation dataset. Prepare a dataset in
.jsonlformat and upload it to OSS. The file must contain one JSON object per line. Each object must include a typical question and its corresponding ground truth. Sample file: langstudio_eval_demo.jsonl.Create an evaluation task.
In the upper-right corner of the application flow canvas, click Evaluation.
On the Create Evaluation Task page, configure the following core parameters:
Evaluation Dataset: Select the OSS path where your uploaded
.jsonlfile is located.Workflow Input Mapping: Maps the workflow input (
question) to thequeryfield in the evaluation dataset.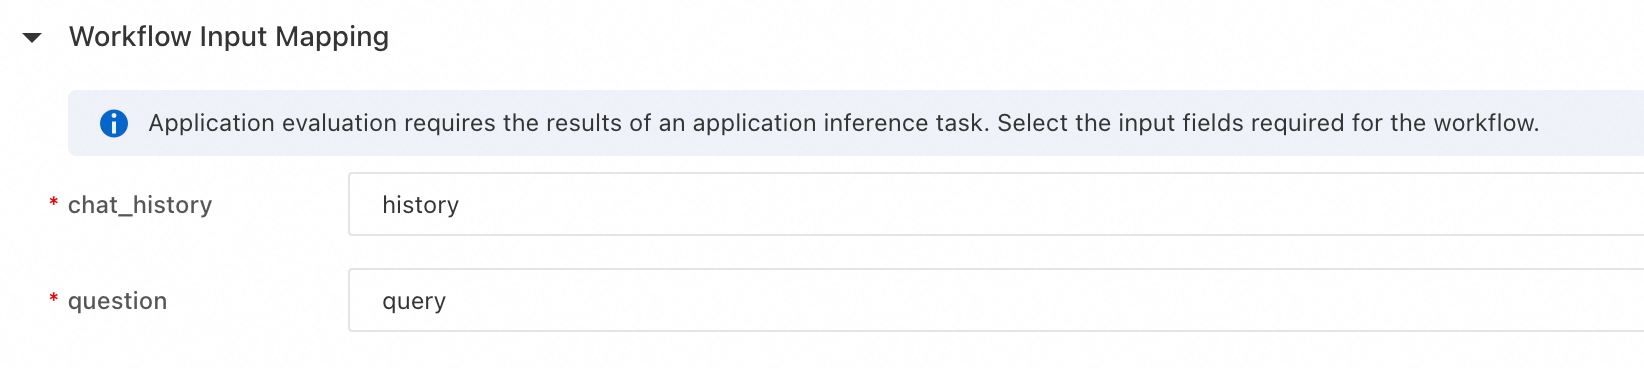
Evaluation Configuration: Select an evaluation metric, such as Answer Consistency.
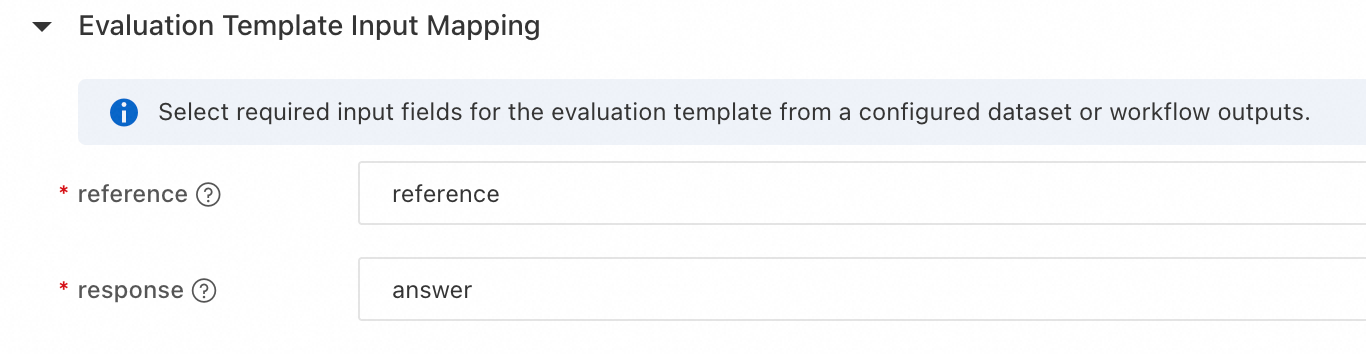
Evaluation Template Input Mapping:
reference: Select the ground truth field
referencefrom the evaluation dataset.response: Select the output field of the workflow.
Click Confirm to submit the evaluation task.
View evaluation results. After you submit the evaluation task, you are redirected to the task Overview page. Switch to the Metrics tab to view the scores for metrics such as Answer Consistency to quantitatively evaluate the application's performance.
Step 5: Deploy as an online service
After development and evaluation, you can deploy the workflow as a standard PAI-EAS online service for API integration.
Deploy the service
In the upper-right corner of the application flow canvas, click Deploy.
On the deployment page, configure parameters such as the service name, resource group, and network configuration (VPC, vSwitch), and then click Confirm.
ImportantThe Model Studio service and the web search service in the workflow require public network access. However, EAS services do not have public network access by default. Therefore, during deployment, you must configure a VPC and vSwitch that can access the public network for the service. This typically requires associating a NAT Gateway. Otherwise, the service call will fail. For more information, see Access public or internal resources from EAS.
On the deployment flow page that appears, click Submit deployment.
In the upper-right corner, click Go to EAS to go to the EAS service details page. Wait for the service status to become Running. This process may take 5 to 10 minutes.
Invoke the service
LangStudio application services can be invoked in basic mode or full mode. The following is an example of invoking the service in basic mode. For more information, see Deploy an application flow - Invoke the service.
Request body description: A JSON object whose key must match the input parameter defined in the application flow's Start node. In this example, the key is question.
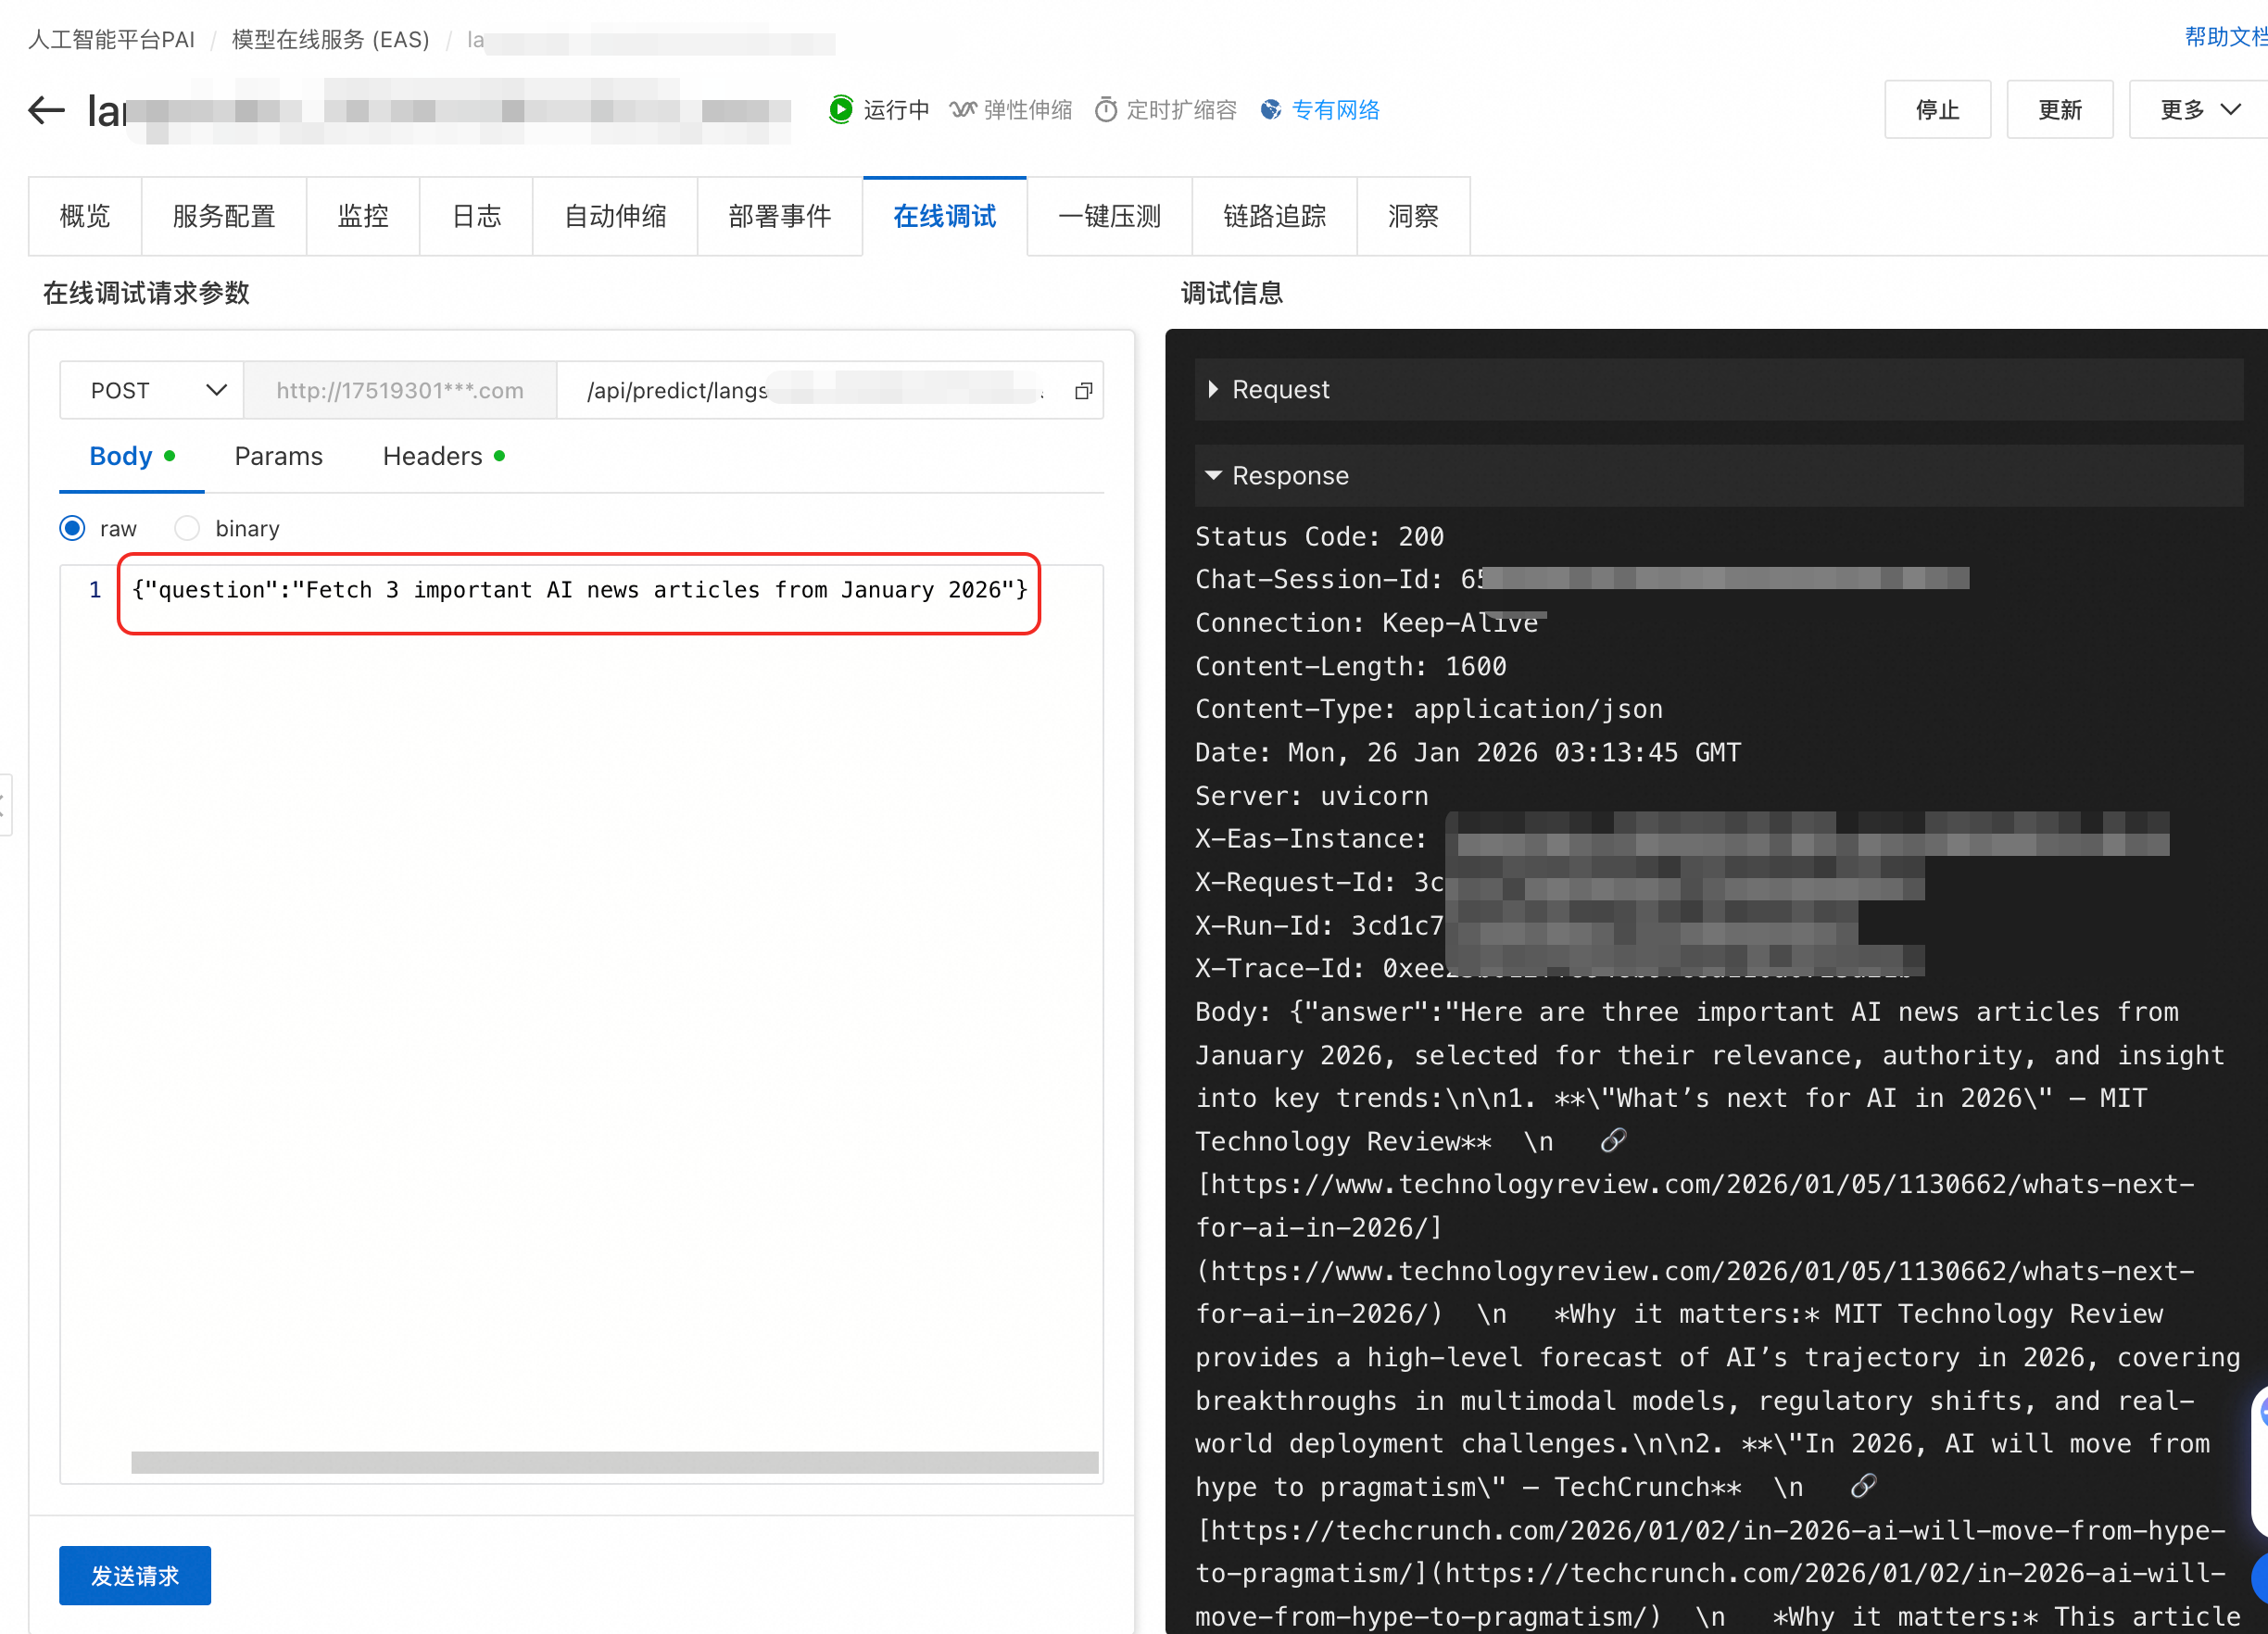
Online debugging
First, you can test the service call on the Online Debugging tab of the EAS service details page.
Invoke using curl
On the Overview tab of the EAS service details page, click View Endpoint Information in the Basic Information section to retrieve the endpoint and authentication token.
# Replace <EAS_ENDPOINT> and <EAS_TOKEN> with your service endpoint and authentication token
curl -X POST '<EAS_ENDPOINT>' \
-H 'Authorization: <EAS_TOKEN>' \
-H 'Content-Type: application/json' \
-d '{
  "question":"Get 3 important AI news items from January 2026"
}'
Step 6: Monitor and observe
After deploying the service:
On the Monitoring tab of the EAS service details page, you can view key metrics such as the number of requests, success rate, error rate, and P95/P99 response latency.
On the Logs tab in EAS, you can find error logs to locate problematic nodes.
On the Tracing Analysis tab in EAS, you can view the call trace to evaluate the application's performance.
Clean up resources
To avoid unnecessary charges, promptly clean up all created resources after you finish the experiment.
PAI-EAS online service: In the PAI-EAS console, stop and delete the deployed application service.
LangStudio runtime: On the Runtime tab in LangStudio, stop and delete the runtime instance.
When you delete an application, the files stored in its bucket are not automatically deleted. You must manage these files manually to avoid unnecessary storage fees.
Next steps
You can explore the following topics:
Add more nodes to the workflow, such as document parsing and conditional branches, to support more complex business logic. For more information, see Node types and configurations.
Learn about more advanced features of LangStudio, such as knowledge base management.