This topic describes the FAQ about TensorFlow.
Contents
How do I reference multiple Python files?
You can use Python files to organize your training scripts. First, store the data preprocessing logic in a Python file. Then, define the model in another Python file. At last, use one Python file to train the data throughout the entire training process. For example, you can define a function in the test1.py file. If the test2.py file needs to use the function provided in the test1.py file and the test2.py file serves as the program entry, you only need to add the test1.py and test2.py files to a tar.gz package and upload the package. The following figure shows the upload parameters. 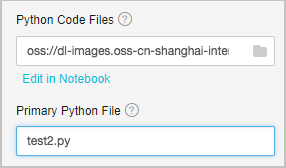
Python Code Files: the tar.gz package.
Primary Python File: the program entry file.
How do I upload data to OSS?
Before you upload data to OSS, you must create an OSS bucket to store the data of deep learning algorithms. We recommend that you create the OSS bucket in the same region as the GPU cluster that you use for deep learning. This way, you can transmit data in the classic network of Alibaba Cloud, where traffic generated by algorithms is free. After you create an OSS bucket, you can create folders, organize data directories, and upload data in the OSS console.
To upload data to OSS, you can call API operations or use SDKs. For more information, see Simple upload. In addition, OSS provides a large number of tools to facilitate data uploads and downloads. For more information, see OSS tools. We recommend that you use ossutil or osscmd to upload and download files.
When you use these tools to upload files, you must configure an AccessKey ID and an AccessKey secret. You can log on to the Alibaba Cloud Management console to create or view your AccessKey ID and AccessKey secret.
How do I read data from OSS?
Python code cannot be run to read data from OSS. All code that calls functions such as Python Open() and os.path.exist() to perform operations on files and folders cannot be executed. For example, code that invokes scipy.misc.imread() and numpy.load() cannot be executed.
You can read data in PAI by using the following methods:
Use functions of the tf.gfile module to read images or text. The following sample functions are supported:
tf.gfile.Copy(oldpath, newpath, overwrite=False) # Copies a file.
tf.gfile.DeleteRecursively(dirname) # Recursively deletes all files in a directory.
tf.gfile.Exists(filename) # Checks whether a file exists.
tf.gfile.FastGFile(name, mode='r') # Reads a file in non-blocking mode.
tf.gfile.GFile(name, mode='r') # Reads a file.
tf.gfile.Glob(filename) # Queries all files in a directory. You can filter these files by pattern.
tf.gfile.IsDirectory(dirname) # Checks whether an item is a directory.
tf.gfile.ListDirectory(dirname) # Queries all files in a directory.
tf.gfile.MakeDirs(dirname) # Creates a folder in a directory. If no parent directories exist, a parent directory is automatically created. If the folder you want to create already exists and is writable, a success response is returned.
tf.gfile.MkDir(dirname) # Creates a folder in a directory.
tf.gfile.Remove(filename) # Deletes a file.
tf.gfile.Rename(oldname, newname, overwrite=False) # Renames a file.
tf.gfile.Stat(dirname) # Queries statistical data about a directory.
tf.gfile.Walk(top, inOrder=True) # Queries the file tree of a directory.
Use
tf.gfile.Glob,tf.gfile.FastGFile,tf.WholeFileReader(), andtf.train.shuffle_batch()functions to batch read files. Before you batch read files, you must obtain the list of the files and create a batch.
When you create a deep learning experiment on the Machine Learning Studio page, you must specify the parameters such as the code file that you want to read and its directory on the right side of the page. Functions of the tf.flags module can pass in parameters in the -XXX form, where XXX represents a string.
import tensorflow as tf
FLAGS = tf.flags.FLAGS
tf.flags.DEFINE_string('buckets', 'oss://{OSS Bucket}/', 'Folder of the training image file')
tf.flags.DEFINE_string('batch_size', '15', 'Size of the batch')
files = tf.gfile.Glob(os.path.join(FLAGS.buckets,'*.jpg')) # Queries the paths of all JPG files in buckets.
We recommend that you use the following methods to batch read files based on the number of files:
Use the
tf.gfile.FastGfile()function to batch read a small number of files.for path in files: file_content = tf.gfile.FastGFile(path, 'rb').read() # Remember to specify rb when you call this function. Otherwise, errors may occur. image = tf.image.decode_jpeg(file_content, channels=3) # In this example, JPG images are used.Use the
tf.WholeFileReader()function to batch read a large number of files.reader = tf.WholeFileReader() # Instantiates a reader. fileQueue = tf.train.string_input_producer(files) # Creates a queue for the reader to read. file_name, file_content = reader.read(fileQueue) # Uses the reader to read a file from the queue. image_content = tf.image.decode_jpeg(file_content, channels=3) # Decodes the file content into images. label = XXX # In this example, label processing operations are omitted. batch = tf.train.shuffle_batch([label, image_content], batch_size=FLAGS.batch_size, num_threads=4, capacity=1000 + 3 * FLAGS.batch_size, min_after_dequeue=1000) sess = tf.Session() # Creates a session. tf.train.start_queue_runners(sess=sess) # Starts the queue. If this command is not executed, the thread keeps blocked. labels, images = sess.run(batch) # Obtains the result.The following description explains the code:
tf.train.string_input_producer: converts files to a queue. You must use thetf.train.start_queue_runnerssyntax to start the queue.tf.train.shuffle_batchincludes the following parameters:batch_size: the amount of data to return each time after you run a batch task.
num_threads: the number of threads to run. The value is usually set to 4.
capacity: the number of pieces of data from which you want to randomly extract data. For example, assume that a dataset has 10,000 pieces of data. If you want to randomly extract data from 5,000 pieces of data to train, set capacity to 5000.
min_after_dequeue: the minimum length of the queue to maintain. The value must be less than or equal to the value of capacity.
How do I write data to OSS?
You can write data to OSS by using one of the following methods: (The generated file is stored in the /model/example.txt directory.)
Use the
tf.gfile.FastGFile()function to write a file. The following code shows a sample function:tf.gfile.FastGFile(FLAGS.checkpointDir + 'example.txt', 'wb').write('hello world')Use the
tf.gfile.Copy()function to copy a file. The following code shows a sample function:tf.gfile.Copy('./example.txt', FLAGS.checkpointDir + 'example.txt')
Why does an OOM error occur?
The out-of-memory (OOM) error occurs because your memory usage reaches the maximum of 30 GB. We recommend that you use gfile functions to read data from OSS. For more information, see the "How do I read data from OSS" section of this topic.
What use cases of TensorFlow are available?
Use TensorFlow to classify images. For more information, see Use PAI-TensorFlow to build an image classification model and CIFAR-10 dataset.
Use TensorFlow to write songs. For more information, see Lyric writing.
What is the role of model_average_iter_interval when two GPUs are configured?
If the model_average_iter_interval parameter is not set, the parallel Stochastic Gradient Descent (SGD) algorithm is used in the GPUs, and the gradient is updated in each iteration. If the model_average_iter_interval parameter is greater than 1, the model averaging method is used to calculate two average model parameters after the data is trained multiple times at the specified iteration interval. The model_average_iter_interval parameter specifies the number of training times.
Export TensorFlow models in the SavedModel format?
SavedModel format
Before you use the built-in official processor in Elastic Algorithm Service (EAS) of Machine Learning Platform for AI (PAI) to deploy a TensorFlow model service online, you must export the model in the SavedModel format. The SavedModel format is defined and recommended by TensorFlow. The SavedModel format uses the following directory structure:
assets/
variables/
    variables.data-00000-of-00001
    variables.index
saved_model.pb|saved_model.pbtxt
The directory structure includes the following directories:
The
assetsdirectory is optional. It stores supporting files for the prediction service.The
variablesdirectory stores the variables saved by calling the tf.train.Saver method.The
saved_model.pborsaved_model.pbtxtdirectory stores MetaGraphDef and SignatureDef. MetaGraphDef stores the model training logic and SignatureDef specifies the input and output of the model service.
Export models in the SavedModel format
For more information about how to use TensorFlow to export models in the SavedModel format, visit Saving and Restoring. If the model is simple, you can use the following method to export it in the SavedModel format:
tf.saved_model.simple_save(
  session,
  "./savedmodel/",
  inputs={"image": x},   ## x specifies the input variables of the model.
  outputs={"scores": y}  ## y specifies the output variables of the model.
)
When you call the online prediction service, you must set the signature_name parameter for the model in the request. If the model is exported by calling the simple_save() method, the default value of the signature_name parameter is serving_default.
If the model is complex, you can manually export it in the SavedModel format, as shown in the following sample code:
print('Exporting trained model to', export_path)
builder = tf.saved_model.builder.SavedModelBuilder(export_path)
tensor_info_x = tf.saved_model.utils.build_tensor_info(x)
tensor_info_y = tf.saved_model.utils.build_tensor_info(y)

prediction_signature = (
    tf.saved_model.signature_def_utils.build_signature_def(
        inputs={'images': tensor_info_x},
        outputs={'scores': tensor_info_y},
        method_name=tf.saved_model.signature_constants.PREDICT_METHOD_NAME)
)

legacy_init_op = tf.group(tf.tables_initializer(), name='legacy_init_op')

builder.add_meta_graph_and_variables(
    sess, [tf.saved_model.tag_constants.SERVING],
    signature_def_map={
        'predict_images': prediction_signature,
    },
    legacy_init_op=legacy_init_op
)

builder.save()
print('Done exporting!')
Take note of the following parameter descriptions:
The
export_pathparameter specifies the path to which the model is exported.The
prediction_signatureparameter indicates the SignatureDef that specifies the input and output of the model. For more information, visit SignatureDef. In this example, the signature_name parameter is set to predict_images.The
builder.add_meta_graph_and_variablesmethod specifies the parameters for exporting the model.
When you export the model required for prediction, you must specify tf.saved_model.tag_constants.SERVING as the tag of the exported model.
For more information about TensorFlow models, visit TensorFlow SavedModel.
Convert a Keras model to the SavedModel format
You can call the model.save() method of Keras to convert a Keras model to the H5 format. However, a Keras model must be converted to the SavedModel format for online prediction. To implement the format conversion, you can call the load_model() method to load the H5 model, and then export it in the SavedModel format, as shown in the following sample code:
import tensorflow as tf
with tf.device("/cpu:0"):
    model = tf.keras.models.load_model('./mnist.h5')
    tf.saved_model.simple_save(
      tf.keras.backend.get_session(),
      "./h5_savedmodel/",
      inputs={"image": model.input},
      outputs={"scores": model.output}
    )
Convert a Checkpoint model to the SavedModel format
When you call the tf.train.Saver() method during model training, a model is saved in the Checkpoint format. You must convert it to the SavedModel format for online prediction. You can call the saver.restore() method to load the Checkpoint model as tf.Session, and then export the model in the SavedModel format, as shown in the following sample code:
import tensorflow as tf
# variable define ...
saver = tf.train.Saver()
with tf.Session() as sess:
  # Initialize v1 since the saver will not.
    saver.restore(sess, "./lr_model/model.ckpt")
    tensor_info_x = tf.saved_model.utils.build_tensor_info(x)
    tensor_info_y = tf.saved_model.utils.build_tensor_info(y)
    tf.saved_model.simple_save(
      sess,
      "./savedmodel/",
      inputs={"image": tensor_info_x},
      outputs={"scores": tensor_info_y}
    )