Object Storage Service (OSS) SDKs allow you to integrate OSS with your application for efficient storage management. This guide uses the OSS SDK for Java to walk you through a complete workflow: creating a bucket, uploading, downloading, and listing a file, and finally deleting the file and the bucket.
Prerequisites
An Alibaba Cloud Account is created.
OSS is activated.
Configure environment variables
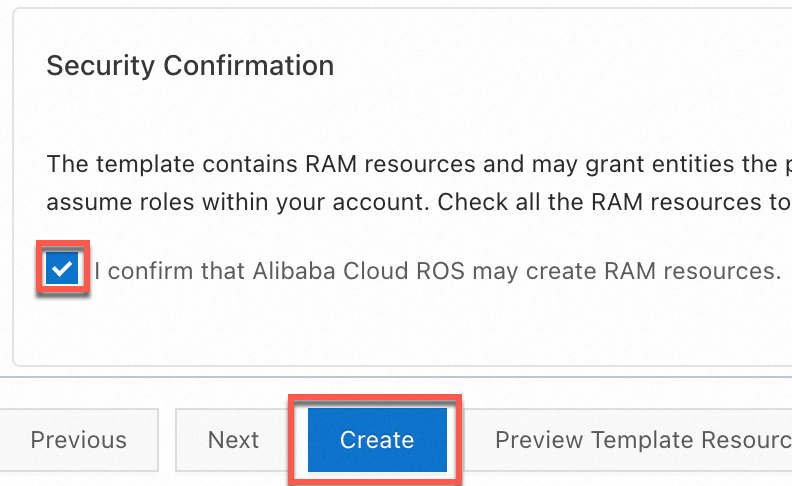
You can quickly create an AccessKey pair for a RAM user that has full OSS access permissions by using a Resource Orchestration Service (ROS) script. To do so, go to the wizard for template-based stack creation, select I confirm that Alibaba Cloud ROS may create RAM resources in the Security Confirmation section, and click Create.
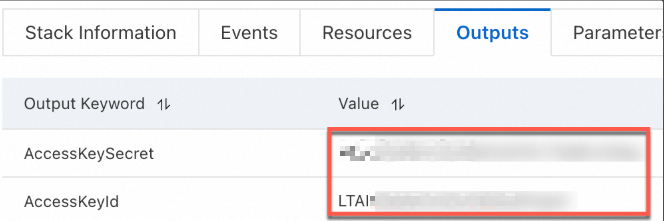
After the AccessKey pair is created, copy the AccessKey pair on the Outputs tab.
Configure environment variables for the AccessKey pair.
Linux
Run the following commands on the CLI to add the configurations of the environment variables to the
~/.bashrcfile:echo "export OSS_ACCESS_KEY_ID='YOUR_ACCESS_KEY_ID'" >> ~/.bashrc echo "export OSS_ACCESS_KEY_SECRET='YOUR_ACCESS_KEY_SECRET'" >> ~/.bashrcRun the following command to apply the changes:
source ~/.bashrcRun the following commands to check whether the environment variables have taken effect:
echo $OSS_ACCESS_KEY_ID
echo $OSS_ACCESS_KEY_SECRET
macOS
Run the following command in the terminal to view the default shell type:
echo $SHELLConfigure environment variables based on the default shell type.
Zsh
Run the following commands to add the configurations of the environment variables to the
~/.zshrcfile:echo "export OSS_ACCESS_KEY_ID='YOUR_ACCESS_KEY_ID'" >> ~/.zshrc echo "export OSS_ACCESS_KEY_SECRET='YOUR_ACCESS_KEY_SECRET'" >> ~/.zshrcRun the following command to apply the changes:
source ~/.zshrcRun the following commands to check whether the environment variables take effect:
echo $OSS_ACCESS_KEY_ID
echo $OSS_ACCESS_KEY_SECRET
Bash
Run the following commands to add the configurations of the environment variables to the
~/.bash_profilefile:echo "export OSS_ACCESS_KEY_ID='YOUR_ACCESS_KEY_ID'" >> ~/.bash_profile echo "export OSS_ACCESS_KEY_SECRET='YOUR_ACCESS_KEY_SECRET'" >> ~/.bash_profileRun the following command to apply the changes:
source ~/.bash_profileRun the following commands to check whether the environment variables take effect:
echo $OSS_ACCESS_KEY_ID
echo $OSS_ACCESS_KEY_SECRET
Windows
CMD
Run the following commands in CMD:
setx OSS_ACCESS_KEY_ID "YOUR_ACCESS_KEY_ID"
setx OSS_ACCESS_KEY_SECRET "YOUR_ACCESS_KEY_SECRET"
Run the following commands to check whether the environment variables take effect:
echo %OSS_ACCESS_KEY_ID%
echo %OSS_ACCESS_KEY_SECRET%
PowerShell
Run the following commands in PowerShell:
[Environment]::SetEnvironmentVariable("OSS_ACCESS_KEY_ID", "YOUR_ACCESS_KEY_ID", [EnvironmentVariableTarget]::User)
[Environment]::SetEnvironmentVariable("OSS_ACCESS_KEY_SECRET", "YOUR_ACCESS_KEY_SECRET", [EnvironmentVariableTarget]::User)
Run the following commands to check whether the environment variable takes effect:
[Environment]::GetEnvironmentVariable("OSS_ACCESS_KEY_ID", [EnvironmentVariableTarget]::User)
[Environment]::GetEnvironmentVariable("OSS_ACCESS_KEY_SECRET", [EnvironmentVariableTarget]::User)
After configuring the environment variables as described above, please restart or refresh your compilation and runtime environment, namely IDEs, command-line interfaces, other desktop applications, and background services, to ensure that the latest system environment variables are successfully loaded.
Install OSS SDK for Java
Install Java 7 or later.
You can check your Java version by running the following command:
java -versionIf Java is not installed in your environment or the Java version is earlier than V7, download a compatible version.
Install OSS SDK for Java.
NoteSelect an appropriate version of OSS SDK for Java based on your requirements. We recommend that you use the latest OSS SDK for Java V3.17.4 to ensure that the sample code in this section runs properly.
Add dependencies to your Maven project (recommended)
To use OSS SDK for Java in Java 7 or 8, add the corresponding SDK dependency to the pom.xml file.
In this example, the dependency for OSS SDK for Java V3.17.4 is added.<dependency> <groupId>com.aliyun.oss</groupId> <artifactId>aliyun-sdk-oss</artifactId> <version>3.17.4</version> </dependency>If you use Java 9 or later, add the following jaxb-related dependencies in addition to the OSS SDK dependency:
<dependency>
    <groupId>javax.xml.bind</groupId>
    <artifactId>jaxb-api</artifactId>
    <version>2.3.1</version>
</dependency>
<dependency>
    <groupId>javax.activation</groupId>
    <artifactId>activation</artifactId>
    <version>1.1.1</version>
</dependency>
<!-- no more than 2.3.3-->
<dependency>
    <groupId>org.glassfish.jaxb</groupId>
    <artifactId>jaxb-runtime</artifactId>
    <version>2.3.3</version>
</dependency>
Import the JAR file to an Eclipse project
To use OSS SDK for Java V3.17.4, perform the following steps to import the JAR file to your project:
Download OSS SDK for Java.zip.
Decompress the package.
Copy the aliyun-sdk-oss-3.17.4.jar file and all files in the lib directory to your project.
In Eclipse, select your project and choose in the right-click menu.
Select all JAR files that you copied and import the files to Libraries.
Import the JAR files to an IntelliJ IDEA project
To use OSS SDK for Java V3.17.4, perform the following steps to import the JAR file to your project:
Download OSS SDK for Java.zip package.
Decompress the package.
Copy the aliyun-sdk-oss-3.17.4.jar file and all JAR files in the lib directory to your project.
In IntelliJ IDEA, select your project and choose .
Select all JAR files that you copied and import the files to External Libraries.
Complete code example
Run the following code to verify your setup and perform essential storage operations. The example uses the Singapore region to ensure the code runs immediately with default endpoints.
Due to a policy change to improve compliance and security, starting March 20, 2025, new OSS users must use a custom domain name (CNAME) to perform data API operations on OSS buckets located in Chinese mainland regions. Default public endpoints are restricted for these operations. Refer to the official announcement for a complete list of the affected operations. If you access your data via HTTPS, you must bind a valid SSL Certificate to your custom domain. This is mandatory for OSS Console access, as the console enforces HTTPS.
import java.io.*;
import java.util.Random;

import com.aliyun.oss.*;
import com.aliyun.oss.model.OSSObject;
import com.aliyun.oss.model.ObjectListing;
import com.aliyun.oss.model.OSSObjectSummary;
import com.aliyun.oss.common.auth.*;
import com.aliyun.oss.common.comm.SignVersion;

public class OssJavaSdkQuickStart {
    /** Generates a unique bucket name. */
    public static String generateUniqueBucketName(String prefix) {
        // Get the current timestamp.
        String timestamp = String.valueOf(System.currentTimeMillis());
        // Generate a random number between 0 and 9999.
        Random random = new Random();
        int randomNum = random.nextInt(10000); // Generate a random number between 0 and 9999.
        // Concatenate the parts to form a unique bucket name.
        return prefix + "-" + timestamp + "-" + randomNum;
    }

    public static void main(String[] args) throws com.aliyuncs.exceptions.ClientException {
        // This example uses the Singapore region to illustrate process. Set the endpoint to https://oss-ap-southeast-1.aliyuncs.com. Replace it with the actual endpoint.
        String endpoint = "https://oss-ap-southeast-1.aliyuncs.com";
        String bucketName = generateUniqueBucketName("demo");
        // Specify the region where the bucket is located. This example uses Singapore. Set the region to ap-southeast-1.
        String region = "ap-southeast-1";

        // Obtain access credentials from environment variables. Before you run the sample code, configure the environment variables.
        EnvironmentVariableCredentialsProvider credentialsProvider =
                CredentialsProviderFactory.newEnvironmentVariableCredentialsProvider();

        // Create an OSSClient instance.
        // When the OSSClient instance is no longer used, call the shutdown method to release resources.
        ClientBuilderConfiguration clientBuilderConfiguration = new ClientBuilderConfiguration();
        // Explicitly declare the use of the V4 signature algorithm.
        clientBuilderConfiguration.setSignatureVersion(SignVersion.V4);
        OSS ossClient = OSSClientBuilder.create()
                .endpoint(endpoint)
                .credentialsProvider(credentialsProvider)
                .region(region)
                .build();
        try {
            // 1. Create a bucket.
            ossClient.createBucket(bucketName);
            System.out.println("1. Bucket " + bucketName + " created.");
            // 2. Upload a file.
            String objectName = "exampledir/exampleobject.txt";
            String content = "Hello OSS";
            ossClient.putObject(bucketName, objectName, new ByteArrayInputStream(content.getBytes()));
            System.out.println("2. File " + objectName + " uploaded.");
            // 3. Download the file.
            OSSObject ossObject = ossClient.getObject(bucketName, objectName);
            InputStream contentStream = ossObject.getObjectContent();
            BufferedReader reader = new BufferedReader(new InputStreamReader(contentStream));
            String line;
            System.out.println("3. Content of the downloaded file:");
            while ((line = reader.readLine()) != null) {
                System.out.println(line);
            }
            contentStream.close();
            // 4. List files.
            System.out.println("4. Files in the bucket:");
            ObjectListing objectListing = ossClient.listObjects(bucketName);
            for (OSSObjectSummary objectSummary : objectListing.getObjectSummaries()) {
                System.out.println(" - " + objectSummary.getKey() + " (size = " + objectSummary.getSize() + ")");
            }
            // 5. Delete the file.
            ossClient.deleteObject(bucketName, objectName);
            System.out.println("5. File " + objectName + " deleted.");
            // 6. Delete the bucket.
            ossClient.deleteBucket(bucketName);
            System.out.println("6. Bucket " + bucketName + " deleted.");
        } catch (OSSException oe) {
            System.out.println("Caught an OSSException, which means your request made it to OSS, "
                    + "but was rejected with an error response for some reason.");
            System.out.println("Error Message:" + oe.getErrorMessage());
            System.out.println("Error Code:" + oe.getErrorCode());
            System.out.println("Request ID:" + oe.getRequestId());
            System.out.println("Host ID:" + oe.getHostId());
        } catch (ClientException | IOException ce) {
            System.out.println("Caught an ClientException, which means the client encountered "
                    + "a serious internal problem while trying to communicate with OSS, "
                    + "such as not being able to access the network.");
            System.out.println("Error Message:" + ce.getMessage());
        } finally {
            if (ossClient != null) {
                ossClient.shutdown();
            }
        }
    }
}
Successful execution will produce a continuous log similar to the following:
1. Bucket demo-1731651903982-4074 created.
2. File exampledir/exampleobject.txt uploaded.
3. Content of the downloaded file:
Hello OSS
4. Files in the bucket:
 - exampledir/exampleobject.txt (size = 9)
5. File exampledir/exampleobject.txt deleted.
6. Bucket demo-1731651903982-4074 deleted.
Other languages
SDKs for other languages are also available for bucket management and file operations.