FAQ covering NAS mounting, supported protocols, NFS request tuning, mount verification, and force unmount.
Question navigation
-
Mounting
-
Does NAS support mounting from the internet or a local IP address?
-
Can I mount a file system using both the NFS and SMB protocols?
-
Does batch mounting support classic networks, cross-VPC mounting, and cross-region mounting?
-
Does the batch mounting feature support mounting from on-premises data centers (IDCs)?
-
How do I check the result of a batch mount or unmount command?
-
How do I create and mount a subdirectory of a NAS file system on a Linux instance?
-
Why can't I mount an SMB file system on Windows Server versions later than 2016?
-
After mounting an NFS file system on a Windows instance, how do I fix garbled Chinese file names?
-
Why does the mount fail with error 5 when I join an AD domain?
-
How do I mount the same SMB file system in multiple AD domains?
-
-
Protocols
-
Unmounting
-
Other
-
How do I prevent the NFS 4.0 listener port from being flagged as a Trojan?
-
How do I troubleshoot issues when using IIS services on Alibaba Cloud NAS?
-
Does the file lock feature work when using an NFS file system on a Windows instance?
-
Can I use a NAS file system as the storage directory for Docker services?
-
How do I find the mount point of a NAS file system on a server?
Public or on-premises NAS mounting
No. NAS requires an internal network connection. For external access, connect to the file system's VPC first. Access a file system from a data center.
SMB mount failure on Linux
Troubleshoot the failure to mount an SMB file system on a Linux instance.
Mount NAS from an on-premises host
|
Operating environment |
Instructions |
|
Linux operating system |
To mount and access the file system: |
|
Windows operating system |
|
|
macOS client |
Mount the SMB file system on macOS using the Kerberos protocol. Access an SMB file system from a macOS client over a VPN connection. |
Mount NAS on Alibaba Cloud Workspace
Alibaba Cloud Workspace supports NAS for shared storage across cloud desktops. Create one NAS file system per workspace.
Mount a NAS file system based on your scenario:
-
If no shared storage NAS is available
Log on to the Cloud Workspace console to create a shared storage NAS. The system automatically mounts it to cloud desktops in that workspace. After creation, the NAS appears on the File Storage NAS page with status Active. Mount a NAS file system on a Windows cloud computer.
-
If a shared storage NAS is already available
The system automatically mounts the available NAS when you create, start, restart, or rebuild a cloud desktop. Manually mount if the NAS was unmounted or you need a different path. Mount a NAS file system on a Linux cloud computer.
Simultaneous mounting with NFS and SMB
No. You can mount a file system using only one protocol at a time.
Mount NFS on Linux and SMB on Windows. Cross-platform mounting causes compatibility issues—character sets and maximum file name length differ (Windows: 255 wide characters; Linux: 255 UTF-8 bytes). Scenarios for mounting a file system and File read and write issues.
Supported OS and file systems
One-click mount supports NFS on Linux only. For other combinations (SMB on Windows, NFS on Windows, SMB on Linux), log on to the ECS instance and run the mount command manually. Mount an SMB file system, Mount an NFS file system (General-purpose NAS), and Mount an SMB file system.
Console mounting for classic networks or connected VPCs
This is not supported.
One-click mount requires the ECS instance and NAS file system to be in the same VPC. For other cases, use Cloud Assistant. Batch mount the same NFS file system on multiple ECS instances.
For connected VPCs, you can mount file systems only between VPCs within the same region.
NAS cross-zone mounting
General-purpose NAS supports cross-zone mounting. Extreme NAS should be mounted in the same zone to avoid performance degradation.
Linux: Does mounting a NAS overwrite original data?
Mounting a NAS file system to a non-empty directory temporarily hides the local data and displays NAS data instead. The local data is not deleted—it reappears after unmounting.
Risks of a forced unmount
A forced unmount may lose unwritten data and cause unexpected application exits. Run fuser -mv <mount path> to identify processes using the file system. Stop them, then retry the unmount.
If unmounting still fails with no active applications, force-unmount. Restart the ECS instance afterward to clear residual kernel states; otherwise, remounting may fail.
New ECS instance not found for one-click mount
Refresh your browser, then try the mount operation again.
New mount parameters not taking effect
If the specified mount path is already mounted, the new protocol type and mount parameters are ignored. Unmount first, then rerun the mount command with the new parameters.
Supported operating systems and protocols
Batch mounting supports NFS on Linux only. For other combinations (SMB on Windows, NFS on Windows, SMB on Linux), log on to the ECS instance and mount manually. Mount an SMB file system, Mount an NFS file system (General-purpose NAS), and Mount an SMB file system.
Batch mounting network support
Batch mounting supports classic networks and cross-VPC mounting within the same region. Cross-region mounting is not supported, even if the VPCs are connected.
Batch mounting from on-premises IDCs
No. Connect from an on-premises data center (IDC) through a VPN Gateway or NAT Gateway. Access Alibaba Cloud NAS from an on-premises data center using a NAT Gateway or Access Alibaba Cloud NAS from an on-premises data center using a VPN Gateway.
Check the execution status of batch commands
Log on to the ECS console and choose . On the Cloud Assistant page, check the task status in the operation records. The status will be Successful, Failed, or Partially Failed. To check the status of each ECS instance, click View in the task's Actions column.
Interpret ECS mount information
Log on to the NAS console, go to the target file system's details page, and click the Mount Targets tab. Use the query feature to check ECS mount status. Query the status of an ECS instance.
New parameters ineffective in batch mounting
If the specified mount path is already mounted, the new protocol type and mount parameters are ignored. Unmount first, then rerun the mount command with the new parameters.
Modify concurrent NFS requests
The NFS client limits concurrent requests. The kernel default is 2, which severely degrades performance. Change this to 128.
-
Run the following commands to change the number of concurrent NFS requests to 128.
echo "options sunrpc tcp_slot_table_entries=128" >> /etc/modprobe.d/sunrpc.conf echo "options sunrpc tcp_max_slot_table_entries=128" >> /etc/modprobe.d/sunrpc.conf sysctl -w sunrpc.tcp_slot_table_entries=128NoteRun these commands once as root after the initial NFS client installation.
-
Optional: Restart the ECS instance.
rebootImportantRestarting an ECS instance interrupts your services. Restart during off-peak hours.
-
Run the following command to check the result.
A returned value of 128 indicates that the change was successful.
cat /proc/sys/sunrpc/tcp_slot_table_entries
Create and mount a NAS subdirectory
Ensure the file system is mounted. Mount an NFS file system.
If you mount the NAS root directory to /mnt on a Linux ECS instance, /mnt acts as the NAS root. Create subdirectories under /mnt.
-
Create a subdirectory in the NAS file system.
mkdir /mnt/subdir -
Create a local directory to mount the NAS subdirectory.
mkdir /tmp/mntNoteYou can mount only one file system per local directory. To mount multiple file systems, create a separate local directory for each one.
-
Mount the subdirectory.
sudo mount -t nfs -o vers=3,nolock,proto=tcp,rsize=1048576,wsize=1048576,hard,timeo=600,retrans=2,noresvport file-system-id.region.nas.aliyuncs.com:/subdir /tmp/mntReplace the placeholders in the preceding command with their actual values:
-
file-system-id.region.nas.aliyuncs.com: the mount target address. To find it, log in to the NAS console, click the ID of the target file system on the File System List page, and then click Mount Targets on the file system details page.
-
/subdir: the NAS subdirectory.
-
/tmp/mnt: the local directory on the server.
-
Resolve Linux server issues after deleting a mount target
Symptom
If you delete a mount target in the NAS console without first unmounting the file system, the Linux server may become unresponsive or commands may hang.
Solution
-
On the server, such as a Linux ECS instance, press
Ctrl+Cto interrupt the command. -
Run the
mountcommand to view the mount information.Find the mount path in the output. In the following example, /mnt/data is the current mount path.
debugfs on /sys/kernel/debug type debugfs (rw,relatime) mqueue on /dev/mqueue type mqueue (rw,relatime) hugetlbfs on /dev/hugepages type hugetlbfs (rw,relatime) sunrpc on /var/lib/nfs/rpc_pipefs type rpc_pipefs (rw,relatime) tmpfs on /run/user/0 type tmpfs (rw,nosuid,nodev,relatime,size=773356k,mode=700) xxx xxx xxx xxx 0.xxx-tgp98.cn-hangzhou.nas.aliyuncs.com:/ on /mnt/data type nfs4 (rw,relatime,vers=4.0,rsize=1048576,wsize=1048576,namlen=255,hard,noresvport,proto=tcp,timeo=600,retrans=2,sec=sys,clientaddr=1xx.xxx.xxx.1x5,local_lock=none,addr=1xx.xxx.xxx.1x7) -
Run the
umount -f /mnt/datacommand to forcibly unmount the file system.Command format:
umount -f <mount path>NoteIf the issue persists after you run the
umount -f <mount path>command, try running theumount -l <mount path>command.After unmounting the file system, create a new mount target and then mount the file system again.
NFS 4.0 listener port mistaken for trojan
Symptom
After you mount a NAS file system using the NFSv4.0 protocol, a random port begins listening on 0.0.0.0, and you cannot locate the listener process using netstat.
Because the listener port is random and the process cannot be located, this behavior is sometimes mistaken for a trojan attack.
Cause
The NFSv4.0 client uses a random port for its callback feature because fs.nfs.nfs_callback_tcpport defaults to 0. This port is safe.
Solution
Before mounting the file system, assign a fixed port by setting the fs.nfs.nfs_callback_tcpport parameter to a non-zero value.
sudo sysctl fs.nfs.nfs_callback_tcpport=<port> For example, after setting fs.nfs.nfs_callback_tcpport to 45450 and mounting the file system using the NFSv4.0 protocol, netstat reports 45450 as the listener port.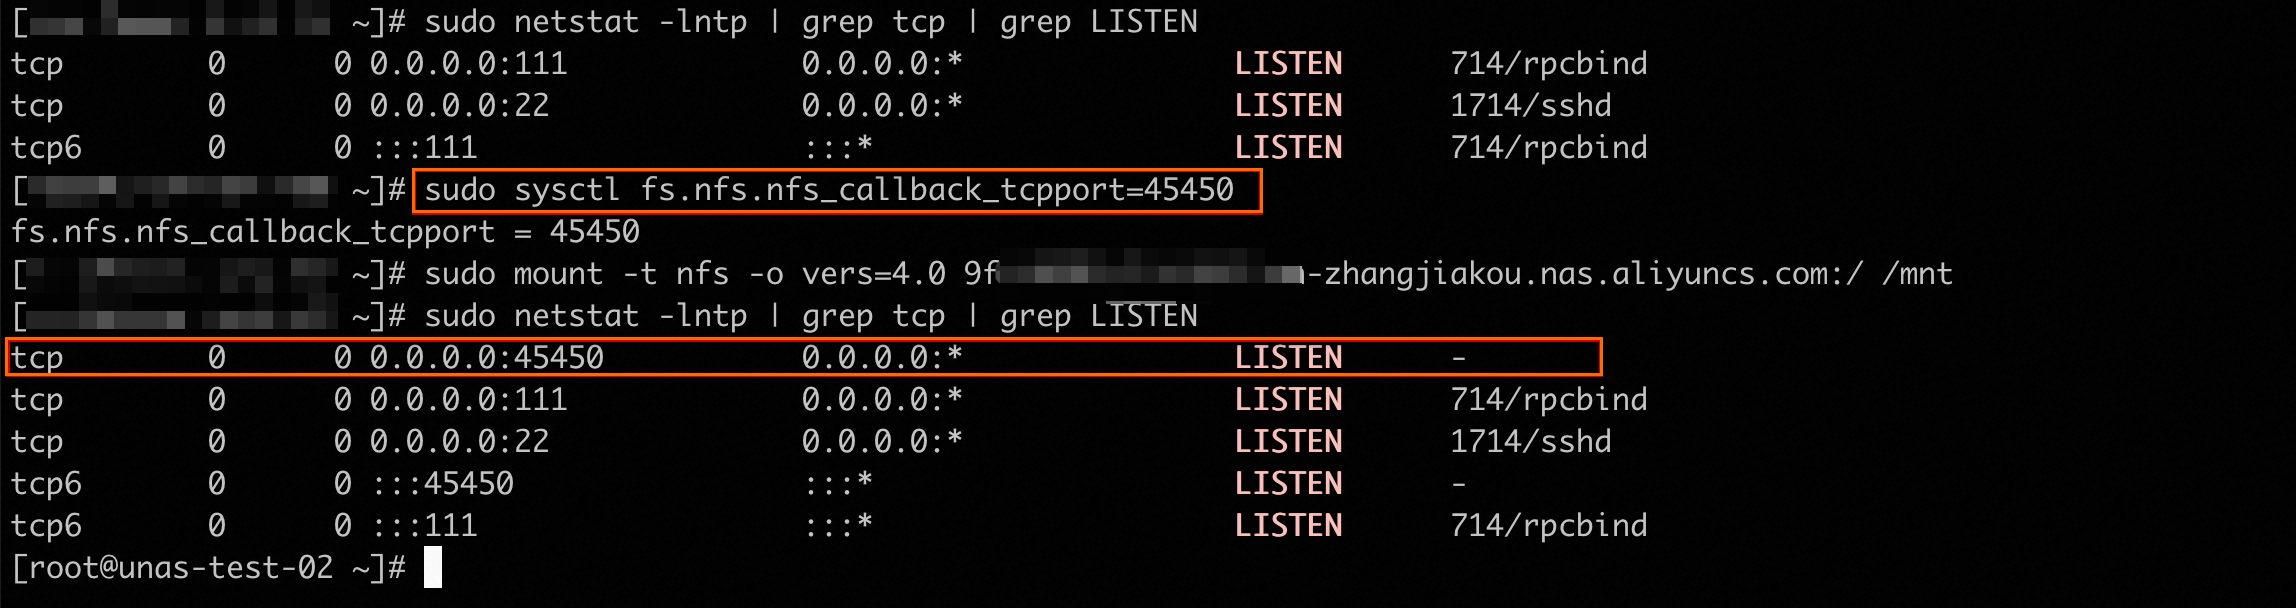
SMB mount failure on Windows Server 2016 and later
Symptom
Command and error message:
C:\Users\Administrator>net use z: \\xxxxx-xxxx.xxxxx.nas.aliyuncs.com\myshare
System error 1272 has occurred.
You can't access this shared folder because your organization's security policies block unauthenticated guest access. These policies help protect your PC from unsafe or malicious devices on the network.
Cause
Windows Server 2016 and later blocks guest access to remote shared directories by default.
Solution
-
Modify the registry:
[HKEY_LOCAL_MACHINE\SYSTEM\CurrentControlSet\Services\LanmanWorkstation\Parameters]
"AllowInsecureGuestAuth"=dword:0
Change the entry to:
[HKEY_LOCAL_MACHINE\SYSTEM\CurrentControlSet\Services\LanmanWorkstation\Parameters] "AllowInsecureGuestAuth"=dword:1 -
Alternatively, run the following command in PowerShell:
New-ItemProperty -Path $registryPath -Name $name -Value $value -PropertyType DWORD -Force
Troubleshoot IIS services on Alibaba Cloud NAS
Mount failure on Windows Server 2016, HTTP error 500.19, and error code 0x8007003a are covered in Best practices for using IIS services on Alibaba Cloud NAS.
Clean up leaked client handles for SMB
Use the following tools to disconnect all connections to the SMB file system and release all handles.
-
Windows client
Use TCPView to disconnect all connections to the SMB file system. Open TCPView (Sysinternals) and filter for established TCP connections where Remote Port is 445. Verify the Remote Address matches your mount point IP. Right-click the connection and select Close Connection to clear leaked handles.
-
Linux client
Use killcx to disconnect all connections to the SMB file system.
NFS file lock on Windows
No. To use the file lock feature on a Windows instance, use a NAS SMB file system.
Troubleshoot ECS security group configuration
Mounting a NAS file system requires access to specific ports: 2049 and 111 for NFS, and 445 for SMB. If a security group denies outbound traffic to these ports, mounting fails.
Troubleshoot and modify security group rules as follows.
Log in to the ECS console.
-
In the left-side navigation pane, choose .
-
At the top of the page, select a resource group and a region.
-
Click the ID of the target security group to open its details page.
-
On the Security Group Details tab, click the Outbound tab. Check for a rule that allows outbound TCP traffic to the mount target's IP address or CIDR block on the required ports (NFS: 2049 and 111; SMB: 445).
Note-
By default, a basic security group allows all outbound traffic. In this case, you do not need to modify the rules.
-
By default, an advanced security group denies all outbound traffic. In this case, you must add an outbound rule that allows traffic to the IP address of the file system mount target on the required TCP ports.
If a security group rule denies outbound traffic to the mount target's IP address or CIDR block on the required ports, click Edit in the Operation column for that rule and modify the Action or {value}. Security group rules.
If you encounter DNS resolution failures, add the following rule to your security group to enable default DNS resolution.
Action
Priority
Protocol
Destination
IPv4
Port
Allow
1
Custom UDP
0.0.0.0/0
53/53
The following examples show how to configure a rule that allows outbound traffic to port 2049 for a mount target with the IP address 192.168.12.151.
-
Basic security group
Action
Priority
Protocol
Destination
IPv4
Port
Allow
1
Custom TCP
The following CIDR blocks include the mount target IP address (192.168.12.151). You can use any of them.
-
0.0.0.0/0
-
192.0.0.0/8
-
192.168.0.0/16
-
192.168.12.0/24
-
192.168.12.151/32
2049/2049
-
-
Advanced security group
Action
Priority
Protocol
Destination
IPv4
Port
Allow
1
Custom TCP
The following CIDR blocks include the mount target IP address (192.168.12.151). You can use any of them.
-
0.0.0.0/0
-
192.0.0.0/8
-
192.168.0.0/16
-
192.168.12.0/24
-
192.168.12.151/32
2049/2049
-
-
Troubleshoot NAS permission group rules
A NAS permission group acts as a whitelist. The mount target's permission group must include the IP address or CIDR block of your ECS instance, or mounting will fail.
Add all private IP addresses of an ECS instance, including secondary IPs, to the mount target's permission group. This prevents mount failures caused by NIC switching.
Follow these steps to troubleshoot and modify permission group rules.
-
Log on to the NAS console.
-
In the left-side navigation pane, choose File System > File System List.
-
In the top menu bar, select the resource group and region where the file system is located.
-
Click Manage in the Actions column for the desired file system.
-
On the file system details page, click the Mount Targets tab. On the Mount Target tab, find the permission group for the mount target.
-
If the permission group is the Default VPC permission group (all allowed), you do not need to modify it.
The default permission group allows any IP address to access the file system with full read/write access and no restrictions for Linux users, and it cannot be modified or deleted.
-
If the mount target uses a custom permission group, click its name in the Permission Group column.
If the rule list does not contain the IP address or CIDR block of the ECS instance, click Edit in the Actions column for the target rule. Add the IP address to the authorized address.
For example, if a rule's authorized address does not include the IP address of the ECS instance (192.168.12.150), you can add one of the following CIDR blocks:
-
192.168.12.150/32
-
192.168.12.0/24
-
192.168.0.0/16
-
192.0.0.0/8
-
0.0.0.0/0
-
-
Auto-generated security group for Extreme NAS
No. Extreme NAS auto-generates a security group (Createdbynas.Shouldnotdeleteit) that applies only to the Extreme NAS server's ENI. It cannot be modified or deleted. If a cloud security product flags it, add the security group to a whitelist.
Security Center high-risk alert for Extreme NAS
Security Center flags unnecessary open ports and recommends least-privilege configuration. Extreme NAS auto-generates a security group (Createdbynas.Shouldnotdeleteit) that applies only to the Extreme NAS server-side ENI. If this alert is disruptive, add the triggering rule to the whitelist.
NAS for Docker storage
No. Docker storage requires the overlay feature, which NAS currently does not support.
View NAS mount directory
-
On a Linux system, log on to the target server and run
df -hto view the mount directory.In the output,
/mntin the Mounted on column is the mount directory on the ECS instance.Filesystem Size Used Avail Use% Mounted on devtmpfs 3.7G 0 3.7G 0% /devtmpfs tmpfs 3.8G 0 3.8G 0% /dev/shm tmpfs 3.8G 452K 3.8G 1% /run tmpfs 3.8G 0 3.8G 0% /sys/fs/cgroup /dev/vda1 40G 3.0G 35G 8% / tmpfs 3.8G 0 3.8G 0% /tmp tmpfs 761M 0 761M 0% /run/user/0 19f04a4****-i****.cn-chengdu.nas.aliyuncs.com:/ 10P 0 10P 0% /mnt -
On a Windows system, view the mount directory in File Explorer.
NFS client retry mechanism and error codes
Network jitter, concurrent access, or backend exceptions can delay NAS requests and trigger error codes. These are typically transient—retry the operation.
|
Error code |
Description |
|
EAGAIN |
The resource is temporarily unavailable. |
|
EBUSY |
The device or resource is busy. |
|
EIO |
Input/output error. |
|
ENOMEM |
Out of memory. |
|
ETIMEDOUT |
The connection timed out. |
|
EREMOTEIO |
Remote I/O error. |
|
ESTALE |
The file handle is stale. Do not retry if the error is caused by concurrent access and delete operations between different nodes. If a single node exclusively accesses the file, retry the operation. |
Always mount NFS NAS with the hard option. The soft option can compromise data consistency. If you use soft, you assume all associated risks.
Visual file transfer for NAS on Linux
Upload and download files using one of the following methods:
-
If you mounted a NAS file system on an ECS instance, use Workbench to upload or download files.
-
If you mounted a NAS file system on an on-premises Linux server, use an SFTP client to upload or download files. For instructions, see Migrate data by using an SFTP client.
Garbled Chinese file names on Windows NFS
Cause
The NFS protocol on Windows does not support UTF-8 encoding by default.
Solution
Enable global UTF-8 support in Windows to resolve this issue.
-
In the search box on the taskbar, enter
intl.cpland click Open. -
Switch to the Administrative tab and click Change system locale.
-
Select the checkbox for Beta: Use Unicode UTF-8 for worldwide language support.
-
Click OK and restart the ECS instance to apply the settings.
AD domain: mount failure with error 5
Symptom
Mounting a network share on a host in an AD domain fails with error code 5.
C:\Users\Administrator>net use z: \\09a34xxx.cn-shanghai.nas.aliyuncs.com\myshare /user:mount.com\Administrator
xxx
System error 5 has occurred.
Access is denied.
Solution
-
Press Win+R to open the Run dialog box, enter
gpedit.msc, and click OK to open the Local Group Policy Editor. -
In the console tree, expand the following nodes: Computer Configuration > Windows Settings > Security Settings > Local Policies > Security Options.
-
Configure the allowed encryption types for Kerberos.
In the details pane, double-click Network security: Configure encryption types allowed for Kerberos. In the dialog box that opens, select all listed encryption types, including DES_CBC_CRC, DES_CBC_MD5, RC4_HMAC_MD5, AES128_HMAC_SHA1, and AES256_HMAC_SHA1.
-
Click Apply > OK.
Mount an SMB instance in multiple AD domains
-
For each AD domain, generate a corresponding keytab file. See Join an SMB file system to an AD domain for instructions.
-
Merge the keytab files.
-
Log on to a Linux host and upload all the keytab files.
-
Install the ktutil utility.
yum install -y krb5-workstation -
Start the ktutil interactive utility.
ktutil -
Read each keytab file.
read_kt domain-a.keytab read_kt domain-b.keytab -
View the loaded keytab entries.
list -
Write the merged entries to a new file. This example uses
merged.keytabas the filename.write_kt merged.keytab[user@linuxServer ~]$ ll total 8 -rw-r--r-- 1 user user 94 Dec 11 10:59 issues.example.com.keytab -rw-r--r-- 1 root root 93 Dec 11 10:47 issues-KERBAUTH.keytab [user@linuxServer ~]$ ktutil ktutil: read_kt issues.example.com.keytab ktutil: read_kt issues-KERBAUTH.keytab ktutil: list slot KVNO Principal ---- ---- --------------------------------------------------------------------- 1 4 HTTP/issues.example.com@EXAMPLE.LOCAL 2 3 HTTP/issues.example.com@KERBAUTH.COM ktutil: write_kt merged.keytab ktutil: quit [user@linuxServer ~]$ ll total 12 -rw-r--r-- 1 user user 94 Dec 11 10:59 issues.example.com.keytab -rw-r--r-- 1 root root 93 Dec 11 10:47 issues-KERBAUTH.keytab -rw------- 1 user user 193 Dec 11 11:02 merged.keytab [user@linuxServer ~]$
-
-
Upload the merged keytab file to the console to allow clients from multiple AD domains to access the SMB instance.