To share data in a File Storage NAS (NAS) file system among multiple Elastic Compute Service (ECS) instances, use Cloud Assistant to mount the file system on multiple instances simultaneously. This feature supports only the Network File System (NFS) protocol.
Prerequisites
The Cloud Assistant Agent is installed and running on your ECS instances.
The ECS instances are in the Running state.
Your network meets one of the following requirements:
Same VPC: The ECS instances and the mount target of the NAS file system reside in the same virtual private cloud (VPC).
Classic network: For legacy instances in the classic network, authorize the private IP addresses in the permission group attached to the mount target. For more information, see Manage permission groups.
Cross-VPC access: The ECS instances and the mount target reside in different VPCs that are connected. The private IP addresses of the ECS instances are authorized in the permission group attached to the mount target. For more information, see Use CEN to mount a NAS file system across VPCs in the same region.
Limits
Only NFS file systems are supported.
Only ECS Linux instances are supported. CoreOS, FreeBSD, and Fedora CoreOS do not support the batch mount feature. For Red Hat instances, install Cloud Assistant Agent using RPM before mounting. For more information, see Install Cloud Assistant Agent.
The ECS instances and the NAS file system must reside in the same region.
Procedure
Log on to the ECS console.
In the left-side navigation pane, choose Maintenance & Monitoring > Cloud Assistant.
In the top navigation bar, select the region where your ECS instances reside.
On the Common Commands tab, search for ACS-NAS-ClickMount-Mount-Linux-NFS.sh and click Run.
In the Run Command panel, configure the following parameters:
Command parameters
Parameter | Description |
MountTargetDomain | The mount target address of the file system. Format: |
EcsLocalPath | The local directory on the ECS instance where the NAS file system is mounted. Specify an empty absolute path that starts with |
NasRemotePath | The directory of the NAS file system to mount. Set this to the root directory ( |
ProtocolType | The NFS protocol version. Valid values:
Important: This value is case-sensitive and cannot contain leading or trailing spaces. |
AutoMountOnBoot | Specifies whether the file system is automatically mounted when the ECS instance starts. Valid values: |
MountParam | Optional. Custom mount parameters. If no specific requirements exist, leave this parameter empty. For information about the parameters, see Mount an NFS file system. |
Execution options
Parameter | Description |
Execution Plan | Select when to run the command:
|
Execution Path | The path where the command is executed. |
Username | The user account for running the command. Default: |
Timeout | The timeout period in seconds. If the command execution exceeds this period, the task is forcibly stopped. |
Tags | Set tag key-value pairs for classification and management. |
Task Stop Scope | The mode for stopping tasks manually or on timeout:
|
Launcher | The launcher program for script execution. |
Select the ECS instances on which to mount the file system.
Click Run.
Query command execution results
After running a mount, unmount, or query command, use Cloud Assistant to view the results.
Log on to the ECS console.
In the left-side navigation pane, choose Maintenance & Monitoring > Cloud Assistant.
Select the region where your ECS instances reside.
On the Command Execution Result tab, select Command Name from the drop-down list, enter the name of the command whose output you want to query, and then click the
 icon.
icon.Mount:
ACS-NAS-ClickMount-Mount-Linux-NFS.shUnmount:
ACS-NAS-ClickMount-Unmount-Linux-NFS.shQuery:
ACS-NAS-ClickMount-Check-Linux-NFS.sh
Click View in the Actions column to see execution details.
On the Instances tab in the command execution details panel, click the
 icon next to the target instance name to view detailed command results.
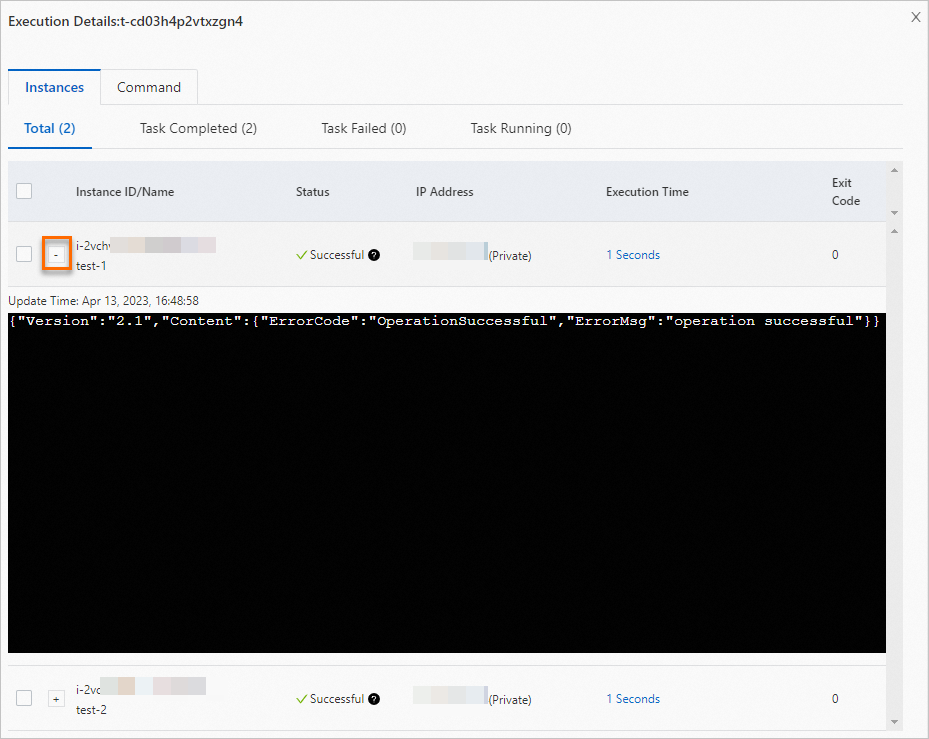
If an error is returned, identify the cause of the error and fix the error based on the cause. Then, run the command again. For more information, see the Error messages section in this topic.
Error messages
The following table describes error codes that may appear in the command output.
ErrorCode | Description | Solution |
SystemNoPermission | The command was not run with root permissions. | Ensure the command runs as the root user. |
SystemMissingMounts | The | Check the operating system integrity. |
SystemMissingFstab | The | Create the fstab configuration file. |
SystemBashOutdated | The bash version is earlier than 4.0. | Upgrade bash to version 4.0 or later. |
BadInputMountTarget | The mount target address is invalid. | Use a mount target ending with |
BadInputLocalPath | The local path is invalid. | Use an absolute path starting with |
BadInputRemotePath | The remote NAS path is invalid. | Use an absolute path starting with |
BadInputProtocol | The protocol type is invalid. | Use |
BadInputAutoMount | The auto-mount value is invalid. | Use |
BadInputForceUnmount | The force unmount value is invalid. | Use |
NasClientNfsInstallFail | Failed to install the NFS client. | Manually install the NFS client package. |
LocalPathCreateFail | Failed to create the mount directory. | Manually create the directory. |
LocalPathAlreadyMounted | The directory is already mounted to another mount target. | Choose a different local directory. |
LocalPathNonEmpty | The mount directory is not empty. | Use an empty directory. |
LocalPathNotOnMountTarget | The local path is not mounted to this mount target. | Initiate the operation from the correct mount target. |
LocalPathMultipleMounts | The local path is mounted multiple times. | Verify and force unmount. |
LocalPathAncestorMounted | A parent directory is already mounted. | Choose a directory outside the existing mount. |
LocalPathNonExistent | The mount path does not exist. | Choose a different path. |
RemotePathCreateFail | Failed to create the NAS subdirectory. | Mount the root directory instead. |
MountFailRemoteRoot | Failed to mount the root directory. | For more information about how to troubleshoot mount failures, see Troubleshoot file system mount failures. |
MountFailRemotePath | Failed to mount the subdirectory. | Try mounting the root directory instead. |
UnmountFailRemoteRoot | Failed to unmount the root directory before mounting a subdirectory. | Mount the root directory instead. |
UnmountFailLocalPath | Failed to unmount the file system. | Stop related applications and force unmount. |
UnmountFailRemoveAutoMount | Failed to remove the auto-mount configuration. | Manually edit |
More operations
Unmount from multiple instances
Replace the command in step 4 with ACS-NAS-ClickMount-Unmount-Linux-NFS.sh. Configure the following parameters:
Parameter | Description |
MountTargetDomain | The mount target address. Find the address on the Mount Targets page of the file system in the NAS console. For more information, see Manage mount targets. |
EcsLocalPath | The local directory where the file system is mounted. To view the local directory, log on to the NAS console. Go to the Mount Targets page of the file system. Click Mount in the Actions column of the mount target. Then, click Query Mount Details in the Actions column of the ECS instance. |
CancelAutoMountOnBoot | Specifies whether to disable automatic mounting of the NAS file system when the ECS instances start. Valid values: |
ForceUnmount | Specifies whether to forcibly unmount the NAS file system. Valid values: |
Query mount status on multiple instances
Run the command ACS-NAS-ClickMount-Check-Linux-NFS.sh with the following parameter:
Parameter | Description |
MountTargetDomain | Optional. The mount target address. If not specified, the command returns details for all mounted NAS file systems. |