After configuring a transit node for data transfer, use a migration tool to migrate data to your File Storage NAS (NAS) file system. This topic describes how to migrate data from an external source to a NAS file system using various tools.
Prerequisites
An Elastic Compute Service (ECS) instance is configured as a transit node for data transfer. For more information, see Configure a transit node for data migration.
Method 1: Migrate data using an SFTP client
For one-time uploads of a small number of files, install and use a Secure Shell (SSH) File Transfer Protocol (SFTP) client on your local system.
Benefits
Supports multiple operating system platforms.
Provides a graphical user interface (GUI).
Procedure
Install an SFTP client on your local operating system.
Various SFTP clients are available. This topic uses FileZilla as an example. Download and install an SFTP client compatible with your local operating system.
Establish a connection between the SFTP client and the transit ECS instance.
Open the FileZilla client, configure the following parameters, and click Quickconnect to establish a connection.

Parameter
Description
Host
The public IP address of the transit node ECS instance. Example:
192.0.2.1Username
The username of the transit node ECS instance. The user must have read and write permissions on the NAS file system directory. Example:
rootPassword
The login password of the transit node ECS instance. Example: the login password of the root user. To reset a forgotten login password, see Reset the logon password of an instance.
Port
The SFTP port number. Default:
22Note: The default username of a Linux ECS instance is
rootorecs-user. The default username of a Windows ECS instance isadministrator.In the right pane, enter the mount path of the NAS file system (such as
/mnt) in the Remote site field. Press Enter to view the files in the NAS file system.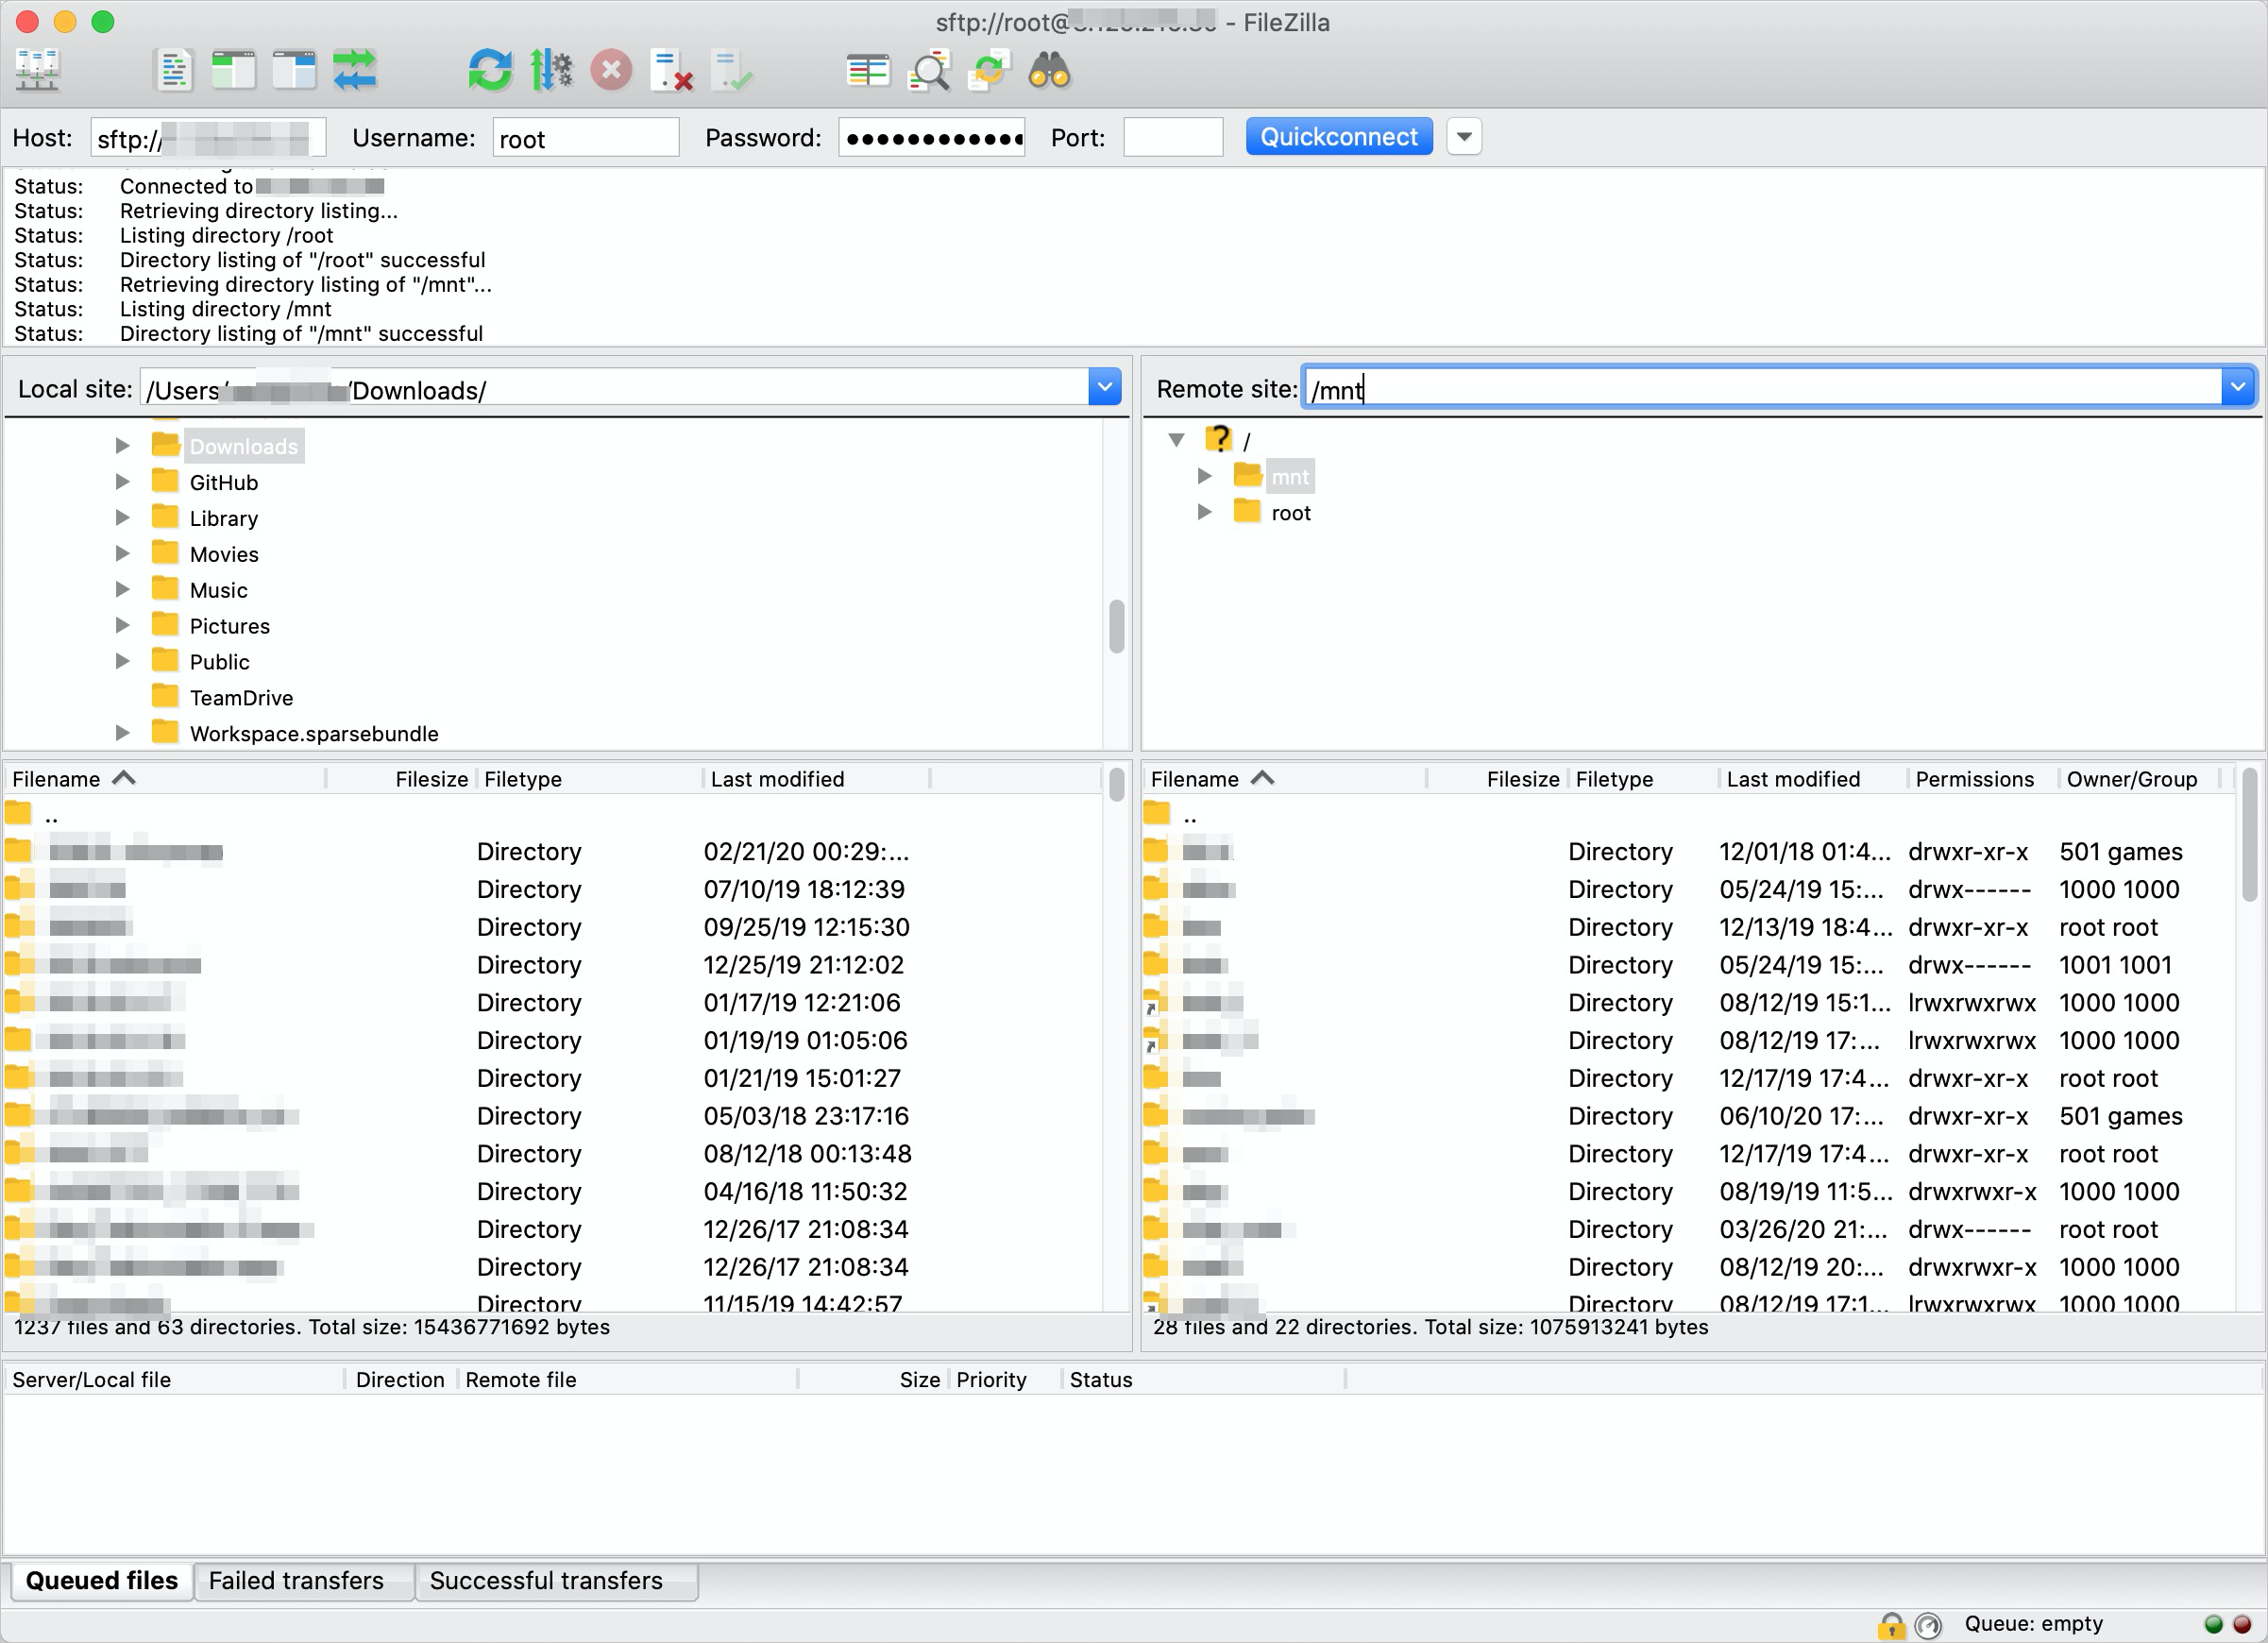
Upload the data.
Drag files or folders from the left pane (local) to the right pane (server) to upload the data.
Method 2: Migrate data using the rsync command-line tool
For uploading many files or performing frequent upload tasks, install and use the rsync command-line tool.
Benefits
Preserves file metadata, such as owner and permission information.
Supports incremental data synchronization.
Enables scheduled backups using crontab on Linux or macOS.
Step 1: Install rsync
Linux:
Operating system | Command |
CentOS / Red Hat |
|
Ubuntu / Debian |
|
Note: For other Linux distributions, use the corresponding package manager.
macOS:
Download and install the homebrew package manager. Then run:
brew install rsyncWindows:
Download and install the Cygwin environment. During installation, search for and install the rsync tool, or manually download, compile, and install rsync.
Note: Open the SSH port (TCP 22) in the VPC security group.
Step 2: Upload data
Run the following command to upload a local folder to Alibaba Cloud NAS using incremental synchronization:
rsync -avP DirToSync/ root@192.0.2.0:/mnt/DirToSync/Parameter | Description |
DirToSync | The name of the local folder to upload |
root | The owner of the destination folder in the NAS file system |
192.0.2.0 | The public IP address of the ECS instance with the NAS file system mounted |
/mnt | The mount path on the ECS instance |
Important: The source path must end with a forward slash (/). Otherwise, the data paths will be incorrect after synchronization.Concurrent copy:
To concurrently copy data to a NAS file system, run:
threads=<number_of_threads>
src=<source_path/>
dest=<destination_path/>
rsync -av -f"+ */" -f"- *" $src $dest && (cd $src && find . -type f | xargs -n1 -P$threads -I% rsync -av % $dest/%)
Example: 10 threads, source path /abc, destination path /mnt1:
threads=10
src=/abc/
dest=/mnt1/
rsync -av -f"+ */" -f"- *" $src $dest && (cd $src && find . -type f | xargs -n1 -P$threads -I% rsync -av % $dest/%)
Step 3 (Optional): Configure scheduled backups
On a local Linux or macOS system, use rsync and crontab to configure scheduled upload and backup tasks.
Linux:
Create a passwordless SSH connection from your local system to the ECS instance. For more information, see Connect to a Linux instance using OpenSSH or Xshell.
Confirm the connection is successful:
ssh -i ~/.ssh/ecs.pem root@1.2.3.4Note:
~/.ssh/ecs.pemis the path to the key file on your local system.Configure crontab.
Run
crontab -eto open the editor and add:0 23 * * * rsync -av -e "ssh -i ~/.ssh/ecs.pem" ~/Documents/ root@192.0.2.0:/mnt/Documents/This configuration automatically uploads and backs up data from the Documents folder to Alibaba Cloud NAS at 23:00 daily. Modify the parameters as needed.
macOS:
Configure access permissions for the
/usr/sbin/crondirectory.Go to System Settings > Security & Privacy > Privacy > Full Disk Access. Click the lock icon, click +, select the Macintosh HD folder, press Cmd+Shift+. to display hidden folders, and select
/usr/sbin/cron.Create a passwordless SSH connection (same as Linux above).
Configure crontab (same as Linux above).
Note: If rsync performs poorly during data migration, use the fpsync tool for multi-threaded migration. See Appendix: Migrate data using fpsync.
Method 3: Migrate data using Robocopy (Windows)
Robocopy is a built-in Windows directory replication command that creates mirrored copies without duplicating unnecessary files. It preserves all file information, including dates, timestamps, ACLs, owner information, and auditing information.
Procedure
Log on to the Alibaba Cloud ECS instance used for data migration.
Migrate the data.
Run the following command to migrate data from the source file system (drive Z) to the destination file system (drive Y):
robocopy Z:\ Y:\ /e /w:5 /z /mt:32Note: Only data in the specified folder is migrated. The folder itself is not included.
Parameter
Description
/mt
Sets the number of concurrent threads. Default: 8. Valid values: 1-128. This example uses 32 threads.
/w
Sets the interval in seconds between retries
/z
Enables resumable transfer
/e
Copies all subdirectories, including empty ones
/copyall
Copies all file information (data, properties, timestamps, ACL, owner, auditing)
Note: To accelerate migration of large data volumes (such as hundreds of millions of small files exceeding 10 TB), install the latest Python program on a Windows ECS instance. For more information, see 如何加速迁移数据至NAS SMB协议文件系统.
Verify the migration result.
Run the following command to verify consistency between the source and destination file systems:
ROBOCOPY Z:\ Y:\ /e /l /ns /njs /njh /ndl /fp /log:reconcile.txtParameter
Description
/e
Lists only folders, including empty ones
/l
Records differences without modifying or copying files
/fp
Includes full file paths in the log (only necessary if
/ndlis omitted)/ns
Excludes file sizes from the log
/ndl
Excludes folders from the log
/njs
Excludes the job summary
/njh
Excludes the job header
/log:reconcile.txt
Writes the migration result to reconcile.txt. Overwrites existing logs.
Method 4: Migrate data using IIS FTP
For one-time uploads of a small number of files, configure a File Transfer Protocol (FTP) client on your local system.
Benefits
Supports multiple operating system platforms
Provides a graphical user interface
Procedure
Configure the IIS FTP service on the ECS instance and configure the FTP client on your local system. For more information, see Set up the Windows IIS web service.
Open the corresponding FTP TCP port in the VPC security group.
Other FTP servers and clients can also be configured to upload and download data over the public network.
Inbound traffic to an elastic IP address (EIP) is free of charge, but outbound traffic is charged. Uploading data to NAS over the public network incurs no traffic fees, but downloading data does. For billing details, see Pay-as-you-go.
Appendix: Migrate data using fpsync
Step 1: Download and install fpsync
wget -N https://github.com/martymac/fpart/archive/fpart-1.1.0.tar.gz -P /tmp
tar -C /tmp/ -xvf /tmp/fpart-1.1.0.tar.gz
cd /tmp/fpart-fpart-1.1.0
sudo yum install -y automake libtool
autoreconf -i
./configure
make
sudo make install
sudo yum install parallel -y
printf "will cite" | parallel --bibtex
sudo yum install -y rsync
Step 2: Copy the entire folder
fpsync -n 10 -f 10000 /data/src/ /data/dst/Note: For more information about the fpsync tool, see fpsync tool.
References
If you frequently read and write large amounts of data on NAS from your data center, use a leased line to mount and access NAS directly. For more information, see Access a file system from a data center.
To upload large amounts of data when public network bandwidth is insufficient, upload the data to Object Storage Service (OSS) first, then migrate from OSS to NAS. For more information, see Upload objects and Migrate data.
Next steps
After uploading data, mount the NAS file system on the ECS instance or container to share and access the data.
For example, on an ECS instance, mount an NFS file system on Linux or an SMB file system on Windows to access NAS data as if it were local. For more information, see Mount an NFS file system and Mount an SMB file system。
Build business applications on the cloud to have programs on multiple compute nodes read and write large amounts of data on NAS. For example, use NGINX as a proxy for File Storage NAS or use Windows IIS to access Alibaba Cloud NAS.
If the transit node ECS instance is no longer needed for uploading or downloading data, release the instance. For more information, see Release an instance.