Internet Information Service (IIS) can access data in Server Message Block (SMB) file systems in the same way as it accesses data in on-premises disks. IIS provides the web and FTP services to separate website storage from computing. This topic describes how to configure IIS to access a NAS file system.
Prerequisites
An SMB file system is created and a mount target is created for the file system. For more information, see Create a file system and Create a mount target.
WinSCP is installed.
Background information
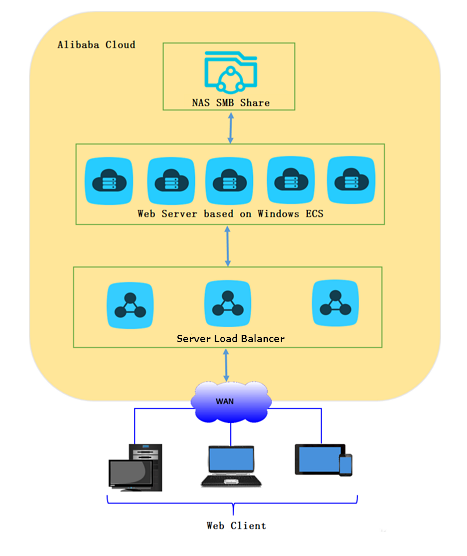
Windows Server is a popular platform that is used to build websites. A large number of users build websites on Windows Elastic Compute Service (ECS) instances and store the content resources of the websites on a reliable and high-throughput SMB file system. In addition, the computing and storage resources support auto scaling based on specific business requirements.
The FTP service provided by IIS includes a wide range of requirements. A large number of website administrators remotely manage website content by using the FTP service. Meanwhile, a large number of Alibaba Cloud users want to transfer and share files between wide area networks (WANs) and Alibaba Cloud by using the FTP service on Windows ECS instances.
In this example, IIS 7.5 (Windows Server 2008 R2) is used to describe how to use NAS to provide both the web service and FTP service for a Windows ECS instance. You can also use Server Load Balancer (SLB) to build a multi-server website that provides fault tolerance. For more information, see What is CLB?
The topic provides some security suggestions, but they are not a complete security solution. You must devise your own plans to secure your web services and data. For example, you can safeguard your system security by setting up firewalls, configuring security groups for ECS instances, and installing operating system patches. You can also safeguard your service security by using the security services of Alibaba Cloud.
In this topic, a regular user named iss_user is used. We recommend that you access data as this user instead of the system administrator when you deploy FTP services or run IIS web services on Windows Server 2016.
Install Windows IIS
In this example, Windows Server 2008 R2 is used to describe how to add an IIS role and install IIS by using Server Manager.
For more information about how to install IIS on different Windows operating systems, see Install IIS and ASP.NET Modules.
In the Windows server, choose .
In the left-side navigation pane of the Server Manager dialog box, click Roles. Then, click Add Roles.
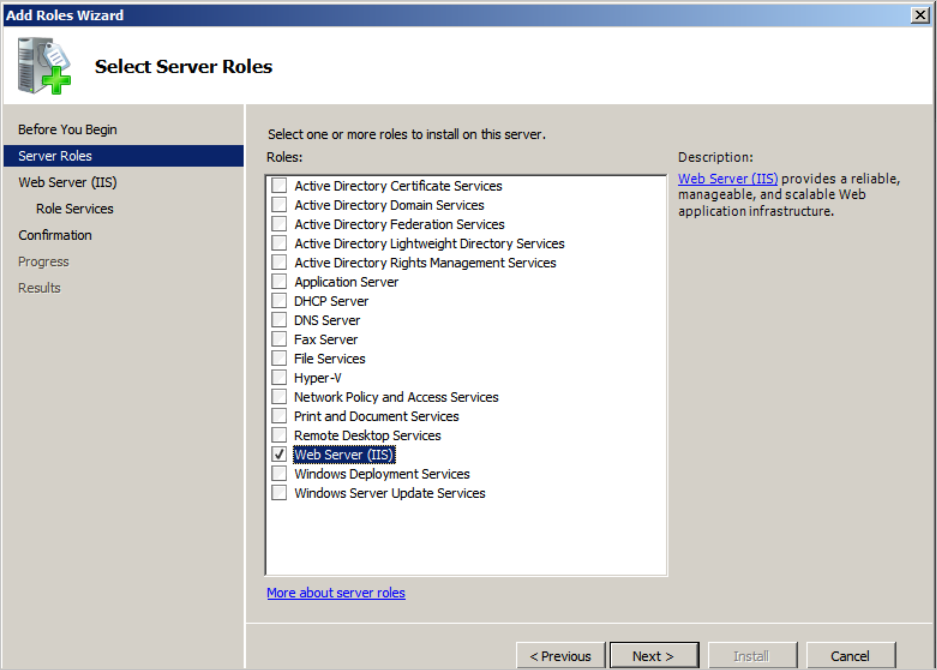
In the left-side navigation pane of the Add Roles Wizard, click Server Roles. Then, select Web Server (IIS).
In the left-side navigation pane of the Add Roles Wizard, click Role Services. Then, select the role services that you want to install for the web server (IIS).
In addition to the default services, you must also select ASP and FTP Server to enable FTP services and demonstrate dynamic web pages by using scripts.

Click Next and complete the installation as prompted.
Access the SMB file system
You can store your web resources and configuration files in the shared directory (myshare by default) of the SMB file system. You can configure the permission group of the SMB file system to make sure that the web server can read data from and write data to the file system.
Open the File Explorer window and enter \\file-system-id.region.nas.aliyuncs.com\myshare in the address bar to access the SMB file system.
file-system-id.region.nas.aliyuncs.com is the domain name of the mount target for the SMB file system. For more information about how to obtain the domain name of the mount target for an SMB file system, see View mount targets.
myshare is the default shared directory of the SMB file system. You cannot change this directory.
Create a subdirectory named www in the myshare directory of the SMB file system to store web page files of your website.
In this example, the static web page file index.html and the dynamic web page file test.asp are created in the myshare\www directory. The following sample code shows how to create the files:
Index.html
<HTML>
  <HEAD>
     <TITLE>Hello World in HTML</TITLE>
  </HEAD>
  <BODY>
     <CENTER><H1>Hello World!</H1></CENTER>
  </BODY>
</HTML>
Hello World!is displayed in the static web page.Test.asp
<HTML>
  <BODY>
     This page was last refreshed on <%= Now() %>.
  </BODY>
</HTML>
The current system time is displayed on the dynamic web page.
Set up the Windows IIS web service
In the Windows server, choose .
In the left-side navigation pane, choose . Then, click Basic Settings.
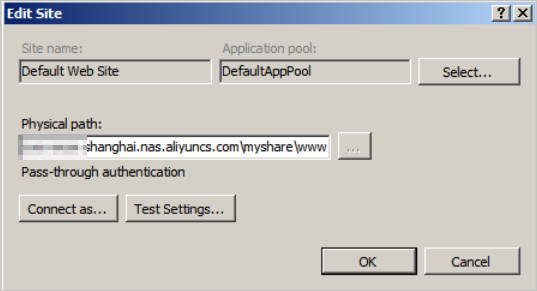
In the Edit Site dialog box, set Physical path and click OK.
In the Physical path field, enter the storage path of web resources on NAS, for example, \\file-system-id.region.nas.aliyuncs.com\myshare\www. file-system-id.region.nas.aliyuncs.com is the domain name of the mount target for the SMB file system. Replace the domain name with the actual value.
 Note
NoteBy default, you must use a user account and user group of IIS to access a network drive (for example, Z:\) mapped in the user session. You cannot directly access the mapped network drive as a Windows user. Otherwise, an access error may occur.
Optional. Modify the registry and add the iis_user user.
To achieve the coordination of IIS and NAS, you must perform the following steps. For Windows Server 2016, you must modify the registry and add the iis_user user. For Windows Server 2019, you must modify the registry, add the iis_user user, and then run the New-SmbGlobalMapping command in PowerShell to mount the SMB file system. The command ensures that dynamic-link libraries (DLLs) can be loaded.
Modify the registry key of the SMB client.
On the Windows server, choose .
In the left-side navigation pane of Registry Editor, choose , right-click a blank area, and then choose .
Set the value name to AllowInsecureGuestAuth, set the value data to 1, and then click OK.
Specify a local user to access the web resources stored on NAS.
In the Windows server, choose .
In the left-side navigation pane, choose . Then, click Basic Settings.
In the Edit Site dialog box, click Connect as.
Select Specific User and click Set.
Set the username and password, and then click OK.
In this example, the username is iis_user.
Run the New-SmbGlobalMapping command in PowerShell to mount the SMB file system.
# Define clear text string for username and password [string]$userName = 'WORKGROUP\administrator' [string]$userPassword = '****' # Convert to SecureString [securestring]$secStringPassword = ConvertTo-SecureString $userPassword -AsPlainText -Force [pscredential]$credObject = New-Object System.Management.Automation.PSCredential ($userName, $secStringPassword) New-SmbGlobalMapping -LocalPath z: -RemotePath \\file-system-id.region.nas.aliyuncs.com\myshare -Persistent $true -Credential $credObject****is the password of the administrator of the operating system.file-system-id.region.nas.aliyuncs.comis the domain name of the mount target for the SMB file system. Replace the domain name with the actual value.NoteWhen IIS accesses a file in the shared directory of the NAS file system, the backend of IIS may access the shared directory for multiple times. Although each access request does not take a long time, the client may take a long time to respond if multiple access requests are sent. For more information, see How can I improve the performance of access from IIS to NAS?
We recommend that you store the web-related files such as JS and CSS files to local disks if these files are frequently accessed by IIS.
If a write failure still occurs after you perform the preceding operations, contact NAS technical support.
Verify the settings.
Enter the local paths of the index.html and test.asp files in the address bar of your browser to open these files. If the following figures are displayed, IIS is running as expected. You can also configure security groups for your ECS instances and configure Windows Firewall to ensure access security.


Set up the Windows IIS FTP service
In the Windows server, choose .
Install the SSL certificate.
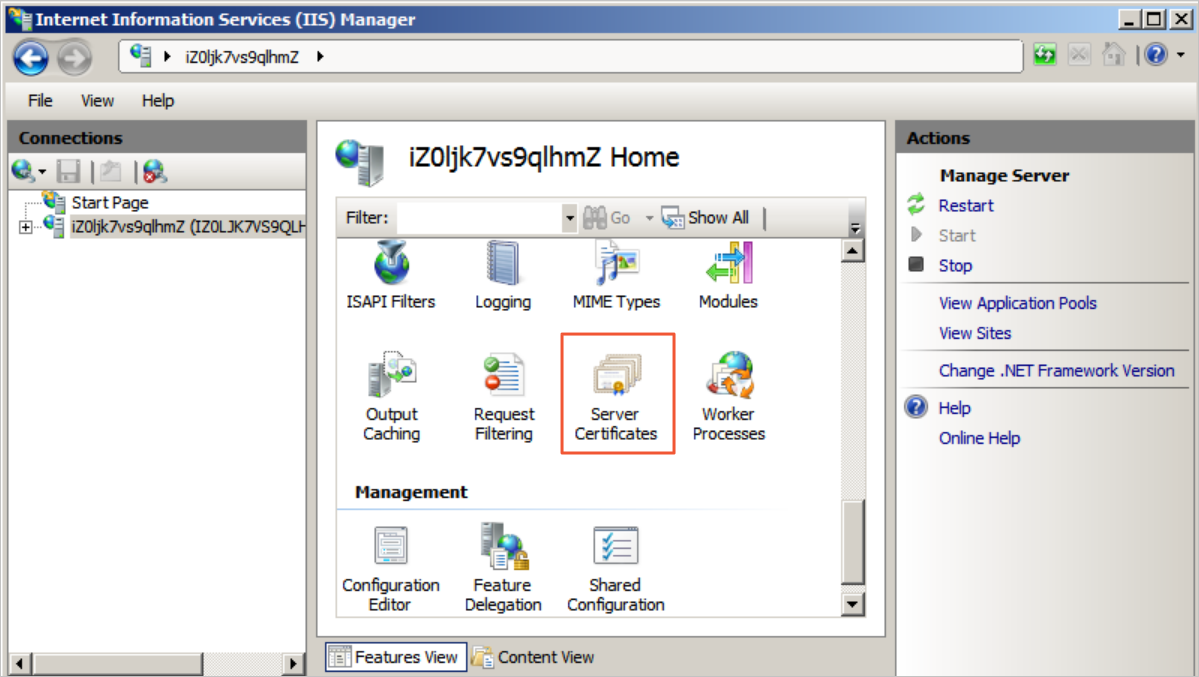
On the homepage, double-click Server Certificates.
On the Server Certificates page, click Create Self-Signed Certificate.
Specify a name for the certificate, and click OK.
Set up an FTP site.
In the left-side navigation pane, double-click Sites.
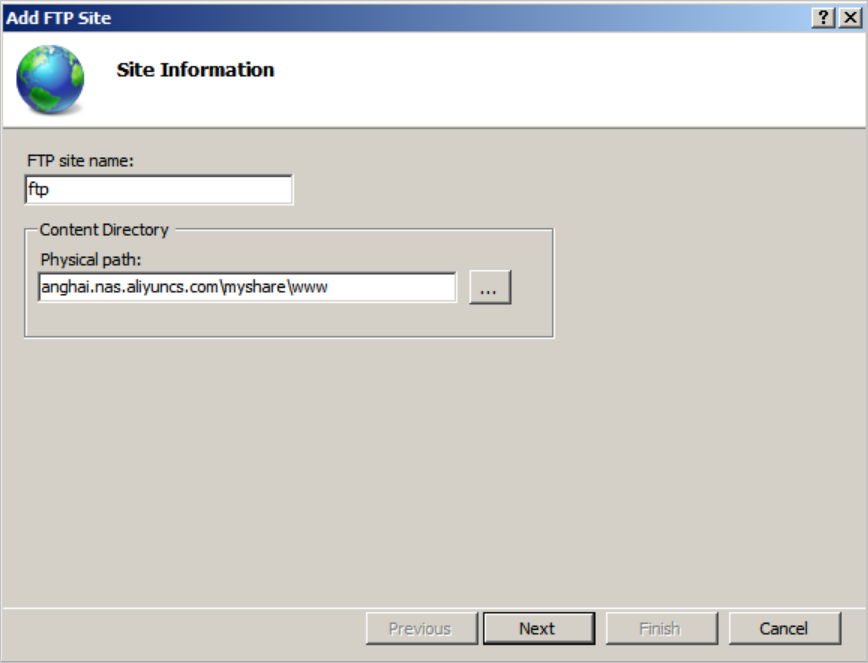
On the Sites page, click Add FTP Site.
In the Add FTP site dialog box, configure the relevant parameters and click Next.
In the Physical path field, enter the storage path of web resources on NAS, for example, \\file-system-id.region.nas.aliyuncs.com\myshare\www. file-system-id.region.nas.aliyuncs.com is the domain name of the mount target. Replace the domain name with the actual value.
You can select another subdirectory in the myshare directory based on your business requirements. You can also set up multiple FTP sites that provide different ports to access different directories.
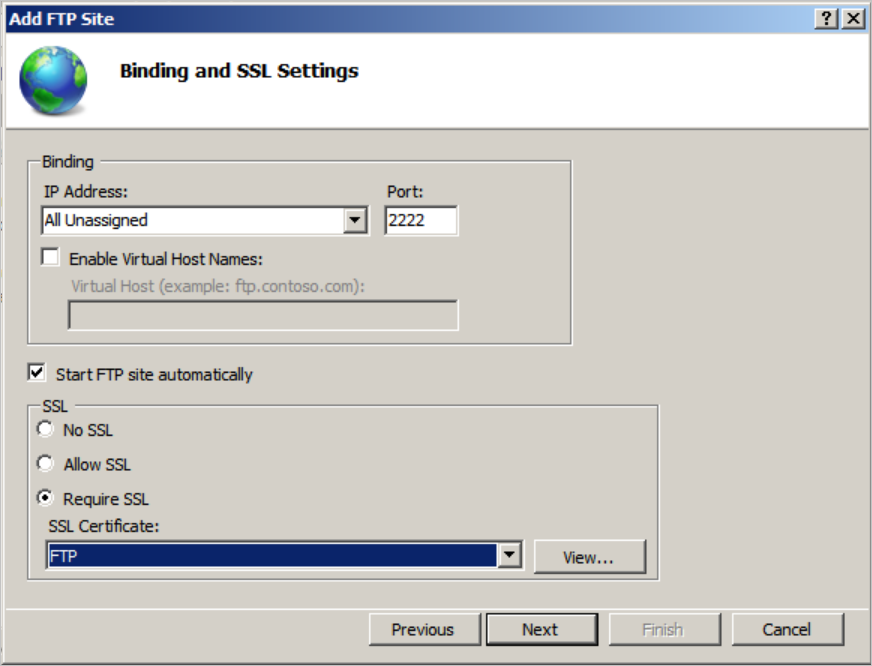
In the Binding and SSL Settings dialog box, configure the relevant parameters and click Next.
Configure the following parameters:
Port: The default port number is 21. For security concerns, port 2222 is used.
SSL Certificate: Select the created SSL certificate.
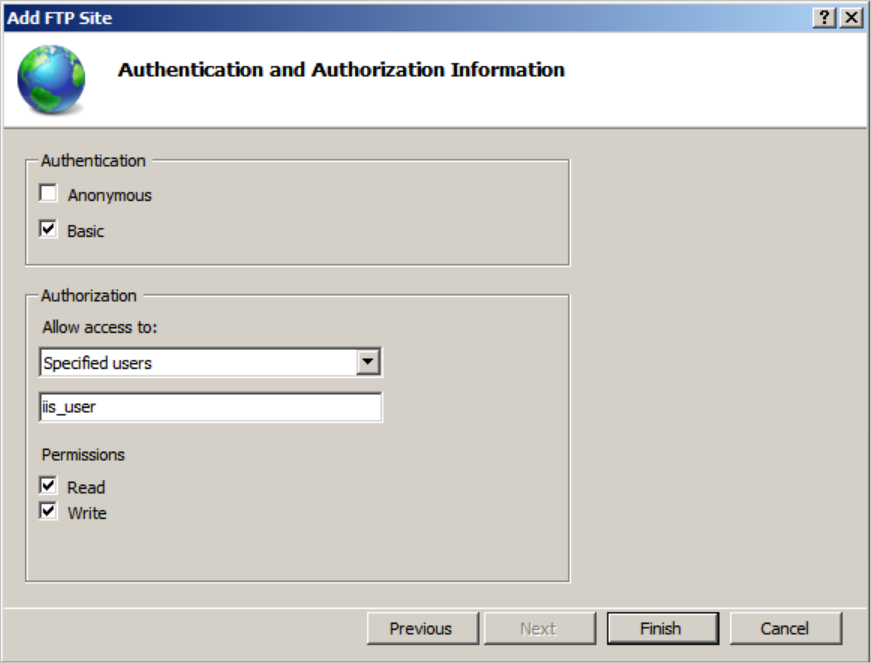
Configure the authentication and authorization information, and then click Finish.
Configure the following parameters:
Authentication: Select Basic.
Authorization: Select a user who is allowed to access NAS. In this example, iis_user is used.
Permissions: Grant the read and write permissions to the user.
Set up the FTP firewall.
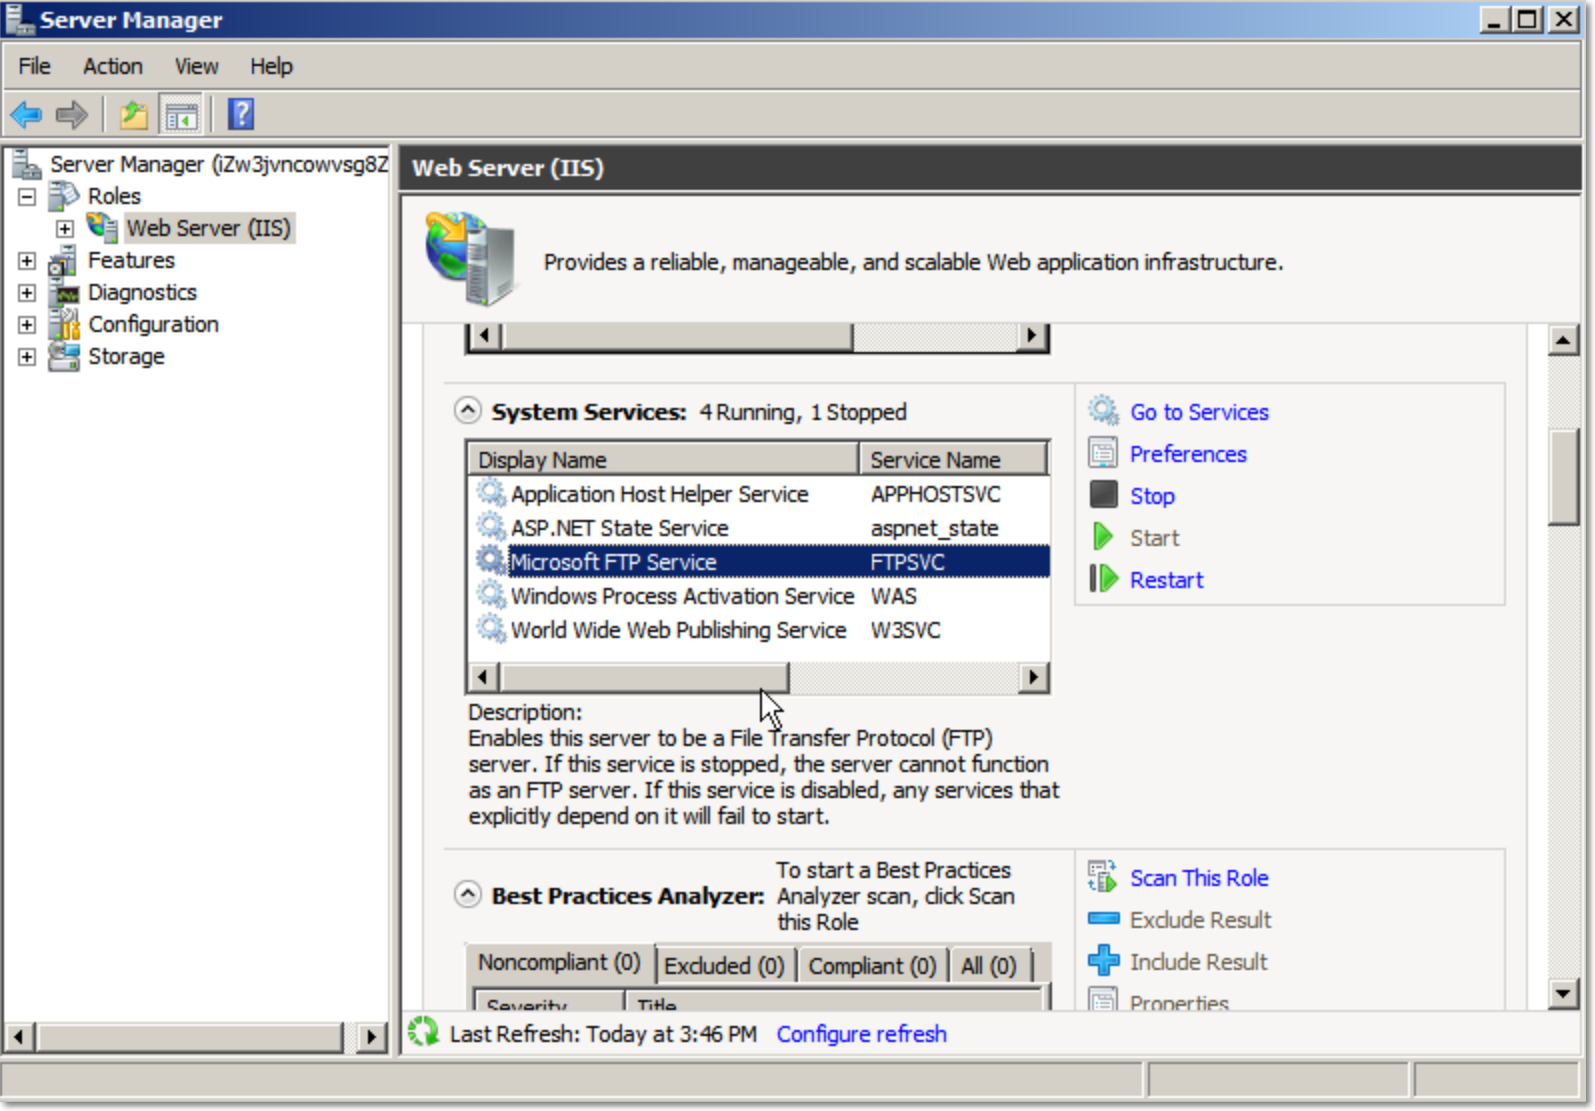
On the homepage, double-click FTP Firewall Support, specify Data Channel Port Range, and then click Apply.
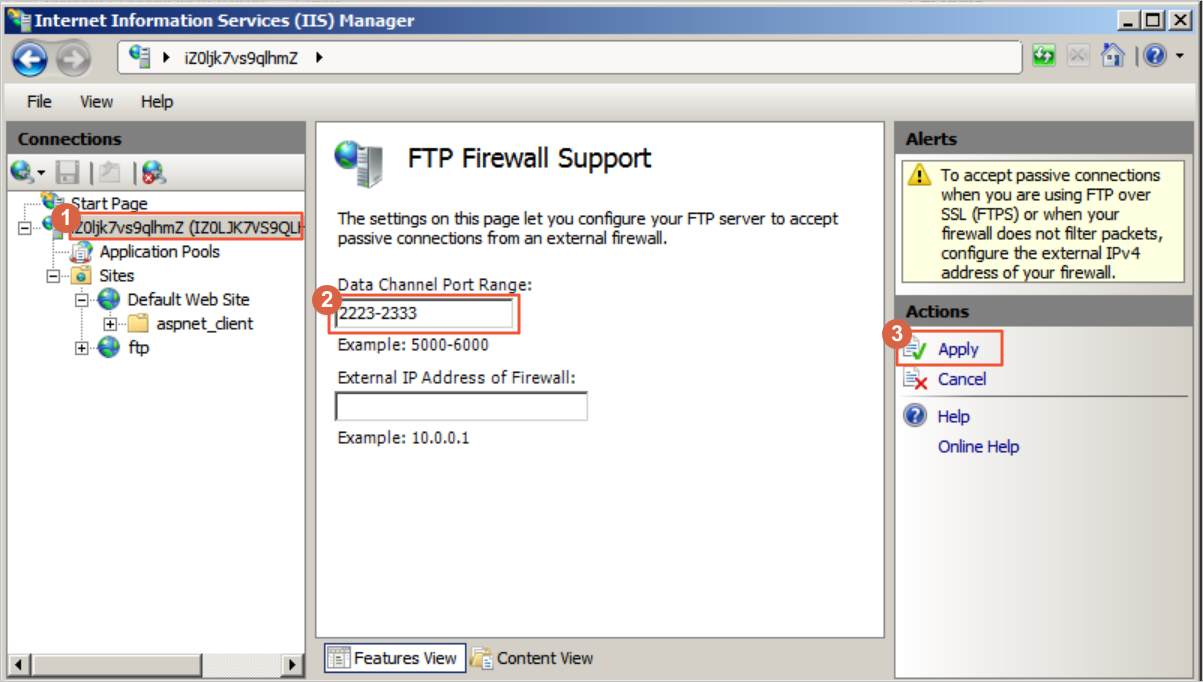
In the Server Manager window, restart the FTP service to validate the port range configurations.
In the ECS console, configure the security group for the ECS instance to restrict the access of FTP clients. For more information, see Create a security group.
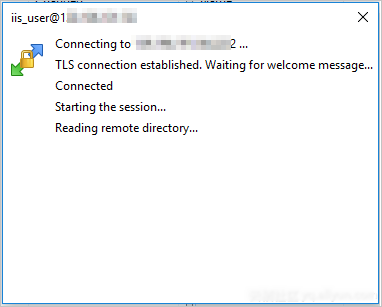
Access the FTP site through the FTP client WinSCP.
Open WinSCP.
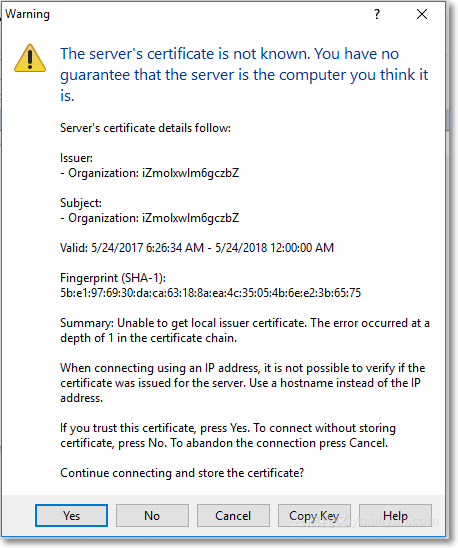
Click Yes to accept the server certificate.
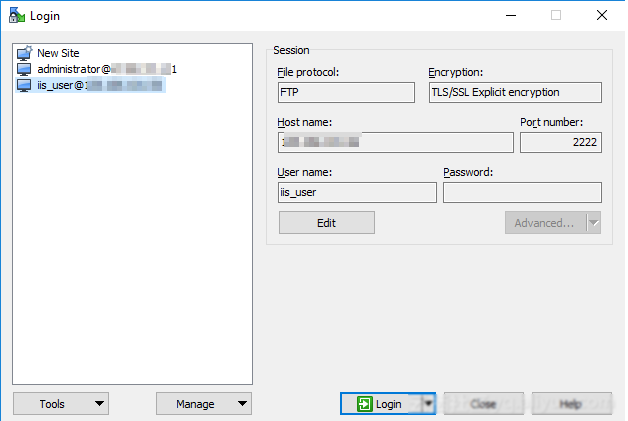
Set the protocol type, port number, and logon information.
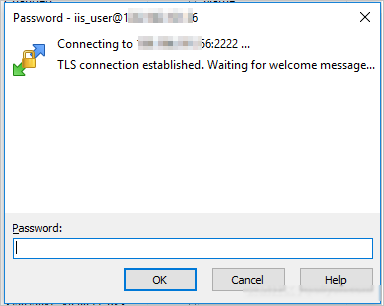
Enter the password of the authorized user (iis_user).
Establish a data connection to allow the server to read data from and write data to remote directories.
After the connection is created, upload or download files.
