This topic describes how to use Data Transmission Service (DTS) to migrate data from a self-managed MongoDB sharded cluster on an ECS instance to an ApsaraDB for MongoDB instance, using the incremental data migration feature of DTS for a smooth migration with minimal downtime.
This topic describes the procedure in the old DTS console. For the procedure in the new DTS console, see Migrate a self-managed MongoDB database (sharded cluster) to an ApsaraDB for MongoDB instance (replica set or sharded cluster).
How it works
DTS migrates a sharded cluster one shard at a time. Create a separate migration task for each shard.
Data distribution depends on the shard key you configure. Configure data sharding to maximize shard performance.
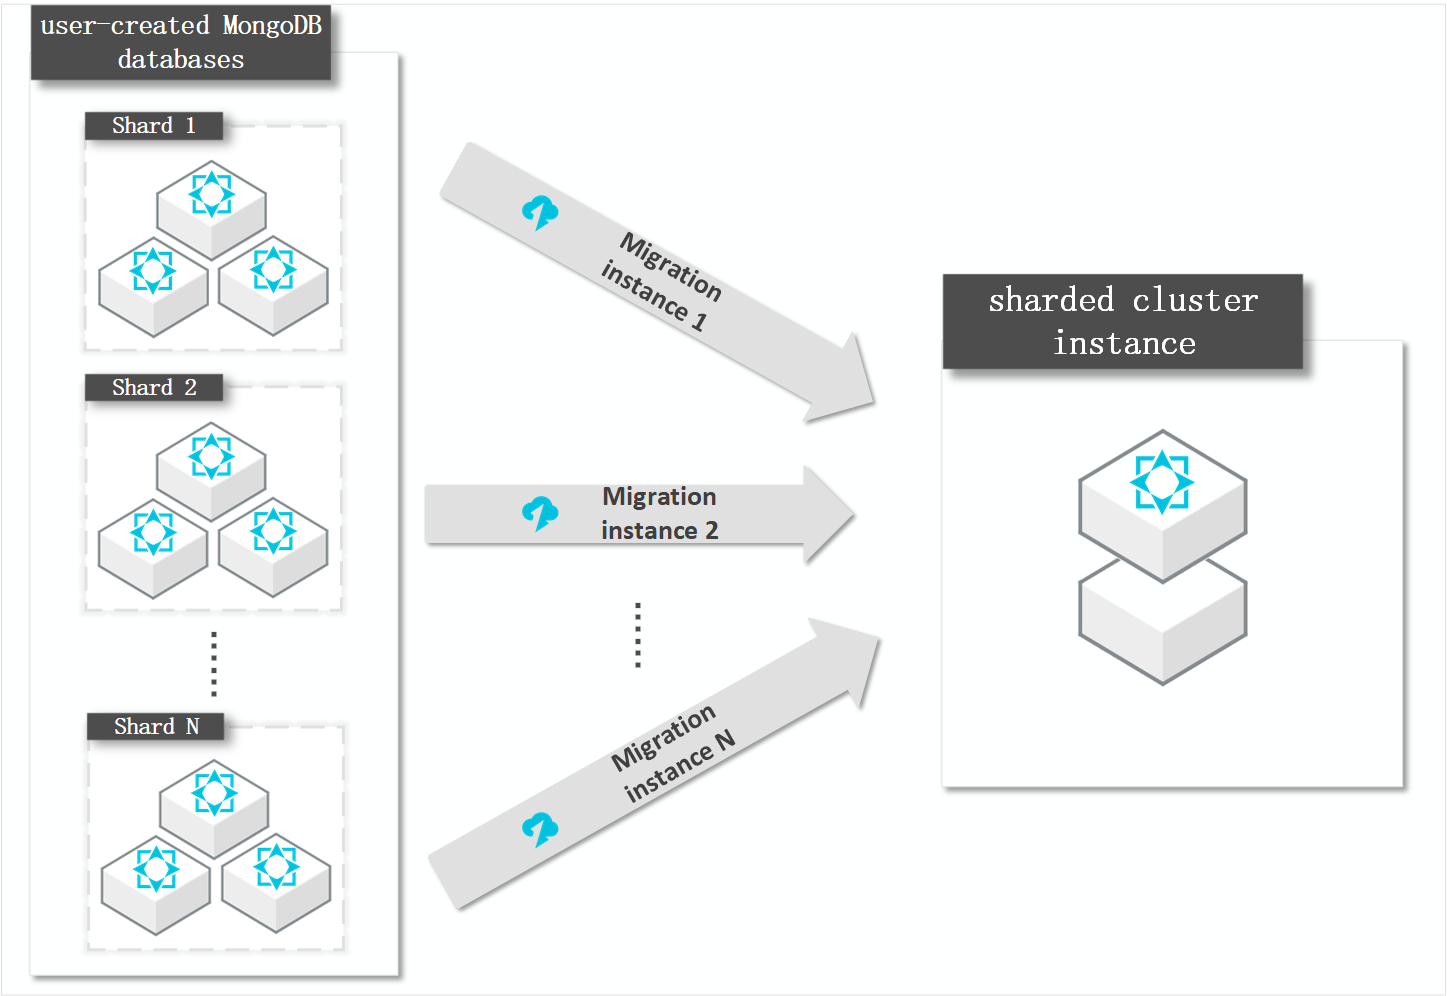
Prerequisites
The self-managed MongoDB database must be version 3.0 or later.
Ensure that each shard in the destination sharded cluster instance has sufficient storage space.
NoteFor example, if your self-managed database on an ECS instance has three shards and the largest one uses 500 GB of storage, each shard in the destination sharded cluster instance must have more than 500 GB of storage space.
Usage notes
Full data migration increases load on both source and destination databases. Run the migration during off-peak hours to avoid service interruptions.
avoid service interruptions.
When migrating across versions or storage engines, verify compatibility in Versions and storage engines first.
a#concept_qg2_xcr_52b">Versions and storage engines first.
DTS writes data concurrently, so the destination database may use 5% to 10% more storage than the source.
database may use 5% to 10% more storage than the source.
Ensure the destination has no documents with the same primary key (_id by default) as the source. If conflicts exist and deletion does not affect your business, delete the conflicting documents from the destination before migration.
nflicts exist and deletion does not affect your business, delete the conflicting documents from the destination before migration.
The admin and local databases cannot be used as the source or destination.
cannot be used as the source or destination.
The source MongoDB sharded cluster can have a maximum of 10 mongos nodes.
have a maximum of 10 mongos nodes.
Billing
Migration type | Task configuration fee | Internet traffic fee |
Full data migration | Free of charge. | Data migrated out of Alibaba Cloud over the public internet incurs charges. DTS Pricing. |
Incremental data migration | Charged. .DTS Pricing |
Migration types
Full data migration: Migrates all existing data of the selected objects from the source MongoDB database to the destination MongoDB database.
NoteThis includes databases, collections, and indexes.
Incremental data migration: Captures and replicates data changes from the source to the destination in real time after the full data migration is complete.
NoteThis includes creating and deleting databases, collections, and indexes.
This also includes inserting, deleting, and updating documents.
Required permissions for database accounts
Data source | Full data migration | Incremental data migration |
Self-managed MongoDB database on an ECS instance | read permission on the source database | read permission on the source database, the admin database, and the local database |
ApsaraDB for MongoDB instance | readWrite permission on the destination database | readWrite permission on the destination database |
To create accounts and grant permissions:
ApsaraDB for MongoDB instances: See Manage MongoDB database users by using DMS.
Self-managed MongoDB databases: See db.createUser().
Preparations
Before starting the data migration, disable the balancer and clear orphaned documents in the source database. For more information, see Preparations for migrating a sharded cluster database.
Procedure
- Log on to the DTS console.
In the left-side navigation pane, click Data Migration.
At the top of the Data Migration Tasks page, select the region of the destination ApsaraDB for MongoDB instance.
In the upper-right corner, click Create Data Migration Task.
Configure the source and destination database information.
Category
Setting
Description
Task Name
-
DTS automatically generates a task name. The task name does not need to be unique.
You can change the name. Specify a descriptive name for easy identification.
Source database
Instance type
Select Self-managed Database on ECS.
Instance region
Select the region of the ECS instance.
ECS instance ID
DTS migrates a sharded cluster by migrating each shard individually. For this task, select the ECS instance ID of the first shard.
When you create the next migration task, select the ECS instance ID of the second shard, and so on, until all shards are migrated.
Database type
Select MongoDB.
Port
Enter the service port of the first shard.
When you create the next migration task, enter the service port of the second shard, and so on, until all shards are migrated.
Database name
Enter the name of the authentication database.
Database account
Enter the account for connecting to the self-managed MongoDB database. For the required permissions, see Required permissions for database accounts.
Database password
Enter the password for the database account.
NoteAfter you configure the source database information, click Test Connectivity next to the Database Password field to verify the settings. If the settings are valid, a Passed message appears. If a Failed message appears, click Diagnose next to the Failed message and modify the settings based on the results.
Destination database
Instance type
Select MongoDB Instance.
Instance region
Select the region of the destination ApsaraDB for MongoDB instance.
MongoDB instance ID
Select the ID of the destination ApsaraDB for MongoDB instance.
Database name
Enter the name of the authentication database.
Database account
Enter the account for connecting to the destination ApsaraDB for MongoDB instance. For the required permissions, see Required permissions for database accounts.
Database password
Enter the password for the database account.
NoteAfter you configure the destination database information, click Test Connectivity next to the Database Password field to verify the settings. If the settings are valid, a Passed message appears. If a Failed message appears, click Diagnose next to the Failed message and modify the settings based on the results.
In the lower-right corner of the page, click Test Connectivity and Proceed.
NoteIf the source or destination database is an Alibaba Cloud database instance such as ApsaraDB for MongoDB or a self-managed database on an ECS instance, DTS automatically adds the IP address ranges of DTS servers in the corresponding region to the whitelist of the Alibaba Cloud database instance or the security rules of the ECS instance. You do not need to manually add them. For more information, see CIDR blocks of DTS servers.
If the source or destination database is a self-managed database, adding the public IP address ranges of DTS servers to allow access may pose security risks. Use a more secure connection method, such as using strong passwords, limiting the allowed ports, or connecting over an internal network by using Express Connect, VPN Gateway, or Smart Access Gateway.
After the DTS task is complete or released, manually remove the IP address ranges of the DTS servers.
Select the migration type and objects.
Setting
Description
Migration type
To perform only a full data migration, select Full Data Migration.
NoteTo ensure data consistency, do not write new data to the self-managed MongoDB database during full data migration.
For a migration with minimal downtime, select both Full Data Migration and Incremental Data Migration.
Source Objects
In the Source Objects box, select the objects to migrate and then click
 to move them to the Selected Objects box. Note
You cannot migrate the admin and local databases.
The config database is an internal system database. Do not migrate it unless necessary.
You can select objects at the database or collection/function level.
To rename objects in the destination database, use the object name mapping feature. For more information, see Map database, table, and column names.
After completing the preceding settings, click Next: Precheck and Start Task in the lower-right corner.
Note-
Before the migration task starts, DTS performs a precheck. The task starts only after it passes the precheck.
-
If the precheck fails, click View Details next to the failed check item, fix the issue based on the prompt, and then run the precheck again.
-
If a warning is reported during the precheck:
-
For check items that cannot be ignored, click View Details next to the failed item, fix the issue based on the prompt, and then run the precheck again.
-
For check items that can be ignored, you can click Confirm Alert Details, Ignore, OK, and Precheck Again to skip the alert item and run the precheck again. If you choose to ignore a warning, it may cause issues such as data inconsistency and pose risks to your business.
-
-
After the precheck is successful, click Next.
On the Purchase page, choose an Instance Class and select the Data Transmission Service (Pay-As-You-Go) Service Terms checkbox.
Click Buy and Start to start the migration task.
Repeat steps 4 to 11 to create migration tasks for the remaining shards.
Complete the migration tasks.
Full data migration
Do not stop the task manually, as this can cause data loss. It stops automatically when complete.
Incremental data migration
The task does not stop automatically. Stop it manually.
NoteStop during off-peak hours or when ready to switch to the ApsaraDB for MongoDB instance.
Wait for all shard migration tasks to show Incremental Data Migration and Undelayed. Then stop writes to the source database for a few minutes. The Incremental Data Migration status may briefly show latency.
When the Incremental Data Migration status for all shard migration tasks returns to Undelayed, stop the tasks manually. Select all migration tasks, confirm that they all show Undelayed, and then click the Stop button at the bottom of the page to complete the migration.
urns to Undelayed, stop the tasks manually. Select all migration tasks, confirm that they all show Undelayed, and then click the Stop button at the bottom of the page to complete the migration.
Switch your business to the ApsaraDB for MongoDB instance.