Use Data Transmission Service (DTS) to migrate a self-managed MongoDB sharded cluster to ApsaraDB for MongoDB with no service interruption. DTS migrates both existing (full) data and ongoing changes (incremental), so your application keeps running throughout.
For a broader view of available migration approaches, see Overview of MongoDB data migration and synchronization solutions.
How it works
DTS treats each shard as an independent migration source. You create one migration task per shard. After migration completes, data distribution on the destination cluster depends on the shard key you configure.
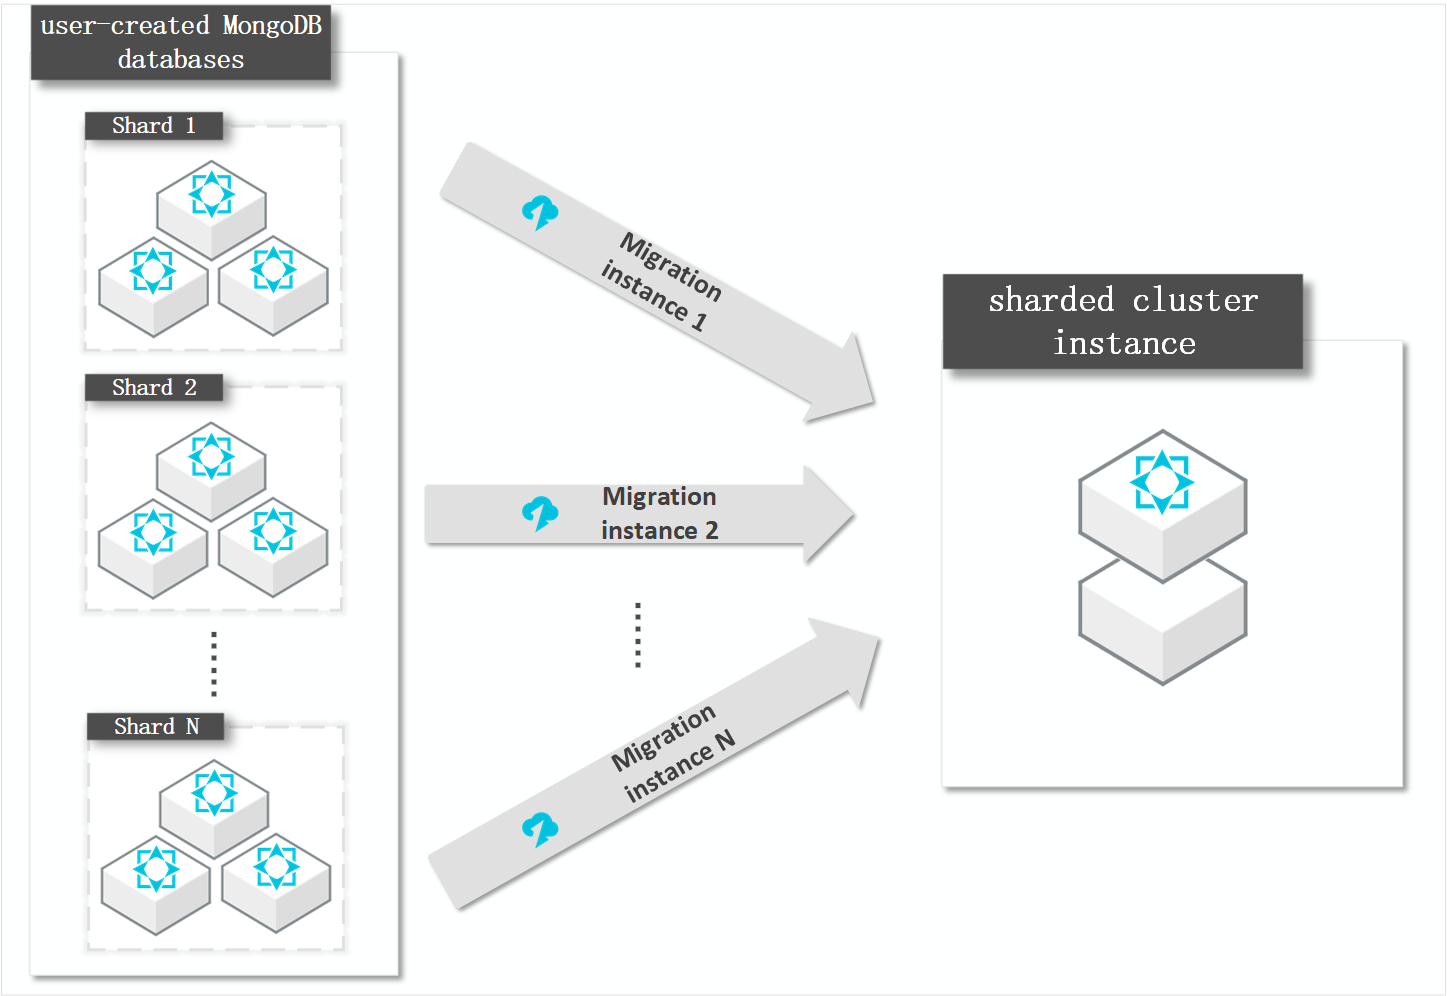
Data distribution on the destination MongoDB instance depends on the shard key you set. For more information, see Configure data sharding to maximize shard performance.
Migration types
DTS supports two migration types, which you can combine for a zero-downtime migration:
Full data migration: Migrates all historical data from the source, including databases, collections, and indexes.
Incremental data migration: Migrates ongoing changes after full migration completes. Supports create, delete, and update operations on documents, and create and delete operations on databases, collections, and indexes.
Billing
| Migration type | Task configuration fee | Data transfer cost |
|---|---|---|
| Full data migration | Free | Charged for data transferred over the Internet from Alibaba Cloud. See DTS pricingDTS pricing. |
| Incremental data migration | Charged. See DTS pricingDTS pricing. | — |
DTS charges during the connection retry period. Set the retry duration to match your business needs.
Limitations
The
adminandlocaldatabases cannot be the source or destination.The source MongoDB sharded cluster cannot have more than 10 mongos nodes.
Sharded clusters with Migration Method set to Oplog do not support SSL-encrypted connections.
DTS consumes read and write resources on both source and destination during full data migration, which increases database load. Run migrations during off-peak hours.
The destination database must not contain documents with the same primary key (
_id) as the source. Delete any conflicting documents from the destination before starting migration.
Prerequisites
Before you begin, make sure that:
The source and destination MongoDB versions are compatible. See Migration solutions overview for supported version combinations. For cross-version or cross-engine migrations, verify compatibility in advance.
Each shard in the destination sharded cluster has enough storage space. DTS writes data concurrently, so the destination typically uses 5%–10% more storage than the source.
For example, if the source has three shards and the largest shard uses 500 GB, each destination shard must have more than 500 GB of available space.
The source MongoDB database account has the required permissions (see Permissions required).
The destination ApsaraDB for MongoDB account has the required permissions (see Permissions required).
Permissions required
| Database | Full data migration | Full + incremental data migration |
|---|---|---|
| Self-managed MongoDB | Read on the source database | Read on the source database, the admin database, and the local database |
| ApsaraDB for MongoDB | Read and write on the destination database | Read and write on the destination database |
To create a database account and grant permissions:
Self-managed MongoDB: See MongoDB Create User documentation.
ApsaraDB for MongoDB: See Use DMS to manage MongoDB database users.
Prepare the source database
Complete these steps before creating the DTS migration task. Skipping them can cause data inconsistency or migration errors.
Step 1: Disable the balancer
If the balancer is running during migration, chunk migration corrupts the data that DTS reads. Disable the balancer before starting the DTS task.
Disable the balancer on the self-managed MongoDB database. For instructions, see Managing the MongoDB balancer.
Step 2: Remove orphaned documents
Orphaned documents from failed chunk migrations slow migration performance and can trigger _id conflicts that fail the migration.
Download the cleanupOrphaned.js script:
wget "https://docs-aliyun.cn-hangzhou.oss.aliyun-inc.com/assets/attach/120562/cn_zh/1564451237979/cleanupOrphaned.js"Open
cleanupOrphaned.jsand replacetestwith the name of the database to clean.Repeat steps 2 and 3 for each database.
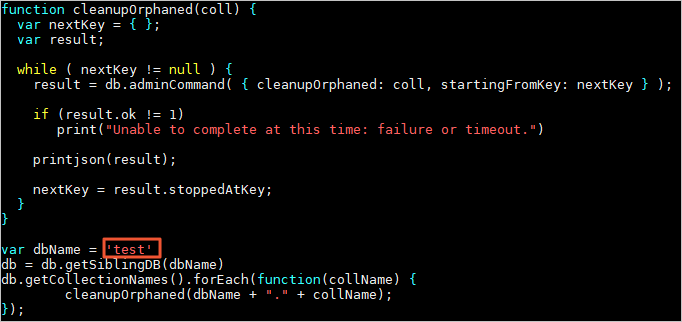
Run the script on each shard node's primary:
Placeholder Description <Shardhost>IP address of the shard node <Primaryport>Service port of the shard's primary node <database>Authentication database for the account <username>Database account name <password>Database account password mongo --host <Shardhost> --port <Primaryport> --authenticationDatabase <database> -u <username> -p <password> cleanupOrphaned.jsExample — a source cluster with three shards:
mongo --host 172.16.1.10 --port 27018 --authenticationDatabase admin -u dtstest -p 'Test123456' cleanupOrphaned.js
mongo --host 172.16.1.11 --port 27021 --authenticationDatabase admin -u dtstest -p 'Test123456' cleanupOrphaned.js
mongo --host 172.16.1.12 --port 27024 --authenticationDatabase admin -u dtstest -p 'Test123456' cleanupOrphaned.js
Step 3: Configure data sharding on the destination
Before creating the DTS task, create the databases and collections that need sharding on the destination cluster, and configure sharding rules. This prevents all migrated data from landing on a single shard and exhausting its storage.
See Configure data sharding to fully utilize shard performance.
Create a migration task
Step 1: Open the migration task list
Use either the DTS or DMS console.
From the DTS console
Log on to the DTS console.Data Transmission Service (DTS) console
In the left navigation pane, click Data Migration.
In the upper-left corner, select the region where the migration instance is located.
From the DMS console
The DMS console layout varies by mode. See Simple mode console and Customize the layout and style of the DMS console.
Log on to the DMS console.Data Management (DMS) console
In the top menu bar, choose Data + AI > Data Transmission (DTS) > Data Migration.
To the right of Data Migration Tasks, select the region where the migration instance is located.
Step 2: Create and configure the task
Click Create Task to open the task configuration page.
Read the limits displayed at the top of the configuration page before proceeding. Ignoring them can cause task failure or data inconsistency.
Configure the source database
| Parameter | Value |
|---|---|
| Task Name | DTS generates a name automatically. Specify a descriptive name for easy identification. The name does not need to be unique. |
| Select Existing Connection | Select a saved connection from the drop-down list to auto-fill the fields below, or configure manually. In the DMS console, this is labeled Select a DMS database instance. |
| Database Type | Select MongoDB. |
| Access Method | Select the connection type based on where your source database is deployed. This example uses Public IP Address. For other connection types, complete the required preparations first. |
| Instance Region | Select the region of the self-managed MongoDB database. If the exact region is not listed, select the geographically closest one. |
| Architecture | Select Sharded Cluster. This option appears only when Access Method is Express Connect, VPN Gateway, or Smart Access Gateway, Public IP Address, or Cloud Enterprise Network (CEN). |
| Migration Method | Select the incremental migration method: Oplog (recommended — oplog is enabled by default on self-managed MongoDB; lower latency than Change Streams) or Change StreamsChange Streams (required for Amazon DocumentDB non-elastic clusters). When Architecture is Sharded Cluster, the Shard account and Shard password fields are not required for Change Streams. |
| Endpoint Type | Select Standalone or Multi-node. Appears only when Access Method is Express Connect, VPN Gateway, or Smart Access Gateway, Public IP Address, or Cloud Enterprise Network (CEN). |
| Mongos Domain Name or IP Address | Enter the domain name or IP address of a single mongos node. Appears only when Endpoint Type is Standalone. |
| Port Number | Enter the service port of the source database. Appears only when Endpoint Type is Standalone. All mongos node ports must be open to the public network. |
| Mongos endpoint | Enter the connection addresses in <IP>:<Port> format, one per line. Appears only when Endpoint Type is Multi-node. Use publicly resolvable domain names where possible. |
| Authentication Database | Enter the database the account belongs to. Default: admin. |
| Database Account | Account for the mongos node. If Access Method is Self-managed Database on ECS or Database Gateway, enter the account for the shard node. |
| Database Password | Password for the database account. |
| Access to Multiple Shard Nodes | Configure shard node connection information. Appears only when Architecture is Sharded Cluster, Migration Method is Oplog, and Endpoint Type is Multi-node. Click Add, enter the <IP>:<Port> of each shard node, and repeat for all shards. |
| Shard access information (IP:Port) | Enter shard node addresses in <IP>:<Port> format, separated by commas. Appears only when Endpoint Type is Standalone. |
| Shard account | Shard account for the self-managed MongoDB database. |
| Shard password | Password for the shard account. |
| Encryption | Select Non-encrypted, SSL-encrypted, or Mongo Atlas SSL. Available options depend on Access Method and Architecture. Sharded clusters with the Oplog migration method do not support SSL-encrypted. If the source database is a self-managed MongoDB database that uses the Replica Set, the Access Method is not set to Alibaba Cloud Instance, and you have selected SSL-encrypted, you can also upload a CA certificate to verify the connection to the source database. |
Configure the destination database
| Parameter | Value |
|---|---|
| Select Existing Connection | Select a saved connection or configure manually. |
| Database Type | Select MongoDB. |
| Access Method | Select Alibaba Cloud Instance. |
| Instance Region | Select the region of the destination ApsaraDB for MongoDB instance. |
| Replicate Data Across Alibaba Cloud Accounts | Select No to use an instance under the current account. |
| Architecture | Select the architecture of the destination instance. |
| Instance ID | Select the ID of the destination ApsaraDB for MongoDB instance. |
| Authentication Database | Enter the database the account belongs to. Default: admin. |
| Database Name | Enter the name of the database that receives the migrated objects. |
| Database Account | Enter the destination database account. |
| Database Password | Enter the password for the database account. |
| Encryption | Select the connection type. Sharded clusters do not support SSL-encrypted. If the destination database is a self-managed MongoDB database that uses the Replica Set, the Access Method is not Alibaba Cloud Instance, and you select SSL-encrypted, DTS also supports uploading a CA certificate to verify the connection. |
Step 3: Test connectivity
Click Test Connectivity and Proceed at the bottom of the page. In the CIDR Blocks of DTS Servers dialog box, click Test Connectivity.
Add the DTS server IP address ranges to the security settings (whitelist) of both source and destination databases. See Add DTS server IP addresses to a whitelist.
Step 4: Configure migration objects
On the Configure Objects page, set the following parameters.
| Parameter | Description |
|---|---|
| Migration Types | Select Schema Migration and Full Data Migration for a one-time migration. Add Incremental Data Migration to minimize downtime. If you skip Schema Migration, create the target database and collections manually, or use object name mapping in Selected Objects. If you skip Incremental Data Migration, stop writing to the source during migration to maintain consistency. |
| Processing Mode of Conflicting Tables | Precheck and Report Errors: Fails the precheck if same-name tables exist in the destination. Ignore Errors and Proceed: Skips the check — during full migration, DTS keeps existing destination records; during incremental migration, source records overwrite destination records. Use this option with caution, as it may cause data inconsistency. |
| Capitalization of Object Names in Destination Instance | Configure case sensitivity for migrated object names. Default is DTS default policy. See Case sensitivity of object names. |
| Source Objects | Click objects to migrate in the Source Objects box, then click |
| Selected Objects | Right-click a migrated object to rename it or map it to a different destination object. To remove an object, click it and click |
Step 5: Configure advanced settings
Click Next: Advanced Settings to configure the following parameters.
| Parameter | Description |
|---|---|
| Dedicated Cluster for Task Scheduling | By default, DTS uses a shared cluster. To use a dedicated cluster, purchase one first. See What is a DTS dedicated cluster?. |
| Retry Time for Failed Connections | How long DTS retries after a connection failure. Default: 720 minutes. Range: 10–1,440 minutes. Set to at least 30 minutes. DTS charges during the retry period. For shared source/destination instances, the most recently created task determines the retry time. |
| Retry Time for Other Issues | How long DTS retries after non-connectivity errors (such as DDL/DML failures). Default: 10 minutes. Range: 1–1,440 minutes. Keep this value lower than Retry Time for Failed Connections. |
| Enable Throttling for Full Data Migration | Limit DTS resource consumption during full migration by setting QPS (queries per second) to the source database, RPS of Full Data Migration, and Data migration speed for full migration (MB/s). Available only when Full Data Migration is selected. You can also adjust the speed after the task starts. |
| Only one data type for primary key _id in a table of the data to be synchronized | Yes: DTS skips scanning primary key data types and migrates only one type per collection. No: DTS scans and migrates all data types. Select carefully — incorrect selection can cause data loss. Available only when Full Data Migration is selected. |
| Enable Throttling for Incremental Data Migration | Set RPS of Incremental Data Migration and Data migration speed for incremental migration (MB/s) to limit load on the destination. Available only when Incremental Data Migration is selected. |
| Environment Tag | (Optional) Assign an environment tag to identify the instance. |
| Configure ETL | Enable the extract, transform, and load (ETL) feature to transform data during migration. See What is ETL? and Configure ETL in a data migration task. |
| Monitoring and Alerting | Configure alerts for migration failures or latency exceeding a threshold. See Configure monitoring and alerting. |
Step 6: Configure data validation
Click Next: Data Validation to set up a data validation task. See Configure data validation.
Step 7: Run the precheck
Click Next: Save Task Settings and Precheck.
To preview the API parameters for this configuration, hover over Next: Save Task Settings and Precheck and click Preview OpenAPI parameters.
DTS runs a precheck before starting the migration. If the precheck fails:
Click View Details next to the failed item, fix the issue, then run the precheck again.
For warnings on items that cannot be ignored, fix the issue and rerun.
For warnings on items that can be ignored, click Confirm Alert Details > Ignore > OK > Precheck Again. Ignoring warnings may cause data inconsistency.
Step 8: Purchase the migration instance
When the Success Rate reaches 100%, click Next: Purchase Instance.
On the Purchase page, select the instance class for the migration link. See Data migration link specifications to choose the right specification for your workload.
Parameter Description Resource Group Settings Select the resource group for the instance. Default: default resource group. See What is Resource Management?. Instance Class Select a specification based on your migration volume and required speed. Read and accept the Data Transmission Service (Pay-as-you-go) Service Terms.
Click Buy and Start, then click OK in the confirmation dialog.
Track progress on the Data Migration Tasks list page.
Full-only migrations stop automatically when complete — the task status changes to Completed. Migrations that include incremental migration continue running and show Running status until you stop them manually.
Step 9: Repeat for remaining shards (if applicable)
If the Access Method of the source is Self-managed Database on ECS or Database Gateway, repeat steps 1–8 to create migration tasks for each remaining shard node.
Complete the migration
Full data migration only
Do not stop the migration task manually. Wait for it to stop automatically. Stopping early results in incomplete data.
Full + incremental data migration
The incremental migration task does not stop automatically. Stop it manually when your application is ready to cut over.
Verify that the Running stage for all shard migration tasks shows Incremental Data Migration and the Operation Info column shows Undelayed.
Stop writing to the source database for a few minutes. The latency indicator may show a brief delay as DTS catches up.
Wait for the Incremental Data Migration status for all shard tasks to return to Undelayed.
Stop the migration tasks manually.
There is no automatic timeout for incremental migration tasks. Stop them when your application is fully switched over to the destination database.