Learn how the Realtime API authenticates connections with tokens, including how to get an API key and how to authenticate over the WebSocket, WebRTC, and AOQ protocols.
Authentication methods
The Realtime API uses API keys for authentication. Whether you connect over AOQ, WebRTC, or WebSocket, you pass a bearer token in the Authorization HTTP request header.
Authentication happens only during connection setup. After the connection is established, data transmission doesn't require re-authentication.
The following table compares how the three protocols authenticate:
Protocol | When authentication happens | Authentication method | Notes |
|---|---|---|---|
AOQ | When the business AppServer requests the gateway | HTTP header | The API key is used only on the server side. The client uses the token returned by the gateway |
WebRTC | During the SDP exchange HTTP request | HTTP header | The client or server initiates the SDP exchange with the API key |
WebSocket | During the WebSocket handshake | HTTP header | The client or server connects directly with the API key |
Get an API key
Step 1: Activate Model Studio
- Go to the Alibaba Cloud Model Studio console and log on with your Alibaba Cloud account.
- If this is your first time using the service, follow the on-screen instructions to activate it.
Step 2: Create an API Key
- In the left navigation pane of the console, choose API Key.
- Click Create API Key and select the workspace to associate with the key.
- After the key is created, copy and store it immediately.
ImportantSecurity note: The API key is your only credential for accessing the service. Don't hard-code it in client code or commit it to a code repository. Manage it through environment variables or distribute it from a backend service.
Connection authentication details
AOQ protocol authentication
AOQ uses a server-side proxy authentication model: the API key is used only on the business AppServer. The client connects with a temporary token returned by the gateway, which keeps the API key off the client.
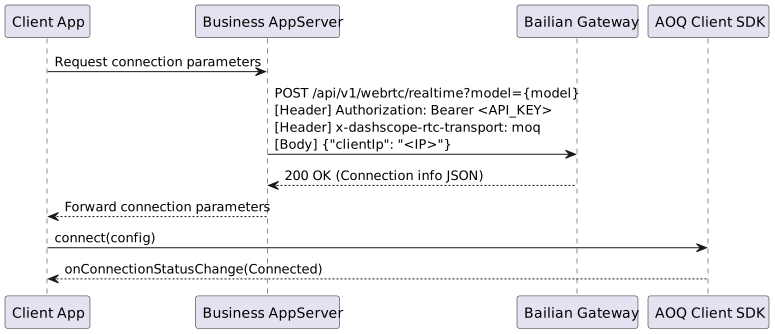
For AOQ access, select the connection request path based on the model series. For protocol support by model, see Realtime API overview.
| Model series | Connection request path |
|---|---|
| Qwen-Omni-Realtime, Qwen-Audio-Realtime, Qwen-Livetranslate-Realtime | /api/v1/webrtc/realtime |
| Qwen-Audio-TTS, CosyVoice, Qwen-Audio-ASR-Streaming, Qwen-Audio-ASR-Message, Fun-ASR-Realtime | /api/v1/webrtc/inference |
The following Realtime example uses qwen3.8-omni-flash-realtime. Set {endpoint} to {WorkspaceId}.cn-beijing.maas.aliyuncs.com for China (Beijing) or {WorkspaceId}.ap-southeast-1.maas.aliyuncs.com for Singapore. Replace {WorkspaceId} with your workspace ID and use the API key for the same region and workspace.
curl -X POST \
  "https://{endpoint}/api/v1/webrtc/realtime?model=qwen3.8-omni-flash-realtime" \
  -H "Content-Type: application/json" \
  -H "Authorization: Bearer ${DASHSCOPE_API_KEY}" \
  -H "x-dashscope-rtc-transport: moq" \
  -d "{\"clientIp\": \"${CLIENT_REAL_IP}\"}"
curl -X POST \
  "https://{endpoint}/api/v1/webrtc/inference?model=fun-asr-realtime" \
  -H "Content-Type: application/json" \
  -H "Authorization: Bearer ${DASHSCOPE_API_KEY}" \
  -H "x-dashscope-rtc-transport: moq" \
  -d "{\"clientIp\": \"${CLIENT_REAL_IP}\"}"
Request fields
Item | Value | Description |
|---|---|---|
endpoint | Select an access domain based on your business scenario | Specifies the access domain. For details, see Regions and access domains. If you use Token Plan, the |
Content-Type |
| Specifies the message type |
Authorization |
| Your API key |
x-dashscope-rtc-transport |
| Specifies the AOQ protocol |
clientIp | The client's real public IP address | Optional. If not specified, the IP address that requests the Model Studio gateway is used. If specified, the clientIp value takes precedence. The Realtime API assigns the best Relay access point based on the client IP address |
Response example
{
    "sid": "1d06b55683db49bba67a407902f62d02:1782706970:69aecdc5...",
    "aoqTokenForClient": "ecc1a46015d5496ca4ff7a48281eb739",
    "clientRelayEndpoints": [{"endpoint": "121.199.XX.XX", "port": 8443, "route_index": 0}],
    "clientRelayCertFingerprint": "sha256/99843495...",
    "sidExpiresInSecs": 7200,
    "extraInfo": {"workspaceIdHash": "2021b6f98cea4cff"}
}
Response fields
Field | Description |
|---|---|
sid | Unique session ID |
aoqTokenForClient | Client connection token. Pass it to the SDK's token field |
clientRelayEndpoints | Array of Relay access points (endpoint + port) |
clientRelayCertFingerprint | Relay TLS certificate fingerprint |
sidExpiresInSecs | Session expiration time, in seconds |
extraInfo.workspaceIdHash | Workspace ID hash |
AOQ Client SDK connection example
NoteclientIp is an optional field in the request body. If not specified, the IP address that requests the Model Studio gateway is used as the client IP. If specified, the clientIp value takes precedence. Have your business AppServer obtain the client's real IP address and pass it in to get the best Relay access point.
let resp = try JSONDecoder().decode(AllocateResponse.self, from: responseData)

let config = AoqConnectConfig()
config.token = resp.aoqTokenForClient
config.sid = resp.sid
config.certFingerprint = resp.clientRelayCertFingerprint
config.relayEndpoints = resp.clientRelayEndpoints.enumerated().map { index, item in
    let ep = AoqRelayEndpoint()
    // Fall back to the array index when route_index is missing
    ep.routeIndex = item.routeIndex ?? index
    ep.endpoint = item.endpoint
    ep.port = item.port
    return ep
}
config.workspaceIdHash = resp.extraInfo?.workspaceIdHash ?? ""

let audioTrack = AoqTrackParam()
audioTrack.trackType = .audio
let dataTrack = AoqTrackParam()
dataTrack.trackType = .data
config.publishTracks = [audioTrack, dataTrack]
config.subscribeTracks = [audioTrack, dataTrack]

engine.connect(config)
JSONObject obj = new JSONObject(responseText);
AoqClientEngine.AoqConnectConfig cfg = new AoqClientEngine.AoqConnectConfig();
cfg.token = obj.optString("aoqTokenForClient", "");
cfg.sid = obj.optString("sid", "");
cfg.certFingerprint = obj.optString("clientRelayCertFingerprint", "");

JSONArray arr = obj.optJSONArray("clientRelayEndpoints");
if (arr != null) {
    for (int i = 0; i < arr.length(); i++) {
        JSONObject o = arr.optJSONObject(i);
        AoqClientEngine.AoqRelayEndpoint ep = new AoqClientEngine.AoqRelayEndpoint();
        // Fall back to the array index when route_index is missing
        ep.routeIndex = o.has("route_index") ? o.optInt("route_index", i) : i;
        ep.endpoint = o.optString("endpoint", "");
        ep.port = o.optInt("port", 0);
        cfg.relayEndpoints.add(ep);
    }
}

JSONObject ext = obj.optJSONObject("extraInfo");
cfg.workspaceIdHash = ext != null ? ext.optString("workspaceIdHash", "") : "";

AoqClientEngine.AoqTrackParam audio = new AoqClientEngine.AoqTrackParam();
audio.trackType = AoqClientEngine.AoqTrackType.AoqTrackTypeAudio;
AoqClientEngine.AoqTrackParam data = new AoqClientEngine.AoqTrackParam();
data.trackType = AoqClientEngine.AoqTrackType.AoqTrackTypeData;
cfg.publishTracks.add(audio);
cfg.publishTracks.add(data);
cfg.subscribeTracks.add(audio);
cfg.subscribeTracks.add(data);

engine.connect(cfg);
const obj = JSON.parse(responseText) as Record<string, Object | undefined>;
const cfg: AoqConnectConfig = {
    token: String(obj['aoqTokenForClient'] ?? ''),
    sid: String(obj['sid'] ?? ''),
    certFingerprint: String(obj['clientRelayCertFingerprint'] ?? ''),
    // Fall back to the array index when route_index is missing
    relayEndpoints: (obj['clientRelayEndpoints'] as Array<any>).map((item, index) => ({
        routeIndex: Number(item['route_index'] ?? index),
        endpoint: String(item['endpoint'] ?? ''),
        port: Number(item['port'] ?? 0)
    })),
    workspaceIdHash: String((obj['extraInfo'] as any)?.['workspaceIdHash'] ?? ''),
    publishTracks: [
        { trackType: AoqTrackType.AoqTrackTypeAudio },
        { trackType: AoqTrackType.AoqTrackTypeData }
    ],
    subscribeTracks: [
        { trackType: AoqTrackType.AoqTrackTypeAudio },
        { trackType: AoqTrackType.AoqTrackTypeData }
    ]
};
engine.connect(cfg);
WebRTC protocol authentication
WebRTC completes the SDP exchange over an HTTP POST request, and authentication happens at this stage. The client sends the Offer SDP to the server, and the server returns the Answer SDP.
Item | Value | Description |
|---|---|---|
Request method | POST | - |
Request URL |
| Replace endpoint and model_name. The connection URL varies by model. For details, see WebRTC connection |
Content-Type |
| The request body is an SDP string |
Authorization |
| Your API key |
Response | HTTP 200 with the Answer SDP | Returns a 4xx status code on failure |
const pc = new RTCPeerConnection();
const stream = await navigator.mediaDevices.getUserMedia({ audio: true });
stream.getAudioTracks().forEach(t => pc.addTrack(t, stream));
pc.createDataChannel('oai-events');

const offer = await pc.createOffer();
await pc.setLocalDescription(offer);

// Send after ICE gathering is complete
const resp = await fetch(API_URL, {
  method: 'POST',
  headers: {
    'Content-Type': 'application/sdp',
    'Authorization': `Bearer ${API_KEY}`,
  },
  body: pc.localDescription.sdp,
});
const answerSdp = await resp.text();
await pc.setRemoteDescription({ type: 'answer', sdp: answerSdp });
WebSocket protocol authentication
WebSocket has the simplest authentication: send the API key in an HTTP header when you establish the connection.
Item | Value | Description |
|---|---|---|
Connection URL |
| The connection URL varies by model. For details, see WebSocket connection |
Authorization |
| Your API key |
import websocket, os
API_KEY = os.getenv("DASHSCOPE_API_KEY")
URL = "wss://dashscope.aliyuncs.com/api-ws/v1/realtime?model=qwen3.5-omni-plus-realtime"
ws = websocket.WebSocketApp(URL, header=["Authorization: Bearer " + API_KEY])
ws.run_forever()