MaxCompute resources let you package and reference external code — Python scripts, JAR files, and archives — in user-defined functions (UDFs) and MapReduce jobs. This topic describes how to create or upload resources in DataWorks DataStudio and how to reference them in nodes or register them as functions.
Prerequisites
Before you begin, ensure that you have:
已创建数据源并绑定至DataStudio(数据开发)。在目标工作空间的DataStudio(数据开发)模块绑定所需MaxCompute数据源后,才可基于该数据源进行数据开发相关操作。详情请参见创建MaxCompute数据源、开发前准备:绑定数据源或集群。
A MaxCompute computing resource associated with DataStudio
A workflow created in DataStudio (DataWorks stores resources inside workflows)
A node created if you plan to reference a resource in compute code
(Optional, for OSS uploads) Object Storage Service (OSS) activated, a bucket created, the file stored in that bucket, and your Alibaba Cloud account granted access to the bucket
已创建数据源并绑定至DataStudio(数据开发)。在目标工作空间的DataStudio(数据开发)模块绑定所需MaxCompute数据源后,才可基于该数据源进行数据开发相关操作。详情请参见创建MaxCompute数据源、开发前准备:绑定数据源或集群。
已创建数据源并绑定至DataStudio(数据开发)。在目标工作空间的DataStudio(数据开发)模块绑定所需MaxCompute数据源后,才可基于该数据源进行数据开发相关操作。详情请参见创建MaxCompute数据源、开发前准备:绑定数据源或集群。
Limits
Resource size
| Source | Maximum size |
|---|---|
| Create a Python resource directly in the DataWorks console | 200 MB |
| Create a file resource with Online Editing selected | 500 KB |
| Upload from your on-premises machine | 500 MB |
| Upload from OSS | 500 MB |
Standard mode workspaces
In a standard mode workspace, commit resources to the development environment and then deploy them to the production environment before production nodes can use them. Development and production environments use separate computing resource configurations — confirm that the configuration for the target environment is correct before querying tables or resources.
Resources added outside DataWorks
DataWorks only manages resources that were created or uploaded through its console. If you added a resource using another tool such as MaxCompute Studio, load it into DataWorks manually using the MaxCompute resource feature in DataStudio before it appears in the resource directory.
Billing
Creating and uploading resources in DataWorks is free. MaxCompute charges for data storage and backup. For pricing details, see Storage fees.
Key concepts
Resource is a concept specific to MaxCompute. Before you can run UDFs or MapReduce jobs, you must upload the required code and dependency files as resources. Resources are stored inside workflows in DataStudio.
The following resource types are supported:
| Resource type | Supported formats | Creation method |
|---|---|---|
| Python | .py | Create directly in the DataWorks console |
| JAR | .jar | Upload from your on-premises machine or from OSS |
| Archive | .zip, .tgz, .tar.gz, .tar, .jar | Upload from your on-premises machine or from OSS |
| File | .zip, .so, .jar | Upload from your on-premises machine, from OSS, or create with Online Editing |
How it works
The end-to-end flow for making a resource available to a node or function:
Create or upload the resource in DataStudio.
Commit the resource to the development environment.
Deploy the resource to the production environment (required for standard mode workspaces).
Reference the resource in a node or register it as a function.
Choose an upload method
Select the method based on your file type and size:
| Situation | Method |
|---|---|
| Python script up to 200 MB, or file up to 500 KB | Create in the DataWorks console |
| File on your machine (any supported format, up to 500 MB) | Upload from your on-premises machine |
| Python script larger than 200 MB, or file larger than 500 KB | Upload from your on-premises machine or upload from OSS |
| File already stored in an OSS bucket (up to 500 MB) | Upload from OSS |
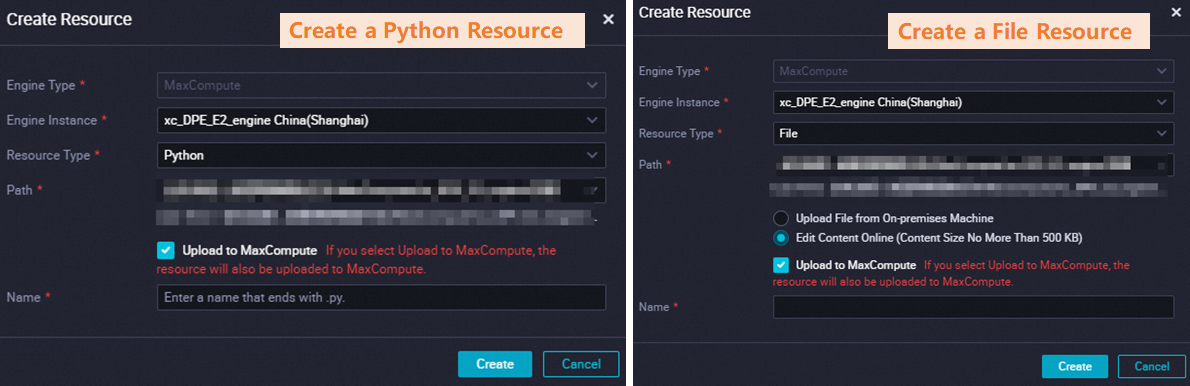
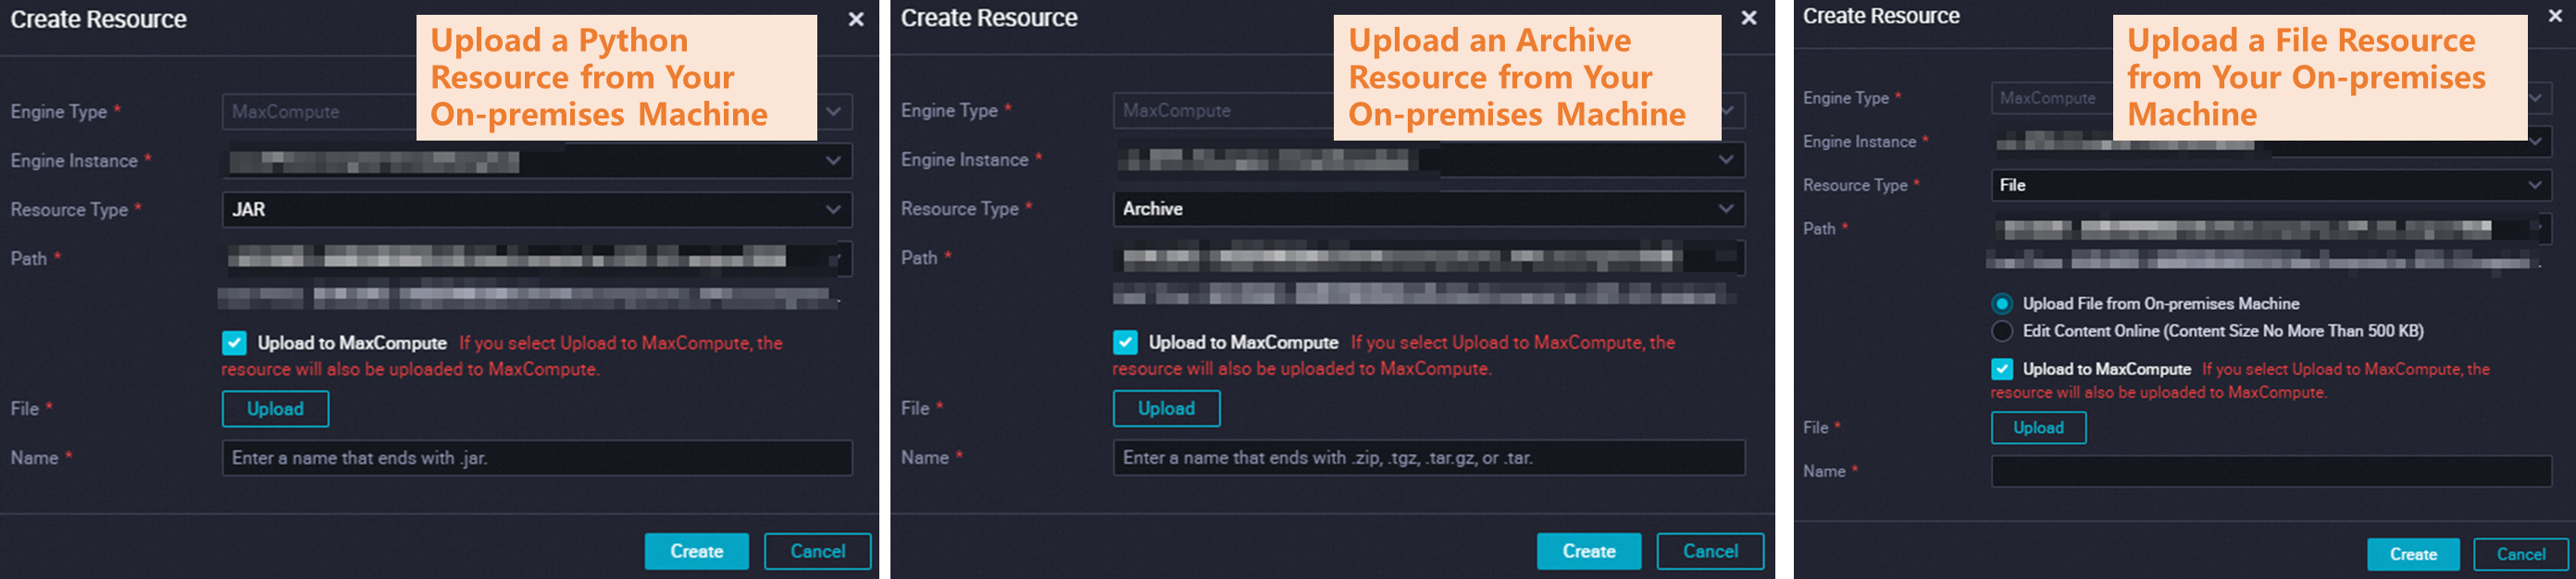
Step 1: Create or upload a resource
Open the resource creation entry point
Log on to the DataWorks console. In the top navigation bar, select the target region. In the left-side navigation pane, choose Data Development and O&M > Data Development. Select the target workspace from the drop-down list and click Go to Data Development.
On the DataStudio page, find the target workflow. Right-click the workflow name, select Create Resource, and then select a resource type under MaxCompute.
If no workflow exists, create one first. See Create a workflow.
Create in the DataWorks console
Use this method for Python scripts up to 200 MB or file resources up to 500 KB.
On the resource configuration tab that opens, fill in the resource details and write or paste your code directly in the editor.
For Python resources larger than 200 MB and file resources larger than 500 KB, use the on-premises machine upload or OSS upload method instead. For a walkthrough of creating a Python resource and registering a Python UDF, see Use MaxCompute to query geolocations of IP addresses.
Upload from your on-premises machine
Use this method to upload a resource (up to 500 MB) from your local disk.
On the resource configuration tab, set File Source to upload from your machine and select the local file.
Upload from OSS
Use this method to upload a resource stored in an OSS bucket (up to 500 MB). Follow the on-screen instructions to assign the AliyunDataWorksAccessingOSSRole role to the Alibaba Cloud account you use for the upload.
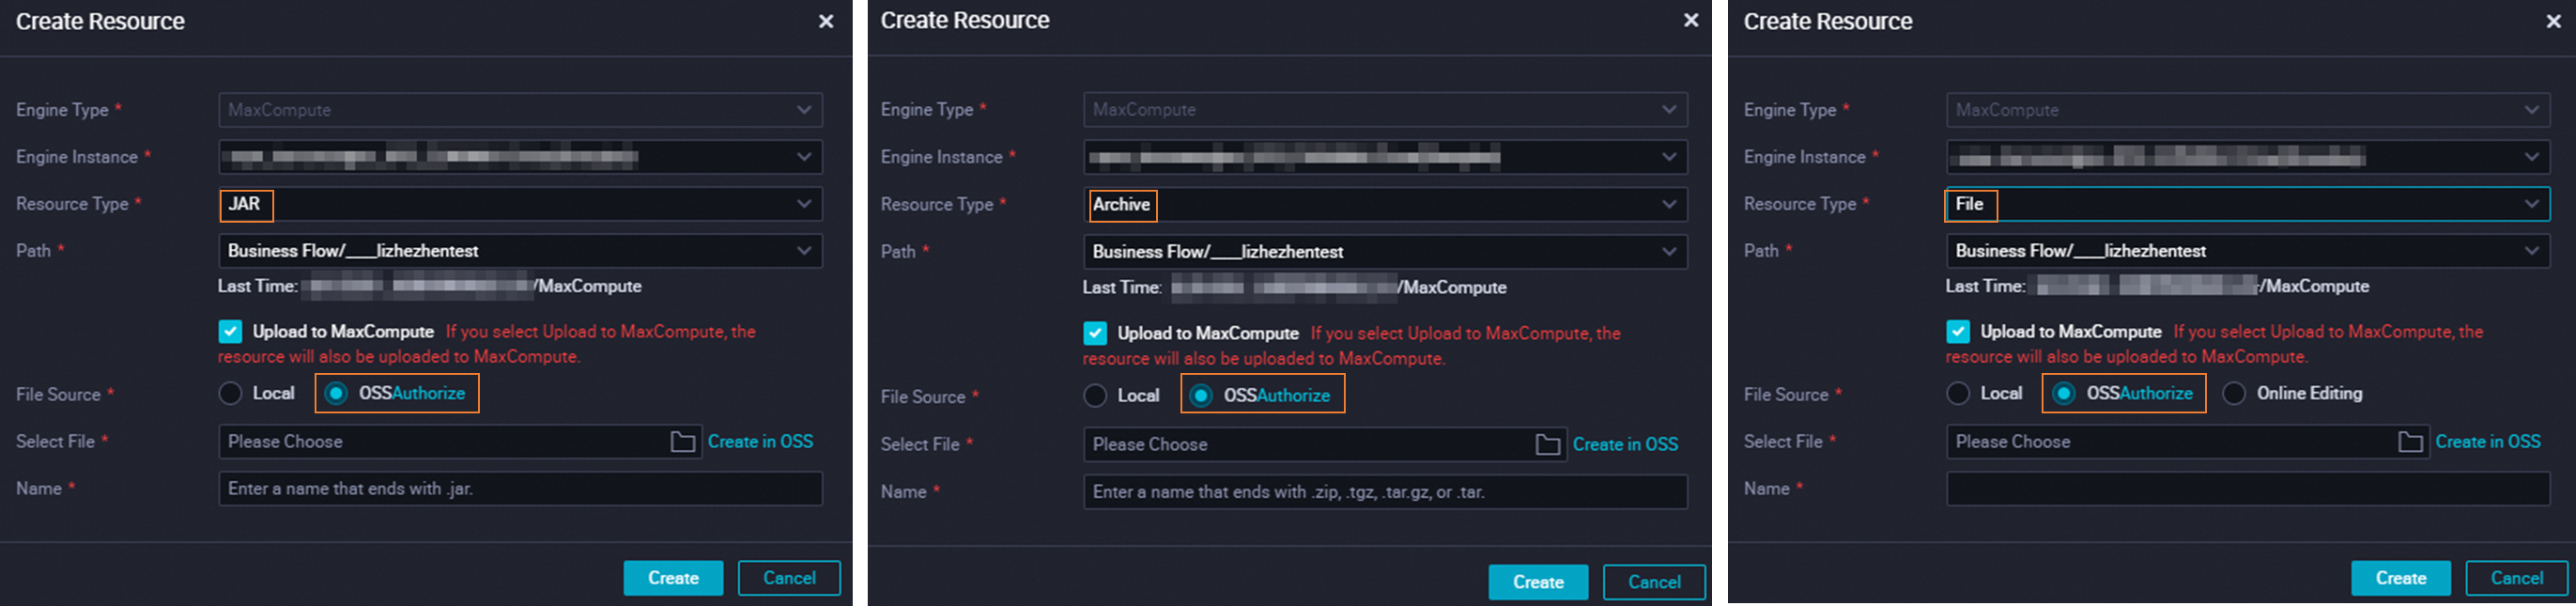
"Upload to MaxCompute" checkbox
When creating or uploading a resource, pay attention to the Upload to MaxCompute checkbox:
Select it if the resource has never been uploaded to MaxCompute. After creation, the resource is stored in both DataWorks and MaxCompute.
Clear it if the resource already exists in MaxCompute. Leaving the checkbox selected for an already-uploaded resource causes an error.
If you later delete the resource from MaxCompute using a command, the copy in DataWorks remains and continues to appear in the resource directory.
The resource name can differ from the name of the uploaded file.
Step 2: Commit and deploy the resource
After creating the resource, click the ![]() icon in the top toolbar of the resource configuration tab to commit it to the development environment.
icon in the top toolbar of the resource configuration tab to commit it to the development environment.
If nodes in the production environment need to use the resource, also deploy it to the production environment. See Deploy nodes.
Step 3: Use the resource
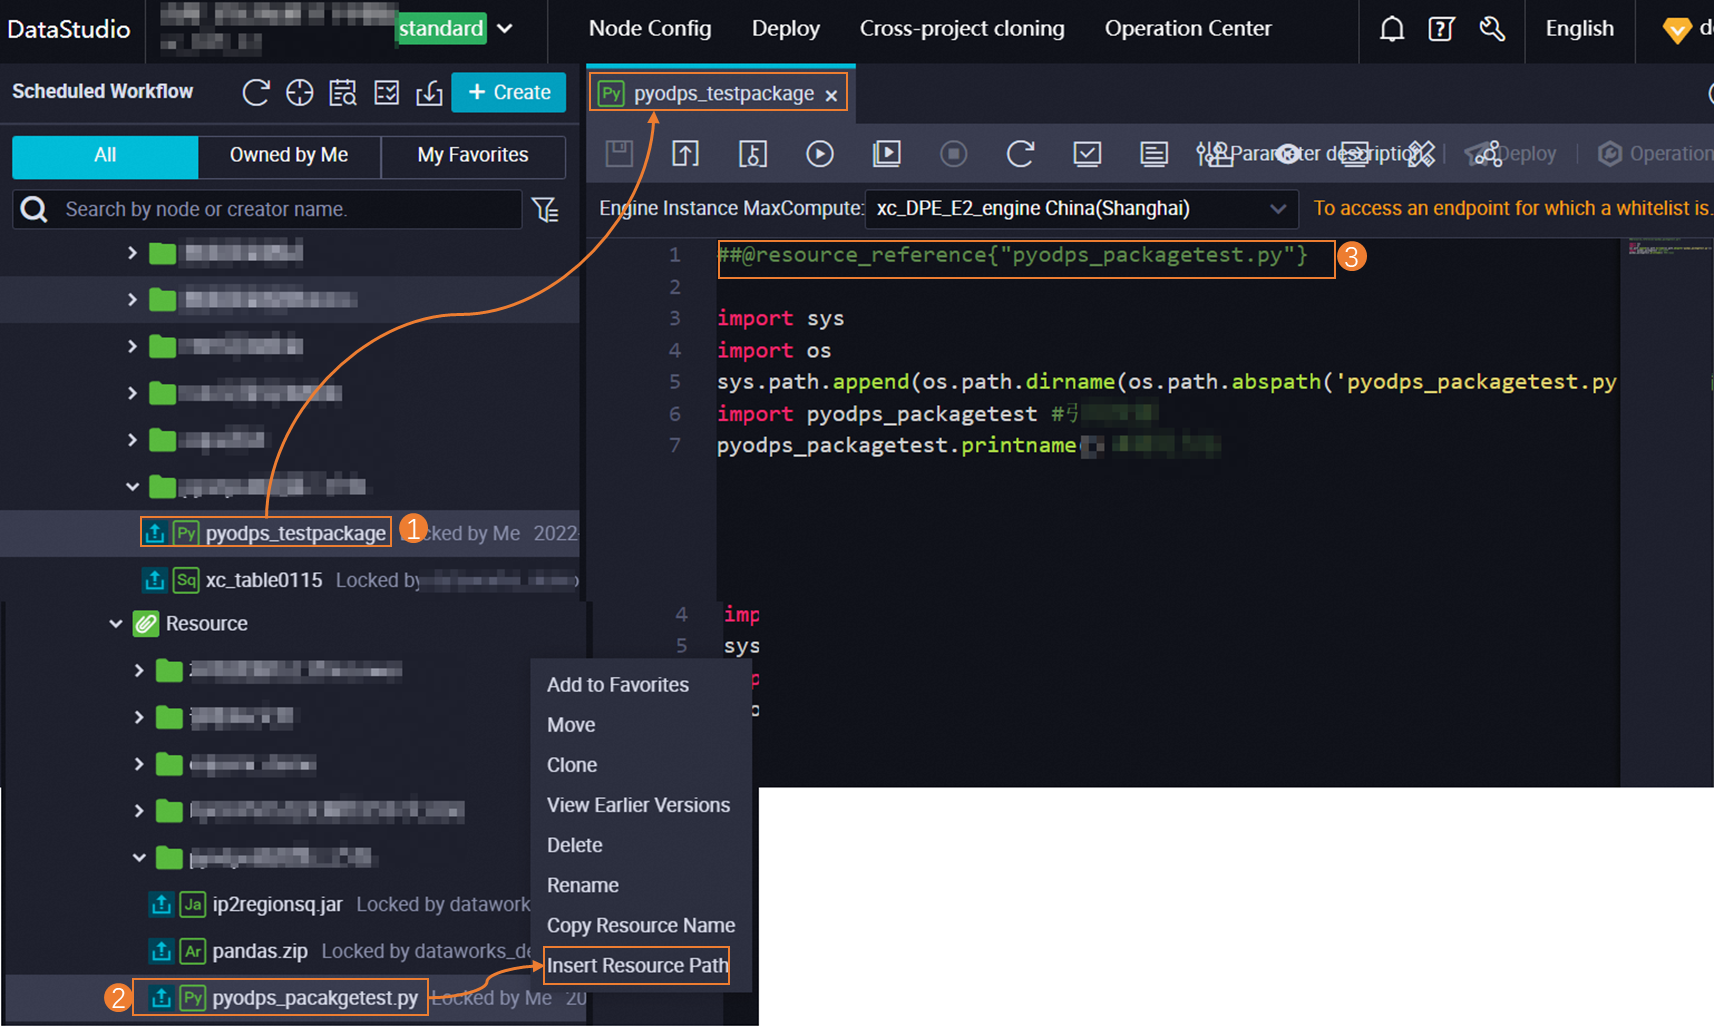
Reference a resource in a node
After the resource is committed, open the target node and drag the resource name from the resource directory into the code editor. The editor inserts a reference in the following format:
Standard nodes:
@resource_reference{"Resource name"}PyODPS 2 nodes:
##@resource_reference{"Resource name"}
PyODPS code depends on third-party packages. Install the required packages using a custom image before running PyODPS code. See Manage images.
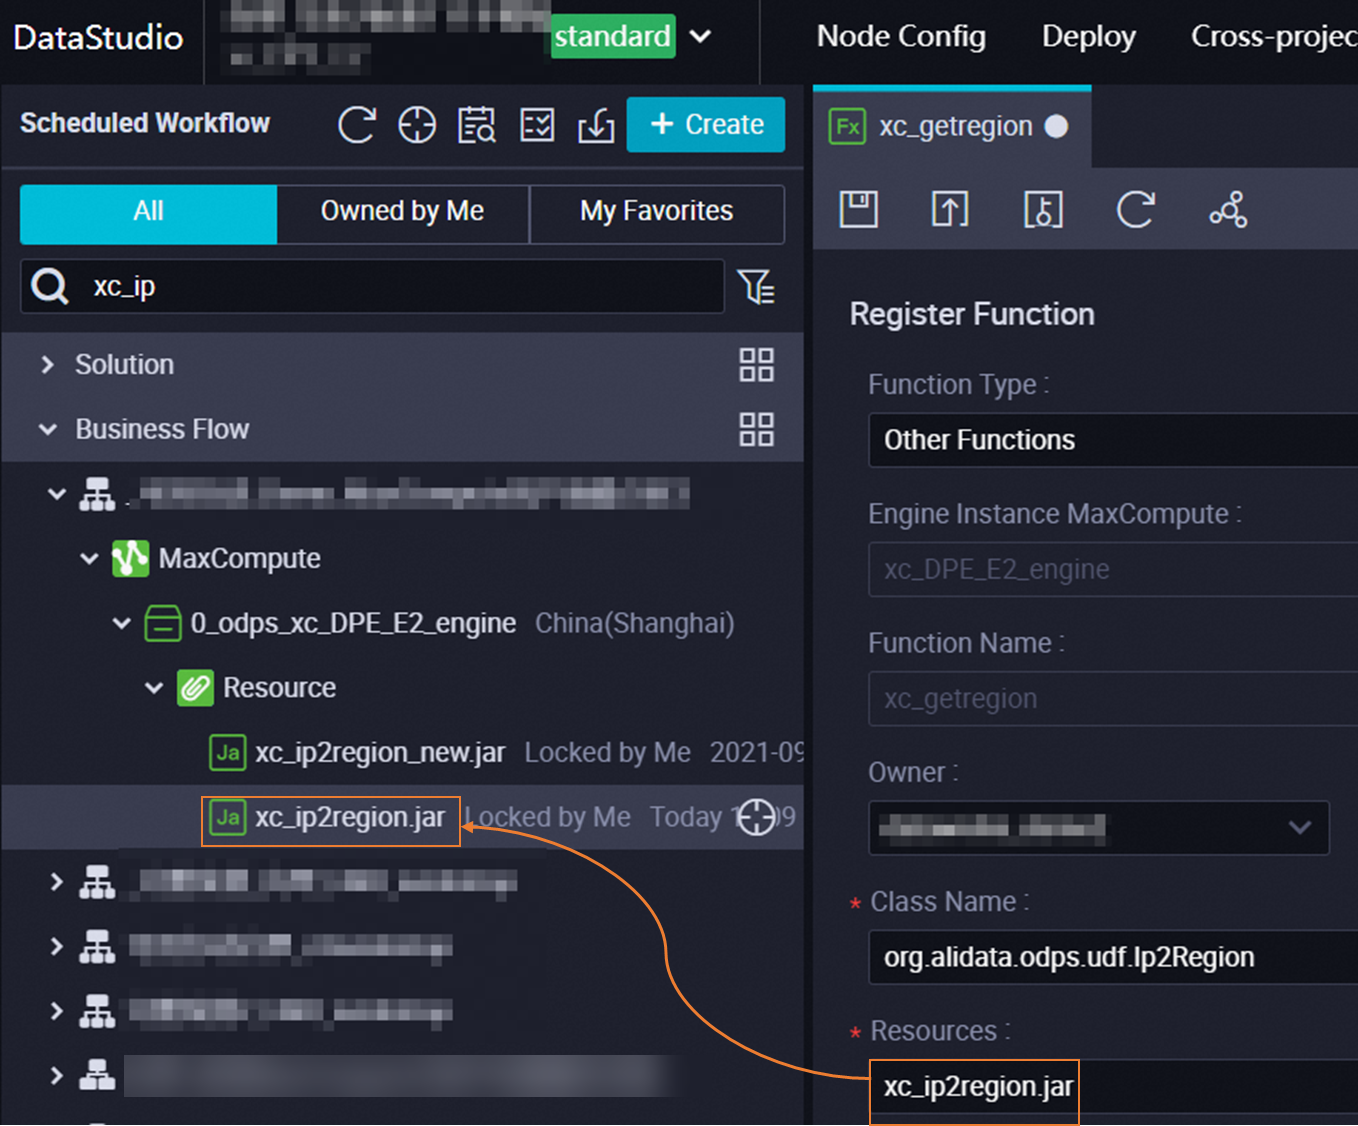
Register a resource as a function
Before registering a function, make sure the resource is committed (see Step 2).
Create a MaxCompute UDF following Create and use a MaxCompute UDF. On the function configuration tab, enter the name of the resource.
For information about built-in functions, see Use built-in functions. To view functions in a MaxCompute computing resource and their change history, see Manage MaxCompute functions.
More operations
Manage resources in the console
In the resource directory of the workflow, right-click the resource name to access the following operations:
View Earlier Versions: View saved or committed versions of the resource and compare changes between any two versions. Select at least two versions to enable comparison.
Delete: Only resources in the development environment can be deleted directly. To remove the resource from the production environment, deploy the deletion from the development environment — the resource is removed from production only after the deployment completes. See Deploy nodes.
Manage resources using commands
Manage resources from the command line on any of the following platforms: MaxCompute client (odpscmd), SQL Analysis, Cloud Shell (odpscmd), DataWorks, and MaxCompute Studio.
Common operations:
| Operation | Required permission |
|---|---|
| Add resources | Write on resources |
| View resource information | Read on resources |
| View a list of resources | List on objects in the project |
| Create an alias for a resource | Write on resources |
| Download resources | Write on resources |
| Delete resources | Delete on resources |
To list resources from DataStudio, run the following commands. If you don't specify a project, the commands default to the current MaxCompute project in the development environment.
-- List all resources in the current project
list resources;

-- List all resources in a specific project
use <MaxCompute project name>;
list resources;
For the full command reference, see Resource operations.
Load an existing MaxCompute resource into DataWorks
If a resource was added to MaxCompute using a tool other than DataWorks (for example, MaxCompute Studio), use the MaxCompute resource feature in DataStudio to load it into DataWorks for management. Resources up to 200 MB can be loaded this way. See Manage MaxCompute resources.
What's next
Create and use a MaxCompute UDF — register a function backed by a JAR or Python resource
Manage MaxCompute functions — view, update, and delete registered functions
Resource operations — full command reference for resource management