The virtual studio is a chroma keying feature provided by Cloud Production. It automatically removes blue-screen, green-screen, or real-world backgrounds and composites the result in the cloud, enabling multi-device, multi-angle, and remote broadcasts with dual-screen, split-screen, and picture-in-picture layouts.
Prerequisites
-
You have activated Media Production Studio. For more information, see Activate Media Production Studio.
-
You have added a domain name for production and configured its CNAME record. For more information, see Add an accelerated domain name and Configure a CNAME record for live streaming.
-
(Optional) To select a video source from the ApsaraVideo Live console, add a live streaming domain name and configure a CNAME record for it. For more information, see Add a live streaming domain name and Configure a CNAME record for live streaming.
-
(Optional) To select a video source from the media library, add an ApsaraVideo VOD domain name and configure a CNAME record for it. For more information, see Add an ApsaraVideo VOD domain name and Configure a CNAME record for ApsaraVideo VOD.
-
(Optional) To use the live recording feature, activate the storage service for recordings. For more information, see Record live streams to OSS.
-
You have read the API development guide. For more information, see Development guide.
Background information
-
The virtual studio combines chroma keying with Cloud Production to support multi-device, multi-angle, and remote broadcasts. Cloud-based composition enables dual-screen, split-screen, and picture-in-picture layouts. This guide covers the full workflow from setup to live broadcast.
-
Cloud Production also provides API operations to add, delete, query, and modify virtual studio layouts for quick integration.
Workflow diagram
The virtual studio adds chroma keying to the standard Production Studio workflow. The following figure shows the live broadcasting workflow. 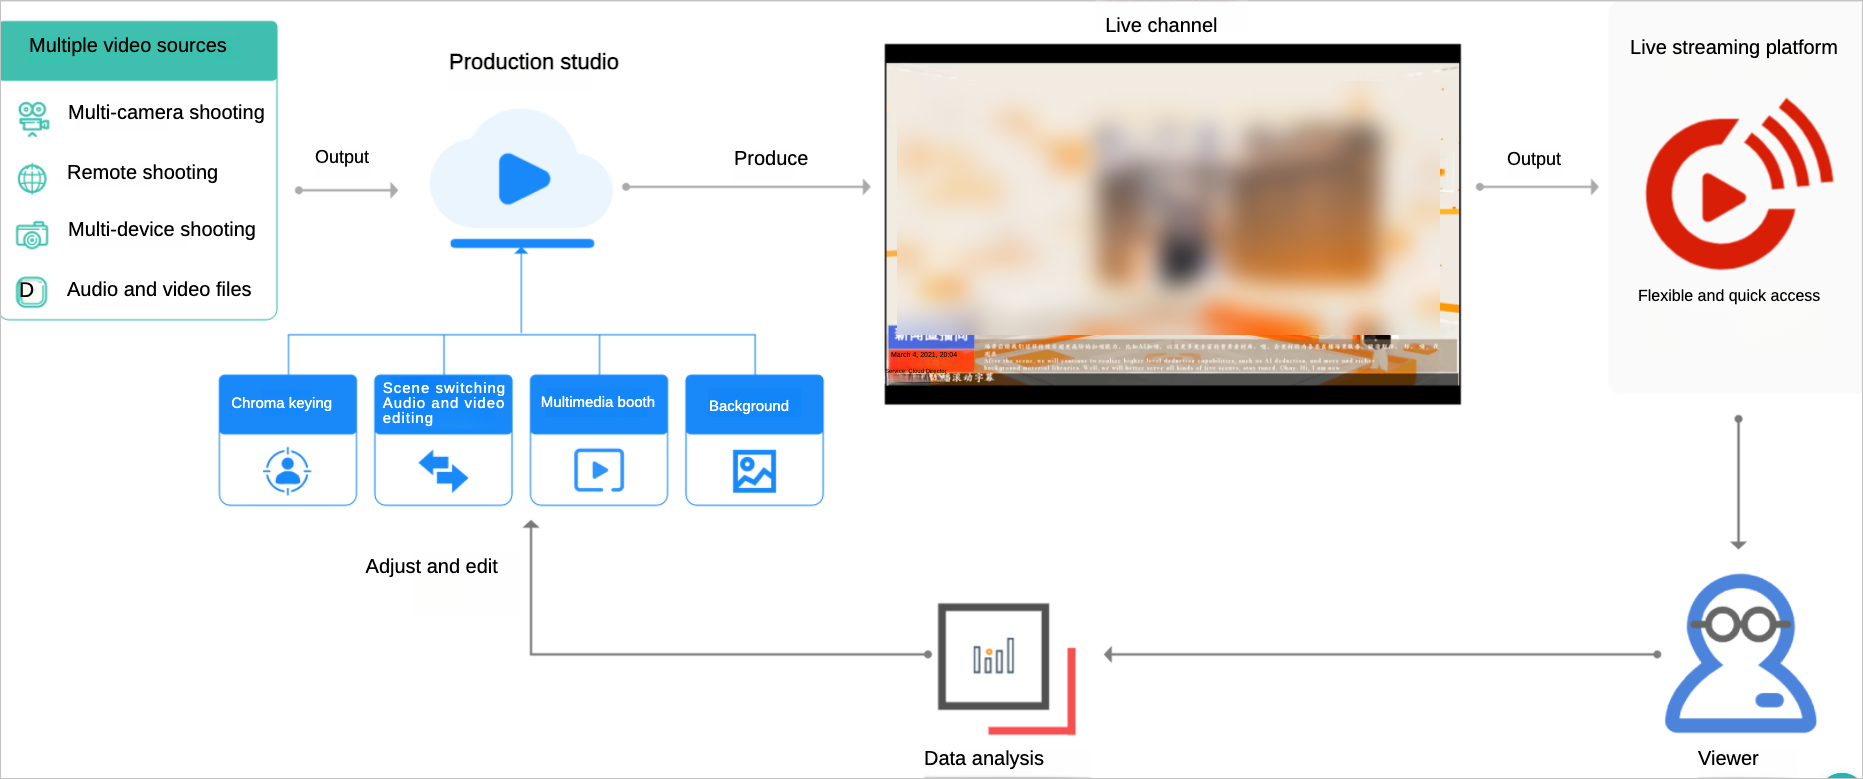 The workflow includes these stages:
-
Live stream setup: Configure the playback domain, output resolution, transcoding, and recording in the Cloud Production console.
-
Live stream configuration: Add audio and video assets and configure their output layout.
-
Start live streaming: Preview the mixed output in the PVW window and use the PGM output for the official broadcast.
-
Real-time production: During the broadcast, use live subtitles, graphic overlays, and the audio mixer to adjust content and effects.
Console
Live stream setup
-
Log on to the ApsaraVideo Live console. In the left-side navigation pane, choose > Production Studios.
-
Find the virtual studio and click Open in the Actions column.
-
The first time you enter a new Production Studio instance, the Studio Settings panel appears automatically. After you complete the configuration, click OK.
If this is not your first time entering the panel, you can click Live Stream Settings in the upper-right corner of the page to open the settings panel.
The panel also includes basic configuration fields such as Name (required), Region (for example, China (Shanghai)), and Resource Group.
Parameter
Actions
Domain
Click the Domain text box and select the live streaming domain that is configured with a CNAME record.
Output
Select the original resolution from the Output drop-down list. Options include Low Definition, Standard Definition, High Definition, Ultra High Definition 1080p (1920 × 1080), Portrait Low Definition, Portrait Standard Definition, Portrait High Definition, and Portrait Ultra High Definition 1080p (1080 × 1920).
Transcoding Specifications
-
Low Definition
-
Standard Definition
-
High Definition
-
Ultra High Definition 1080p (1920 × 1080)
After configuring the output, set the transcoding specification. Select one or more options (Low Definition, Standard Definition, High Definition, or Ultra High Definition 1080p (1920 × 1080)).
NoteYou can select multiple transcoding specifications, but their resolutions cannot be higher than the original stream's resolution. For example, if you select the Low Definition transcoding format, viewers can choose between Original Quality and Low Definition resolutions during playback.
Recording Settings
(Optional) Turn on the Recording Settings switch.
Choose between automatic and manual recording. Automatic recording starts when the live stream begins. Manual recording lets you start and stop recording as needed during the broadcast.
-
Set the storage location for the recorded live streams.
NoteThe storage location must be in the same region as Cloud Production. Cross-region recording is not supported.
-
Select one or more storage formats for the recording files.
-
Set the recording interval. For example, if you set it to 10 minutes, a new recording file is generated every 10 minutes.
Stream Delay
(Optional) Turn on the Stream Delay switch to set a delay for the broadcast output. The delay can be set from 15 to 300 seconds.
Standby Video
(Optional)
-
Live Stream: Choose Select from ApsaraVideo Live Console or Enter a live URL. to specify a standby video.
-
VOD Resource: Click Select and choose a video from the VOD source list. This video will play before the live stream starts or if the stream is interrupted.
ImportantAll ApsaraVideo VOD assets (VOD sources and standby videos) must be in the same region as Cloud Production. Cloud Production does not support selecting VOD videos from other regions. (If you use Cloud Production in China (Shanghai), your assets must also be in ApsaraVideo VOD in China (Shanghai).)
-
Image: Click Select From Media Library or Local Upload to set a standby image. Supported formats are JPG and PNG. The file size cannot exceed 10 MB.
Multi-way Stream Relay
(Optional) Click Add URL to set a relay destination address.
Important-
After you add or delete a relay address, you must stop and restart the PGM output for the settings to take effect.
-
Using third-party platforms may incur additional stream relay fees. By default, you get three free relay addresses per domain name. Any additional addresses are billed. The billing follows the same standard as stream relay in ApsaraVideo Live. For more information, see Stream relay billing of ApsaraVideo Live.
-
Live stream configuration
-
Add input sources. The virtual studio supports two types of video sources.
-
Chroma key input source: A live stream with a green-screen background. The Production Studio removes the background automatically. To add this source, select the Chroma Key Input Source tab in the video source area of the Production Studio.
-
Multimedia input source: A video source for a multimedia window. You can add a VOD file or a live stream. To add this source, select the Multimedia Input Source tab in the video source area of the Production Studio.
Click Add Media to open the Add Resource panel. Refer to the table below to add live streams or VOD videos and select your video sources.
Method
Actions
Live Stream
-
Select from ApsaraVideo Live console: After you select a domain name, a list of all live streams under that domain is automatically displayed. Select the ingest URL that you want to add to the current Production Studio instance.
-
Enter live stream URL: Enter a valid live streaming URL. RTMP, FLV, and RTS formats are supported.
VOD
Click Select, choose a video from the media asset list, select Once or Loop, and then click OK to add the video.
NoteTo use a VOD asset selected from the VOD, you must first go to the ApsaraVideo VOD console, select More > For Live Production for the video. The video must be uploaded and pre-processed before it can be used in Cloud Production. For information about pre-processing rules and billing, see ApsaraVideo VOD Pricing.
Local Stream Ingest
Push method:
-
Screen sharing: Share your screen. You can select an application window or your entire desktop as the input source.
-
Camera push: Use your local camera as the input source.
Resolution: Select a suitable resolution.
-
-
Click Layout to add and configure a studio layout.
-
In the Layout Settings window, select Studio Layout for Layout Type and enter a Layout Name. Production Studio supports two types of layouts—common and studio—for switching between standby clips, ads, and the main live stream.
The right side of the window provides four tabs for asset configuration: Background Image, Chroma Key Asset, Multimedia Asset, and Layer Order. For Background Image, you can either Select from Template Library or Upload from Local.
-
On the Background Image tab of the Layout Settings window, add a background image. You can select an image from the template library or upload one from your computer.
NoteThe background image will be displayed in full screen. We recommend using an image with the same dimensions as the live video. The file size cannot exceed 10 MB.
-
On the Chroma Key Materials tab of the Layout Settings window, click Add to add a chroma key asset. After associating an input source, configure the automatic chroma keying settings for the source as described in the table below. A single live room supports multiple chroma key input sources. The configuration area includes Input Source selection, Portrait Type (Full-length or Half-length), Chroma Key Gamut (such as green screen), and position/size parameters like Horizontal Offset, Scale, and Vertical Offset. The asset is anchored to the top-left corner, and its size and position adjust proportionally.
Setting
Description
Input Source
Select an input source from the drop-down list.
Portrait Type
Supports Full-length and Half-length portrait types.
Color Gamut for Chroma Key
Automatically identifies green-screen, blue-screen, and real-world scene backgrounds.
Position/Size
Set the horizontal offset, vertical offset, and scale.
-
On the Multimedia Materials tab of the Layout Settings window, click Add to add a multimedia asset. A single live room can have 1 to 3 multimedia windows, supporting video or image assets.
-
On the Order of Layers tab of the Layout Settings window, you can adjust the stacking order of the assets.
-
Click OK to complete the virtual studio layout configuration.
-
Start live streaming
-
To start the live stream, click the desired layout and then click Start Live Streaming. The video sources will appear in the PVW window according to the layout.
-
Click Synchronize to PGM to broadcast the live content to your audience.
To switch live content, click a new layout. Once it appears in the PVW preview, click Synchronize to PGM to broadcast it.
Important-
To switch content in the PVW preview, switch between configured studio layouts. To change scenes during a broadcast—such as switching studios, chroma key sources, or multimedia content—configure a separate studio layout for each scene in advance.
-
When adding multiple studio layouts, use distinct names to easily distinguish them.
-
-
To end the live stream, click Stop.
Real-time production
During the broadcast, use these features to adjust content and effects.
-
Click and drag the audio fader up or down to adjust the program volume.
-
The PVW window is silent. Audio Follows Video (selected): With Audio Follows Video selected, clicking Synchronize to PGM sends the PVW source's audio to the PGM output. The audio of other video sources is muted by default. You can use the audio mixer to control the audio output of all video sources.
-
Audio Follows Video (not selected): When you switch from PVW to PGM without selecting Audio Follows Video, the audio from the previewed video source is not sent to the PGM output.
-
-
Set subtitle styles and bilingual translation.
NoteThe live subtitles feature is not available in the Singapore region.
The live subtitles feature uses real-time speech recognition to transcribe live audio and display it as subtitles. The recognized text can be translated in real time, so you can show subtitles in the source language, a target language, or both.
Translation is supported between Chinese, English, Spanish, and Russian. Real-time translation makes your content accessible to multilingual audiences, which is especially valuable for cross-border e-commerce and international events.
-
Click Live Subtitles to open the subtitle component window.
-
Set the component name, font style, size, position, video source, source language, and translation language. You can preview the effect on the left. Click OK to save. The Add Component window shows a preview on the left and settings on the right. These settings include a component Name (up to 10 characters), Font, Size, and Font Color. You can also enable a Subtitle Background with configurable Background Color and Opacity, set a Subtitle Delay in milliseconds, adjust the Position, and select a Video Source. After configuring these settings, click OK.
-
-
Insert effects like watermarks, logos, or banner text into the live stream.
-
Add an image
-
Click Image to open the image component window.
-
Click Upload Image and select an image from your computer. After the image is uploaded, set the component name, scale (size), and position. You can preview the result on the left. Click OK to save.
-
-
Add text
-
Click Text to open the text component window.
-
Enter text, then set the component name, font style, size, display mode, and position. You can preview the result on the left. Click OK to save.
-
-
-
Change the video stream layout. You can create up to 20 layouts.
-
Click Switch to Standby to switch to the standby source during a stream interruption, ensuring a smooth broadcast.
API
You can integrate the virtual studio by calling API operations. The process is as follows:
-
Create and configure a Production Studio, and set the type to virtual studio. For more information, see the CreateCaster and SetCasterConfig operations.
-
Add video resources to the Production Studio. For more information, see the AddCasterVideoResource operation.
-
Add a virtual studio layout. For more information, see the AddStudioLayout operation.
-
(Optional) Add components to the Production Studio. For more information, see the AddCasterComponent operation.
-
Start the Production Studio. For more information, see the StartCaster operation.
-
Set the playback scene. For more information, see the SetCasterSceneConfig operation.
-
Stop the Production Studio. For more information, see the StopCaster operation.