This topic describes the interfaces and basic workflow of the Push SDK for iOS and provides usage examples for key features.
Features
Supports stream ingest over Real-Time Messaging Protocol (RTMP).
Supports RTS stream ingest and pulling based on Real-Time Communication (RTC).
Supports co-streaming and battles.
Adopts H.264 for video encoding and AAC for audio encoding.
Supports custom configurations for features such as bitrate control, resolution, and display mode.
Supports various camera operations.
Supports real-time retouching and custom retouching effects.
Allows you to add and remove animated stickers as watermarks.
Allows you to stream screen recordings.
Supports external audio and video inputs in different formats such as YUV and pulse-code modulation (PCM).
Supports mixing of multiple streams.
Supports ingest of audio-only and video-only streams and stream ingest in the background.
Supports background music.
Supports video snapshot capture.
Supports automatic reconnection and error handling.
Supports Automatic Gain Control (AGC), Automatic Noise Reduction (ANR), and Acoustic Echo Cancellation (AEC) algorithms.
Allows you to switch between the software and hardware encoding modes for video files. This improves the stability of the encoding module.
Limitations
Take note of the following limits before you use Push SDK for iOS:
You must configure screen orientation before stream ingest. You cannot rotate the screen during live streaming.
You must disable auto screen rotation for stream ingest in landscape mode.
In hardware encoding mode, the value of the output resolution must be a multiple of 16 to be compatible with the encoder. For example, if you set the resolution to 540p, the output resolution is 544 × 960. You must scale the screen size of the player based on the output resolution to prevent black bars.
API reference
Workflow
The basic workflow is as follows:
Using features
Register the SDK
To apply for and configure a license, see Integrate a Push SDK license.
You must register the SDK before using the stream ingest feature. Otherwise, you cannot use the Push SDK.
Call the license registration interface at an early stage (before you use the Push SDK).
[AlivcLiveBase registerSDK];The
AlivcLiveBaseclass allows you to set log levels, specify a local log path, and get the SDK version.The
onLicenceCheckmethod of theAlivcLiveBase#setObserverinterface lets you asynchronously check if the license was configured successfully.
Configure stream parameters
In the ViewController where you plan to use the pusher, import the header file: #import <AlivcLivePusher/AlivcLivePusher.h>.
Basic stream ingest parameters have recommended default values, allowing for a simple initialization without further configuration.
AlivcLivePushConfig *config = [[AlivcLivePushConfig alloc] init];// Initialize the stream ingest configuration class. You can also use initWithResolution.
config.resolution = AlivcLivePushResolution540P;// The default resolution is 540p. The maximum is 720p.
config.fps = AlivcLivePushFPS20; // We recommend a frame rate of 20 fps.
config.enableAutoBitrate = true; // Enable bitrate control. The default value is true.
config.videoEncodeGop = AlivcLivePushVideoEncodeGOP_2;// The default value is 2. A larger keyframe interval results in higher latency. We recommend a value of 1 or 2.
config.connectRetryInterval = 2000; // The reconnection interval in milliseconds. The default is 2000 ms (2s). The interval must be at least 1s. We recommend using the default value.
config.previewMirror = false; // The default value is false. In normal cases, this should be false.
config.orientation = AlivcLivePushOrientationPortrait; // The default orientation is portrait. You can set it to landscape with the home button to the left or right.Considering mobile device performance and network bandwidth, we recommend setting the resolution to 540p. Most mainstream live streaming apps use 540p.
If you disable bitrate control, the bitrate is fixed at the initial bitrate and does not adapt between the set target and minimum bitrates. This may cause playback stuttering in unstable network conditions. Use this setting with caution.
Ingest a camera stream
Initialize the SDK.
After you configure the stream ingest parameters, call the initWithConfig method to initialize the SDK. Sample code:
self.livePusher = [[AlivcLivePusher alloc] initWithConfig:config];NoteAlivcLivePusherdoes not support multiple instances. Therefore, eachinitcall must be paired with a correspondingdestroycall.Register stream ingest callbacks.
The following stream ingest callbacks are supported:
Info: the callbacks that are used for notifications and status detection.
Error: the callbacks that are returned when errors occur.
Network: the callbacks that are related to network.
Register the delegates to receive their corresponding callbacks. Sample code:
[self.livePusher setInfoDelegate:self];
[self.livePusher setErrorDelegate:self];
[self.livePusher setNetworkDelegate:self];
Start the preview.
After the livePusher object is initialized, you can start the preview. You need to pass the display view, which must be a subclass of UIView, for the camera preview. Sample code:
[self.livePusher startPreview:self.view];Start stream ingest.
You can start stream ingest only after the preview is successful. To do this, listen for the
onPreviewStartedcallback fromAlivcLivePusherInfoDelegateand add the following code inside the callback.[self.livePusher startPushWithURL:@"Test ingest URL (rtmp://......)"];NoteThe ingest URL supports RTMP and RTS (artc://) protocols. To obtain a URL, see Generate ingest and streaming URLs.
ApsaraVideo Live does not support ingesting multiple concurrent streams to the same URL. The second stream ingest request is rejected.
Camera controls
You can call camera-related methods only after the preview starts, such as during stream ingest, in a paused state, or during reconnection. These methods allow you to switch cameras, control the flash, adjust focus, zoom, and set mirroring. Calling these methods before the preview starts has no effect.
/* Switch between the front and rear cameras. */
[self.livePusher switchCamera];
/* Turn the flash on or off. The flash is not available on the front camera. */
[self.livePusher setFlash:false];
/* Adjust the focal length to zoom the captured image. A positive value zooms in, and a negative value zooms out. */
CGFloat max = [_livePusher getMaxZoom];
[self.livePusher setZoom:MIN(1.0, max)];
/* Manually set focus. You must pass two parameters: 1. point: the coordinates of the focus point; 2. autoFocus: whether to enable autofocus for this specific action. Subsequent auto-focus behavior follows the previously set value. */
[self.livePusher focusCameraAtAdjustedPoint:CGPointMake(50, 50) autoFocus:true];
/* Enable or disable autofocus. */
[self.livePusher setAutoFocus:false];
/* Configure mirroring. There are two mirroring interfaces: PushMirror for the ingested stream and PreviewMirror for the preview. PushMirror only affects the playback display, while PreviewMirror only affects the preview display. The two are independent. */
[self.livePusher setPushMirror:false];
[self.livePusher setPreviewMirror:false];
Ingest controls
Stream ingest controls include start, stop, pause, resume, restart, and destroy. You can add buttons to your UI to trigger these operations based on your application's needs. Sample code:
/* Set a pauseImage and then call pause to switch from camera streaming to static image streaming. Audio ingest continues. */
[self.livePusher pause];
/* Switch from static image streaming back to camera streaming. Audio ingest continues. */
[self.livePusher resume];
/* Stop the current stream ingest. This can only be called while a stream is active. */
[self.livePusher stopPush];
/* Stop the preview. This can only be called while in the previewing state, not during an active stream ingest. After stopping, the preview display freezes on the last frame. */
[self.livePusher stopPreview];
/* Restart the stream. This can be called during an active stream ingest or in an error state. In an error state, you can only call this method, reconnectPushAsync, or destroy. This restarts all internal AlivcLivePusher resources, including preview and stream ingest. */
[self.livePusher restartPush];
/* Asynchronously reconnect the stream. This can be called during an active stream or in a network-related error state from AlivcLivePusherNetworkDelegate. In an error state, you can also call restartPush or destroy. This action attempts to re-establish the RTMP connection. */
[self.livePusher reconnectPushAsync];
/* Destroy the stream ingest instance. This stops the stream ingest and preview, and removes the preview display. All resources related to AlivcLivePusher are released. */
[self.livePusher destory];
self.livePusher = nil;
/* Get the current stream ingest status. */
AlivcLivePushStatus status = [self.livePusher getLiveStatus];
Screen sharing ingest
ReplayKit, introduced in iOS 9, supports screen recording. iOS 10 enabled ReplayKit to broadcast screen content live through third-party app extensions. On iOS 10 and later, you can use the Push SDK with an app extension to implement live screen broadcasting.
To ensure system performance, iOS allocates limited resources to screen recording extensions. If an extension uses too much memory, the system terminates it. To work around this memory limitation, the Push SDK splits the screen sharing process between an Extension App and a Host App. The Extension App captures screen content and sends it to the Host App via inter-process communication. The Host App creates the AlivcLivePusher engine and ingests the screen data to the server. Because the entire stream ingest process is handled in the Host App, microphone capture and transmission can also be managed by the Host App, leaving the Extension App responsible only for screen capture.
The Push SDK demo uses an App Group for inter-process communication between the Extension App and the Host App. This logic is encapsulated in the AlivcLibReplayKitExt.framework.
To implement screen sharing on iOS, you must create a screen recording extension. The system instantiates this extension when needed to receive captured screen images.
Create an App Group.
Log in to Apple Developer and complete the following steps:
On the Certificates, IDs & Profiles page, register an App Group. For more information, see Register an App Group.
Return to the Identifier page, select App IDs, and then click your App ID to enable the App Group capability. You must perform the same configuration for both the Host App and the Extension App IDs. For more information, see Enable App Group.
After you complete the configuration, download the updated Provisioning Profiles and install them in Xcode.
After these steps are correctly completed, the Extension App and Host App can communicate with each other.
NoteAfter creating the App Group, save the App Group Identifier. You will need it in a later step.
Create the screen recording extension.
The Push SDK for iOS demo includes AlivcLiveBroadcast and AlivcLiveBroadcastSetupUI extensions for screen sharing. To create the screen recording extension in your app, follow these steps:
In your existing project, choose New > Target… and select Broadcast Upload Extension.
Change the Product Name, select the Include UI Extension checkbox, and click Finish to create the broadcast and UI extensions. For example, set the Product Name to
AlivcLiveBroadcast.Configure the Info.plist file for the broadcast extension. In the new target, Xcode automatically creates a header file and a source file named SampleHandler. This target directory is named AlivcLiveBroadcast.
Drag the
AlivcLibReplayKitExt.frameworkinto your project and link it as a dependency for the extension target.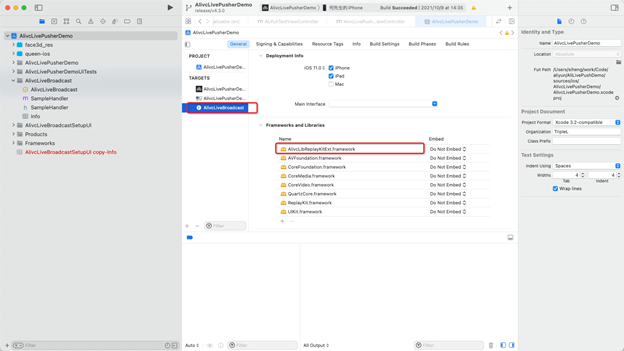 Replace the code in
 SampleHandler.mwith the following code. You must replacekAPPGROUPin the code with the App Group Identifier you created in Step 1. Sample code:#import "SampleHandler.h" #import <AlivcLibReplayKitExt/AlivcLibReplayKitExt.h> @implementation SampleHandler - (void)broadcastStartedWithSetupInfo:(NSDictionary<NSString *,NSObject *> *)setupInfo { // User has requested to start the broadcast. Setup info from the UI extension can be supplied but is optional. [[AlivcReplayKitExt sharedInstance] setAppGroup:kAPPGROUP]; } - (void)processSampleBuffer:(CMSampleBufferRef)sampleBuffer withType:(RPSampleBufferType)sampleBufferType { if (sampleBufferType != RPSampleBufferTypeAudioMic) { // Audio is captured and sent by the Host App. [[AlivcReplayKitExt sharedInstance] sendSampleBuffer:sampleBuffer withType:sampleBufferType]; } } - (void)broadcastFinished { [[AlivcReplayKitExt sharedInstance] finishBroadcast]; } @end
In your project, create a target for the Broadcast Upload Extension and integrate the
AlivcLibReplayKitExt.framework, which is customized for the screen recording extension module, into that target.Integrate the live SDK into the Host App.
In the Host App, create
AlivcLivePushConfigandAlivcLivePusherobjects. SetExternMainStreamtotrueandAudioFromExternaltofalse. This configuration means audio is still captured by the SDK. CallstartScreenCaptureto begin receiving screen data from the Extension App, and then start and stop the stream ingest. Follow these specific steps:Add dependencies on AlivcLivePusher.framework, AlivcLibRtmp.framework, RtsSDK.framework, and AlivcLibReplayKitExt.framework to the Host App process.
Initialize the Push SDK and configure it to use an external video source.
Set
ExternMainStreamtotrueandExternVideoFormattoAlivcLivePushVideoFormatYUV420P. To use the internal SDK for audio capture, setAudioFromExternaltofalse. Configure other stream ingest parameters as shown in the following sample code:self.pushConfig.externMainStream = true; self.pushConfig.externVideoFormat = AlivcLivePushVideoFormatYUV420P; self.pushConfig.audioSampleRate = 44100; self.pushConfig.audioChannel = 2; self.pushConfig.audioFromExternal = false; self.pushConfig.videoEncoderMode = AlivcLivePushVideoEncoderModeSoft; self.pushConfig.qualityMode = AlivcLivePushQualityModeCustom; self.pushConfig.targetVideoBitrate = 2500; self.pushConfig.minVideoBitrate = 2000; self.pushConfig.initialVideoBitrate = 2000; self.livePusher = [[AlivcLivePusher alloc] initWithConfig:self.pushConfig];Use AlivcLivePusher to manage live streaming functions by calling the following methods:
Start receiving screen recording data.
You must replace
kAPPGroupin the code with theApp Group Identifieryou created earlier. Sample code:[self.livePusher startScreenCapture:kAPPGROUP];Start stream ingest.
Sample code:
[self.livePusher startPushWithURL:self.pushUrl]Stop stream ingest.
Sample code:
[self.livePusher stopPush];
[self.livePusher destory];
self.livePusher = nil;
Preview display modes
The Push SDK supports three preview modes. The preview display mode does not affect the ingested stream.
ALIVC_LIVE_PUSHER_PREVIEW_SCALE_FILL: The preview fills the window. If the aspect ratios of the video and the window are different, the preview is distorted.ALIVC_LIVE_PUSHER_PREVIEW_ASPECT_FIT: (Default) The preview maintains the video's aspect ratio. If the aspect ratios of the video and the window are different, the preview has black bars.ALIVC_LIVE_PUSHER_PREVIEW_ASPECT_FILL: The preview crops the video to fit the window's aspect ratio. If the aspect ratios of the video and the window are different, the video is cropped.Sample code:
mAlivcLivePushConfig.setPreviewDisplayMode(AlivcPreviewDisplayMode.ALIVC_LIVE_PUSHER_PREVIEW_ASPECT_FIT);You can set the mode in
AlivcLivePushConfigor dynamically set it by using thesetpreviewDisplayModeAPI during preview or stream ingest.This setting affects only the preview. The ingested video stream's resolution is determined by
AlivcLivePushConfigand is unaffected by the preview mode. Preview display modes are designed to adapt to different phone screen sizes, allowing you to choose the best preview effect.
Image ingest
The SDK can ingest a static image when the app is in the background or the bitrate is too low. When the app is in the background, video ingest is paused by default, and only audio is ingested. At this time, you can set an image to be streamed. For example, you can display an image with a message like The host will be back in a moment. Sample code:
config.pauseImg = [UIImage imageNamed:@"image.png"];// Set the image for background stream ingest.In addition, you can set a static image to be ingested when the network connection is poor. After the image is set, the SDK detects when the current bitrate is low and ingests this image to avoid video stuttering. Sample code:
config.networkPoorImg = [UIImage imageNamed:@"image.png"];// Set the image to ingest during poor network conditions.External audio and video ingest
The Push SDK supports ingesting audio and video from external sources, such as an audio or video file.
Configure external audio and video input in the stream ingest configuration.
Insert external video data.
Insert audio data.
Sample code:
config.externMainStream = true;// Enable external stream input.
config.externVideoFormat = AlivcLivePushVideoFormatYUVNV21;// Set the video data color format. Here, it is set to YUVNV21. You can set it to other formats as needed.
config.externAudioFormat = AlivcLivePushAudioFormatS16;// Set the audio data bit depth format. Here, it is set to S16. You can set it to other formats as needed.Sample code:
/* The sendVideoData interface only supports continuous buffer data in external video formats like YUV and RGB. You can use it to send the video data buffer, length, width, height, timestamp, and rotation angle. */
[self.livePusher sendVideoData:yuvData width:720 height:1280 size:dataSize pts:nowTime rotation:0];
/* If the external video data is in CMSampleBufferRef format, you can use the sendVideoSampleBuffer interface. */
[self.livePusher sendVideoSampleBuffer:sampleBuffer]
/* You can also convert the CMSampleBufferRef format to a continuous buffer and then pass it to the sendVideoData interface. The following is reference code for the conversion. */
// Get the sample buffer size.
- (int) getVideoSampleBufferSize:(CMSampleBufferRef)sampleBuffer {
if(!sampleBuffer) {
 return 0;
}
int size = 0;
CVPixelBufferRef pixelBuffer = CMSampleBufferGetImageBuffer(sampleBuffer);
CVPixelBufferLockBaseAddress(pixelBuffer, 0);
if(CVPixelBufferIsPlanar(pixelBuffer)) {
 int count = (int)CVPixelBufferGetPlaneCount(pixelBuffer);
 for(int i=0; i<count; i++) {
 int height = (int)CVPixelBufferGetHeightOfPlane(pixelBuffer,i);
 int stride = (int)CVPixelBufferGetBytesPerRowOfPlane(pixelBuffer,i);
 size += stride*height;
 }
}else {
 int height = (int)CVPixelBufferGetHeight(pixelBuffer);
 int stride = (int)CVPixelBufferGetBytesPerRow(pixelBuffer);
 size += stride*height;
}
CVPixelBufferUnlockBaseAddress(pixelBuffer, 0);
return size;
}
// Convert a sample buffer to a continuous buffer.
- (int) convertVideoSampleBuffer:(CMSampleBufferRef)sampleBuffer toNativeBuffer:(void*)nativeBuffer
{
if(!sampleBuffer || !nativeBuffer) {
 return -1;
}
CVPixelBufferRef pixelBuffer = CMSampleBufferGetImageBuffer(sampleBuffer);
CVPixelBufferLockBaseAddress(pixelBuffer, 0);
int size = 0;
if(CVPixelBufferIsPlanar(pixelBuffer)) {
 int count = (int)CVPixelBufferGetPlaneCount(pixelBuffer);
 for(int i=0; i<count; i++) {
 int height = (int)CVPixelBufferGetHeightOfPlane(pixelBuffer,i);
 int stride = (int)CVPixelBufferGetBytesPerRowOfPlane(pixelBuffer,i);
 void *buffer = CVPixelBufferGetBaseAddressOfPlane(pixelBuffer, i);
 int8_t *dstPos = (int8_t*)nativeBuffer + size;
 memcpy(dstPos, buffer, stride*height);
 size += stride*height;
 }
}else {
 int height = (int)CVPixelBufferGetHeight(pixelBuffer);
 int stride = (int)CVPixelBufferGetBytesPerRow(pixelBuffer);
 void *buffer = CVPixelBufferGetBaseAddress(pixelBuffer);
 size += stride*height;
 memcpy(nativeBuffer, buffer, size);
}
CVPixelBufferUnlockBaseAddress(pixelBuffer, 0);
return 0;
}Sample code:
/* Only continuous buffer data in PCM format is supported. Use sendPCMData to send the audio data buffer, size, and timestamp. */
[self.livePusher sendPCMData:pcmData size:size pts:nowTime];
Configure watermarks
The Push SDK allows you to add multiple watermarks. Watermark images must be in PNG format. Sample code:
NSString *watermarkBundlePath = [[NSBundle mainBundle] pathForResource:
[NSString stringWithFormat:@"watermark"] ofType:@"png"];// Set the path of the watermark image.
[config addWatermarkWithPath: watermarkBundlePath
 watermarkCoordX:0.1
 watermarkCoordY:0.1
watermarkWidth:0.3];// Add a watermark.The
coordX,coordY, andwidthparameters are relative values. For example,watermarkCoordX:0.1places the watermark's x-position at 10% of the stream's total width. If the stream resolution is 540×960, the watermark's x-position will be 54.The height of the watermark image is scaled proportionally based on its original aspect ratio and the specified
widthvalue.To implement a text watermark, first convert the text into an image, then use this interface to add the image as a watermark.
To ensure the clarity and smooth edges of the watermark, use a source image that has the same dimensions as the final output size of the watermark. For example, if the output video resolution is 544×940 and the watermark's relative width is
0.1f, the ideal source image width should be around 54.4 pixels (544 * 0.1).
Configure video quality
Three video quality modes are supported: resolution priority mode, fluency priority mode, and custom mode.
To configure video quality, you must enable bitrate control: config.enableAutoBitrate = true;
Resolution priority mode (default)
In resolution priority mode, the SDK internally configures bitrate parameters to prioritize the clarity of the ingested video stream.
config.qualityMode = AlivcLivePushQualityModeResolutionFirst; // Resolution priority modeFluency priority mode
In fluency priority mode, the SDK internally configures bitrate parameters to prioritize the smoothness of the ingested video stream.
config.qualityMode = AlivcLivePushQualityModeFluencyFirst; // Fluency priority modeCustom mode
In custom mode, the SDK configures the stream based on the bitrate that you set. When you use custom mode, you need to define the initial, minimum, and target bitrates.
Initial bitrate: The bitrate at the start of the live stream.
Minimum bitrate: When the network connection is poor, the bitrate gradually decreases to the minimum bitrate to reduce video stuttering.
Target bitrate: When the network connection is good, the bitrate gradually increases to the target bitrate to improve video clarity.
config.qualityMode = AlivcLivePushQualityModeCustom // Set to custom mode.
config.targetVideoBitrate = 1400; // Target bitrate: 1400 Kbps
config.minVideoBitrate = 600; // Minimum bitrate: 600 Kbps
config.initialVideoBitrate = 1000; // Initial bitrate: 1000 Kbps
When setting a custom bitrate, refer to the recommended settings from Alibaba Cloud. The recommended settings are provided in the following tables:
Table 1. Recommended settings for Resolution Priority mode
Resolution | initialVideoBitrate | minVideoBitrate | targetVideoBitrate |
360p | 600 | 300 | 1000 |
480p | 800 | 300 | 1200 |
540p | 1000 | 600 | 1400 |
720p | 1500 | 600 | 2000 |
1080p | 1800 | 1200 | 2500 |
Table 1. Recommended settings for Resolution Priority mode
Resolution | initialVideoBitrate | minVideoBitrate | targetVideoBitrate |
360p | 400 | 200 | 600 |
480p | 600 | 300 | 800 |
540p | 800 | 300 | 1000 |
720p | 1000 | 300 | 1200 |
1080p | 1500 | 1200 | 2200 |
Adaptive resolution
When adaptive resolution is enabled, the SDK automatically lowers the resolution during poor network conditions to improve video smoothness.
config.enableAutoResolution = YES; // Enable adaptive resolution. This is disabled by default (NO).Adaptive resolution is effective only when the Video quality mode is set to Clarity First or Fluency First, but not in custom mode.
Some players may not support dynamic resolution changes. If you need to use the adaptive resolution feature, we recommend using ApsaraVideo Player.
Background music
The Push SDK supports background music playback, audio mixing, denoising, in-ear monitoring, and muting. You can call background music-related interfaces only after the preview starts. Sample code:
/* Start playing background music. */
[self.livePusher startBGMWithMusicPathAsync:musicPath];
/* Stop playing background music. If background music is already playing and you need to switch songs, you only need to call the start playing interface again. You do not need to stop the current background music first. */
[self.livePusher stopBGMAsync];
/* Pause background music. This can only be called after background music has started playing. */
[self.livePusher pauseBGM];
/* Resume playing background music. This can only be called when the background music is paused. */
[self.livePusher resumeBGM];
/* Enable looping for the music. */
[self.livePusher setBGMLoop:true];
/* Set the denoising switch. When enabled, non-human sounds in the captured audio are filtered. This might slightly suppress human voices. We recommend letting users choose whether to enable this feature. It is disabled by default. */
[self.livePusher setAudioDenoise:true];
/* Set the in-ear monitoring switch. This feature is mainly used in karaoke scenarios. When enabled, the host's voice is audible in the headphones. When disabled, the voice is not audible. In-ear monitoring does not work if no headphones are connected. */
[self.livePusher setBGMEarsBack:true];
/* Configure audio mixing to adjust the volume of the background music and captured voice. */
[self.livePusher setBGMVolume:50];// Set the background music volume.
[self.livePusher setCaptureVolume:50];// Set the captured voice volume.
/* Set mute. When muted, both music and voice input are silenced. To mute only the music or voice, use the audio mixing volume settings. */
[self.livePusher setMute:isMute?true:false];
Stream snapshots
The Push SDK provides a feature to capture snapshots from the local video stream. Sample code:
/* Set the snapshot callback. */
[self.livePushersetSnapshotDelegate:self];
/* Call the snapshot API. */
[self.livePushersnapshot:1interval:1];
Configure retouching
The ApsaraVideo Live Push SDK offers two retouching modes: basic and advanced. Basic retouching includes skin whitening, smoothing, and adding a rosy complexion. Advanced retouching supports facial recognition-based whitening, smoothing, rosy complexion, eye enlargement, and face slimming. This feature is provided by the Queen SDK. Sample code:
#pragma mark - "APIs for Retouching Types and Parameters"/**
* @brief Enables or disables a specific retouching type.
* @param type A value from QueenBeautyType.
* @param isOpen YES: enable, NO: disable.
*
*/
- (void)setQueenBeautyType:(kQueenBeautyType)type enable:(BOOL)isOpen;
/**
* @brief Sets a retouching parameter.
* @param param The retouching parameter type, one from QueenBeautyParams.
* @param value The value to set, ranging from [0,1]. Values less than 0 are set to 0, and values greater than 1 are set to 1.
*/
- (void)setQueenBeautyParams:(kQueenBeautyParams)param
value:(float)value;
#pragma mark - "APIs for Filters"
/**
* @brief Sets a filter image. kQueenBeautyTypeLUT must be enabled before setting a filter image.
* @param imagePath The path to the filter image to be set.
*/
- (void)setLutImagePath:(NSString *)imagePath;
#pragma mark - "APIs for Face Shaping"
/**
*@brief Sets the face shaping type. kQueenBeautyTypeFaceShape must be enabled before setting.
*@param faceShapeType The type of face shaping to set, see QueenBeautyFaceShapeType.
*@param value The value to set.
*/
- (void)setFaceShape:(kQueenBeautyFaceShapeType)faceShapeType
value:(float)value;
#pragma mark - "APIs for Makeup"
/**
* @brief Sets the makeup type and material asset path. kQueenBeautyTypeMakeup must be enabled before setting makeup.
* @param makeupType The makeup type.
* @param imagePaths A collection of paths to makeup material assets.
* @param blend The blend type.
*/
- (void)setMakeupWithType:(kQueenBeautyMakeupType)makeupType
paths:(NSArray<NSString *> *)imagePaths
blendType:(kQueenBeautyBlend)blend;
/**
* @brief Sets the makeup type and material asset path.
* @param makeupType The makeup type.
* @param imagePaths A collection of paths to makeup material assets.
* @param blend The blend type.
* @param fps The corresponding frame rate.
*/
- (void)setMakeupWithType:(kQueenBeautyMakeupType)makeupType
paths:(NSArray<NSString *> *)imagePaths
blendType:(kQueenBeautyBlend)blend fps:(int)fps;
/**
* @brief Sets the makeup transparency, with an option to specify gender.
* @param makeupType The makeup type.
* @param isFeMale Whether the user is female. YES for female, NO for male.
* @param alpha The transparency of the makeup.
*/
- (void)setMakeupAlphaWithType:(kQueenBeautyMakeupType)makeupType
female:(BOOL)isFeMale alpha:(float)alpha;
/**
* @brief Sets the blend type for a makeup type.
* @param makeupType The makeup type.
* @param blend The blend type.
*/
- (void)setMakeupBlendWithType:(kQueenBeautyMakeupType)makeupType
blendType:(kQueenBeautyBlend)blend;
/**
* @brief Clears all makeup effects.
*/
- (void)resetAllMakeupType;
Real-time parameter adjustment
The Push SDK supports real-time adjustment of retouching parameters during stream ingest. Enable the retouching switch and adjust the corresponding parameter values. Sample code:
[_queenEngine setQueenBeautyType:kQueenBeautyTypeSkinBuffing enable:YES];
[_queenEngine setQueenBeautyType:kQueenBeautyTypeSkinWhiting enable:YES];
[_queenEngine setQueenBeautyParams:kQueenBeautyParamsWhitening value:0.8f];
[_queenEngine setQueenBeautyParams:kQueenBeautyParamsSharpen value:0.6f];
[_queenEngine setQueenBeautyParams:kQueenBeautyParamsSkinBuffing value:0.6];
Configure live quiz
The live quiz feature works by inserting SEI messages into the live stream for the player to parse. The Push SDK provides an interface to insert SEI. You can call this interface only while a stream ingest is active. Sample code:
/*
msg: The SEI message body to insert into the stream. We recommend using JSON format. The ApsaraVideo Player SDK can receive this SEI message, parse it, and display the content.
repeatCount: The number of frames to send. To ensure that SEI messages are not dropped, you must set the number of repetitions. For example, a value of 100 inserts this SEI message into the next 100 frames. The player will deduplicate identical SEI messages.
delayTime: The delay in milliseconds before sending.
KeyFrameOnly: Whether to send only on keyframes.
*/
[self.livePusher sendMessage:@"Question Information" repeatCount:100 delayTime:0 KeyFrameOnly:false];
iPhone X adaptation
In most scenarios, setting the preview view's frame to full screen works correctly. However, on an iPhone X, a full-screen preview may appear stretched due to the device's unique aspect ratio. We recommend avoiding a full-screen view for previews on iPhone X.
Resize view during ingest
Iterate through the UIView you assigned when calling the startPreview or startPreviewAsync interface. Change the frame for all subviews of the preview view. For example:
[self.livePusher startPreviewAsync:self.previewView];
for (UIView *subView in [self.previewView subviews]) {
 // ...
}
External sound effects
If you need to play sound effects or music on the stream ingest page, we recommend using AVAudioPlayer, as the SDK currently conflicts with AudioServicesPlaySystemSound. After playback, you need to update the AVAudioSession settings. The following is sample code for playing sound effects with AVAudioPlayer:
- (void)setupAudioPlayer {
 NSString *filePath = [[NSBundle
mainBundle] pathForResource:@"sound" ofType:@"wav"];
 NSURL *fileUrl = [NSURL URLWithString:filePath];
 self.player = [[AVAudioPlayer alloc] initWithContentsOfURL:fileUrl error:nil];
 self.player.volume = 1.0;
 [self.player prepareToPlay];
}
 - (void)playAudio {
 self.player.volume = 1.0;
 [self.player play];
 // Configure AVAudioSession
 AVAudioSession *session = [AVAudioSession sharedInstance];
 [session setMode:AVAudioSessionModeVideoChat error:nil];
 [session overrideOutputAudioPort:AVAudioSessionPortOverrideSpeaker error:nil];
 [session setCategory:AVAudioSessionCategoryPlayAndRecord withOptions:AVAudioSessionCategoryOptionDefaultToSpeaker|AVAudioSessionCategoryOptionAllowBluetooth
| AVAudioSessionCategoryOptionMixWithOthers error:nil];
 [session setActive:YES error:nil];
}
Background mode and phone calls
The SDK handles background mode internally, so no action is required from you. By default, when the app enters the background, the SDK continues to ingest audio while the video stream pauses on the last frame. You need to enable the Background Modes capability in your app and select Audio, AirPlay and Picture in Picture. This ensures that your app can capture audio in the background.
If you want to stop audio ingest while the app is in the background, you should destroy the stream ingest engine when the app enters the background and re-create it when the app becomes active again.
If you use this method, you must listen for UIApplicationWillResignActiveNotification and UIApplicationDidBecomeActiveNotification. Using other methods may lead to risks.
Callbacks
The Push SDK includes the following main callbacks:
Callback type | Class name |
AlivcLivePusherInfoDelegate | |
AlivcLivePusherNetworkDelegate | |
AlivcLivePusherErrorDelegate | |
AlivcLivePusherBGMDelegate | |
AlivcLivePusherCustomFilterDelegate |
Ingest callbacks
Stream ingest callbacks report the SDK's status, such as when the preview starts, the first video frame is rendered, the first audio or video frame is sent, and when stream ingest starts and stops.
onPushStarted: Indicates a successful connection to the server.onFirstFramePushed: Indicates that the first audio or video frame was sent successfully.onPushStartedandonFirstFramePushed: Indicate that the SDK has successfully started stream ingest.
Network callbacks
Network-related callbacks notify the app of the network and connection status. For brief network fluctuations or switches that fall within the reconnection timeout and retry count set in AlivcLivePushConfig, the SDK automatically attempts to reconnect. If the reconnection is successful, stream ingest continues.
onConnectFail: Indicates that stream ingest failed. Check if the ingest URL is invalid, contains illegal characters, has authentication issues, exceeds the maximum concurrent stream limit, or is on a deny list. Ensure the ingest URL is valid and available before retrying. Specific error codes are in the ranges 0x30020901 to 0x30020905 and 0x30010900 to 0x30010901.onConnectionLost: Triggered when the connection is lost. The SDK automatically tries to reconnect and triggersonReconnectStart. If the connection cannot be restored after the maximum number of retries (config.connectRetryCount),onReconnectErroris triggered.onNetworkPoor: Triggered during slow network conditions. This indicates the network is insufficient for stable streaming, but the ingest is still active. You can handle your business logic here, such as displaying a UI notification to the user.onNetworkRecovery: Triggered when the network connection is restored.onReconnectError: A callback for reconnection failure. This indicates that the reconnection attempt failed. We recommend checking the current network and restarting the stream when the network recovers.onSendDataTimeout: A callback for data sending timeout. We recommend checking the current network, stopping the stream, and then restarting it when the network recovers.onPushURLAuthenticationOverdue: A callback indicating the authentication for the current ingest URL has expired. You need to provide a new URL to the SDK.
Error callbacks
onSystemError: A callback for system device exceptions. You need to destroy the engine and try again.onSDKError: A callback for SDK errors. You need to handle different errors based on their codes:If the error code is 805438211, it indicates poor device performance and a low encoding and rendering frame rate. You should notify the host and stop any resource-intensive business logic in the app layer, such as advanced retouching or animations.
You must handle callbacks for missing microphone and camera permissions. The error code for missing microphone permission is 268455940, and the error code for missing camera permission is 268455939.
For now, all other errors should only be logged without requiring additional actions.
Background music callbacks
onOpenFailed: The background music failed to start. Check if the music file and its path passed to thestartBGMWithMusicPathAsyncinterface are correct. You can callstartBGMWithMusicPathAsyncto try again.onDownloadTimeout: The background music playback timed out. This often occurs when playing music from a network URL. Prompt the host to check the current network status. You can callstartBGMWithMusicPathAsyncto try again.
Custom filter callbacks
Use the AlivcLivePusherCustomFilterDelegate callback to integrate with third-party retouching SDKs to implement basic and advanced retouching features. The main purpose of AlivcLivePusherCustomFilterDelegate is to provide the SDK's internal texture or CVPixelBuffer to the retouching SDK for processing, and then return the processed texture or CVPixelBuffer to our SDK to apply the retouching effects.
If the livePushMode switch in AlivcLivePushConfig is set to AlivcLivePushBasicMode, the SDK provides the texture ID through the AlivcLivePusherCustomFilterDelegate callback, not the CVPixelBuffer. The core callbacks are as follows:
onCreate: A callback for when the OpenGL context is created. This is typically used to initialize the retouching engine.onProcess: A callback for when the OpenGL texture is updated. This method provides the SDK's original internal texture ID. In this callback, you call your retouching processing method and return the processed texture ID.onDestory: A callback for when the OpenGL context is destroyed. This is typically used to destroy the retouching engine.
Common APIs
/* In custom mode, you can adjust the minimum and target bitrates in real time. */
[self.livePusher setTargetVideoBitrate:800];
[self.livePusher setMinVideoBitrate:200]
/* Get the current stream ingest status. */
BOOL isPushing = [self.livePusher isPushing];
/* Get the ingest URL. */
NSString *pushURLString = [self.livePusher getPushURL];
/* Get performance debugging information for stream ingest. For specific parameters and descriptions, refer to the API documentation or interface comments. */
AlivcLivePushStatsInfo *info = [self.livePusher getLivePushStatusInfo];
/* Get the SDK version number. */
NSString *sdkVersion = [self.livePusher getSDKVersion];
/* Set the log level to filter debugging information as needed. */
[self.livePusher setLogLevel:(AlivcLivePushLogLevelDebug)];
Debugging tool
The SDK provides a UI debugging tool called DebugView. DebugView is a movable, global floating window that always stays on top of the view hierarchy. It includes debugging features such as viewing stream ingest logs, real-time monitoring of performance parameters, and line charts for key performance metrics.
Do not call the interface to add DebugView in your release build.
Sample code:
[AlivcLivePusher showDebugView];// Open the debugging tool.API reference
FAQ
Stream ingest fails
You can use the troubleshooting tool to check if the ingest URL is valid.
How can I get information about ingested audio and video streams?
Go to the Stream Management page. In the Active Streams section, you can view and manage your ingested audio and video streams.
How do I play the stream?
After starting stream ingest, you can use a player like ApsaraVideo Player, FFplay, or VLC to test stream pulling. To obtain a playback URL, see Generate ingest and streaming URLs.
App Store submission rejection
The RtsSDK is a fat binary that includes architectures for both physical devices and the simulator. To submit your app to the App Store, you must remove the simulator architecture. You can use lipo -remove to remove the x86_64 slice from the binary.