Lindorm Compute Engine lets you run SQL queries against column store and wide table data. This guide shows you how to create a resource group, connect to it, and run your first SQL statement.
Choose the resource group type that fits your workload:
| Resource group type | Interface | Best for |
|---|---|---|
| OLAP | MySQL-compatible SQL | Interactive queries, high-concurrency analytics, low-latency responses |
| ETL | Spark SQL (serverless) | Batch transformations, complex computations, infrequent or offline jobs |
Prerequisites
Before you begin, ensure that you have:
LindormTable activated. See Create an instance
Lindorm Compute Engine activated. See Activate the service
Your client IP address added to the Lindorm whitelist. See Set a whitelist
Use an OLAP resource group
An Online Analytical Processing (OLAP) resource group provides a MySQL-compatible interface. After creation, dedicated compute nodes are allocated for high-concurrency, low-latency analytical queries.
Step 1: Create an OLAP resource group
Log on to the Lindorm console. Select the region of your instance in the upper-left corner. On the Instances page, click the instance ID or click View Instance Details in the Actions column.
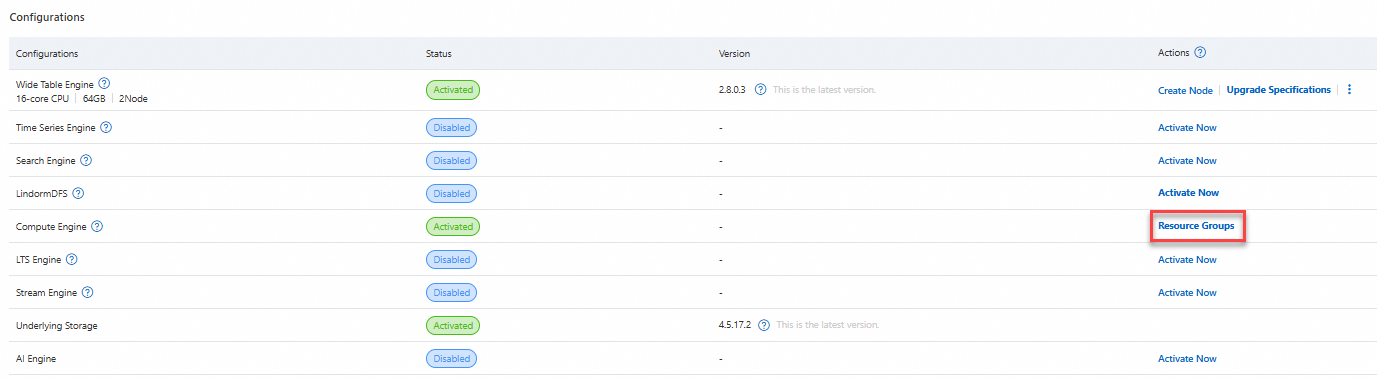
On the Instance Details page, go to the Configurations section and click Resource Groups in the Compute Engine column.
On the Resource Group Details page, click Create Resource Group and set the following parameters:
Parameter Description Resource Group Type Select OLAP. Resource Group Name Lowercase letters and digits only; max 63 characters. Example: cg0Node Specifications Select the compute node specifications. Working Nodes in Job Number of worker nodes per job. Valid values: [4, 1024]. Default: 4Click OK.
Resource group creation takes about 20 minutes.
On the Resource Group Details page, wait until the status shows Running under Status and Description. Hover over the resource group name to get its Virtual Private Cloud (VPC) internal endpoint:
jdbc:mysql://ld-bp1dv48fk0yg0****-olap-proxy-ldps.lindorm.aliyuncs.com:9030Configure the MySQL client, then connect to the OLAP resource group using your LindormTable username and password:
mysql -hld-bp1dv48fk0yg0****-olap-proxy-ldps.lindorm.aliyuncs.com -P9030 -uroot -p
Step 2: Access data
The OLAP resource group uses two catalogs to identify data sources:
| Catalog | Data source | Default |
|---|---|---|
lindorm_columnar | Column store (Iceberg-compatible data lake) | Yes — selected automatically when you connect via MySQL |
lindorm_table | Wide tables (LindormTable) | No — switch explicitly with SET CATALOG lindorm_table; |
Access column store data
Column store is a data lake built on columnar storage, compatible with the Iceberg ecosystem. Data is stored in the file engine of the Lindorm instance.
The lindorm_columnar catalog is selected by default. To switch to it explicitly, run:
SET CATALOG lindorm_columnar;The following steps create a database, write data, and run sample queries.
Create and use a database.
-- Create a database.
CREATE DATABASE olapdemo;

-- Use the database.
USE olapdemo;
Create a table and write data.
-- Create a table.
CREATE TABLE test (id INT, name STRING) ENGINE = iceberg;

-- Insert data.
INSERT INTO test VALUES (0, 'Jay'), (1, 'Edison');
Query data. Example 1 — filter by condition:
SELECT id, name FROM test WHERE id != 0;Result:
+------+--------+
| id   | name   |
+------+--------+
|    1 | Edison |
+------+--------+
Example 2 — aggregate:
SELECT count(distinct name) FROM test;Result:
+----------------------+
| count(DISTINCT name) |
+----------------------+
|                    2 |
+----------------------+
Example 3 — join:
SELECT * FROM
  (SELECT id, name FROM test WHERE id != 0) t0
  JOIN
  (SELECT id, name FROM test WHERE id != 2) t1
  ON t0.id = t1.id;
Result:
+------+--------+------+--------+
| id   | name   | id   | name   |
+------+--------+------+--------+
|    1 | Edison |    1 | Edison |
+------+--------+------+--------+
Clean up.
DROP TABLE test;
DROP DATABASE olapdemo;
Access wide table data
The OLAP resource group can query LindormTable data using its dedicated compute nodes. Only read operations are supported — you cannot create tables or write data to LindormTable through the OLAP resource group.
Switch to the wide table catalog before querying:
SET CATALOG lindorm_table;If you already have a wide table, skip to the query steps. Otherwise, connect to LindormTable and create a sample table:
-- Create a database.
CREATE DATABASE test;

-- Use the database.
USE test;

-- Create a table and insert two rows.
CREATE TABLE tb (id varchar, name varchar, address varchar, primary key(id, name));
UPSERT INTO tb (id, name, address) VALUES ('001', 'Jack', 'hz');
UPSERT INTO tb (id, name, address) VALUES ('002', 'Edison', 'bj');
In the MySQL command-line interface (CLI) connected to the OLAP resource group, run the following steps.
Switch the data source and select the database.
-- Switch to the wide table catalog.
SET CATALOG lindorm_table;

-- Use the test database.
USE test;
Query wide table data. Example 1 — retrieve rows:
SELECT * FROM tb LIMIT 5;Result:
+------+--------+---------+
| id   | name   | address |
+------+--------+---------+
| 001  | Jack   | hz      |
| 002  | Edison | bj      |
+------+--------+---------+
Example 2 — count rows:
SELECT count(*) FROM tb;Result:
+----------+
| count(*) |
+----------+
|        2 |
+----------+
Use an ETL resource group
An extract, transform, and load (ETL) resource group provides a serverless Spark SQL interface. Resources are allocated on demand and released automatically. This makes it suitable for infrequent queries, batch transformations, and offline reporting.
Step 1: Activate the resource group
Log on to the Lindorm console. Select the region of your instance in the upper-left corner. On the Instances page, click the instance ID or click View Instance Details in the Actions column.
On the Instance Details page, go to the Configurations section and click Resource Groups in the Compute Engine column.
On the Resource Group Details page, click Create Resource Group and set the following parameters:
Parameter Description Resource Group Type Select ETL. Resource Group Name Lowercase letters and digits only; max 63 characters. Example: cg0Daily Resource Quota Maximum CU hours the resource group can consume per day (unit: CU*Hour). Default:100000. Set to0for no limit.ImportantJobs are immediately deleted if this limit is exceeded. For production workloads, set this to
0to avoid unexpected job termination.Maximum CPU cores Maximum CPU cores for the resource group. Valid values: [100, 100000]. Maximum memory Maximum memory for the resource group. Valid values: [400 GB, 1000000 GB]. There is no default value. Authorize users Users allowed to access the resource group. Default: *(all users).Click OK to create the resource group.
Step 2: Set up the environment
Run the following steps on an Elastic Compute Service (ECS) instance in the same VPC as your Lindorm instance.
Install Java Development Kit (JDK) 1.8 or later.
Download the Spark package and decompress it.
Set the
SPARK_HOMEenvironment variable to the directory where you decompressed the package.export SPARK_HOME=/path/to/spark/Edit
$SPARK_HOME/conf/beeline.confand configure the following parameters:Parameter Description endpointJava Database Connectivity (JDBC) URL of the Lindorm compute engine. See View endpoints. userLindormTable username. passwordLindormTable password. shareResourceWhether to share compute resources across sessions for the same user. Default: true.compute-groupName of the ETL resource group. Default: default.Go to
$SPARK_HOME/binand start the interactive session:Idle sessions are released automatically after 4 hours. To monitor running jobs, access the Spark UI using the cluster URL shown in the startup output.
./beelineA successful connection displays:
Welcome to Lindorm Distributed Processing System (LDPS) !!!
Initializing environment. It might take minutes ...
Environemnt prepared. You may visit your jdbc cluster by below url:
http://alb-boqak6zfns5gzx****.cn-hangzhou.alb.aliyuncsslb.com/proxy/75ce76086b61470da7046bd4c2b7****
Please note -- you are sharing this JDBC cluster between SQL sessions from the same user.
The cluster will be released by auto if idle for 4 hours.
You may also kill it manually by visiting above web url and clicking 'kill' in tab of 'Query Engine'
lindorm-beeline>
Step 3: Access data
All examples below use Spark SQL in the lindorm-beeline> session. The lindorm_columnar catalog is selected by default. Use SET CATALOG to switch between data sources.
Access column store data
Column store is a data lake built on columnar storage, compatible with the Iceberg ecosystem. Data is stored in the file engine of the Lindorm instance. You can use Spark SQL to write and query this data.
The lindorm_columnar catalog is selected by default. To switch to it explicitly, run:
SET CATALOG lindorm_columnar;The following steps create a database, write data, and run sample queries.
Create and use a database.
-- Create a database.
CREATE DATABASE etldemo;

-- Use the database.
USE etldemo;
Create a table and write data.
-- Create a table.
CREATE TABLE test (id INT, name STRING);

-- Insert data.
INSERT INTO test VALUES (0, 'Jay'), (1, 'Edison');
Query data. Example 1 — filter by condition:
SELECT id, name FROM test WHERE id != 0;Result:
+------+--------+
| id   | name   |
+------+--------+
|    1 | Edison |
+------+--------+
Example 2 — aggregate:
SELECT count(distinct name) FROM test;Result:
+----------------------+
| count(DISTINCT name) |
+----------------------+
|                    2 |
+----------------------+
Example 3 — join:
SELECT * FROM
  (SELECT id, name FROM test WHERE id != 0) t0
  JOIN
  (SELECT id, name FROM test WHERE id != 2) t1
  ON t0.id = t1.id;
Result:
+------+--------+------+--------+
| id   | name   | id   | name   |
+------+--------+------+--------+
|    1 | Edison |    1 | Edison |
+------+--------+------+--------+
Clean up.
DROP TABLE test;
DROP DATABASE etldemo;
Access wide table data
Spark SQL connections in an ETL resource group can query LindormTable data using elastic compute resources. Data Definition Language (DDL) statements — such as CREATE TABLE or DROP TABLE — are not supported for LindormTable through this connection. Use it for queries and computations only.
Switch to the wide table catalog before querying:
SET CATALOG lindorm_table;If you already have a wide table, skip to the query steps. Otherwise, connect to LindormTable and create a sample table:
-- Create a database.
CREATE DATABASE test;

-- Use the database.
USE test;

-- Create a table and insert two rows.
CREATE TABLE tb (id varchar, name varchar, address varchar, primary key(id, name));
UPSERT INTO tb (id, name, address) VALUES ('001', 'Jack', 'hz');
UPSERT INTO tb (id, name, address) VALUES ('002', 'Edison', 'bj');
In the lindorm-beeline session, run the following steps.
Switch the data source and select the database.
-- Switch to the wide table catalog.
SET CATALOG lindorm_table;

-- Use the test database.
USE test;
Query wide table data. Example 1 — retrieve rows:
SELECT * FROM tb LIMIT 5;Result:
+------+--------+---------+
| id   | name   | address |
+------+--------+---------+
| 001  | Jack   | hz      |
| 002  | Edison | bj      |
+------+--------+---------+
Example 2 — count rows:
SELECT count(*) FROM tb;Result:
+-----------+
| count(1)  |
+-----------+
| 2         |
+-----------+
What's next
View endpoints — find the JDBC URL and connection details for your resource group
Spark UI — monitor running Spark jobs in your ETL resource group