KMS supports deploying KMS Agent as a sidecar in Alibaba Cloud Container Service for Kubernetes (ACK) clusters. The agent retrieves secret values from KMS through the (RAM Roles for Service Accounts) RRSA feature, and business applications retrieve these secrets through a local interface. This approach eliminates the need for SDK integration, reducing application modification costs and ensuring unified integration standards. It is ideal for scenarios where many applications need to access KMS. This topic describes how to deploy KMS Agent in an ACK container environment to retrieve secrets.
Before you begin
Familiarize yourself with the following concepts:
KMS Agent: An HTTP proxy service that retrieves secret values from KMS and caches them in memory. Applications then request these secret values from the agent via HTTP requests.
Pod permission isolation with RRSA: If your application is deployed in an Alibaba Cloud ACK cluster, you can use the RRSA feature to assign distinct RAM roles to different applications within the cluster. Each application can then assume an independent RAM role to access Alibaba Cloud OpenAPIs.
Scenarios
Deploying KMS Agent in an ACK container environment to retrieve secrets using RRSA as an access credential is suitable for the following business scenarios.
Addressing the "last key" problem
Enterprises host sensitive credentials in Alibaba Cloud KMS to enhance security. However, since authentication is still required to access KMS itself, relying on fixed AccessKeys to access cloud services for extended periods creates a potential security risk where KMS access credentials become a new vulnerability.
By enabling the RRSA feature in Alibaba Cloud ACK clusters, different RAM roles can be associated with different Pods. Applications in different Pods can assume independent RAM roles and use temporary credentials to access cloud resources. This implements the principle of least privilege for applications and enables access to Alibaba Cloud OpenAPI without AccessKeys, preventing AccessKey leakage.
Isolating credential access for different applications
For example, permission isolation is required between test and production environments of the same application, along with between different applications, to prevent permission expansion and unauthorized credential access.
RRSA is based on RAM policies. Different applications run in different namespaces and service accounts, binding to different RAM roles. By granting different permissions to RAM roles, access control to KMS secrets can be implemented for different applications.
Reducing development costs for KMS integration.
If only a few applications need to access KMS, they can integrate the SDK. However, for medium to large enterprises with hundreds or thousands of applications, having each application modified to integrate the SDK and designing disaster recovery and caching according to consistent standards is extremely difficult. Additionally, since security, operations, and development teams are typically separate in mainland Chinese enterprises, the existing open-source external secret approach is not very suitable. It is more appropriate for the integrated DevOps model.
In this case, you can use KMS Agent to retrieve secrets. In an ACK container cluster environment, KMS Agent runs as a sidecar container in the same Pod as the business container. When RRSA is enabled in the ACK cluster, KMS Agent automatically accesses KMS with the RRSA RamRole identity without needing to set any access credentials. The Agent retrieves secrets from the remote KMS and caches them in memory, and business applications then retrieve secrets from the Agent.
Solution architecture
The following diagram illustrates an example where a user has two applications, dev and prod, deploying KMS Agent in an ACK container environment to retrieve secrets. Applications in different environments can only access their corresponding KMS secrets.

Limits
ACK clusters support ACK managed clusters, ACK dedicated clusters, ACK registered clusters, and ACK Serverless clusters.
The ACK cluster and KMS instance must be in the same region.
Procedure
The following procedure demonstrates how to configure ACK, RAM, and KMS to enable business applications to retrieve secrets through KMS Agent. Developers only need to create secrets in KMS and then retrieve them locally in the application. The remaining configurations are set up in advance by the operations and security teams. Throughout the process, developers do not need to integrate the SDK in their business code or worry about authentication, authorization, caching, or disaster recovery for applications accessing KMS.

Step 1: Build the KMS Agent executable file
Install the Golang environment. For detailed operations, see Go installation guide.
Download the source code and dependencies.
Visit the Git website to download and install the Git tool.
Execute the following command to download the source code and dependencies.
git clone https://github.com/aliyun/alibabacloud-kms-agent
go mod download
In the project root directory, execute the
go build .command to compile the executable file. The default file name is alibabacloud-kms-agent, saved in the project root directory.If the compilation environment and deployment environment are the same, simply execute the
go build .command. If the compilation environment and deployment environment are different, refer to the following commands for cross-platform compilation to generate a 64-bit executable file.Compilation environment
Deployment environment is Mac
Deployment environment is Linux
Deployment environment is Windows
Mac
go build .CGO_ENABLED=0 GOOS=linux GOARCH=amd64 go build .CGO_ENABLED=0 GOOS=windows GOARCH=amd64 go build .Linux
CGO_ENABLED=0 GOOS=darwin GOARCH=amd64 go build .go build .CGO_ENABLED=0 GOOS=windows GOARCH=amd64 go build .Windows
SET CGO_ENABLED=0 SET GOOS=darwin SET GOARCH=amd64 go build .SET CGO_ENABLED=0 SET GOOS=linux SET GOARCH=amd64 go build .go build .In the project root directory, check if the executable file alibabacloud-kms-agent exists.

Step 2: Enable ACK RRSA and authorize it to access specific secrets
Enable the ACK RRSA feature.
Enable during cluster creation
When you create an ACK managed cluster or ACK Edge cluster, click Enable next to RRSA OIDC in the Advanced Options (Optional) section of the Cluster Configurations step.

Enable after cluster creation
Log on to the ACK console. In the left navigation pane, click Clusters.
On the Clusters page, find the target cluster and click its name. In the navigation pane on the left, click Cluster Information.
In the Security and Auditing section of the Basic Information tab, click Enable next to RRSA OIDC.

In the Enable RRSA dialog box, click Confirm.
In the Basic Information section, if the cluster status changes from Updating to Running, the RRSA feature is enabled for the cluster.
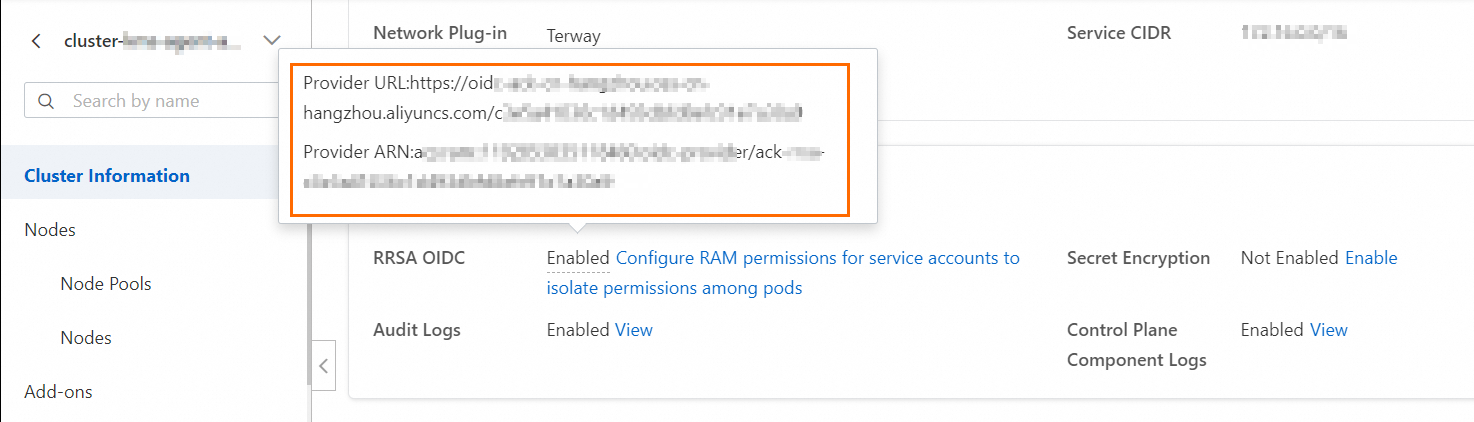
Open the cluster details page. On the Basic Information tab, in the Security And Auditing section, hover over the Enabled status to the right of RRSA OIDC to view the provider's URL link and ARN information.
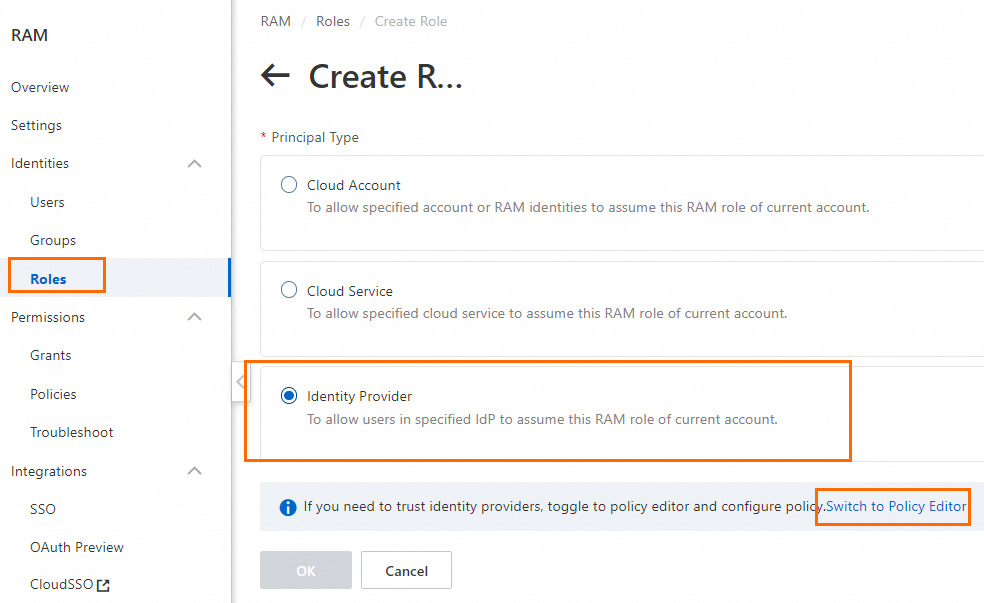
Create a RAM role with a trusted entity of Identity Provider.
Log on to the RAM console using your Alibaba Cloud account.
In the left-side navigation pane, choose . On the Roles page, click Create Role.
In the Create Role panel, select Identity Provider as the trusted entity type, and click Switch to Policy Editor
On the Create Role page, in the Visual editor section, configure the following role information and click OK.
Configuration item
Description
Effect
Select Allow.
Principal
Select the identity provider.
Identity provider type: Select OIDC.
Identity provider: After enabling RRSA, the ACK cluster creates a default identity provider with the naming format ack-rrsa-<cluster_id>. Specify the ID of your cluster in <cluster_id>.
Action
Keep the default. That is, select sts:AssumeRole.
Condition
Add a new condition based on the default oidc:iss and oidc:aud conditions:
Condition key: Select oidc:sub.
Operator: Select StringEquals.
Condition value: system:serviceaccount:<namespace>:<serviceAccountName>.
<namespace>: Specify the namespace of the application.
<serviceAccountName>: the name of the service account.
This example uses
system:serviceaccount:rrsa-dev:dev-sa, where rrsa-dev is the Kubernetes namespace that needs to be created in the next step, and dev-sa is the Kubernetes service account that needs to be created in the next step.
In the Create Role dialog box, set the role name and click OK. In this example, the role name is dev-role-for-rrsa.
View the trust policy of the dev-role-for-rrsa RAM role.
This policy allows a specific service account to assume a RAM role through Alibaba Cloud RRSA (RAM Roles for Service Accounts) after meeting OIDC authentication conditions.
{
  "Statement": [
    {
      "Action": "sts:AssumeRole",
      "Condition": {
        "StringEquals": {
          "oidc:aud": [
            "sts.aliyuncs.com"
          ],
          "oidc:iss": [
            "https://oidc-ack-cn-hongkong.oss-cn-hongkong.aliyuncs.com/cf01******"
          ],
          "oidc:sub": [
            "system:serviceaccount:rrsa-dev:dev-sa"
          ]
        }
      },
      "Effect": "Allow",
      "Principal": {
        "Federated": [
          "acs:ram::5269************:oidc-provider/ack-rrsa-cf01******"
        ]
      }
    }
  ],
  "Version": "1"
}
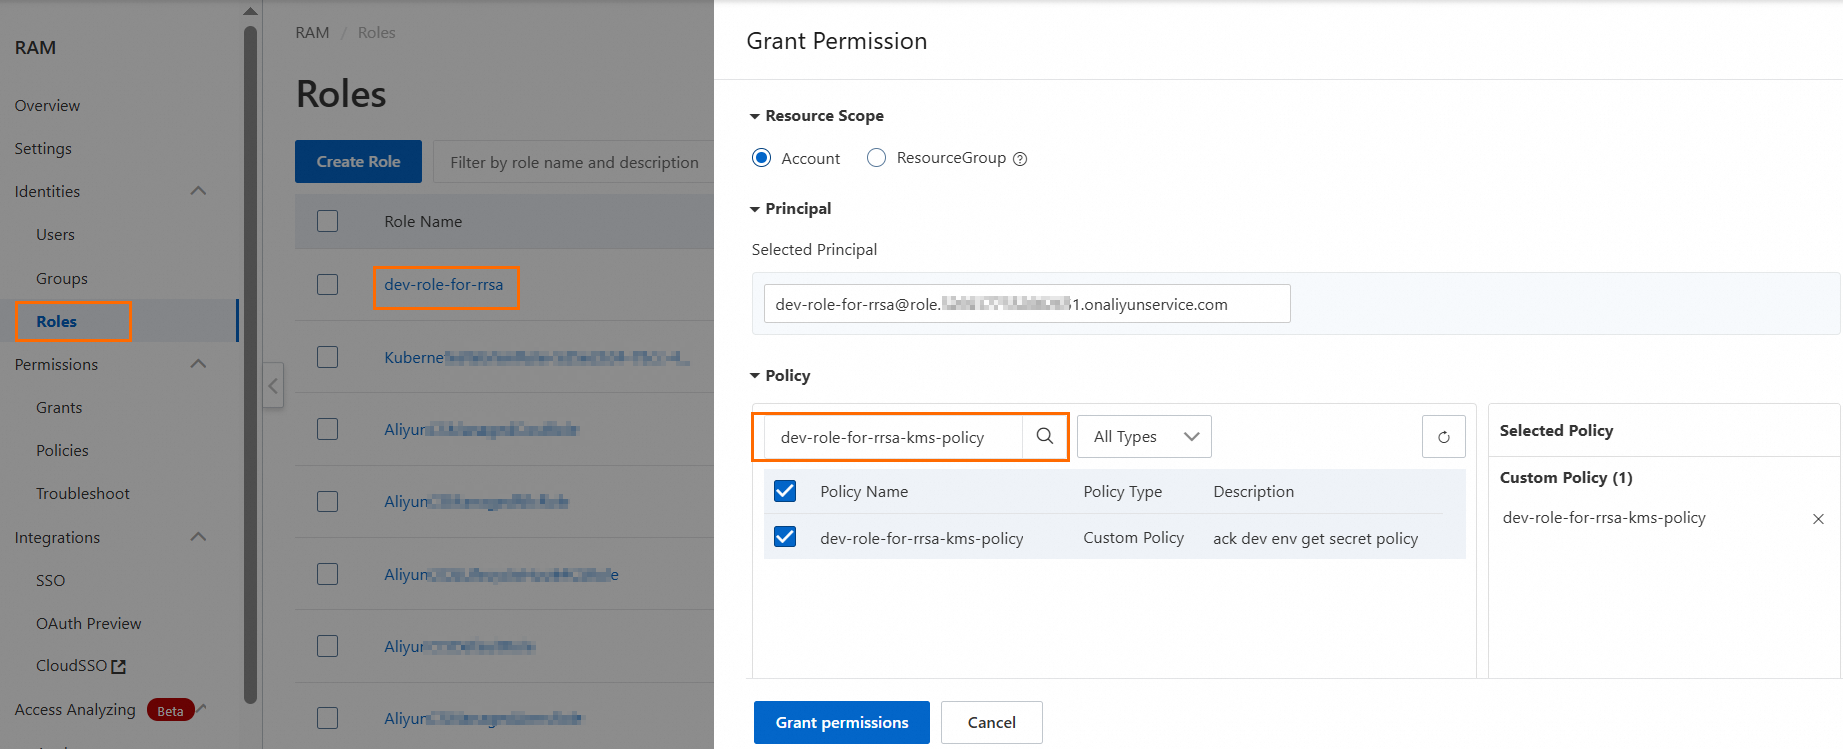
Create a permission policy and grant it to the RAM role.
For this example, the permission policy name is dev-role-for-rrsa-kms-policy, and the policy content only allows access to secrets with the
env:devtag.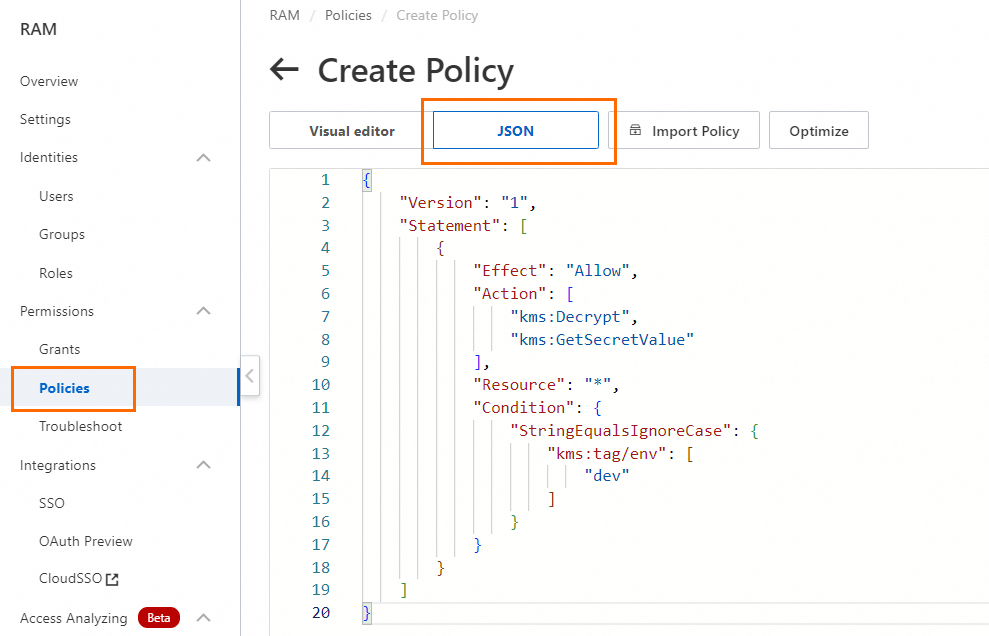
The permission policy content is as follows:
{
    "Version": "1",
    "Statement": [
        {
            "Effect": "Allow",
            "Action": [
                "kms:Decrypt",
                "kms:GetSecretValue"
            ],
            "Resource": "*",
            "Condition": {
                "StringEqualsIgnoreCase": {
                    "kms:tag/env": [
                        "dev"
                    ]
                }
            }
        }
    ]
}
Grant the dev-role-for-rrsa-kms-policy permission policy to the dev-role-for-rrsa role.
Step 3: Create Namespace and Service Account in ACK
Namespaces divide the ACK cluster into logically isolated virtual spaces, used to separate development, testing, production, and other environments. Applications in different namespaces cannot access each other's resources by default, providing a physical boundary for RAM role binding. Service Accounts provide identity for Pods and dynamically bind with RAM roles through the RRSA mechanism.
Create a Namespace using a YAML file.
For this example, the Namespace name is rrsa-dev, and the YAML file name is namespace.yaml.
apiVersion: v1
kind: Namespace
metadata:
  name: rrsa-dev
Execute the following command to create a Namespace named
rrsa-devin the ACK cluster.kubectl apply -f namespace.yamlCheck if the Namespace was created successfully:
kubectl get namespacesIf the output includes
rrsa-dev, the creation was successful.Create a Service Account using a YAML file.
For this example, the Service Account name is dev-sa, and the YAML file name is serviceaccount.yaml.
apiVersion: v1
kind: ServiceAccount
metadata:
  name: dev-sa
  namespace: rrsa-dev
Execute the following command to create a ServiceAccount named
dev-sainrrsa-dev.kubectl apply -f serviceaccount.yamlCheck if the ServiceAccount was created successfully:
kubectl get serviceaccount -n rrsa-devIf the output includes
dev-sa, the creation was successful.
Step 4: Create a sidecar container image
Deploy KMS Agent as a sidecar container alongside the application container in Alibaba Cloud's ACK container service.
Configure KMS Agent runtime parameters in config.toml.
Noteconfig.toml is the Agent's configuration file. You can find this file in the configs directory of the alibabacloud-kms-agent source code retrieved in Step 1.
[Server]
HttpPort = 2025

[KMS]
Region = "cn-hangzhou"

[Cache]
CacheType = "InMemory"
CacheSize = 1000
TtlSeconds = 300

[Log]
LogLevel = "Debug"
LogPath = "./logs/"
MaxSize = 100
MaxBackups = 2
Create a Dockerfile.
For example, if the Agent is deployed in the
deploy/ack/agentpath, create a Dockerfile in that path. For the file content, refer to agent_Dockerfile.# Use the centos image as the base FROM centos:centos7 # Set the working directory inside the container WORKDIR /usr/local/alibabacloudkmsagent # Copy the binary and config to the container COPY alibabacloud-kms-agent . COPY config.toml . # Set the entry point to run the kms agent ENTRYPOINT ["./alibabacloud-kms-agent", "agent", "./config.toml"]Copy the files created in steps 1 and 2 to the deploy/ack/agent directory.
deploy/ack/agent
├── alibabacloud-kms-agent
├── config.toml
├── Dockerfile.agent
Build the sidecar container image and upload it to Alibaba Cloud Container Registry.
# Build
docker build -t registry.cn-hangzhou.aliyuncs.com/<ns>/<repo>:kmsagent-v1.0 .
# Upload
docker push registry.cn-hangzhou.aliyuncs.com/<ns>/<repo>:kmsagent-v1.0
Step 5: Create a business container image
For example, if the business application is deployed in the
deploy/ack/apppath, write a Dockerfile for the application container image in that path.# Use the centos image as the base FROM centos:centos7 # Set the working directory inside the container WORKDIR / # Set the entry point to run the kms agent ENTRYPOINT ["sleep", "360000"]Build the application container image and upload it to Alibaba Cloud Container Registry.
# Build
docker build -t registry.cn-hangzhou.aliyuncs.com/<ns>/<repo>:app-v1.0 .
# Upload
docker push registry.cn-hangzhou.aliyuncs.com/<ns>/<repo>:app-v1.0
Step 6: Deploy the application
Method 1: Custom Deployment template
Write a custom deployment template to deploy KMS Agent as an additional container in the same Pod as the application container. As shown below, place the app and sidecar containers in the same Pod or Deployment for deployment. For information about how to run your container application, see Create a stateless workload (Deployment).
KMS_TOKEN: Specifies the storage path of the SSRF Token file generated when the Agent starts.
ALIBABA_CLOUD_ROLE_ARN: The ARN of the RAM role.
ALIBABA_CLOUD_OIDC_PROVIDER_ARN: The ARN of the OIDC identity provider, which is the ACK cluster ARN in this case.
ALIBABA_CLOUD_OIDC_TOKEN_FILE: The file path containing the OIDC Token.
apiVersion: apps/v1
kind: Deployment
metadata:
  name: my-app
  namespace: rrsa-dev
spec:
  replicas: 1
  selector:
    matchLabels:
      app: my-app
  template:
    metadata:
      labels:
        app: my-app
    spec:
      serviceAccountName: dev-sa
      containers:
      - name: kmsagent
        image: registry-vpc.cn-hangzhou.aliyuncs.com/<ns>/<repo>:kmsagent-v1.0
        env:
        - name: ALIBABA_CLOUD_ROLE_ARN
          value: acs:ram::<uid>:role/dev-role-for-rrsa
        - name: ALIBABA_CLOUD_OIDC_PROVIDER_ARN
          value: acs:ram::<uid>:oidc-provider/ack-rrsa-<ackClusterId>
        - name: ALIBABA_CLOUD_OIDC_TOKEN_FILE
          value: /var/run/secrets/ack.alibabacloud.com/rrsa-tokens/token
        - name: KMS_TOKEN
          value: file:///var/run/kmstoken/token
        volumeMounts:
          - name: shared-volume
            mountPath: /var/run/kmstoken
          - name: rrsa-oidc-token
            mountPath: /var/run/secrets/ack.alibabacloud.com/rrsa-tokens
            readOnly: true
        command: ["/bin/sh", "-c", "./alibabacloud-kms-agent token /var/run/kmstoken/token && ./alibabacloud-kms-agent agent config.toml"]
      - name: my-app
        image: registry-vpc.cn-hangzhou.aliyuncs.com/<ns/<repo>:app-v1.0
        volumeMounts:
          - name: shared-volume
            mountPath: /var/run/kmstoken
      volumes:
        - name: shared-volume
          emptyDir: {}
        - name: rrsa-oidc-token
          projected:
            defaultMode: 420
            sources:
            - serviceAccountToken:
               audience: sts.aliyuncs.com
               expirationSeconds: 3600
               path: token
Method 2: Install OpenKruise and configure injection rules
OpenKruise is a set of standard extensions for Kubernetes. It can be used with native Kubernetes to manage application pods, sidecar containers, and image distribution in an efficient manner. For detailed information, see Deploy cloud-native applications by using OpenKruise.
Install OpenKruise.
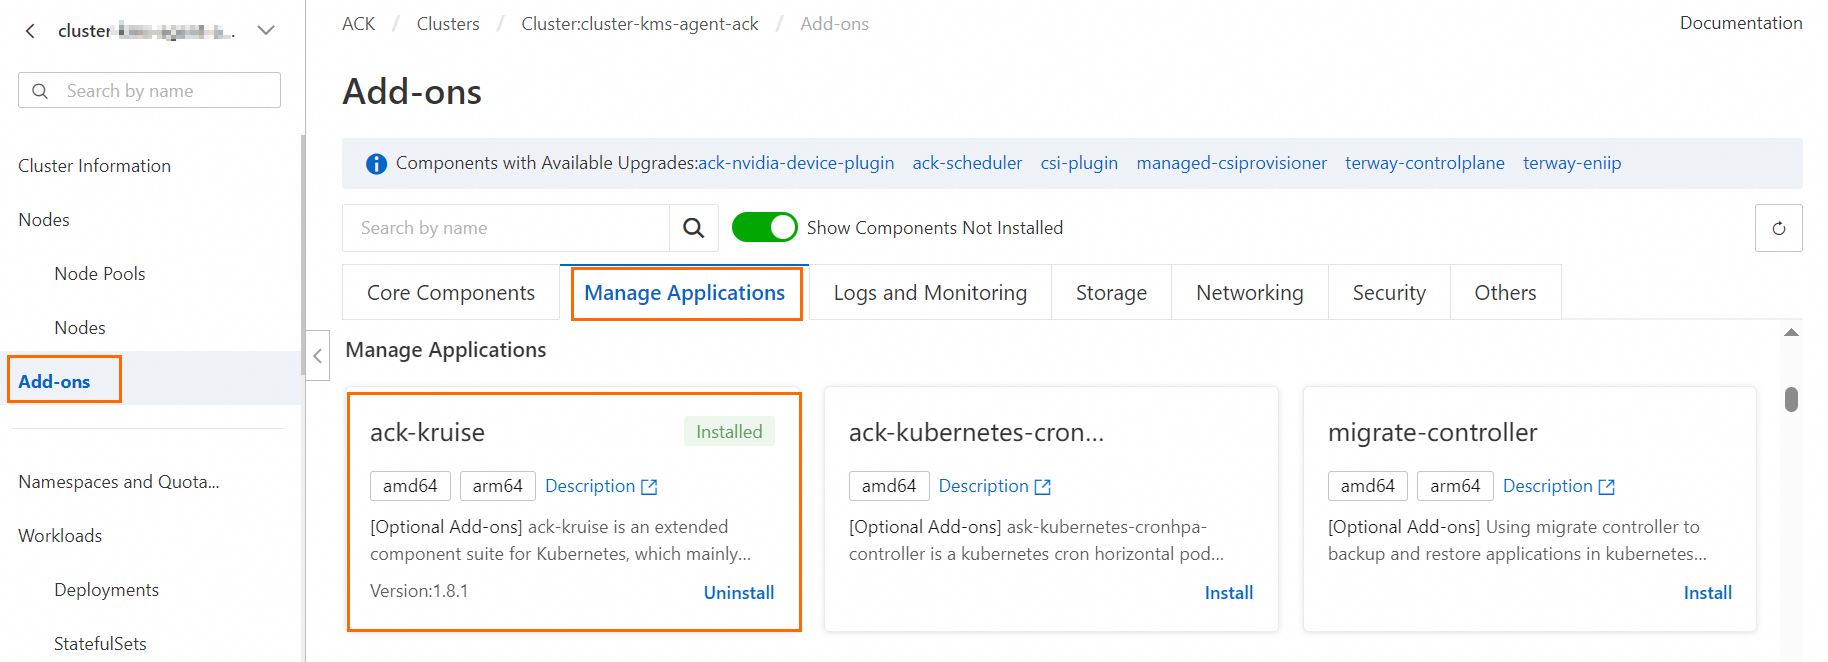
Log on to the ACK console. In the left navigation pane, click Clusters.
On the Clusters page, find the one you want to manage and click its name. In the left navigation pane, click Add-ons.
On the Add-ons page, click the Manage Applications tab. In the ack-kruise section, click Install.
In the Install ack-kruise dialog box, confirm the add-on information and click OK.
Set up Sidecar injection rules.
Set up Sidecar container injection rules to inject Sidecar containers into Pods with the label: app.
Environment variable definitions:
KMS_TOKEN: Specifies the storage path of the SSRF Token file generated when the Agent starts.
ALIBABA_CLOUD_ROLE_ARN: The ARN of the RAM role.
ALIBABA_CLOUD_OIDC_PROVIDER_ARN: The ARN of the OIDC identity provider, which is the ACK cluster ARN in this case.
ALIBABA_CLOUD_OIDC_TOKEN_FILE: The file path containing the OIDC Token.
Selector definition: Selects the Pods that need sidecar injection. This can be modified according to actual requirements. This example injects sidecar containers into Pods with the app label.
apiVersion: apps.kruise.io/v1alpha1
kind: SidecarSet
metadata:
  name: kms-agent-sidecarset
  namespace: rrsa-dev
spec:
  serviceAccountName: dev-sa
  containers:
  - name: kms-agent
    image: registry-vpc.cn-hangzhou.aliyuncs.com/<ns>/<repo>:kmsagent-v1.0
    env:
    - name: ALIBABA_CLOUD_ROLE_ARN
      value: acs:ram::<uid>:role/dev-role-for-rrsa
    - name: ALIBABA_CLOUD_OIDC_PROVIDER_ARN
      value: acs:ram::<uid>:oidc-provider/ack-rrsa-<ackClusterId>
    - name: ALIBABA_CLOUD_OIDC_TOKEN_FILE
      value: /var/run/secrets/ack.alibabacloud.com/rrsa-tokens/token
    - name: KMS_TOKEN
      value: file:///var/run/kmstoken/token
    volumeMounts:
       - name: shared-volume
         mountPath: /var/run/kmstoken
       - name: rrsa-oidc-token
         mountPath: /var/run/secrets/ack.alibabacloud.com/rrsa-tokens
         readOnly: true
    command: ["/bin/sh", "-c", "./alibabacloud-kms-agent token /var/run/kmstoken/token && ./alibabacloud-kms-agent agent config.toml"]
  # Used to select Pods that need sidecar injection, can be modified according to actual requirements
  selector:
    matchLabels:
      app: app
  volumes:
     - name: shared-volume
       emptyDir: {}
     - name: rrsa-oidc-token
       projected:
         defaultMode: 420
         sources:
         - serviceAccountToken:
             audience: sts.aliyuncs.com
             expirationSeconds: 3600
             path: token
Automatically inject KMS Agent.
Write a Deployment file and deploy the application on ACK with the label
app: appto enable Sidecar container injection.apiVersion: apps/v1 kind: Deployment metadata: name: app-with-kmsagent namespace: rrsa-dev spec: replicas: 1 selector: matchLabels: app: app template: metadata: labels: app: app spec: serviceAccountName: dev-sa containers: - name: my-app image: registry-vpc.cn-hangzhou.aliyuncs.com/<ns>/<repo>:app-v1.0 volumeMounts: - name: shared-volume mountPath: /var/run/kmstoken volumes: - name: shared-volume emptyDir: {}Run your container application. For detailed information, see Create a stateless workload (Deployment).
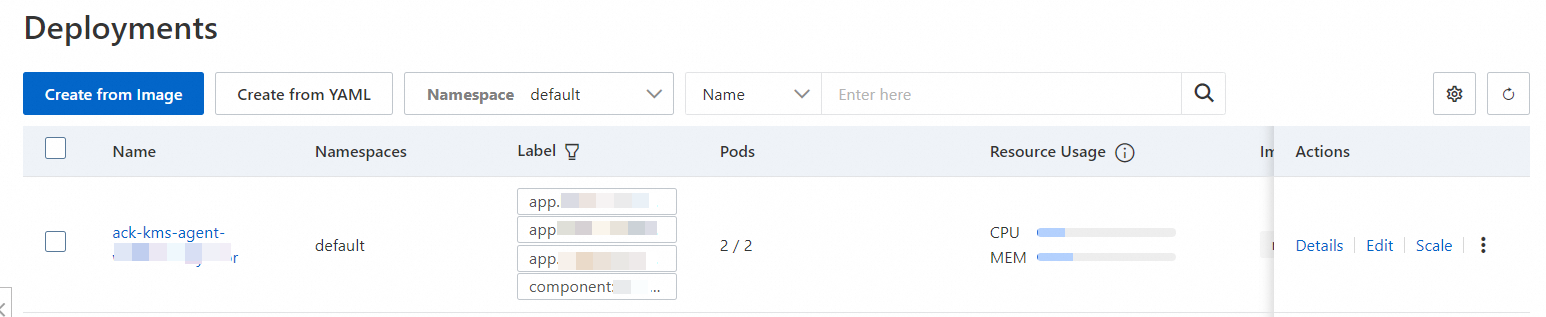
When the application starts, you can see that the KMS agent proxy container has been injected into the Pod where the application is located.
Step 7: Create and retrieve secret values
Create secrets in KMS.
In this example, when creating secrets, you need to add the tag
env:dev. The application container can only retrieve secrets with this tag and does not have permission to retrieve other secrets.Log on to the KMS console. In the top navigation bar, select a region. In the navigation pane on the left, choose .
Click the Generic Secrets tab, select Instance ID, and then click Create Secret. Configure the parameters and click OK.
Parameter
Description
Secret Name
The name of the secret. The secret name is unique within the current region.
Secret Value
The type of sensitive data that you want to manage. Valid values: Secret Key/Value and Plain Text.
The value cannot exceed 30,720 bytes in length, which is equivalent to 30 KB in size.
Initial Version
The initial version of the secret. Default value: v1. You can also specify a custom version number.
CMK
The key that is used to encrypt the current value of the secret.
ImportantYour key and secret must belong to the same KMS instance. The key must be a symmetric key. For more information about the symmetric keys supported by KMS, see Key specifications for symmetric and asymmetric encryption.
If you are a RAM user or a RAM role, you must have the permissions to call the GenerateDataKey operation by using a key.
Tag
The tag that you want to add to the secret. You can use tags to classify and manage secrets. A tag consists of a key-value pair.
NoteA tag key or a tag value can be up to 128 characters in length and can contain letters, digits, forward slashes (/), backslashes (\), underscores (_), hyphens (-), periods (.), plus signs (+), equal sign (=), colons (:), at signs (@), and spaces.
A tag key cannot start with aliyun or acs:.
You can configure up to 20 key-value pairs for each secret.
Description
The description of the secret.
The policy settings of the secret. For more information, see Overview.
You can use the default policy and then modify the policy based on your business requirements after you create the secret.
Retrieve secret values.
Using the curl command.
curl -v -H "X-Vault-Token:$(</var/run/kmstoken/token)" 'http://localhost:2025/secretsmanager/get?secretId=app/dev/secret-1'Using an HTTP GET request in business code to retrieve secrets.
package main

import (
	"fmt"
	"io/ioutil"
	"net/http"
)

func main() {
	url := fmt.Sprintf("http://localhost:2025/secretsmanager/get?secretId=%s", "app/dev/secret-1")

	token, err := ioutil.ReadFile("/var/run/kmstoken/token")
	if err != nil {
		fmt.Printf("error reading token file: %v\n", err)
	}

	req, err := http.NewRequest("GET", url, nil)
	if err != nil {
		fmt.Printf("error creating request: %v\n", err)
	}

	req.Header.Add("X-KMS-Token", string(token))

	client := &http.Client{}
	resp, err := client.Do(req)
	if err != nil {
		fmt.Printf("error sending request: %v \n", err)
	}
	defer resp.Body.Close()

	body, _ := ioutil.ReadAll(resp.Body)
	fmt.Printf("status code %d - %s \n", resp.StatusCode, string(body))
}