This topic describes how Alibaba Cloud ACK integrates KMS Agent through the ack-kms-agent-webhook-injector component.
Overview
Architecture
Alibaba Cloud Container Service for Kubernetes (ACK) provides the ack-kms-agent-webhook-injector component, which injects KMS Agent as a sidecar container into pods through specific annotations (kms-agent-webhook-injector/inject). This allows applications in containers to access credentials from KMS instances through local HTTP interfaces and cache them in memory, avoiding hardcoded sensitive information and ensuring data security. Additionally, the caching mechanism of KMS Agent improves stability when accessing KMS in high concurrency and unstable network scenarios, enhancing the user experience. The following figure shows the architecture:

Limits
ACK cluster type limitations: Supports ACK managed and dedicated clusters, ACK serverless clusters.
Region limitations: ACK clusters and KMS instances must be in the same region.
Performance limitations: Because each pod runs a KMS Agent sidecar container independently, if your business deploys many pods, throttling will be triggered if STS Token requests exceed 500 per minute during authentication, which will affect the normal operation of KMS Agent.
Billing
KMS billing:
Subscription billing: Before using KMS Agent, you need to purchase a KMS instance. Using KMS Agent itself does not incur additional charges. For more information, see Subscription.
Pay-as-you-go billing: In addition to the costs you have already incurred, when using KMS Agent to obtain credentials, additional QPS call fees will be generated due to API call requests. For more information, see Pay-as-you-go.
ACK billing:
The ack-kms-agent-webhook-injector component itself is completely free, but using this component may incur additional costs.
After installing the ack-kms-agent-webhook-injector component, a Webhook service workload will be generated, which will occupy certain computing resources and incur costs. You can limit the CPU and memory usage of this workload in the configuration file.
When you create or update workloads that meet the conditions, ack-kms-agent-webhook-injector will inject KMS Agent into your container as a sidecar, and KMS Agent will use certain computing resources and incur costs.
Authentication methods
Two authentication methods are supported: RRSA and Worker RAM role.
(Recommended) Method 1: RRSA method
This method can achieve pod-level permission isolation. It is applicable to ACK managed clusters and ACK serverless clusters with version 1.22 and above.
ImportantTo achieve pod-level permission isolation, the version of ack-kms-agent-webhook-injector must be greater than or equal to v0.2.0.
For example, through the RRSA method, you can allow applications deployed in app1-dev to use the app1-rrsa role to access credentials in KMS with the secret:app1 tag. Applications deployed in app2-dev use the app2-rrsa role to access credentials in KMS with the secret:app2 tag.

Method 2: Worker RAM role method
This method can achieve worker-level permission isolation. Since ACK serverless clusters do not support binding Worker RAM roles, this method is only applicable to ACK managed clusters and ACK dedicated clusters.
For example, you can use Worker RAM roles to set up applications in app1-dev and app2-dev to access credentials managed in KMS. Applications in the same worker use the same Worker RAM role, meaning you cannot set different permissions for app1-dev and app2-dev.

Prerequisites
A KMS instance has been created, and credentials have been hosted in the KMS instance. For more information, see Purchase and enable a KMS instance, Credential management quick start.
An ACK cluster has been created, and the cluster is in the same region as your KMS instance. See Create an ACK managed cluster, Create an ACK serverless cluster.
Step 1: Configure authentication information to allow KMS Agent to access specific credentials
Method 1: RRSA authorization
For example, if you have two applications app1 and app2, app1 needs to access credentials in the KMS instance labeled with secret: app1, and app2 needs to access credentials in the KMS instance labeled with secret: app2.
app1's namespace is app1-dev, serviceAccountName is app1-service, and RAM role is app1-rrsa.
app2's namespace is app2-dev, serviceAccountName is app2-service, and RAM role is app2-rrsa.
Enable ACK RRSA feature.
Enable during cluster creation
When you create an ACK managed cluster or ACK Edge cluster, click Enable next to RRSA OIDC in the Advanced Options (Optional) section of the Cluster Configurations step.

Enable after cluster creation
Log on to the ACK console. In the navigation pane on the left, click Clusters.
On the Clusters page, find the target cluster and click its name. In the navigation pane on the left, click Cluster Information.
In the Security and Auditing section of the Basic Information tab, click Enable next to RRSA OIDC.

In the Enable RRSA dialog box, click Confirm.
In the Basic Information section, if the cluster status changes from Updating to Running, the RRSA feature is enabled for the cluster.
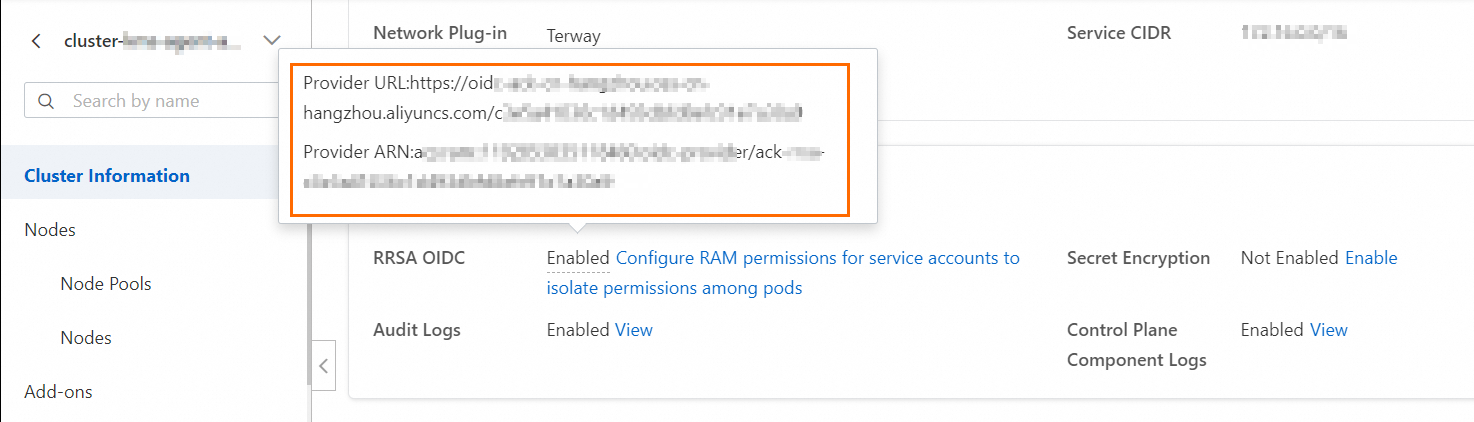
Open the cluster details page, on the Basic Information tab, in the Security And Audit section, hover over the "Enabled" status on the right side of RRSA OIDC to view the provider's URL link and ARN information.
Create a RAM role for app1 with a trusted entity of Identity Provider, and authorize it to access credentials tagged with secret: app1. For more information, see Create a RAM role for a trusted IdP.
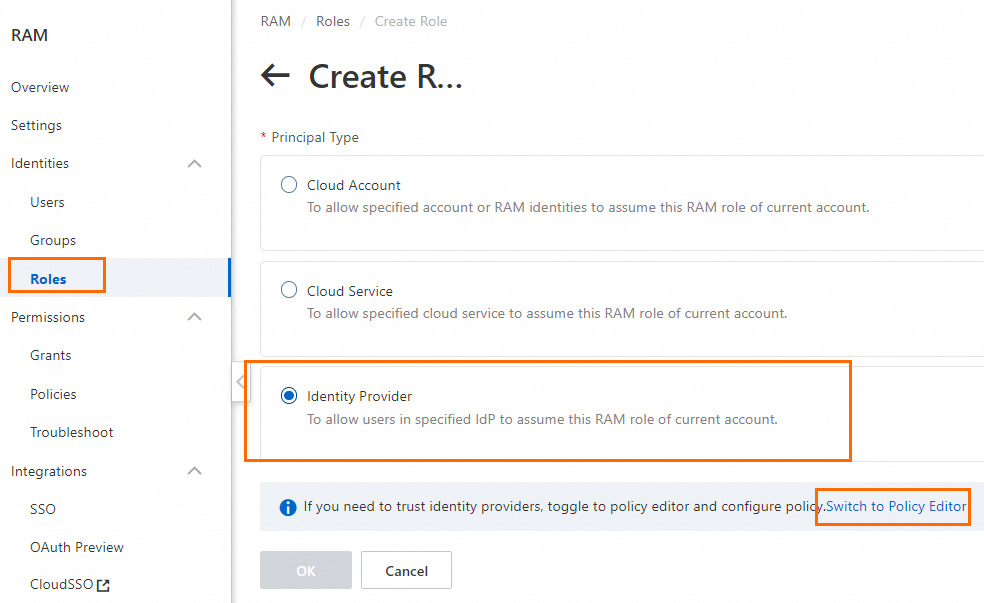
Log on to the RAM console.
In the navigation pane on the left, choose , and then on the Roles page, click Create Role.
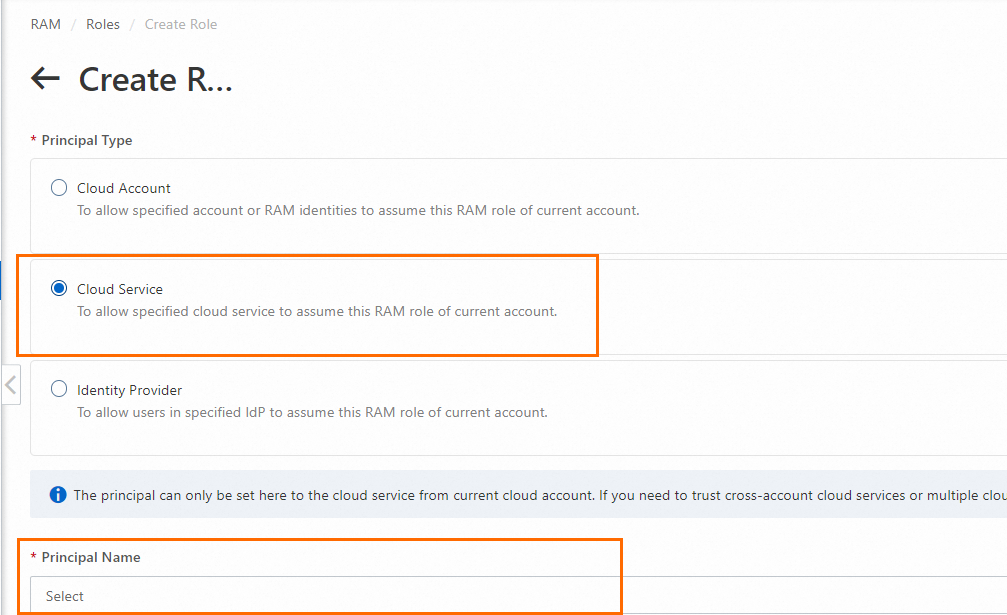
In the Create Role panel, select Identity Provider as the trusted entity type, and click Switch To Editor.
On the Create Role page, in Visual Editor, configure the following role information and click OK.
Parameter
Description
Effect
Select Allow.
Principal
Select an identity provider.
Identity Provider Type: Select OIDC.
Identity Provider: After RRSA is enabled, the ACK cluster creates an identity provider by default, named in the format ack-rrsa-<cluster_id>. <cluster_id> indicates the ID of your cluster.
Action
Keep the default. That is, select sts:AssumeRole.
Condition
Based on the default oidc:iss and oidc:aud conditions, add a new condition:
Condition Key: Select oidc:sub.
Operator: Select StringEquals.
Condition Value: system:serviceaccount:<namespace>:<serviceAccountName>. In this example, it is
system:serviceaccount:app1-dev:app1-service.<namespace>: The namespace where the application that you want to inject KMS Agent is located.
<serviceAccountName>: The service account name used by the application that you want to inject KMS Agent. The service account name provides identity for the pod and can be dynamically bound to RAM roles through the RRSA mechanism.
NoteTo configure for multiple service accounts in different namespaces, you can configure multiple values.
In the Create Role dialog box, set the role name and click OK. In this example, the role name is app1-rrsa.
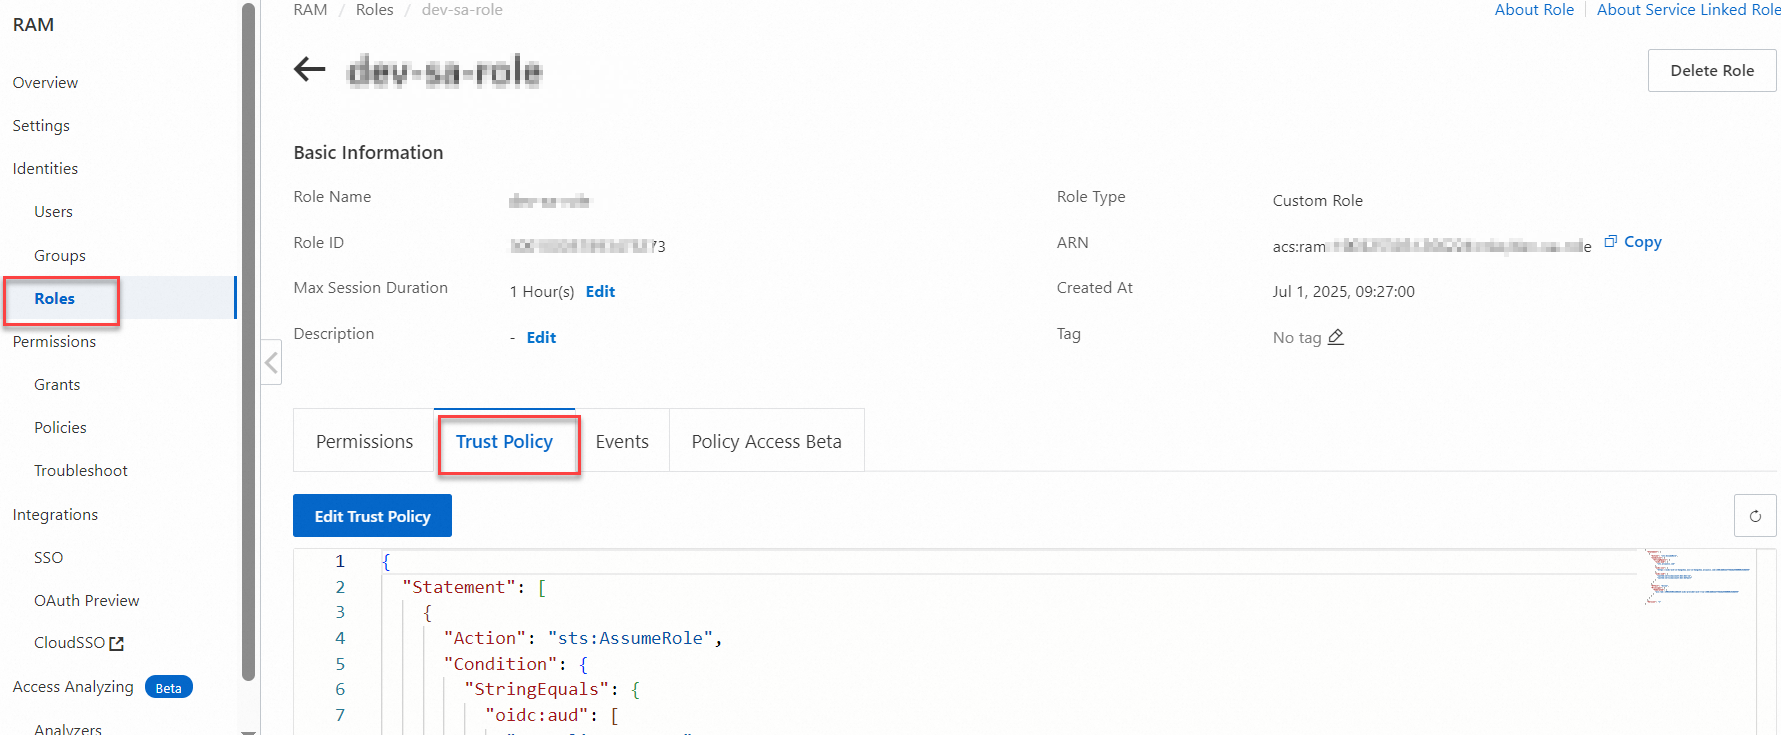
(Optional) View the trust policy of the app1-rrsa RAM role.
The trust policy indicates that the service account app1-service is allowed to assume a RAM role through Alibaba Cloud RRSA (RAM Roles for Service Accounts) after meeting the OIDC authentication conditions.
Create a policy.
The policy name is app1-rrsa-kms-policy in this example, and the policy content is to access credentials tagged with secret: app1.
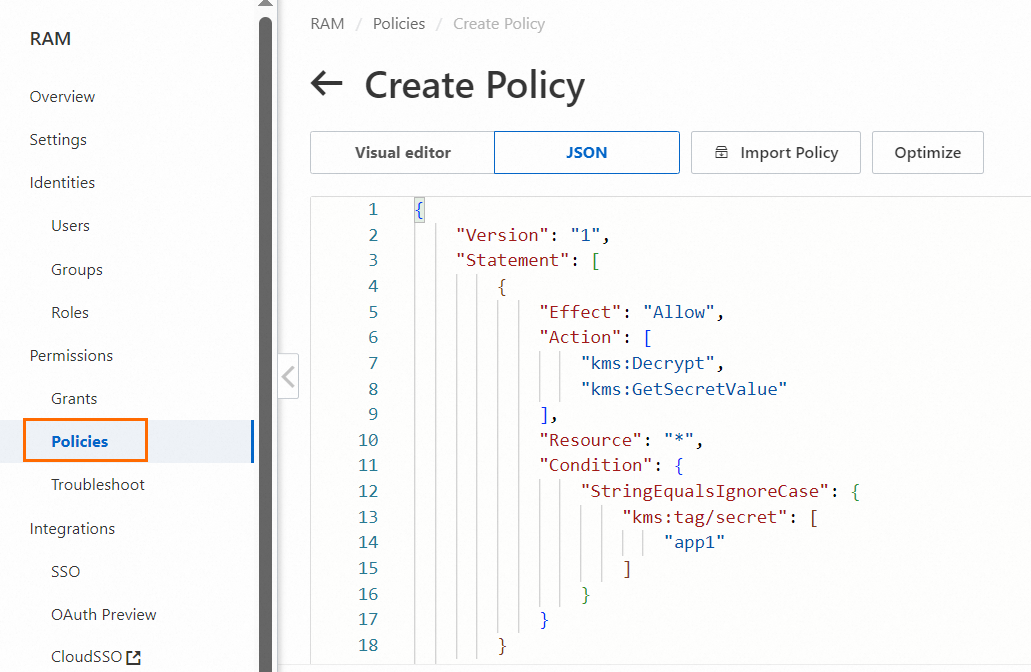
{
    "Version": "1",
    "Statement": [
        {
            "Effect": "Allow",
            "Action": [
                "kms:Decrypt",
                "kms:GetSecretValue"
            ],
            "Resource": "*",
            "Condition": {
                "StringEqualsIgnoreCase": {
                    "kms:tag/secret": [
                        "app1"
                    ]
                }
            }
        }
    ]
}
Attach the app1-rrsa-kms-policy to the app1-rrsa role. For more information, see Grant permissions to a RAM role.
Create a RAM role for app2 with a trusted entity of Identity Provider, and authorize it to access credentials tagged with secret: app1. For more information, see Create a RAM role for a trusted IdP.
Log on to the RAM console.
In the navigation pane on the left, choose , and then on the Roles page, click Create Role.
In the Create Role panel, select Identity Provider as the trusted entity type, and click Switch To Editor.
On the Create Role page, in Visual Editor, configure the following role information and click OK.
Parameter
Description
Effect
Select Allow.
Principal
Select an identity provider.
Identity Provider Type: Select OIDC.
Identity Provider: After RRSA is enabled, the ACK cluster creates an identity provider by default, named in the format ack-rrsa-<cluster_id>. <cluster_id> indicates the ID of your cluster.
Action
Keep the default. That is, select sts:AssumeRole.
Condition
Based on the default oidc:iss and oidc:aud conditions, add a new condition:
Condition Key: Select oidc:sub.
Operator: Select StringEquals.
Condition Value: system:serviceaccount:<namespace>:<serviceAccountName>. In this example, it is
system:serviceaccount:app2-dev:app2-service.<namespace>: The namespace where the application that you want to inject KMS Agent is located.
<serviceAccountName>: The service account name used by the application that you want to inject KMS Agent. The service account name provides identity for the pod and can be dynamically bound to RAM roles through the RRSA mechanism.
NoteTo configure for multiple service accounts in different namespaces, you can configure multiple values.
In the Create Role dialog box, set the role name and click OK. In this example, the role name is app2-rrsa.
(Optional) View the trust policy of the app2-rrsa RAM role.
The trust policy indicates that the service account app2-service is allowed to assume a RAM role through Alibaba Cloud RRSA (RAM Roles for Service Accounts) after meeting the OIDC authentication conditions.
Create a policy.
The policy name is app2-rrsa-kms-policy in this example, and the policy content is to access credentials tagged with secret: app2.
{
    "Version": "1",
    "Statement": [
        {
            "Effect": "Allow",
            "Action": [
                "kms:Decrypt",
                "kms:GetSecretValue"
            ],
            "Resource": "*",
            "Condition": {
                "StringEqualsIgnoreCase": {
                    "kms:tag/secret": [
                        "app2"
                    ]
                }
            }
        }
    ]
}
Attach the app2-rrsa-kms-policy to the app2-rrsa role. For more information, see Grant permissions to a RAM role.
Method 2: Worker RAM role authorization
Worker RAM role is a regular service role. You can specify a Default Role or a Custom Role for the worker node pool.
Default role: ACK managed clusters automatically create a default Worker RAM role shared by all nodes. When you authorize through the default Worker RAM role, permissions will be shared with all nodes in the cluster, which may pose a risk of unintended permission expansion.
(Recommended) Custom role: You need to create a regular service role in the Resource Access Management console in advance and specify this role for the node pool. By assigning specific roles to different node pools, you can isolate permissions for each node pool, reducing the risk of all nodes in the cluster sharing the same permissions. This topic uses a custom role as an example.
Create a regular service role. The role name is ack-secret-manager in this example.
Log on to the RAM console. In the navigation pane on the left, choose .
On the Roles page, click Create Role.
On the Create Role page, select Trusted Entity Type as Alibaba Cloud Service, select Trusted Service Name as Container Service For Kubernetes, and then click OK.
In the Create Role dialog box, enter the role name and click OK.
Create the following custom policy. The policy name is ack-secret-manager-policy in this example. For more information, see Create a custom policy.

{
  "Version": "1",
  "Statement": [
    {
      "Action": [
        "kms:GetSecretValue",
        "kms:Decrypt"
      ],
      "Resource": [
        "*"
      ],
      "Effect": "Allow"
    }
  ]
}
Attach the custom policy ack-secret-manager-policy to the custom role ack-secret-manager.
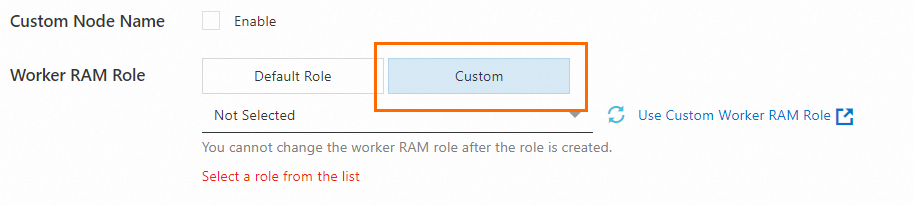
When creating a node pool, specify the Worker RAM role for the node pool.
For Worker RAM Role, select Custom, and then select ack-secret-manager.
To create a node pool when creating a cluster, see Create an ACK managed cluster, Create an ACK serverless cluster. To create a node pool for an existing cluster, see Create and manage node pools.
Step 2: Create namespaces and service accounts in the ACK cluster
Namespaces divide the ACK cluster into logically isolated virtual spaces to separate development, testing, production, and other environments. Applications in different namespaces cannot access each other's resources by default, providing a physical boundary for RAM role binding.
Create two namespaces, app1-dev and app2-dev. The corresponding serviceAccountNames are app1-service and app2-service.
Create a namespace named app1-dev using a YAML file.
Create a YAML file named app1-namespace.yaml.
apiVersion: v1
kind: Namespace
metadata:
  name: app1-dev
Run the following command to create a namespace named app1-dev in the ACK cluster.
kubectl apply -f app1-namespace.yamlCheck if the namespace has been created successfully.
kubectl get namespacesIf the output includes
app1-dev, the creation is successful.
Create a service account named app1-service using a YAML file.
Create a YAML file named app1-serviceaccount.yaml.
apiVersion: v1
kind: ServiceAccount
metadata:
  name: app1-service
  namespace: app1-dev
Run the following command to create a service account named app1-service in
app1-dev.kubectl apply -f app1-serviceaccount.yamlCheck if the service account has been created successfully.
kubectl get serviceaccount -n app1-devIf the output includes
app1-service, the creation is successful.
Repeat the above steps to create the app2-dev namespace and app2-service service account.
Step 3: Install the ack-kms-agent-webhook-injector component in the ACK cluster
Log on to the Container Service console and click Clusters in the navigation pane on the left.
On the Clusters page, click the name of the target cluster. In the navigation pane on the left, choose .
On the Helm page, click Create, configure Basic Information, and click Next.
Parameter
Description
Application Name
Enter your application name. We recommend that you use the default application name. You do not need to enter it here. After you click Next, you will be prompted to use the default application name ack-kms-agent-webhook-injector. Select Yes.
Namespace
Select the namespace where the application is located. We recommend that you use the default namespace. You do not need to select it here. After you click Next, you will be prompted to use the default namespace kube-system. Select Yes.
Installing the component in one namespace in an ACK cluster is sufficient. There is no need to install it repeatedly.
Source
The default is App Catalog, which cannot be modified.
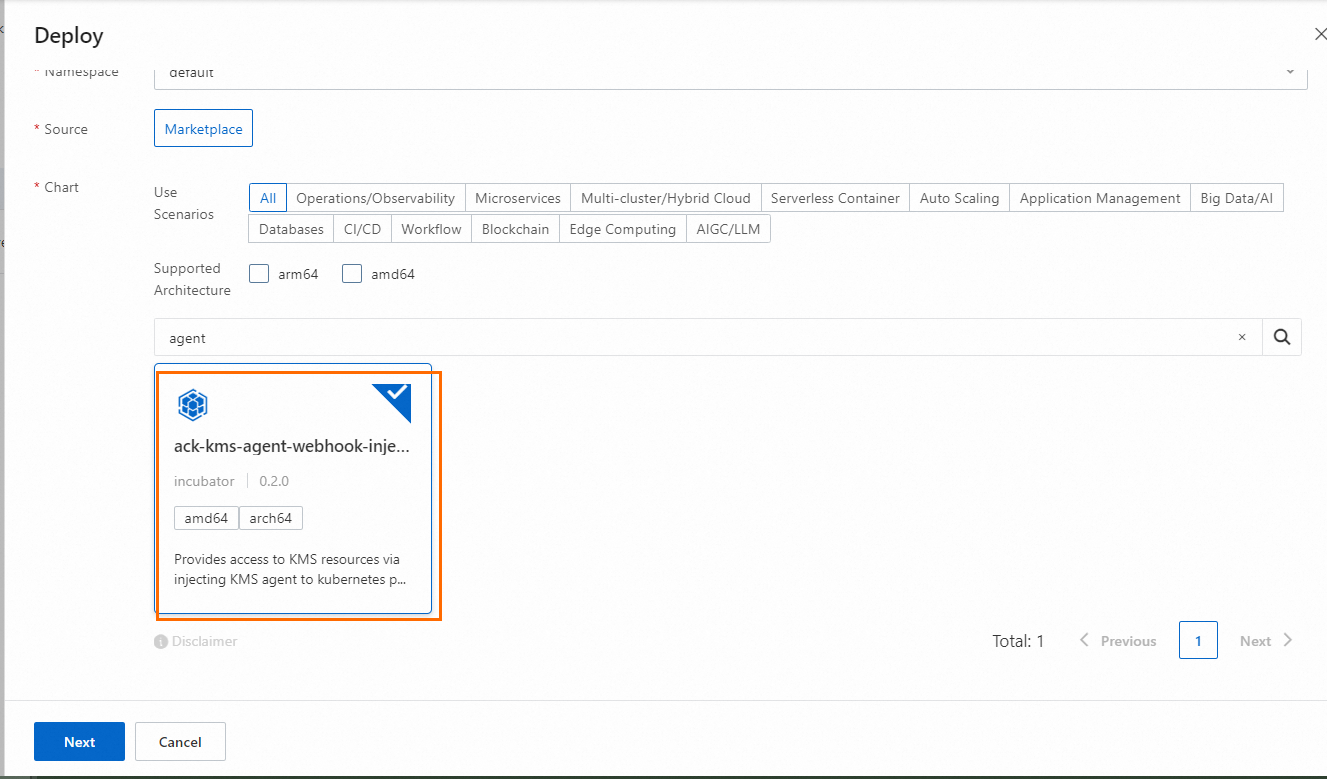
Chart
Search for and select ack-kms-agent-webhook-injector.
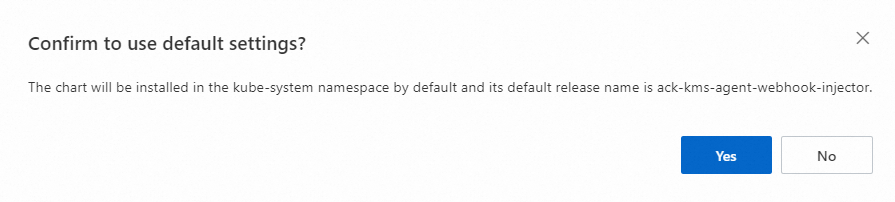
In the dialog box that appears, confirm the information and click Yes.
Selecting Yes means using the default installation path. The component is installed in the kube-system namespace by default and published as an application with the component name.
On the Parameters page, complete the configuration and click OK.
Parameter
Description
Chart Version
We recommend that you select the latest version.
Parameters
Configuration instructions for agent.auth.roleArn and agent.auth.roleArnMapping parameters:
When using RRSA authorization: agent.auth.roleArn is empty, and the format of agent.auth.roleArnMapping is
<NameSpace>:<serviceAccountName>:<RAM Role ARN>.agent: auth: roleArn: roleArnMapping: app1-dev:app1-service: acs:ram::190325303126****:role/app1-rrsa app2-dev:app2-service: acs:ram::190325303126****:role/app2-rrsaWhen using Worker RAM role authorization: both agent.auth.roleArn and agent.auth.roleArnMapping are set to empty.
Wait for about 30 seconds, enter the namespace (default is kube-system), and check the component status in the Deployments workload to confirm whether the component is ready.
Step 4: Inject KMS Agent into workloads
Inject KMS Agent into pods by configuring annotations. The specific operation varies depending on whether you are configuring for a new workload's pod or an existing workload's pod.
Take the stateless workload Deployment as an example. In this example, perform the following operations for app1-dev and app2-dev respectively.
Log on to the Container Service console.
Go to the target cluster and choose in the navigation pane on the left.
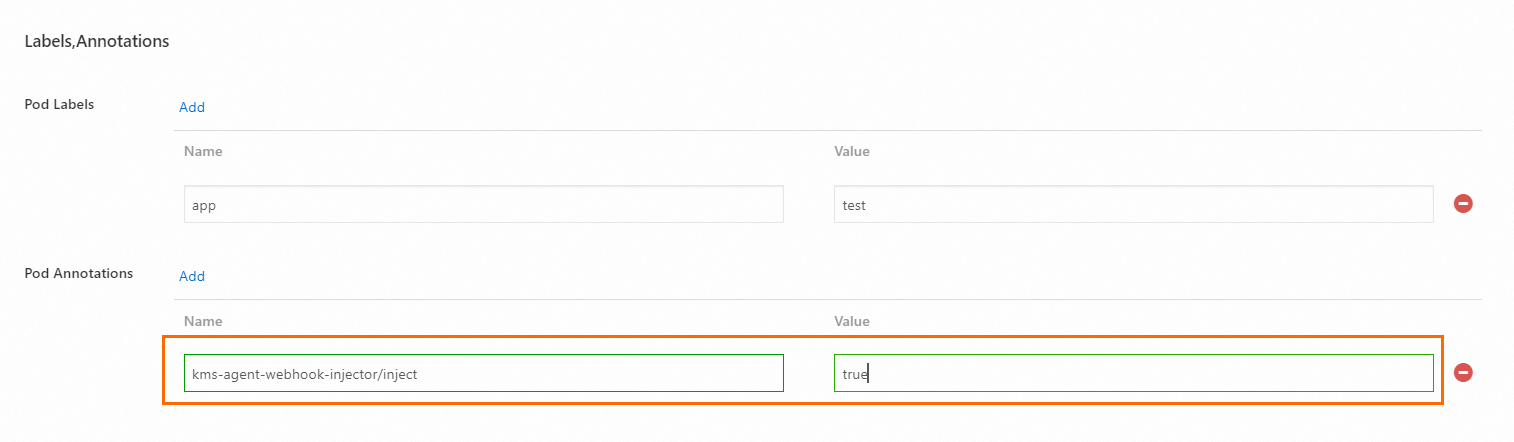
When creating or modifying a workload, add the following pod annotation: Name is kms-agent-webhook-injector/inject, Value is true (values 1, T, t, True, and TRUE are also considered valid).
Scenario 1: Create a new workload using an image
Click Create From Image, complete the configuration, and click Create.
When filling in Advanced, in the Labels And Annotations section, add the following pod annotation: Name is kms-agent-webhook-injector/inject, Value is true.
Scenario 2: Create a new workload using YAML
Click Create From YAML, complete the configuration, and click Create.
Edit the spec.template.metadata.annotations section in the YAML file (if it does not exist, you need to create it), and add the key-value pair kms-agent-webhook-injector/inject: "true". For information about how to configure other parameters, see Workload YAML examples.
Scenario 3: Existing workloads
Locate the target workload and click Details in the Actions column.
On the workload details page, click the YAML button in the upper right corner, find the spec.template.metadata.annotations section (if it does not exist, you need to create it), and add the key-value pair
kms-agent-webhook-injector/inject: "true".
Click Update and wait for the workload to be ready again.
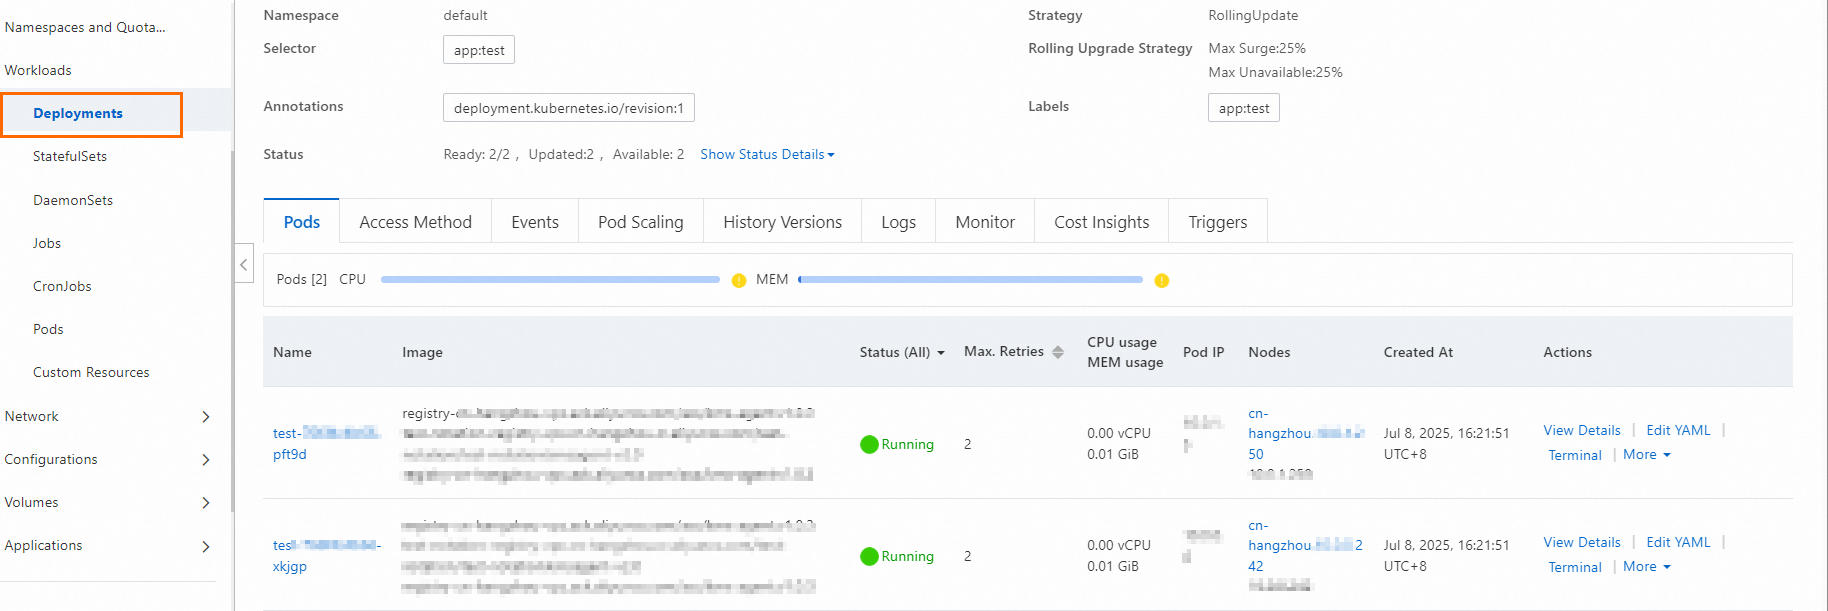
Return to the Deployments page, enter the workload, and you can observe in the Pods tab that KMS Agent has been injected into your workload as a sidecar in the Image column.
ImportantWhen viewing images in the Pods tab, you may notice that the KMS Agent image has been injected twice into the pod. This is because we use an initialization container (initContainer) to perform necessary initialization work. This initialization container terminates (Terminated) after initialization is complete and does not negatively impact your application or continuously occupy your computing resources.
If you use RRSA authorization, modify the YAML configuration file to change the serviceAccountName parameter to the service account authorized in Step 1.
In this example, they are app1-service and app2-service. After modification, the application and KMS Agent can be properly authorized to access KMS credentials.
NoteWhen using Worker RAM role authorization, there is no need to modify the configuration file. The service account can automatically assume the Worker RAM role to obtain permissions.
Step 5: Obtain KMS credentials in the application container
After KMS Agent is injected into the workload, you can send requests to KMS Agent through the HTTP protocol in the application container to obtain credentials stored in KMS.
Example:
The local host HTTP port number takes the default value 2025. If you set it to another port number, please replace 2025 in the example with the actual port number you are using.
The token path takes the default path
file:///var/run/kmstoken/token. If you set another path, such asfile:///var/run/path1/path2, please replace/var/run/kmstoken/tokenin the example with/var/run/path1/path2.
KMS Agent obtains the ACSCurrent version of credentials by default. To obtain credential values of other versions, you can set versionStage or versionId.
KMS Agent only listens on 127.0.0.1, which means it only allows applications or processes on the same machine to communicate with it. External network devices cannot connect. The access address only supports localhost or 127.0.0.1, and does not support changing to the local IP of the application. The following examples use localhost.
Using curl
When using in practice, replace <SecretId> in the example code with your actual credential name.
 # Read token from file
 curl -v -H "X-KMS-Token:$(</var/run/kmstoken/token)" 'http://localhost:2025/secretsmanager/get?secretId=<SecretId>'

 # Write token directly
 curl -v -H "X-KMS-Token:<token>" 'http://localhost:2025/secretsmanager/get?secretId=<SecretId>'
You can specify versionStage or versionId to obtain specific credential values. For example, to obtain credential values with a specified versionId, replace 0a7513ee719da740807b15b77500**** with your actual credential version when using.
 # Read token from file
 curl -v -H "X-KMS-Token:$(</var/run/kmstoken/token)" 'http://localhost:2025/secretsmanager/get?secretId=<SecretId>&versionId=0a7513ee719da740807b15b77500****'

 # Write token directly
 curl -v -H "X-KMS-Token:<token>" 'http://localhost:2025/secretsmanager/get?secretId=<SecretId>&versionId=0a7513ee719da740807b15b77500****'
Go code example
When using, replace agent-test in the example code with your actual credential name.
package main

import (
	"fmt"
	"io/ioutil"
	"net/http"
)

func main() {

	//Support specifying versionStage or versionId to obtain specific credential values.
	//For example, to obtain credential values with a specified versionId, url := fmt.Sprintf("http://localhost:2025/secretsmanager/get?secretId=%s&versionId=%s", "agent-test", "version-id").
	url := fmt.Sprintf("http://localhost:2025/secretsmanager/get?secretId=%s", "agent-test")

	token, err := ioutil.ReadFile("/var/run/kmstoken/token")
	if err != nil {
		fmt.Printf("error reading token file: %v\n", err)
	}

	req, err := http.NewRequest("GET", url, nil)
	if err != nil {
		fmt.Printf("error creating request: %v\n", err)
	}

	req.Header.Add("X-KMS-Token", string(token))

	client := &http.Client{}
	resp, err := client.Do(req)
	if err != nil {
		fmt.Printf("error sending request: %v \n", err)
	}
	defer resp.Body.Close()

	body, _ := ioutil.ReadAll(resp.Body)
	fmt.Printf("status code %d - %s \n",resp.StatusCode, string(body))
}