This topic describes the concepts, configuration, and common use cases of network access endpoints.
Introduction
A network access endpoint provides network connectivity for an IDaaS EIAM instance. Endpoints are categorized into Dedicated Network Access Endpoint and Shared Network Access Endpoint. A Dedicated Network Access Endpoint must be purchased before use (Billing for dedicated network access endpoints), while a Shared Network Access Endpoint is free of charge.
Dedicated Network Access Endpoint
A Dedicated Network Access Endpoint is a network access endpoint that is exclusive to your EIAM instance. Essentially, this endpoint is an ENI that your EIAM instance holds in your VPC. You can configure security group rules or network settings for this ENI to implement dedicated private or public network access for the EIAM instance.
Dedicated private network access
When connected to your VPC over a private network, your IDaaS EIAM instance can synchronize data and perform delegated authentication for services like AD or LDAP without exposing public ports. The following table uses AD as an example to show how to configure network access control for different network topologies.
Scenario
Architecture
Required configuration
AD and ENI in the same VPC
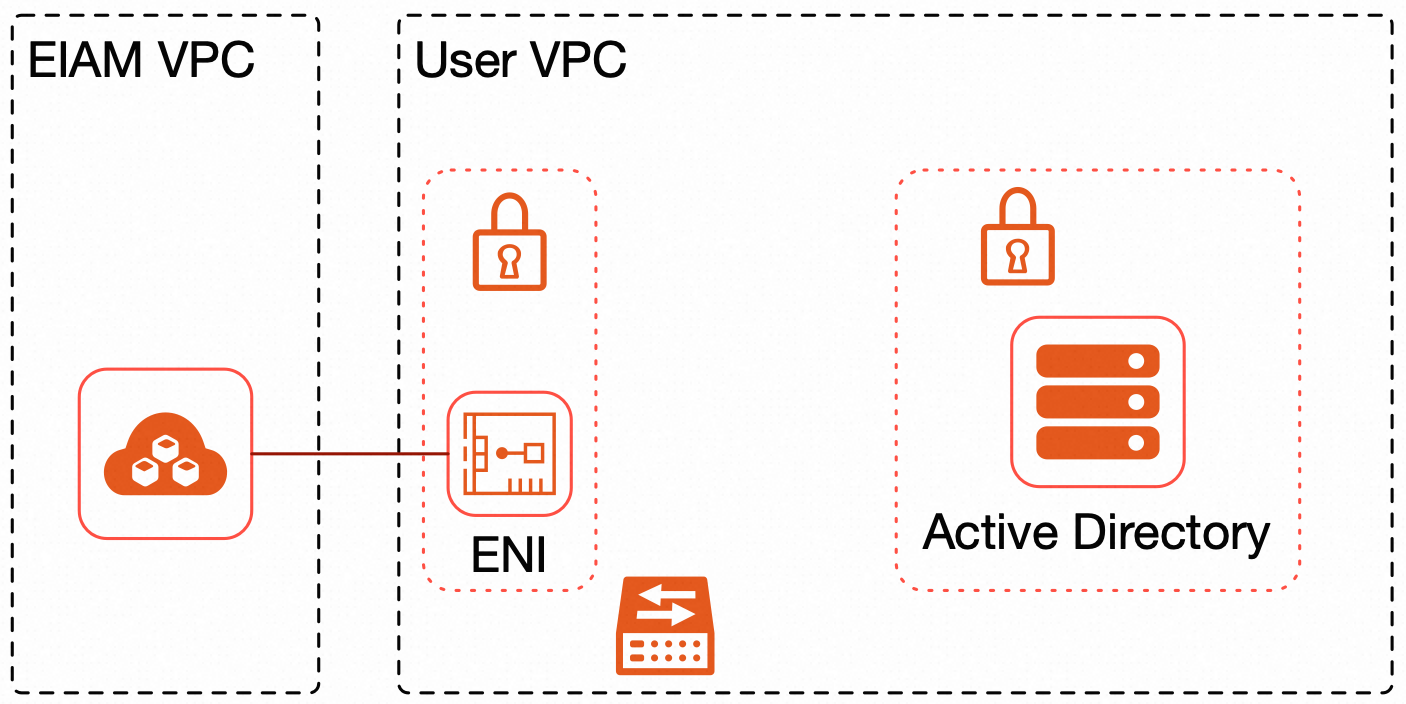
If your AD domain server and the IDaaS EIAM-held ENI are in the same VPC, configure your network access control list (ACL) as follows:
In the security group of your AD domain server, allow traffic from the ENI's IP address.
AD and ENI in different VPCs
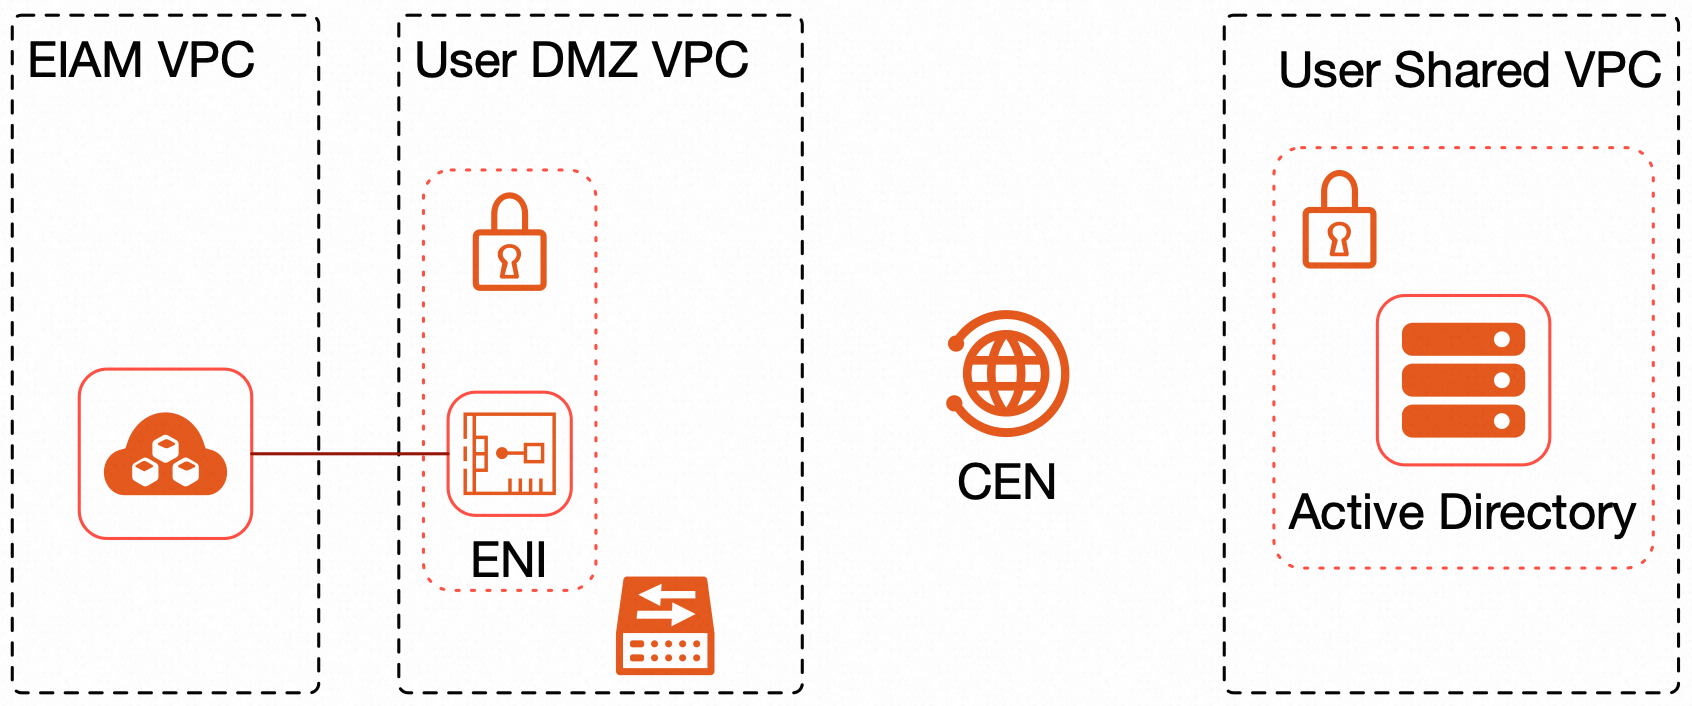
If your AD domain server and the IDaaS EIAM-held ENI are in different VPCs, configure your network ACL as follows:
Connect the different VPCs by using Cloud Enterprise Network (CEN).
In the security group of your AD domain server, allow traffic from the ENI's IP address.
AD in an on-premises data center or on another cloud provider
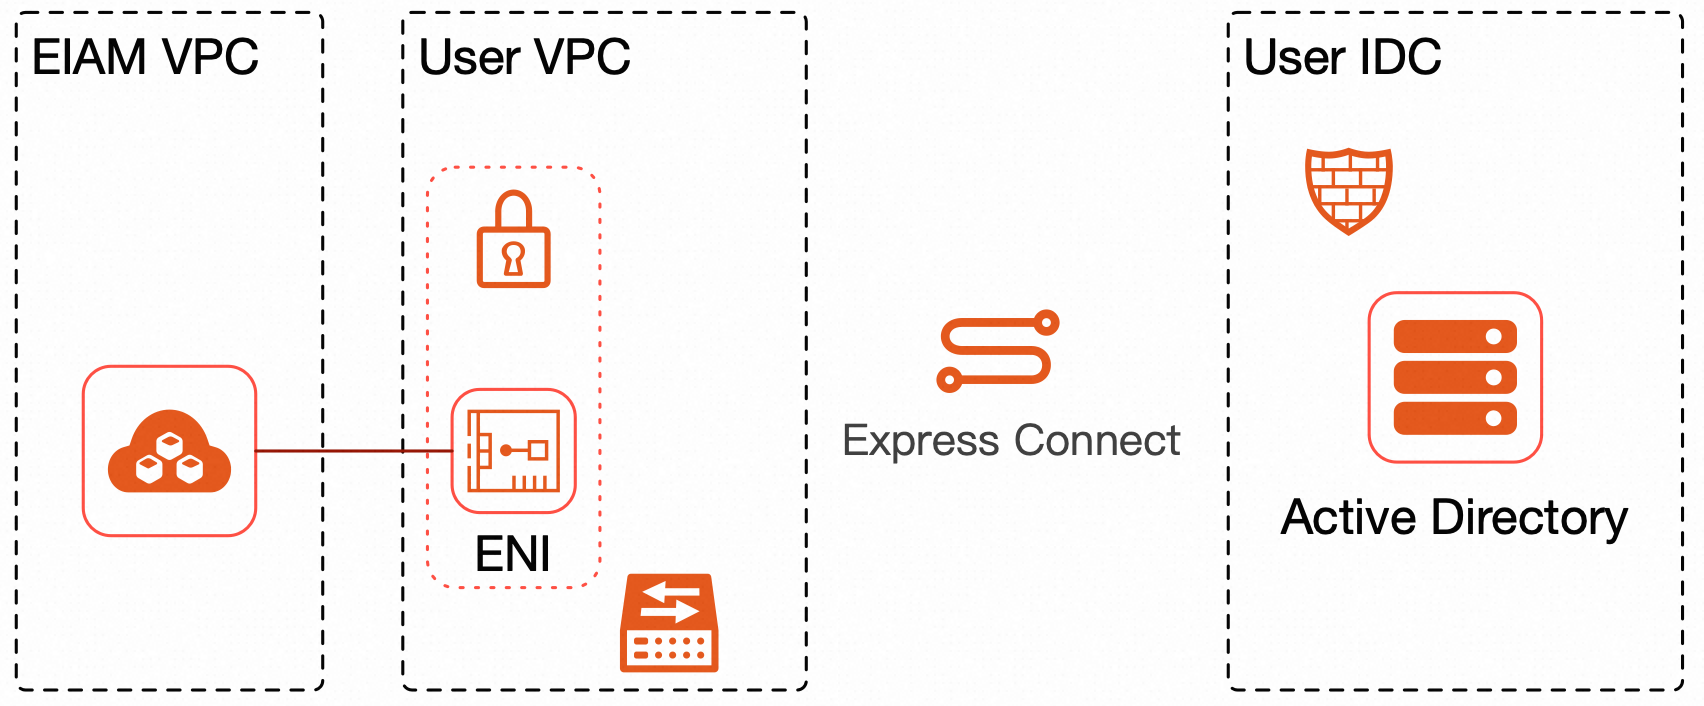
If your AD domain server is in an on-premises data center or hosted by another cloud provider, configure your network ACL as follows:
Use a leased line, such as a VPN, to connect the VPC to the data center or other cloud provider that hosts the AD domain server.
In the firewall of the AD domain server, allow traffic from the ENI's IP address.
Dedicated public network access
After your IDaaS EIAM instance connects to your VPC, you can associate an elastic IP address (EIP) with the IDaaS EIAM instance's ENI or associate an internet NAT gateway with your VPC. This allows the IDaaS EIAM instance to access the internet by using your public IP address. You can add this public IP address to the list of trusted IPs in WeCom to meet its requirements.
Shared Network Access Endpoint
The shared network access endpoint is the default network access endpoint for IDaaS EIAM instances. It is shared by all IDaaS EIAM instances and supports only public network access.
Endpoint comparison
Capability
Dedicated Network Access Endpoint
Shared Network Access Endpoint
Access private networks with a dedicated IP address
Supported
Not supported
Access the internet with a dedicated IP address
Supported
Not supported
Access the internet with a shared IP address
Not supported
Supported
Ownership of network resources (ENI, security group, etc.)
Your Alibaba Cloud account
The IDaaS EIAM team
Available by default
No
Yes
Free of charge
No
Yes
Endpoint support by module
The following table lists the supported endpoints for each module. By default, all modules use the shared network access endpoint. If a dedicated network access endpoint is required, you must switch to it manually.
Module
Dedicated Network Access Endpoint - private access
Dedicated Network Access Endpoint - public access
Shared Network Access Endpoint - public access
DingTalk inbound identity provider
Not supported
Not supported
Supported
DingTalk outbound identity provider
Not supported
Not supported
Supported
AD inbound identity provider
Supported
Supported
Supported
LDAP inbound identity provider
Supported
Supported
Supported
WeCom inbound identity provider
Not supported
Supported
Not supported
Marketplace application
Not yet supported
Not yet supported
Supported
SAML application
Single sign-on (SSO) scenarios: Does not depend on a dedicated network access endpoint.
Data synchronization scenarios: Supports access through a dedicated network access endpoint.
Supported
OIDC application
Supported
Custom application
Not yet supported
Not yet supported
Supported
Add a dedicated endpoint
On the Network Access Endpoint tab, perform the following steps:
Create a service-linked role (SLR)
When you access the Network Access Endpoint page or click Add Dedicated Endpoint, if a service-linked role does not exist, you must create an IDaaS EIAM service-linked role. Only an Alibaba Cloud account or a RAM user that has the
AliyunIDaaSEiamFullAccesspermission can perform this operation.In the dialog box that appears, confirm that the role name is
AliyunServiceRoleForEiamand the authorization policy isAliyunServiceRolePolicyForEiam, and then click Confirm Create.Upgrade or scale up the instance
You can create a Dedicated Network Access Endpoint only if the number of existing Dedicated Network Access Endpoint for your instance is less than Dedicated Network Access Endpoint quota. The quota for Dedicated Network Access Endpoint must be purchased separately.
For a free or trial instance, upgrade the instance and purchase a quota for Dedicated Network Access Endpoint on the buy page.
For an enterprise instance, scale up the instance and purchase a quota for Dedicated Network Access Endpoint on the buy page.
NoteEach IDaaS EIAM instance supports a maximum of one Dedicated Network Access Endpoint.
Select resources
Click Add Dedicated Endpoint and configure the following parameters.
Display Name: The display name of the Dedicated Network Access Endpoint. This name is shown only in the console.
Select Region: The region where the VPC that you want to connect to is located.
Select VPC: The VPC in the selected region. If you require private network access to services such as AD, LDAP, or applications, select the VPC where these services reside or a VPC from which these services can be accessed.
Select vSwitch: A vSwitch in the selected VPC. The vSwitch must have more than two available IP addresses and cannot use the CIDR block 100.64.0.0/10. You can select up to two vSwitches.
ImportantAfter you add a Dedicated Network Access Endpoint, you cannot modify its region, VPC, or vSwitch. Verify your settings before you proceed.
We strongly recommend selecting two vSwitches in different availability zones to enhance fault tolerance.
After you confirm the settings, click Confirm to start adding the Dedicated Network Access Endpoint.
After the endpoint is created, you must complete the following configurations before you can use the Dedicated Network Access Endpoint:
To enable dedicated private network access, see Authorize private network access.
To enable dedicated public network access, see Configure a dedicated public egress IP address.
Authorize private network access
On the Network Access Endpoint tab, find the target Dedicated Network Access Endpoint and click Authorize Private Network Access in the Actions column.
Obtain the access rule. In the Authorize Private Network Access dialog box, copy the Authorization Object. The Authorization Object is a collection of all dedicated private egress IP addresses for the current Dedicated Network Access Endpoint.
Configure a security group access rule. Click Add to go to the page. On this page, select the security group that contains the service requiring private network access.
NoteFor AD, select your security group that contains the AD domain server, not the security group created by IDaaS EIAM. For information about supported configurations for different network topologies, see Dedicated private network access.
Click the Security Group ID/Name to go to the Add. On the tab, click Manually Add.
In the new access rule, configure the following parameters and save the rule:
Action: Allow.
Priority: 1.
Protocol Type: Custom TCP.
Port Range: Enter the port range for your service. For AD or LDAP, use port 389 or 636.
Authorization Object: The dedicated private egress IP addresses that you copied in the previous step.
Configure a dedicated public egress IP
Configure an internet NAT gateway to enable your IDaaS EIAM instance to access the internet through a public IP address that you own. You can add this public IP address to the list of trusted IPs in WeCom to meet its verification requirements.
View the VPC region
On the Network Access Endpoint tab, find the target Dedicated Network Access Endpoint and view its VPC Region.
Associate an elastic IP address
Go to the VPC - Internet NAT Gateway console. In the same region as your VPC, select an internet NAT gateway and click Associate Now to start associating an EIP.
If no internet NAT gateway is available, create one first. For more information, see Create an internet NAT gateway.
You can select an existing EIP, or purchase and associate a new one.
After the association is successful, go to the Internet NAT Gateway page and click the Instance ID/Name.
If no SNAT entry exists for your instance, you must create one to enable public network access for the dedicated network access endpoint. For more information, see Create and manage SNAT entries.
WarningIf no SNAT entry is configured, the dedicated network access endpoint cannot access the internet.
On the Network Access Endpoint tab, click View in the Dedicated Outbound Public IP Address column to see the public IP address that is used by the Dedicated Network Access Endpoint.
Switch to a dedicated endpoint
Go to the IdPs page. Find the target IdPs, for example, an AD identity provider, and click Modify in the Actions column to edit its basic settings.
Configure the Dedicated Network Access Endpoint. In the section:
Select the Dedicated Network Access Endpoint type.
From the drop-down list, select an endpoint that has an associated Dedicated Outbound Public IP Address. The IP address can be from an ENI or an internet NAT gateway.
Submission validation. After you click Confirm, the system immediately performs validation:
Verification requirement: All associated ENIs (up to two) must be able to successfully access the AD service.
If verification passes: The system automatically switches to the Dedicated Network Access Endpoint.
If verification fails: An error message is displayed. Check the network connectivity.
To view the gateway IP in use, click View for the dedicated public egress IP.
After verification passes, the system immediately switches to the Dedicated Network Access Endpoint. We recommend that you perform verification in a test environment first. When a paid instance expires, is released, or is unsubscribed, the dedicated network access endpoint becomes unavailable immediately and is automatically deleted one day later. If you need to use the shared network access endpoint or another dedicated network access endpoint, you must switch to it manually. We recommend that you modify the network access allowlist in your service before the endpoint is deleted.
Modify a Dedicated Network Access Endpoint
You can modify only the Display Name of a Dedicated Network Access Endpoint. To modify other settings, you must delete the endpoint and create a new one.