Analyze massive MaxCompute data for display
Hologres is a real-time interactive analytics engine compatible with PostgreSQL and deeply integrated with MaxCompute. By creating foreign tables in Hologres, you can run SQL queries directly against MaxCompute data without moving it, then connect a BI tool to visualize the results.
This tutorial walks you through a complete example using a Taobao store dataset: querying customer demographics data stored in MaxCompute and displaying a customer persona in Quick BI.
By the end of this tutorial, you will have:
-
Created foreign tables in Hologres that map to MaxCompute tables
-
Run analytical SQL queries against 12 million+ customer records
-
Connected Quick BI to Hologres to display query results as interactive charts
Constraints
Before you start, note the following constraints:
-
Same region required: Hologres cannot query MaxCompute tables that reside in a different region from the Hologres instance. Activate both services in the same region.
-
Data preview is partial: The Data Preview tab shows only a sample of the foreign table data, not the full dataset.
Prerequisites
Before you begin, ensure that you have:
-
MaxCompute activated. See Activate MaxCompute and DataWorks
-
A Hologres instance purchased and connected to HoloWeb. See Connect to HoloWeb and perform queries
-
Quick BI activated. See Prerequisites
How it works
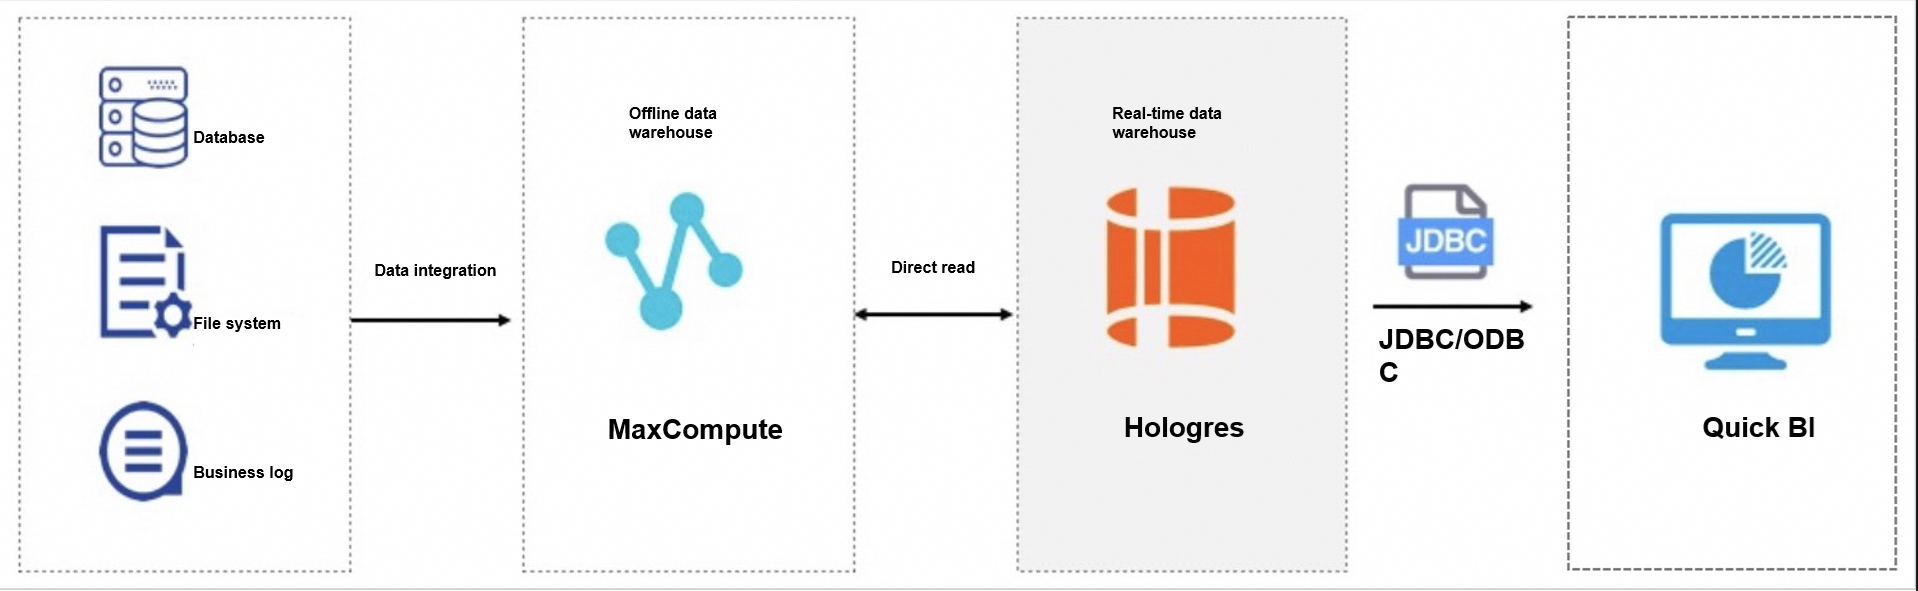
-
Customer visit data is stored in MaxCompute tables.
-
A foreign table is created in Hologres to accelerate queries of data in MaxCompute.
-
Quick BI connects to the Hologres instance to display the customer persona as visualizations.
Step 1: Prepare a MaxCompute data source
This tutorial uses the following existing tables in the MaxCompute project public_data.
| MaxCompute table | Data entries |
|---|---|
| customer | 12 million |
| customer_address | 6 million |
| customer_demographics | 1.92 million |
To use your own data, create tables in MaxCompute and import data to them. See Create tables.
Step 2: Create foreign tables in Hologres
Create foreign tables in HoloWeb to map to the MaxCompute tables.
Create a foreign table
-
Log on to the HoloWeb console.
-
In the top navigation bar, choose Metadata Management > MaxCompute Query Acceleration > Create Foreign Table.
-
Enter the name of the MaxCompute table to query, such as
public_data.customer. The table fields are displayed. -
Select the fields to synchronize, then click Submit.
To create multiple foreign tables at once, run the following SQL statement on the Ad-hoc Query page:
IMPORT FOREIGN SCHEMA public_data LIMIT to(
  customer,
  customer_address,
  customer_demographics,
  inventory,item,
  date_dim,
  warehouse)
FROM server odps_server INTO PUBLIC options(if_table_exist 'update');
Preview foreign table data
In the Instance Management panel, right-click the foreign table and select Open Table. On the table details page, click Data Preview.
Query data
On the table details page, click Query table. On the Ad-hoc Query page, enter SQL statements in the code editor and click the Run icon.
All four sample queries below run against the customer and customer_address tables in the public_data project.
-- SQL 1: Count customers by preferred flag, sorted descending
SELECT c_preferred_cust_flag,
       count(*) AS cnt
FROM customer
WHERE c_preferred_cust_flag IS NOT NULL
GROUP BY c_preferred_cust_flag
ORDER BY cnt DESC LIMIT 10;

-- SQL 2: Count customers by birth year (years with more than 1,000 customers)
SELECT c_birth_year,
       count(*) AS cnt
FROM customer
WHERE c_birth_year IS NOT NULL
GROUP BY c_birth_year HAVING count(*) > 1000
ORDER BY cnt DESC LIMIT 10;

-- SQL 3: Count customers by city (cities with more than 10 customers)
SELECT ca_city,
       count(*) AS cnt
FROM customer ,
     customer_address
WHERE c_current_addr_sk = ca_address_sk
  AND ca_city IS NOT NULL
GROUP BY ca_city HAVING count(*) > 10
ORDER BY cnt DESC LIMIT 10;

-- SQL 4: Preferred customers born between 1980 and 1989, by city
SELECT ca_city,
       count(*) AS cnt
FROM customer ,
     customer_address
WHERE c_current_addr_sk = ca_address_sk
  AND c_birth_year >= 1980
  AND c_birth_year < 1990
  AND c_preferred_cust_flag = 'Y'
  AND ca_city IS NOT NULL
GROUP BY ca_city HAVING count(*) > 10
ORDER BY cnt DESC LIMIT 10;
Step 3: Visualize results in Quick BI
Connect Quick BI to the Hologres instance to display query results as charts.
-
Add a data source. Log on to the Quick BI console and add Hologres as a PostgreSQL data source. See Quick BI.
-
Create a dataset. After connecting Quick BI to Hologres, create a dataset and import the required data to produce reports.
-
Display the customer persona. Build and display reports based on your business requirements.
What's next
-
To build more reports, add additional foreign tables from MaxCompute and create new datasets in Quick BI.
-
To learn more about the foreign table syntax used in this tutorial, see the PostgreSQL postgres_fdw documentation.