This topic describes what an AccessKey pair is and how to create one for a Resource Access Management (RAM) user or an Alibaba Cloud account.
What is an AccessKey pair?
An AccessKey pair is a long-term security credential used to authenticate programmatic requests to Alibaba Cloud APIs. It consists of an AccessKey ID and an AccessKey secret.
AccessKey ID: The unique public identifier for the AccessKey pair.
AccessKey secret: A secret key used to calculate the digital signature for an API request. This signature verifies the request's authenticity and integrity. You must keep your AccessKey secret strictly confidential.
To reduce the risk of leaks, an AccessKey secret is available for you to view or download only at the time of its creation. You cannot retrieve it later. Make sure to store it securely.
How to use an AccessKey pair
AccessKey pairs are intended only for programmatic access to Alibaba Cloud services through tools such as the command-line interface (CLI), software development kits (SDKs), or Terraform. You cannot use an AccessKey pair to log on to the Alibaba Cloud console.
As a best practice, you should not embed AccessKey pairs directly in your applications. Instead, we recommend using temporary security credentials (STS tokens) that are generated by assuming a RAM role. This approach reduces the risk associated with a compromised credential. For specific use cases, see When do I use RAM?
If your use case requires a AccessKey pair, see Best practices for identity and access management.
How an AccessKey pair works
RAM generates the AccessKey ID and AccessKey secret using a specific algorithm. These credentials are encrypted during both storage and transmission.
When an application makes a request, it uses the AccessKey secret to calculate a digital signature and includes the signature in the request. When Alibaba Cloud receives the request, it uses the AccessKey ID to look up the secret and validates the signature. This process verifies the sender's identity and the request's integrity. For more information about the specific signature mechanism that Alibaba Cloud uses, see Request syntax and signature method V3.
AccessKey pair categories
An AccessKey pair can belong to either an Alibaba Cloud account or a RAM user. AccessKey pairs are categorized based on their owner:
Alibaba Cloud account AccessKey pair (Not recommended)
This type of AccessKey pair belongs to an Alibaba Cloud account. It has full permissions to all resources in the account. A compromised AccessKey pair poses an extremely high security risk. We strongly recommend that you do not create or use a Alibaba Cloud account AccessKey pair.
RAM user AccessKey pair (Recommended)
This type of AccessKey pair belongs to a RAM user. It has only the permissions that are granted to that user, which allows you to follow the principle of least privilege. As a best practice, create a unique RAM user and AccessKey pair for each application. This reduces the risk of exposure that can result from sharing credentials.
Permission requirements
Because an Alibaba Cloud account has full access to all resources, you should avoid using it to create AccessKey pairs in a production environment. Instead, as a best practice, use a RAM user that is granted only the necessary permissions to create and manage AccessKey pairs for other RAM users.
You can attach the
AliyunRAMFullAccesssystem policy to an administrator to allow them to create and manage AccessKey pairs for RAM users.You can also allow RAM users to manage their own AccessKey pairs by enabling the Allow users to manage AccessKey option in the global security settings of RAM. For more information, see Manage the security settings of RAM users.
NoteEnabling this setting allows all RAM users to manage their own AccessKey pairs. This includes all related operations, such as creating, disabling, and deleting AccessKey pairs, unless an administrator attaches a policy that explicitly denies these operations.
We do not recommend enabling this setting in a production environment. To allow specific RAM users to manage their own AccessKey pairs, we recommend that you use a custom policy and set the
Resourceelement in the policy to the user's own Alibaba Cloud Resource Name (ARN). The following sample policies are for your reference:Allow a RAM user to create their own AccessKey pair
{
  "Version": "1",
  "Statement": [
    {
      "Effect": "Allow",
      "Action": [
        "ram:CreateAccessKey",
        "ram:ListAccessKeys"
      ],
      "Resource": "acs:ram:*:ACCOUNT_ID:user/USER_NAME"
    }
  ]
}
Allow a RAM user to manage their own AccessKey pair
{
  "Version": "1",
  "Statement": [
    {
      "Effect": "Allow",
      "Action": [
        "ram:CreateAccessKey",
        "ram:ListAccessKeys",
        "ram:UpdateAccessKey",
        "ram:DeleteAccessKey",
        "ram:GetAccessKeyLastUsed",
        "ram:ListAccessKeysInRecycleBin"
      ],
      "Resource": "acs:ram:*:ACCOUNT_ID:user/USER_NAME"
    }
  ]
}
Create an AccessKey pair for a RAM user
A RAM administrator (a user with the AliyunRAMFullAccess policy attached) can perform the following operations. If you do not have any RAM users under your account, create one first.
Console
Log on to the RAM console. In the left-side navigation pane, choose .
Find the target RAM user and click its username.
On the Authentication tab, in the AccessKey section, click Create AccessKey.
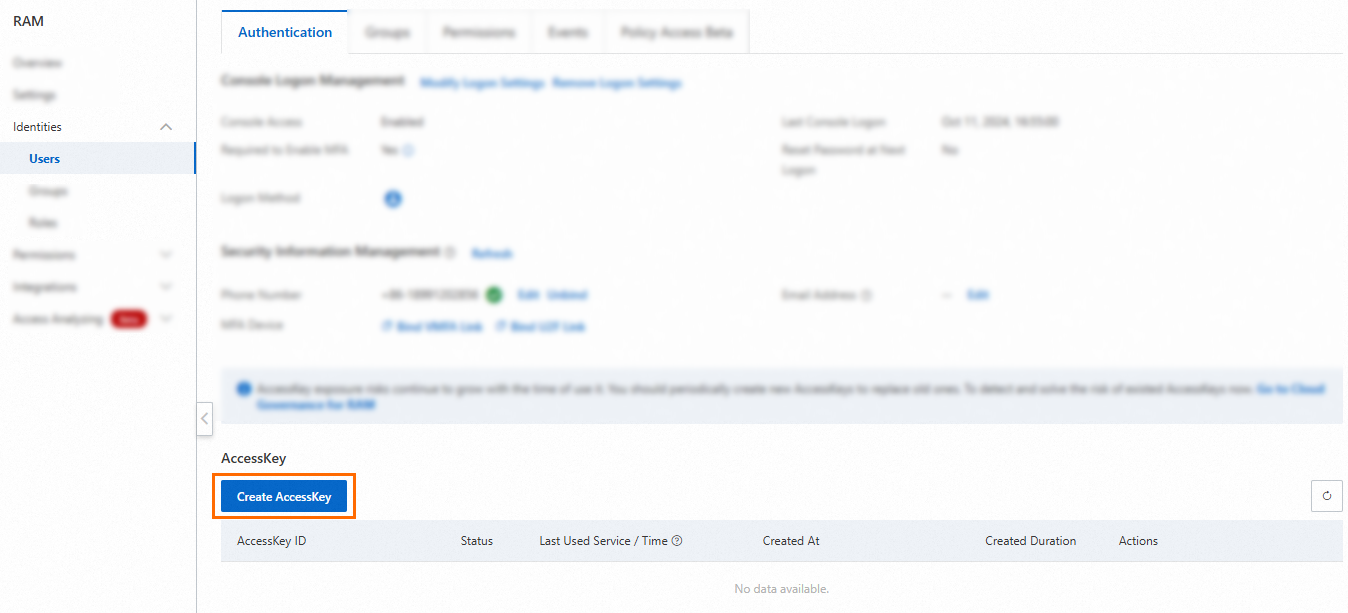 Note
NoteEach RAM user can have a maximum of two AccessKey pairs. One is for regular use, and the other is created for rotation to replace the old one.
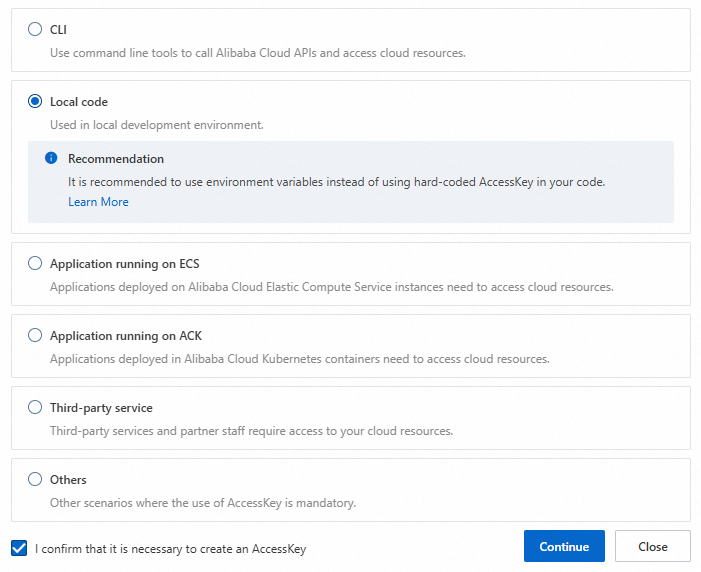
In the dialog box that appears, review the use cases and suggestions for using AccessKey pairs. We recommend that you select a more suitable credential solution. If you must create an AccessKey pair, select a use case, select I confirm that it is necessary to create an AccessKey, and click Continue. This choice is for data collection purposes and does not affect the permissions or properties of the created AccessKey pair.
Complete the security verification as prompted.
In the Create AccessKey dialog box, save the AccessKey ID and AccessKey secret, and click OK.
(Optional) Configure AccessKey Network Access Control: You can restrict the source IP addresses for API requests that use the AccessKey pair. This improves security by restricting access to the AccessKey pair to trusted network environments. We recommend that you identify the network environment where the AccessKey pair is used, and click Go to Settings. For more information, see Configure an AccessKey-level network access restriction policy for a RAM user.
 Important
To reduce the risk of leaks, the AccessKey secret is displayed only once when you create it. You cannot retrieve it later. Make sure to store it securely.
API
Call the CreateAccessKey operation to create an AccessKey pair and specify the following parameter:
UserPrincipalName: The logon name of the RAM user to which the AccessKey pair belongs. The format is test@example.onaliyun.com. You can find the logon name of the RAM user in the RAM console.
To reduce the risk of leaks, the AccessKey secret is displayed only when you call the CreateAccessKey operation. You cannot retrieve it later. Make sure to store it securely.
Create an AccessKey pair for an Alibaba Cloud account (Not recommended)
Unless necessary, we strongly recommend that you do not create or use an AccessKey pair for your Alibaba Cloud account. Before you proceed, evaluate whether you can use the AccessKey pair of a RAM user instead.
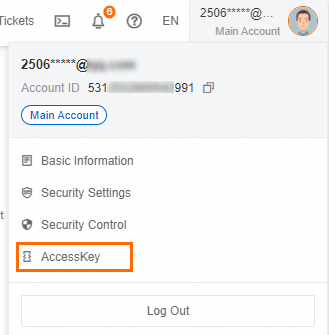
Log on to the RAM console with your Alibaba Cloud account.
Hover over the profile picture in the upper-right corner of the page that appears and click AccessKey.
In the Main Account AccessKey is not recommended dialog box, review the risks of creating an AccessKey pair for your Alibaba Cloud account. To proceed, select I am aware of the security risks of using a main account AccessKey, and click Use Main Account AccessKey.

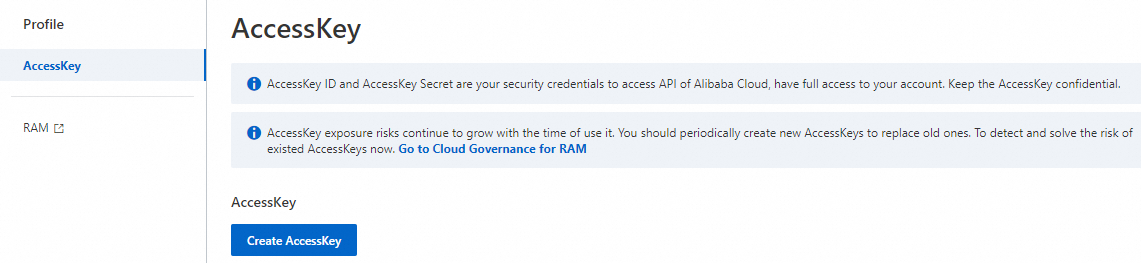
On the AccessKey page, click Create AccessKey.
 Note
NoteAn Alibaba Cloud account can have a maximum of two AccessKey pairs. One is for regular use, and the other is created for rotation to replace the old one.
In the Create Main Account AccessKey dialog box, review the security risks and limits again. To create the AccessKey pair, select I am aware of the security risks of using a main account AccessKey, and click Use Main Account AccessKey.

In the Create AccessKey dialog box, save the AccessKey ID and AccessKey secret, select I have saved the AccessKey Secret, and click OK.
(Optional) Configure AccessKey Network Access Control: You can restrict the source IP addresses for API requests that use the AccessKey pair. This improves security by restricting access to the AccessKey pair to trusted network environments. We recommend that you identify the network environment where the AccessKey pair is used, and click Go to Settings. For more information, see Configure an AccessKey-level network access restriction policy for a RAM user.
 Important
To reduce the risk of leaks, the AccessKey secret of an Alibaba Cloud account is displayed only when you create it. You cannot retrieve it later. Make sure to store it securely.