Register a user-defined function (UDF) before using it in a SQL deployment. This topic covers how to register, update, and delete UDFs in Realtime Compute for Apache Flink.
Prerequisites
Before you begin, make sure that you have:
Namespace access permissions granted to your RAM user or RAM role. For more information, see Grant namespace permissions.
A UDF JAR file (for Java UDFs) or a Python file (for Python UDFs) ready to upload.
Avoid JAR dependency conflicts:
When building a UDF JAR file, follow these rules to prevent dependency conflicts at runtime:
Use the same Flink version in your UDF project as the engine version selected in the SQL Editor.
Mark Flink-related dependencies as
<scope>provided</scope>in your POM file.Package third-party dependencies into the JAR using the Apache Maven Shade Plugin.
For troubleshooting steps, see How do I troubleshoot dependency conflicts of Flink?
Python UDF requirements (deployment-level only):
Requires Ververica Runtime (VVR) 8.0.3 or later.
Configure dependency files (such as
python.filesorpython.archives) in the Parameters section of the Configuration tab.Syntax checks are not supported on Python UDF drafts. Skip the syntax check before deploying.
Choose between catalog UDF and deployment-level UDF
Realtime Compute for Apache Flink supports two UDF scopes. Choose based on your use case:
| Aspect | Catalog UDF | Deployment-level UDF |
|---|---|---|
| Scope | Available across all deployments in the workspace | Tied to a single deployment |
| How to register | SQL Editor > UDFs tab > Register UDF Artifact | Upload artifact > select in Additional Dependencies > CREATE TEMPORARY FUNCTION in SQL |
| Engine version | By default, the latest version of Realtime Compute for Apache Flink is used for data parsing — may conflict with older deployments | Tied to the deployment's engine version and dependency set |
If a catalog UDF causes incompatibility with an older engine version in your deployment, use a deployment-level UDF instead.
Register a catalog UDF
Log on to the Realtime Compute for Apache Flink console.
Find the workspace and click Console in the Actions column.
In the left-side navigation pane, click Development > ETL.
On the left side of the SQL Editor page, click the UDFs tab, then click Register UDF Artifact.
In the Register UDF Artifact dialog box, upload your UDF JAR file.
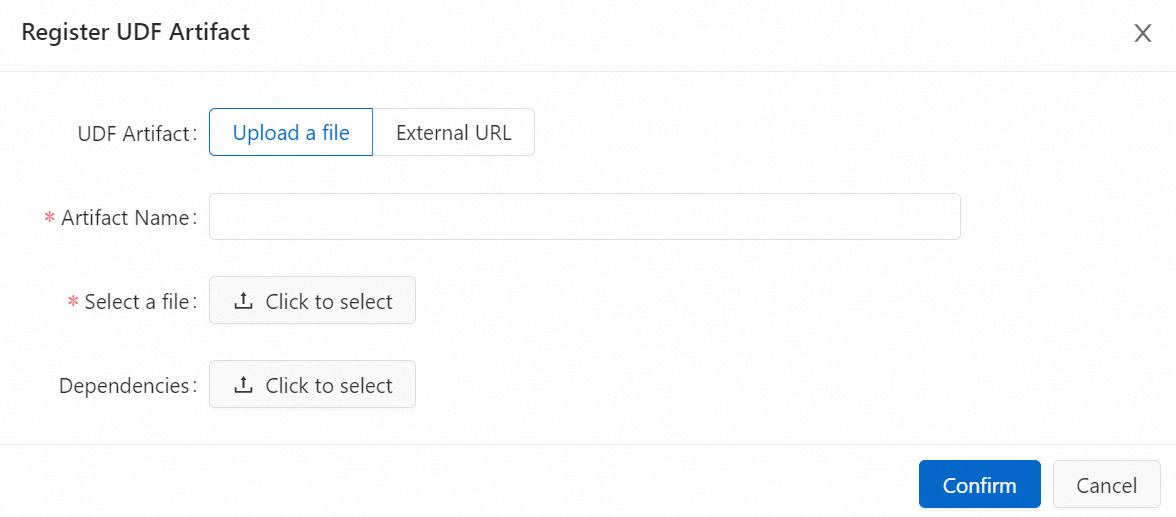
Choose one of the following upload methods:
Upload a file: Click Click to select next to Select a file to upload the JAR file. To add a dependency file, click Click to select next to Dependencies.
NoteThe JAR file is stored in the
sql-artifactsdirectory of the OSS bucket associated with your workspace. For Java UDFs, dependencies can be packaged into the JAR or uploaded separately. For Python UDFs, upload dependencies as a separate dependency file.
External URL: Enter the URL of an existing UDF JAR file hosted in an external location.
NoteOnly the following external URLs are supported:
The endpoint of the Object Storage Service (OSS) bucket specified when you purchased the workspace. View this endpoint in Workspace Details in the Realtime Compute for Apache Flink console.
The endpoint of an external storage system accessible by Realtime Compute for Apache Flink, with a public-read access control list (ACL) or with access explicitly granted to Flink.
Click Confirm.
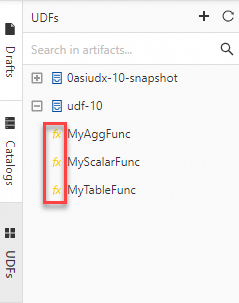
In the Available Functions section of the Manage Functions dialog box, select the UDFs to register and click Create Functions. Flink parses the JAR file and automatically detects classes that implement the UDF, user-defined aggregate function (UDAF), or user-defined table-valued function (UDTF) interfaces. The class names are filled in the Function Name column automatically. After registration, the UDFs appear in the UDFs pane on the left side of the SQL Editor, each prefixed with the fx characters highlighted in yellow.
NoteBy default, the latest version of Realtime Compute for Apache Flink is used for data parsing when you register a catalog UDF. If your deployment uses an older engine version (configured in the Basic section of the Configuration tab), an incompatibility issue may occur. In that case, use a deployment-level UDF instead. See Register a deployment-level UDF.
Register a deployment-level UDF
Deployment-level UDFs are scoped to a single deployment. Use this approach when your deployment runs on an older engine version, or when you need Python UDF support.
Upload the JAR or Python file. In the left-side navigation pane, click Artifacts. On the Artifacts page, click Upload Artifact and upload your JAR or Python file.
Add the file as a dependency in your deployment. On the Configurations tab of the SQL Editor page, select the JAR or Python file from Additional Dependencies.
Register the UDF in your SQL draft using one of the following statements:
Java UDF:
CREATE TEMPORARY FUNCTION yourfunctionname;Python UDF:
CREATE TEMPORARY FUNCTION yourfunctionname LANGUAGE Python;
Update a UDF
If you modify UDF code or add functions to an existing JAR file, update the artifact to apply your changes.
The new JAR file must include all previously registered UDF classes — not just the ones you changed.
Updated code takes effect only when you restart the draft for the deployment or publish a new draft. Running jobs continue to use the original JAR file.
Log on to the Realtime Compute for Apache Flink console.
Find the workspace and click Console in the Actions column.
In the left-side navigation pane, click Development > ETL.
On the left side of the SQL Editor page, click the UDFs tab.
In the UDFs pane, hover over the UDF name and click the
 icon.
icon.In the Register UDF Artifact dialog box, upload the new JAR file.

Click Update.
Delete a UDF
Before deleting a UDF JAR file, make sure no deployment or SQL file references any UDF registered from that file.
Log on to the Realtime Compute for Apache Flink console.
Find the workspace and click Console in the Actions column.
In the left-side navigation pane, click Development > ETL.
On the left side of the SQL Editor page, click the UDFs tab.
In the UDFs pane, hover over the UDF JAR file name and click the
 icon.
icon.Select Delete associated files to remove all registered UDFs from the file. This prevents dirty data from remaining in your workspace.
Click Confirm.
What's next
To develop Java UDFs, including UDF classification, parameter passing, and usage, see Java UDF development guide. For user-defined aggregate functions, see UDAFs.
To develop Python UDFs, including classification, dependencies, debugging, and usage, see Python UDF development guide. For user-defined aggregate functions, see UDAFs.
To sort and aggregate data using a UDAF, see Use a UDAF to sort and aggregate data.