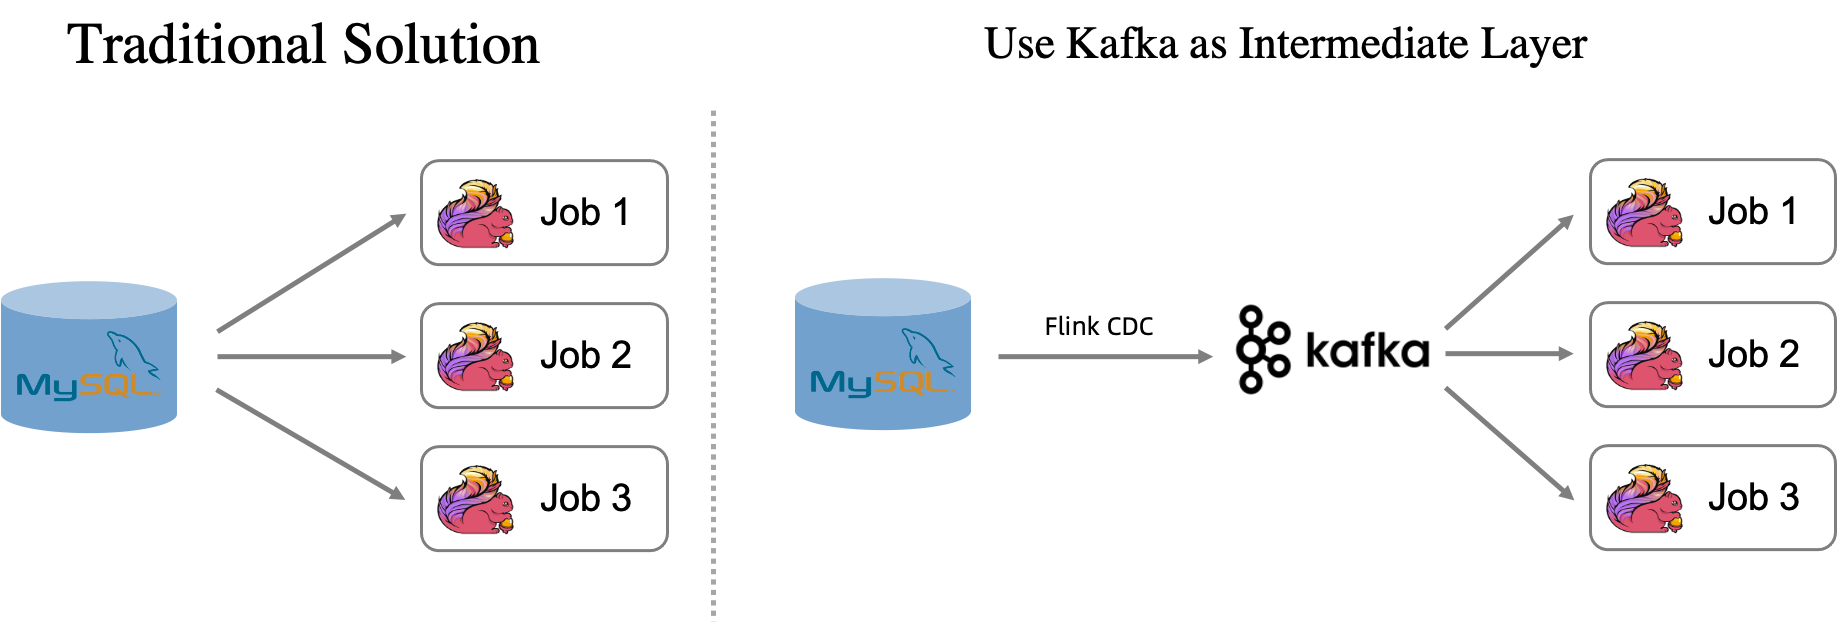
Synchronize an entire MySQL database to Kafka to reduce database load from multiple downstream consumers. A single Flink CDC ingestion job writes all MySQL tables to Kafka topics in real time, so multiple downstream jobs read from Kafka instead of querying MySQL directly.
How it works
When multiple Flink jobs depend on the same MySQL tables, each job opens its own connection for snapshot reads and its own binlog reader for incremental changes. As the number of jobs grows, so does the load on MySQL.
This solution inserts Kafka as an intermediate layer:
-
A single Flink CDC data ingestion job reads the entire MySQL database and writes each table to a dedicated Kafka topic in upsert mode.
-
Downstream jobs consume data from Kafka using the Upsert Kafka connector instead of querying MySQL directly.
Each Kafka topic stores roughly the same amount of data as its source MySQL table. Topics use log compaction (cleanup.policy=compact), so only the latest message per key is retained and data never expires.
This tutorial covers three topic naming strategies (default, per-table, and batch pattern) and two ways to consume the synchronized data (via a Kafka JSON catalog or a temporary table).
Limitations
-
MySQL tables must have primary keys.
-
Supported Kafka clusters: self-managed, E-MapReduce (EMR) Kafka cluster, or ApsaraMQ for Kafka. When using ApsaraMQ for Kafka, use the default endpoint.
-
The Kafka cluster must have more storage space than the source tables. Insufficient space causes data loss.
Use case
Consider a real-time order review analysis with three tables: user, order, and feedback.
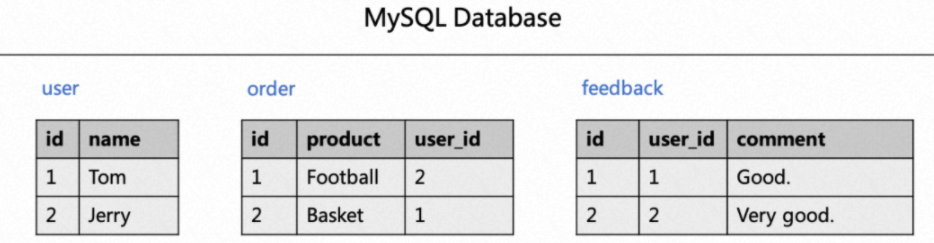
Two SQL jobs both join against the user table:
-- Join order information with the user table.
SELECT order.id as order_id, product, user.name as user_name
FROM order LEFT JOIN user
ON order.user_id = user.id;

-- Join reviews with the user table.
SELECT feedback.id as feedback_id, comment, user.name as user_name
FROM feedback LEFT JOIN user
ON feedback.user_id = user.id;
Both jobs read a full snapshot from MySQL on startup and maintain separate binlog readers for incremental changes. Synchronizing the database to Kafka lets a single ingestion job handle all MySQL reads, while both downstream jobs consume from Kafka.
Prerequisites
Before you begin, make sure you have:
-
Realtime Compute for Apache Flink activated. See Activate Realtime Compute for Apache Flink.
-
ApsaraMQ for Kafka activated. See Deploy an ApsaraMQ for Kafka instance.
-
ApsaraDB RDS for MySQL activated. See Create an ApsaraDB RDS for MySQL instance.
-
All three services in the same Virtual Private Cloud (VPC). If they are in different VPCs, enable cross-VPC access or Internet access. See How does Realtime Compute for Apache Flink access a service across VPCs? and How does Realtime Compute for Apache Flink access the Internet?.
-
If using a Resource Access Management (RAM) user or RAM role, the required permissions to access the resources.
Set up the MySQL data source
-
Create a database named
order_dw. See Create a database. -
On the RDS instance page, click Log on to Database.
-
On the Data Management Service (DMS) logon page, enter your database credentials and click Login.
-
Double-click the
order_dwdatabase on the left to switch to it. -
In the SQL Console, run the following statements to create three tables and insert test data:
CREATE TABLE `user` ( id bigint not null primary key, name varchar(50) not null ); CREATE TABLE `order` ( id bigint not null primary key, product varchar(50) not null, user_id bigint not null ); CREATE TABLE `feedback` ( id bigint not null primary key, user_id bigint not null, comment varchar(50) not null ); -- Insert test data INSERT INTO `user` VALUES(1, 'Tom'),(2, 'Jerry'); INSERT INTO `order` VALUES (1, 'Football', 2), (2, 'Basket', 1); INSERT INTO `feedback` VALUES (1, 1, 'Good.'), (2, 2, 'Very good'); -
Click Execute, and then click Execute.
Synchronize MySQL to Kafka
Create a Flink CDC data ingestion job to stream all tables from MySQL to Kafka. The job automatically creates Kafka topics. Partitions and replicas use the Kafka cluster defaults, and cleanup.policy is set to compact.
Choose one of the three topic naming strategies below.
Default topic names
Topics are named {database}.{table} — for example, order_dw.user, order_dw.order, and order_dw.feedback. Use this strategy when you do not need custom topic names.
-
On the Development > Data Ingestion page, create a Flink CDC data ingestion job and paste the following YAML:
source: type: mysql name: MySQL Source hostname: #{hostname} port: 3306 username: #{username} password: #{password} tables: order_dw\.\.* server-id: 28601-28604 # (Optional) Synchronize data from newly created tables during the incremental phase. scan.binlog.newly-added-table.enabled: true # (Optional) Synchronize table and field comments. include-comments.enabled: true # (Optional) Prioritize unbounded chunks to prevent potential TaskManager OutOfMemory issues. scan.incremental.snapshot.unbounded-chunk-first.enabled: true # (Optional) Enable parsing filters to speed up reads. scan.only.deserialize.captured.tables.changelog.enabled: true sink: type: upsert-kafka name: upsert-kafka Sink properties.bootstrap.servers: xxxx.alikafka.aliyuncs.com:9092 # The following parameters are required for ApsaraMQ for Kafka aliyun.kafka.accessKeyId: #{ak} aliyun.kafka.accessKeySecret: #{sk} aliyun.kafka.instanceId: #{instanceId} aliyun.kafka.endpoint: #{endpoint} aliyun.kafka.regionId: #{regionId} -
Click Deploy in the upper-right corner.
-
Go to O&M > Deployments. In the Actions column, click Start, select Initial Mode, and click Start.
Per-table topic names
Use the route module to assign explicit topic names to individual tables. The following example creates three topics: user1, order2, and feedback3.
-
On the Development > Data Ingestion page, create a Flink CDC data ingestion job and paste the following YAML:
source: type: mysql name: MySQL Source hostname: #{hostname} port: 3306 username: #{username} password: #{password} tables: order_dw\.\.* server-id: 28601-28604 # (Optional) Synchronize data from newly created tables during the incremental phase. scan.binlog.newly-added-table.enabled: true # (Optional) Synchronize table and field comments. include-comments.enabled: true # (Optional) Prioritize unbounded chunks to prevent potential TaskManager OutOfMemory issues. scan.incremental.snapshot.unbounded-chunk-first.enabled: true # (Optional) Enable parsing filters to speed up reads. scan.only.deserialize.captured.tables.changelog.enabled: true route: - source-table: order_dw.user sink-table: user1 - source-table: order_dw.order sink-table: order2 - source-table: order_dw.feedback sink-table: feedback3 sink: type: upsert-kafka name: upsert-kafka Sink properties.bootstrap.servers: xxxx.alikafka.aliyuncs.com:9092 # The following parameters are required for ApsaraMQ for Kafka aliyun.kafka.accessKeyId: #{ak} aliyun.kafka.accessKeySecret: #{sk} aliyun.kafka.instanceId: #{instanceId} aliyun.kafka.endpoint: #{endpoint} aliyun.kafka.regionId: #{regionId} -
Click Deploy in the upper-right corner.
-
Go to O&M > Deployments. In the Actions column, click Start, select Initial Mode, and click Start.
Batch topic names
Use the route module with a pattern and replace-symbol to generate topic names for all tables at once. The following example creates topic_user, topic_order, and topic_feedback.
-
On the Development > Data Ingestion page, create a Flink CDC data ingestion job and paste the following YAML:
source: type: mysql name: MySQL Source hostname: #{hostname} port: 3306 username: #{username} password: #{password} tables: order_dw\.\.* server-id: 28601-28604 # (Optional) Synchronize data from newly created tables during the incremental phase. scan.binlog.newly-added-table.enabled: true # (Optional) Synchronize table and field comments. include-comments.enabled: true # (Optional) Prioritize unbounded chunks to prevent potential TaskManager OutOfMemory issues. scan.incremental.snapshot.unbounded-chunk-first.enabled: true # (Optional) Enable parsing filters to speed up reads. scan.only.deserialize.captured.tables.changelog.enabled: true route: - source-table: order_dw\.\.* sink-table: topic_<> replace-symbol: <> sink: type: upsert-kafka name: upsert-kafka Sink properties.bootstrap.servers: xxxx.alikafka.aliyuncs.com:9092 # The following parameters are required for ApsaraMQ for Kafka aliyun.kafka.accessKeyId: #{ak} aliyun.kafka.accessKeySecret: #{sk} aliyun.kafka.instanceId: #{instanceId} aliyun.kafka.endpoint: #{endpoint} aliyun.kafka.regionId: #{regionId} -
Click Deploy in the upper-right corner.
-
Go to O&M > Deployments. In the Actions column, click Start, select Initial Mode, and click Start.
Consume Kafka data
MySQL data is written to Kafka in JSON format. Multiple downstream jobs can read from the same Kafka topics. Choose one of the following approaches.
Option A: Consume data through a catalog
Read Kafka topics directly through the Kafka JSON catalog without defining a schema manually.
-
On the Development > ETL page, create a streaming SQL job and paste the following SQL:
If a MySQL table schema changes during synchronization, the schema inferred by the Kafka JSON catalog may lag behind. For example, if a field is deleted from MySQL but unconsumed messages still contain it, the catalog may include that field with a null value. No special handling is required.
CREATE TEMPORARY TABLE print_user_product(
  order_id BIGINT,
  product STRING,
  user_name STRING
) WITH (
  'connector'='print',
  'logger'='true'
);

CREATE TEMPORARY TABLE print_user_feedback(
  feedback_id BIGINT,
  `comment` STRING,
  user_name STRING
) WITH (
  'connector'='print',
  'logger'='true'
);

BEGIN STATEMENT SET;      -- Required when writing to multiple sinks.

-- Join order information with the user table.
INSERT INTO print_user_product
SELECT `order`.key_id as order_id, value_product as product, `user`.value_name as user_name
FROM `kafka-catalog`.`kafka`.`order`/*+OPTIONS('properties.group.id'='<yourGroupName>', 'scan.startup.mode'='earliest-offset')*/ as `order`
LEFT JOIN `kafka-catalog`.`kafka`.`user`/*+OPTIONS('properties.group.id'='<yourGroupName>', 'scan.startup.mode'='earliest-offset')*/ as `user`
ON `order`.value_user_id = `user`.key_id;

-- Join reviews with the user table.
INSERT INTO print_user_feedback
SELECT feedback.key_id as feedback_id, value_comment as `comment`, `user`.value_name as user_name
FROM `kafka-catalog`.`kafka`.feedback/*+OPTIONS('properties.group.id'='<yourGroupName>', 'scan.startup.mode'='earliest-offset')*/ as feedback
LEFT JOIN `kafka-catalog`.`kafka`.`user`/*+OPTIONS('properties.group.id'='<yourGroupName>', 'scan.startup.mode'='earliest-offset')*/ as `user`
ON feedback.value_user_id = `user`.key_id;

END;      -- Required when writing to multiple sinks.
This example uses the Print connector to display results in the job logs. Replace it with a sink connector to write results for further analysis. For the multi-sink syntax, see INSERT INTO statement.
-
Click Deploy in the upper-right corner.
-
Go to O&M > Deployments. In the Actions column, click Start, select Initial Mode, and click Start.
Option B: Consume data through a temporary table
Define an explicit schema by creating temporary tables for each Kafka topic. This gives you full control over field names and types.
-
On the Development > ETL page, create a streaming SQL job and paste the following SQL:
Parameter Description Default Notes connectorThe connector type. — Must be kafka.topicThe Kafka topic to read from. — Must match the topic name created by the ingestion job. properties.bootstrap.serversThe Kafka broker addresses. — Format: host:port,host:port,host:port.scan.startup.modeThe offset to start reading from when the job starts without a state. group-offsetsValid values: earliest-offset,latest-offset,group-offsets,timestamp,specific-offsets. If the job restarts from a checkpoint, it resumes from the saved state regardless of this setting.key.formatThe format for deserializing the Kafka message key. — Must be json.value.formatThe format for deserializing the Kafka message value. — Must be json.key.fieldsThe table fields that map to the Kafka message key. — Separate multiple fields with semicolons, for example, field1;field2.key.fields-prefixA prefix applied to key field names to avoid conflicts with value fields. — Must match the key.fields-prefixsetting in the Kafka JSON catalog.value.fields-prefixA prefix applied to value field names to avoid conflicts with key fields. — Must match the value.fields-prefixsetting in the Kafka JSON catalog.value.fields-includeControls whether the message key field appears in the message value. — Set to EXCEPT_KEYso the message body does not duplicate the key field.value.json.infer-schema.flatten-nested-columns.enableWhether to recursively expand nested JSON columns. falseMust match the catalog setting. value.json.infer-schema.primitive-as-stringWhether to infer all primitive types as STRINGin the message value.falseMust match the catalog setting. CREATE TEMPORARY TABLE user_source ( key_id BIGINT, value_name STRING ) WITH ( 'connector' = 'kafka', 'topic' = 'user', 'properties.bootstrap.servers' = '<yourKafkaBrokers>', 'scan.startup.mode' = 'earliest-offset', 'key.format' = 'json', 'value.format' = 'json', 'key.fields' = 'key_id', 'key.fields-prefix' = 'key_', 'value.fields-prefix' = 'value_', 'value.fields-include' = 'EXCEPT_KEY', 'value.json.infer-schema.flatten-nested-columns.enable' = 'false', 'value.json.infer-schema.primitive-as-string' = 'false' ); CREATE TEMPORARY TABLE order_source ( key_id BIGINT, value_product STRING, value_user_id BIGINT ) WITH ( 'connector' = 'kafka', 'topic' = 'order', 'properties.bootstrap.servers' = '<yourKafkaBrokers>', 'scan.startup.mode' = 'earliest-offset', 'key.format' = 'json', 'value.format' = 'json', 'key.fields' = 'key_id', 'key.fields-prefix' = 'key_', 'value.fields-prefix' = 'value_', 'value.fields-include' = 'EXCEPT_KEY', 'value.json.infer-schema.flatten-nested-columns.enable' = 'false', 'value.json.infer-schema.primitive-as-string' = 'false' ); CREATE TEMPORARY TABLE feedback_source ( key_id BIGINT, value_user_id BIGINT, value_comment STRING ) WITH ( 'connector' = 'kafka', 'topic' = 'feedback', 'properties.bootstrap.servers' = '<yourKafkaBrokers>', 'scan.startup.mode' = 'earliest-offset', 'key.format' = 'json', 'value.format' = 'json', 'key.fields' = 'key_id', 'key.fields-prefix' = 'key_', 'value.fields-prefix' = 'value_', 'value.fields-include' = 'EXCEPT_KEY', 'value.json.infer-schema.flatten-nested-columns.enable' = 'false', 'value.json.infer-schema.primitive-as-string' = 'false' ); CREATE TEMPORARY TABLE print_user_product( order_id BIGINT, product STRING, user_name STRING ) WITH ( 'connector'='print', 'logger'='true' ); CREATE TEMPORARY TABLE print_user_feedback( feedback_id BIGINT, `comment` STRING, user_name STRING ) WITH ( 'connector'='print', 'logger'='true' ); BEGIN STATEMENT SET; -- Required when writing to multiple sinks. -- Join order information with the user table. INSERT INTO print_user_product SELECT order_source.key_id as order_id, value_product as product, user_source.value_name as user_name FROM order_source LEFT JOIN user_source ON order_source.value_user_id = user_source.key_id; -- Join reviews with the user table. INSERT INTO print_user_feedback SELECT feedback_source.key_id as feedback_id, value_comment as `comment`, user_source.value_name as user_name FROM feedback_source LEFT JOIN user_source ON feedback_source.value_user_id = user_source.key_id; END; -- Required when writing to multiple sinks.This example uses the Print connector to display results in the job logs. Replace it with a sink connector to write results for further analysis. For the multi-sink syntax, see INSERT INTO statement. The following table describes the connector parameters for the temporary table.
-
Click Deploy in the upper-right corner.
-
Go to O&M > Deployments. In the Actions column, click Start, select Initial Mode, and click Start.
Verify the results
-
Go to O&M > Deployments and click the downstream SQL job.
-
On the Job Logs tab, click the task listed under Path, ID on the Running Task Managers tab.
-
Click Logs and search the page for
PrintSinkOutputWriterto view the output.