High-reliability mode supports multiple connection types, such as optimal disaster recovery (two access points and four independent Express Connect circuits), powerful disaster recovery (two access points and two independent Express Connect circuits), development and testing (one access point and two independent Express Connect circuits), and load balancing for large bandwidth (multiple physical ports on the same access device). This topic describes how to apply for physical ports for different connection types in high-reliability mode.
Prerequisites
Notes
Your port configuration must support the creation of multiple ports. If you exceed the port quota, log on to the Quota Center to increase your quota.
To apply for the load balancing for large bandwidth type, contact your account manager to request permissions.
When you purchase multiple ports, the entire purchase fails if the creation of any port fails. If this happens, delete all Express Connect circuit ports created during the purchase and apply for the physical ports again.
Procedure
Step 1: Apply for physical ports in high-reliability mode
In high-reliability mode, you can apply for physical ports by selecting one of the following connection types:
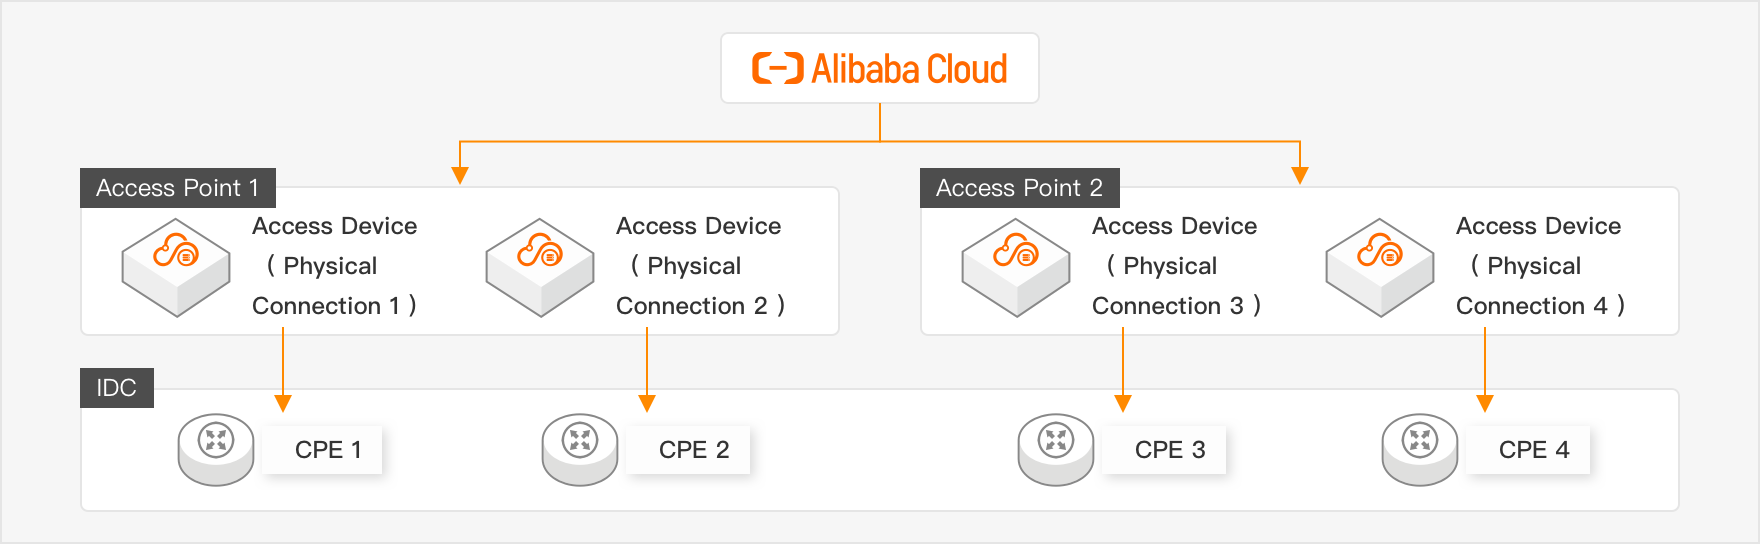
Optimal disaster recovery
Log on to the Express Connect console, click Apply For Physical Port, and select High-reliability Mode.
Select Optimal Disaster Recovery, click Next, configure the following parameters, and then click Next.
Configuration
Description
Port Type
You can select GE Single-mode Optical Port or 10GE Single-mode Optical Port.
Advanced Configuration
Click Advanced Configuration. You can enable features such as VBR Bandwidth Throttling, IPv6, BFD, MPBGP, MPBGP-v6, QoS, and VBR-HA.
If the backend resources do not have ports that support the advanced features you select, the port creation fails.
Resource Group
Select an existing resource group to manage the physical ports by group.
Tag Key
Select an existing tag key and tag value, or enter a new tag key and tag value. Bind specific tags to physical port instances to manage the instances by category.
Tag Value
Region
Select regions for the Express Connect circuits for Access Point 1 and Access Point 2. You can select two different regions.
Carrier
Select carriers for Access Point 1 and Access Point 2. The available access points vary based on the carrier.
NoteChina Unicom, China Telecom, and China Mobile can use only their own leased lines. They do not allow the use of leased lines provided by other carriers. Bare optical fiber access is not supported.
Access Point
Select access points for Access Point 1 and Access Point 2.
Confirm the connection information, select the checkbox to agree to the billing rules, and then click Submit.
After you apply for ports in Optimal Disaster Recovery mode, the system creates four physical port instances. Configure these four physical port instances by following Step 2 and Step 3.
NoteAfter the purchase is complete, the created connections are not associated with specific resources. By default, they are identified by numbered names. For example, if you purchase two ports in Hangzhou-Xiaoshan-A and two ports in Shanghai-Baoshan-C, the four created ports are named Hangzhou-Xiaoshan-A-PConn1, Hangzhou-Xiaoshan-A-PConn2, Shanghai-Baoshan-C-PConn1, and Shanghai-Baoshan-C-PConn2.
If an access point that you select has insufficient resources, your port configuration exceeds the quota, or the resource port cannot meet your requirements, an error message appears. Handle the error as prompted.
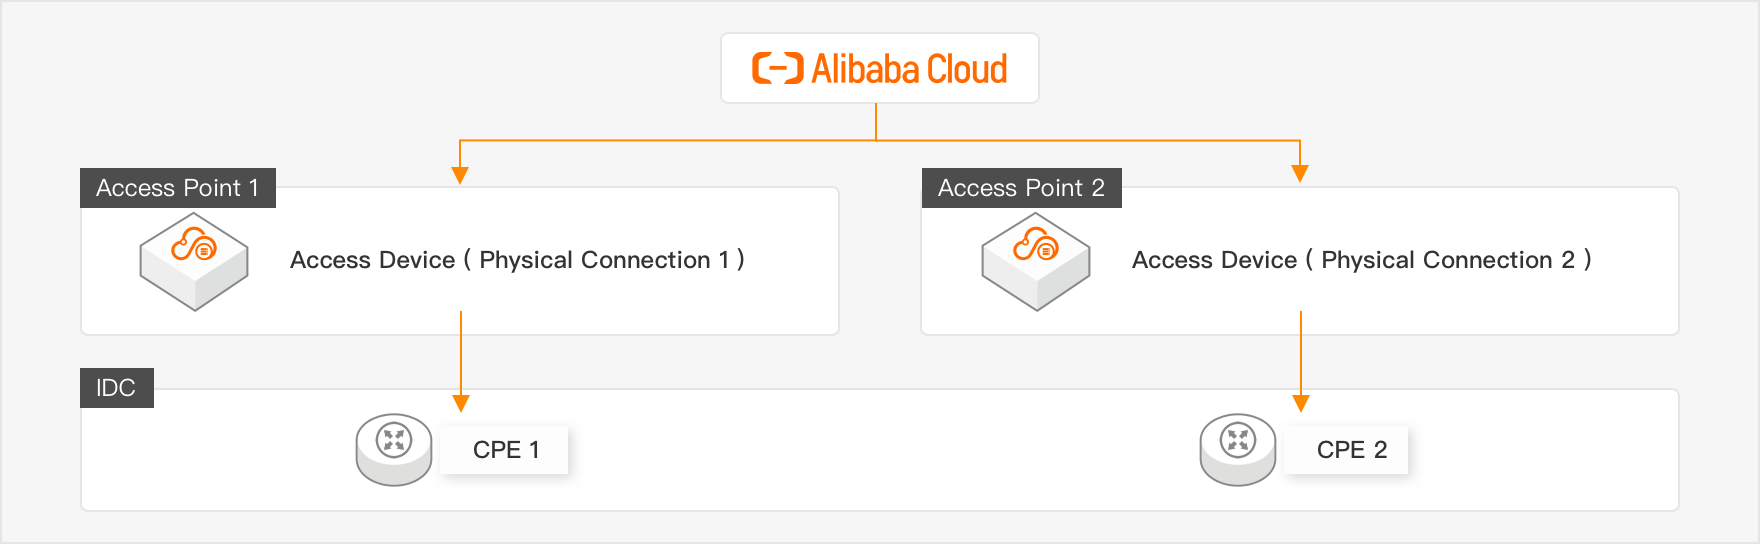
Powerful disaster recovery
Log on to the Express Connect console, click Apply For Physical Port, and select High-reliability Mode.
Select Powerful Disaster Recovery, click Next, configure the following parameters, and then click Next.
Configuration
Description
Port Type
You can select GE Single-mode Optical Port or 10GE Single-mode Optical Port.
Advanced Configuration
Click Advanced Configuration. You can enable features such as VBR Bandwidth Throttling, IPv6, BFD, MPBGP, MPBGP-v6, QoS, and VBR-HA.
If the backend resources do not have ports that support the advanced features you select, the port creation fails.
Resource Group
Select an existing resource group to manage the physical ports by group.
Tag Key
Select an existing tag key and tag value, or enter a new tag key and tag value. Bind specific tags to physical port instances to manage the instances by category.
Tag Value
Region
Select regions for the Express Connect circuits for Access Point 1 and Access Point 2. You can select two different regions.
Carrier
Select carriers for Access Point 1 and Access Point 2. The available access points vary based on the carrier.
NoteChina Unicom, China Telecom, and China Mobile can use only their own leased lines. They do not allow the use of leased lines provided by other carriers. Bare optical fiber access is not supported.
Access Point
Select access points for Access Point 1 and Access Point 2.
Confirm the connection information, select the checkbox to agree to the billing rules, and then click Submit.
After you apply for ports in Powerful Disaster Recovery mode, the system creates two physical port instances. Configure these two physical port instances by following Step 2 and Step 3.
NoteAfter the purchase is complete, the created connections are not associated with specific resources. By default, they are identified by numbered names. For example, if you purchase one port in Hangzhou-Xiaoshan-A and one port in Shanghai-Baoshan-C, the two created ports are named Hangzhou-Xiaoshan-A-PConn1 and Shanghai-Baoshan-C-PConn1.
If an access point that you select has insufficient resources, your port configuration exceeds the quota, or the resource port cannot meet your requirements, an error message appears. Handle the error as prompted.
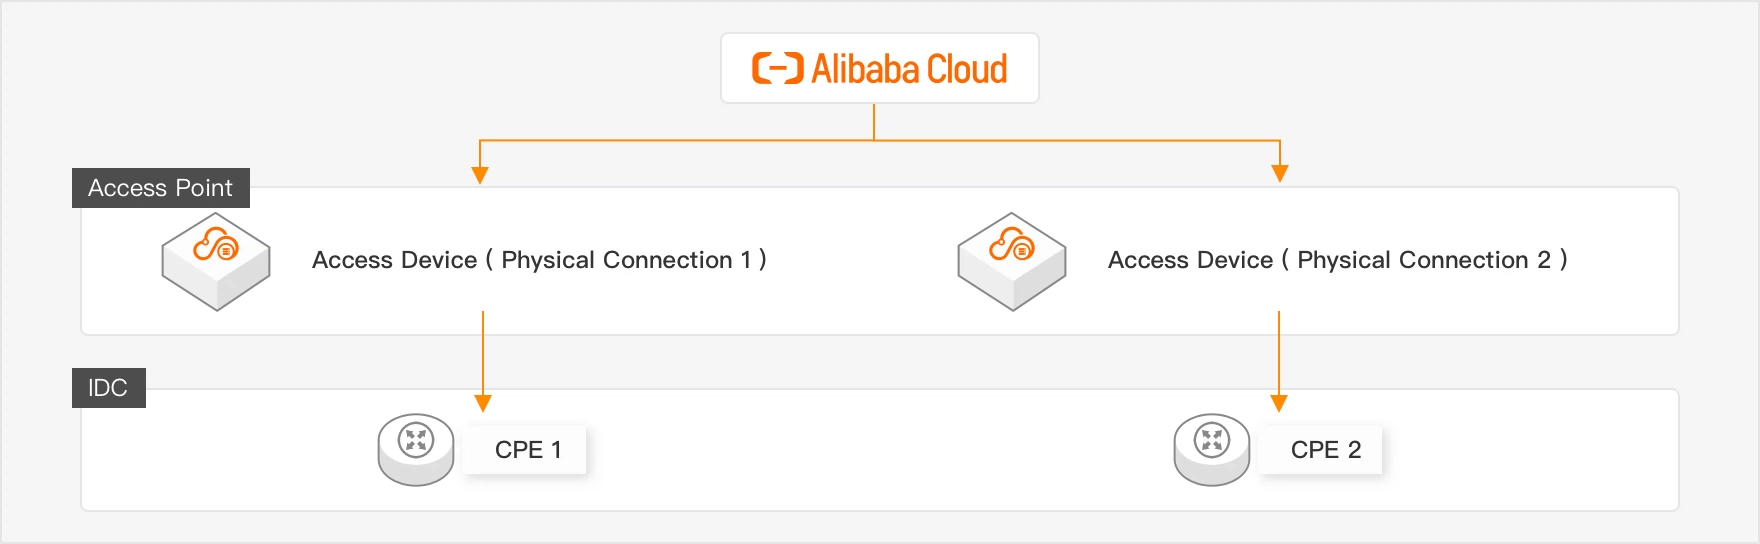
Development and testing
Log on to the Express Connect console, click Apply For Physical Port, and select High-reliability Mode.
Select Development And Testing, click Next, configure the following parameters, and then click Next.
Configuration
Description
Port Type
You can select GE Single-mode Optical Port or 10GE Single-mode Optical Port.
Advanced Configuration
Click Advanced Configuration. You can enable features such as VBR Bandwidth Throttling, IPv6, BFD, MPBGP, MPBGP-v6, QoS, and VBR-HA.
If the backend resources do not have ports that support the advanced features you select, the port creation fails.
Resource Group
Select an existing resource group to manage the physical ports by group.
Tag Key
Select an existing tag key and tag value, or enter a new tag key and tag value. Bind specific tags to physical port instances to manage the instances by category.
Tag Value
Region
Select a region for the Express Connect circuit for Access Point 1.
Carrier
Select a carrier for Access Point 1. The available access points vary based on the carrier.
NoteChina Unicom, China Telecom, and China Mobile can use only their own leased lines. They do not allow the use of leased lines provided by other carriers. Bare optical fiber access is not supported.
Access Point
Select an access point for Access Point 1.
Confirm the connection information, select the checkbox to agree to the billing rules, and then click Submit.
After you apply for ports for development and testing, the system creates two physical port instances. Configure these two physical port instances by following Step 2 and Step 3.
NoteAfter the purchase is complete, the created connections are not associated with specific resources. By default, they are identified by numbered names. For example, if you purchase two ports in Hangzhou-Xiaoshan-A, the two created ports are named Hangzhou-Xiaoshan-A-PConn1 and Hangzhou-Xiaoshan-A-PConn2.
If an access point that you select has insufficient resources, your port configuration exceeds the quota, or the resource port cannot meet your requirements, an error message appears. Handle the error as prompted.
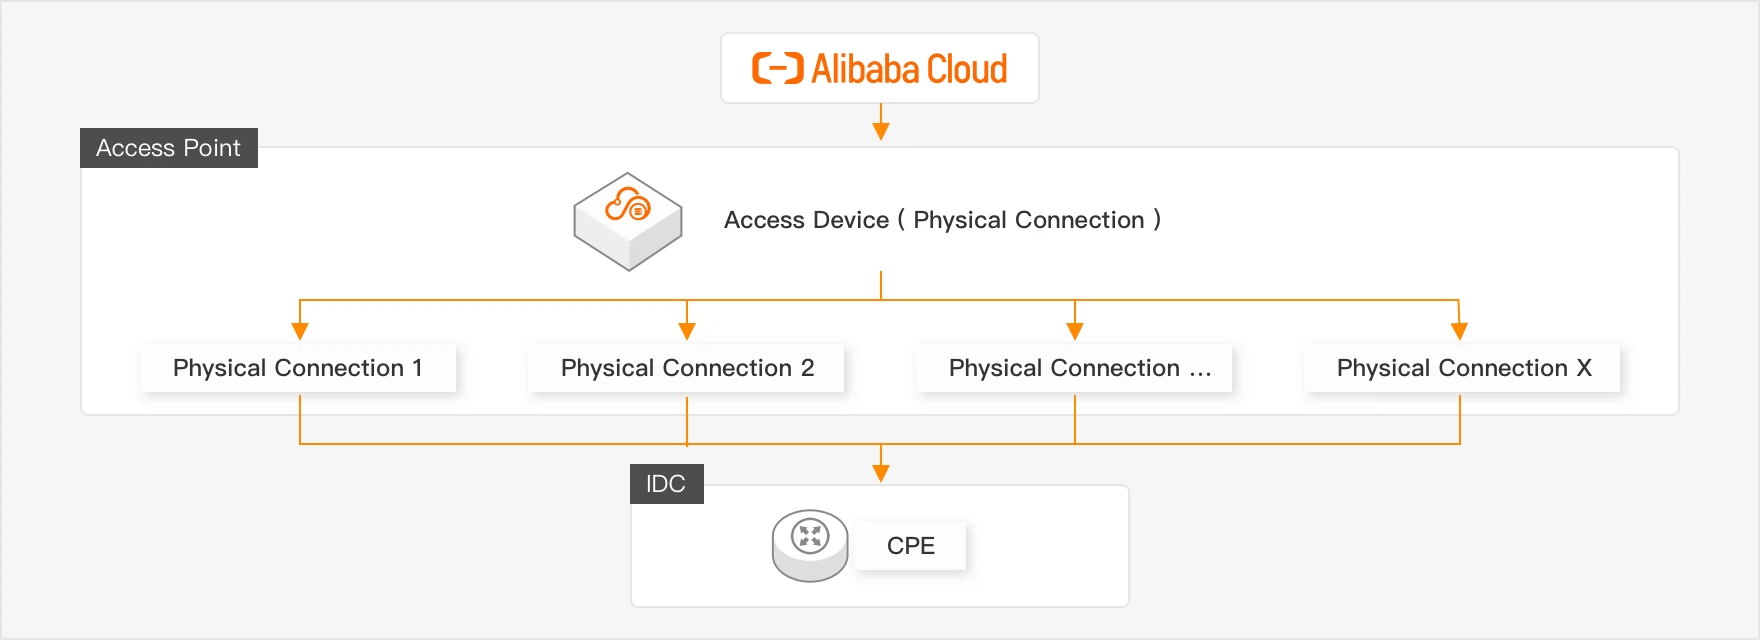
Load balancing for large bandwidth
Log on to the Express Connect console, click Apply For Physical Port, and select High-reliability Mode.
Select Load Balancing For Large Bandwidth, click Next, configure the following parameters, and then click Next.
Configuration
Description
Port Type
You can select GE Single-mode Optical Port or 10GE Single-mode Optical Port.
Number Of Ports
The number of physical ports to purchase. You can select a minimum of 2 ports and a maximum of 16 ports.
Advanced Configuration
Click Advanced Configuration. You can enable features such as VBR Bandwidth Throttling, IPv6, BFD, MPBGP, MPBGP-v6, QoS, and VBR-HA.
If the backend resources do not have ports that support the advanced features you select, the port creation fails.
Resource Group
Select an existing resource group to manage the physical ports by group.
Tag Key
Select an existing tag key and tag value, or enter a new tag key and tag value. Bind specific tags to physical port instances to manage the instances by category.
Tag Value
Region
Select a region for the Express Connect circuit for Access Point 1.
Carrier
Select a carrier for Access Point 1. The available access points vary based on the carrier.
NoteChina Unicom, China Telecom, and China Mobile can use only their own leased lines. They do not allow the use of leased lines provided by other carriers. Bare optical fiber access is not supported.
Access Point
Select an access point for Access Point 1.
Confirm the connection information, select the checkbox to agree to the billing rules, and then click Submit.
After you apply for ports for load balancing for large bandwidth, the system creates multiple physical port instances. Configure these physical port instances by following Step 2 and Step 3.
NoteAfter the purchase is complete, the created connections are not associated with specific resources. By default, they are identified by numbered names. For example, if you purchase two ports in Hangzhou-Xiaoshan-A, the two created ports are named Hangzhou-Xiaoshan-A-PConn1 and Hangzhou-Xiaoshan-A-PConn2.
If an access point that you select has insufficient resources, your port configuration exceeds the quota, or the resource port cannot meet your requirements, an error message appears. Handle the error as prompted.
Step 2: Apply for an LOA for Express Connect circuit installation
Alibaba Cloud lets you reapply for a Letter of Authorization (LOA). To reapply, repeat the steps in Step 2: Apply for an LOA for Express Connect circuit installation.
On the Physical Ports page, find the destination port instance and click Apply for LOA.
In the Apply For LOA (Letter Of Authorization For Express Connect Circuit Installation) panel, enter the following information and click OK.
Configuration
Description
Company Name
The company name that you used to register your Alibaba Cloud account.
If you have an individual account, enter the name of the account owner.
Installation Company To Enter Alibaba Cloud Data Center
The name of the installation company. This is typically the carrier or data center operator.
Leased Line Type
You can select MSTP, MPLS VPN, Direct Fiber Connection, or Other.
Scheduled Installation Time
Site access time for the leased line contractor.
Your Data Center Address
The specific address of your data center.
Express Connect Circuit Bandwidth
Enter the bandwidth value specified in your Express Connect circuit contract.
NoteThis bandwidth value is for reference only. Your actual fees and bandwidth limit are subject to the contract that you sign with your carrier. Enter the bandwidth value as specified in the contract.
Add Field Engineer
Click Add Construction Engineer to add information about the personnel who need to enter the Alibaba Cloud data center for the installation. You can add multiple construction engineers.
ImportantYou must enter the information of the engineers who will perform the installation in the Alibaba Cloud data center.
After you apply for an LOA, the LOA Status of the instance changes to Applying For LOA. After Alibaba Cloud personnel review and approve the application within two business days, the LOA Status changes to LOA Approved.
After you receive a text message notification, perform the following steps:
NoteYou can skip this step if the access point that you select is a third-party data center access point, an access point in the China (Hong Kong) region, or an access point in another country or region.
Obtain an entry pass. Click the entry pass link in the text message to log on to the data center entry application platform. Select the data center information, click Confirm On-site Visit, and then click Entry Pass to obtain a QR code for entry.
Update your personal information.
Copy the link from the text message and paste it into a browser on your computer. Read and agree to the privacy statement and the Alibaba Cloud Data Center Entry Agreement.
Fill in your personal information and click Submit Information. When the page displays Submitted Successfully, you can close the browser window.
Step 3: Complete the Express Connect circuit installation and pay resource usage fees
Install the Express Connect circuit
On the Physical Ports page, find the destination instance, and then view and download the LOA file.

Based on the information in the LOA, contact your carrier to connect the Express Connect circuit to the device outside the Alibaba Cloud data center room based on the engineering survey plan.
NoteData centers in the Chinese mainland: Alibaba Cloud engineers help the carrier connect the Express Connect circuit to the Alibaba Cloud data center room.
Data centers outside the Chinese mainland: The carrier connects the Express Connect circuit to the access device, such as an Optical Distribution Frame (ODF) or a patch panel, outside the Alibaba Cloud data center room.
The procedure for entering the data center room is as follows:
Third-party data center access points: Deliver the LOA file to the on-site engineer at least one day in advance.
Access points in the China (Hong Kong) region and other regions: Contact the on-site engineer.
Other data center access points: Present the entry QR code that you obtained in Step 2 to enter the data center.
After the installation is complete, obtain the circuit test report from the carrier. Then, contact the carrier to obtain the carrier's Express Connect circuit ID, cross connect label, or distribution frame port information.
Connect the fiber pigtail on the Alibaba Cloud side
On the Physical Ports page, find the destination instance and click Report Work Completion. Enter the obtained circuit information and click OK. The instance status changes to Connecting Pigtail.
An Alibaba Cloud on-site engineer connects the Express Connect circuit to the specified port in the Alibaba Cloud data center. After the circuit is connected, the instance status changes to Pending Payment.
NoteFor data centers in the Chinese mainland, the fiber pigtail is laid and connected to the port within two business days. For data centers outside the Chinese mainland, this process is completed within three business days.
Pay resource usage fees
On the Physical Ports page, find the destination instance and click Pay.
Select a subscription duration and a renewal method. Click Buy Now to complete the payment. When the instance status changes to Active, the Express Connect circuit is enabled.
What to do next
After the Express Connect circuit port is enabled, proceed with the steps in Connect an on-premises data center to a VPC over an Express Connect circuit.
References
To apply for physical ports in other modes, see the following topics:
For information about the related API operations, see the following topics:
CreateHighReliablePhysicalConnection: Creates an Express Connect circuit in high-reliability mode.
ApplyPhysicalConnectionLOA: Applies for an LOA.
CompletePhysicalConnectionLOA: Reports the completion of the Express Connect circuit installation.
CreatePhysicalConnectionOccupancyOrder: Creates an order for resource usage fees.
ConfirmPhysicalConnection: Confirms that an Express Connect circuit is available.
EnablePhysicalConnection: Enables an Express Connect circuit.