ES-Hadoop is an open-source connector that enables bidirectional data movement between Elasticsearch and the Hadoop ecosystem. It seamlessly integrates Elasticsearch with services like Hive, leveraging the fast search capabilities of Elasticsearch and the batch processing power of Hadoop for interactive data analysis. This topic describes how to use ES-Hadoop to read from and write data to Alibaba Cloud Elasticsearch by using Hive. This allows you to combine Elasticsearch with Hadoop components for more flexible data analytics.
Background information
The Hadoop ecosystem excels at processing large-scale datasets but often experiences high latency in interactive analysis. In contrast, Elasticsearch is designed for interactive analysis and can return results for many query types, especially ad hoc queries, in seconds. ES-Hadoop combines the strengths of both systems. With only minor code changes, you can use ES-Hadoop to quickly process data stored in Elasticsearch and benefit from the performance boost it provides.
ES-Hadoop works by using Elasticsearch as a data source for data processing engines such as MapReduce, Spark, or Hive. In an architecture with compute and storage separation, Elasticsearch serves as the storage layer. This is similar to other data sources used by MapReduce, Spark, or Hive, but Elasticsearch provides significantly faster data selection and filtering, a critical capability for any analytics engine.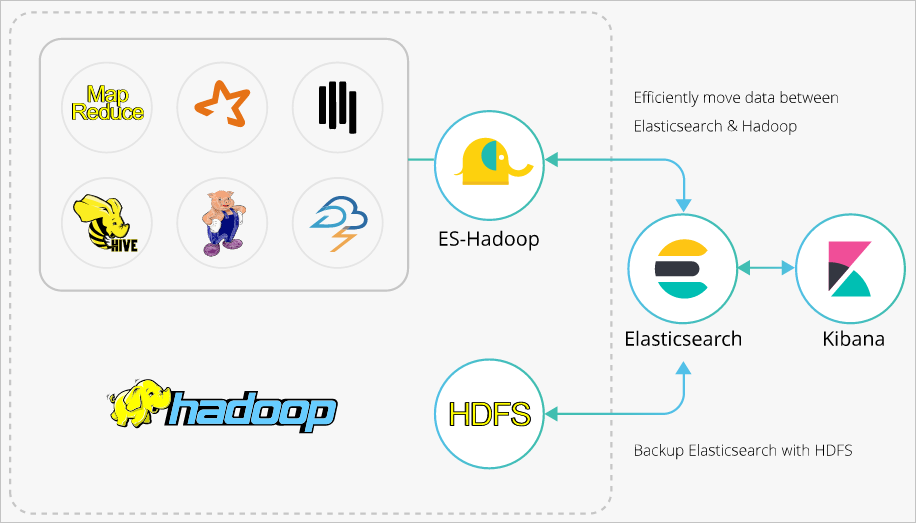
For more information about advanced ES-Hadoop and Hive configurations, see the official Elasticsearch documentation.
Procedure
-
Create an Alibaba Cloud Elasticsearch cluster and an E-MapReduce (EMR) instance in the same virtual private cloud (VPC); disable the auto-indexing feature for the Elasticsearch cluster and create an index and mappings; and download the ES-Hadoop installation package that is compatible with your Elasticsearch cluster version.
-
Step 1: Upload the ES-Hadoop JAR to HDFS
Upload the ES-Hadoop JAR to a directory in HDFS on the EMR master node.
-
Step 2: Create a Hive external table
Create a Hive external table and map its fields to the fields in the Elasticsearch index.
-
Step 3: Write data to the index with Hive
Use HiveSQL to write data to the Elasticsearch index.
-
Step 4: Read data from the index with Hive
Use HiveSQL to read data from the Elasticsearch index.
Prerequisites
-
Create an Alibaba Cloud Elasticsearch cluster.
This topic uses a version 6.7.0 cluster. For more information, see Create an Alibaba Cloud Elasticsearch cluster.
-
Disable the auto-indexing feature for the cluster and create an index and mappings.
If auto-indexing is enabled, Elasticsearch might infer an incorrect data type. For example, a field named
agethat you define asINTmight be indexed asLONG. Therefore, we recommend that you create the index manually. The index and mappings used in this topic are as follows.PUT company { "mappings": { "_doc": { "properties": { "id": { "type": "long" }, "name": { "type": "text", "fields": { "keyword": { "type": "keyword", "ignore_above": 256 } } }, "birth": { "type": "text" }, "addr": { "type": "text" } } } }, "settings": { "index": { "number_of_shards": "5", "number_of_replicas": "1" } } } -
Create an EMR cluster in the same virtual private cloud (VPC) as your Elasticsearch cluster.
ImportantThe private IP address whitelist for an Elasticsearch cluster is set to 0.0.0.0/0 by default. You can view this setting on the security configuration page. If you change this default, you must add the EMR cluster's internal IP address to the whitelist:
-
See View cluster list and details to obtain the internal IP address of the EMR cluster.
-
See Configure a public or private IP address whitelist for an Elasticsearch cluster to configure the VPC private IP address whitelist for the Elasticsearch cluster.
-
Step 1: Upload the ES-Hadoop JAR to HDFS
-
Download the ES-Hadoop installation package whose version matches your Elasticsearch cluster.
This topic uses elasticsearch-hadoop-6.7.0.zip.
-
Log on to the EMR console, obtain the IP address of the master node, and then use SSH to log on to the corresponding ECS instance.
For more information, see Log on to a cluster.
-
Upload the downloaded elasticsearch-hadoop-6.7.0.zip file to the master node and decompress it to get the elasticsearch-hadoop-hive-6.7.0.jar.
-
Create an HDFS directory and upload the elasticsearch-hadoop-hive-6.7.0.jar to this directory.
hadoop fs -mkdir /tmp/hadoop-es
hadoop fs -put elasticsearch-hadoop-6.7.0/dist/elasticsearch-hadoop-hive-6.7.0.jar /tmp/hadoop-es
Step 2: Create a Hive external table
-
In the Data development module of the EMR console, create a HiveSQL job.
For more information, see Configure a Hive SQL job.
In the Create Job dialog box, set Job Name to
hivetest, Folder toJOB/, and click OK. -
Configure the job to create an external table.
The job configuration is as follows.
-- Add the JAR. This command is valid only for the current session.
add jar hdfs:///tmp/hadoop-es/elasticsearch-hadoop-hive-6.7.0.jar;
-- Create a Hive external table and map it to the Elasticsearch index.
CREATE EXTERNAL table IF NOT EXISTS company(
   id BIGINT,
   name STRING,
   birth STRING,
   addr STRING
)
STORED BY 'org.elasticsearch.hadoop.hive.EsStorageHandler'
TBLPROPERTIES(
    'es.nodes' = 'http://es-cn-mp91kzb8m0009****.elasticsearch.aliyuncs.com',
    'es.port' = '9200',
    'es.net.ssl' = 'true',
    'es.nodes.wan.only' = 'true',
    'es.nodes.discovery'='false',
    'es.input.use.sliced.partitions'='false',
    'es.input.json' = 'false',
    'es.resource' = 'company/_doc',
    'es.net.http.auth.user' = 'elastic',
    'es.net.http.auth.pass' = 'xxxxxx'
);
Table 1. ES-Hadoop parameter descriptions
Parameter
Default
Description
es.nodes
localhost
The endpoint of the Alibaba Cloud Elasticsearch cluster. We recommend that you use a private endpoint. You can view the endpoint on the basic information page of the cluster. For more information, see View the basic information of a cluster.
es.port
9200
The port used to access the Elasticsearch cluster.
es.net.http.auth.user
elastic
The username for accessing the Elasticsearch cluster.
NoteIf you specify the
elasticaccount in your application, any subsequent password change for this account can cause temporary service disruptions due to propagation delay. Therefore, using theelasticaccount is not recommended. Instead, create a dedicated user with appropriate permissions in the Kibana console. For more information, see Use the RBAC mechanism of Elasticsearch X-Pack to control user access.es.net.http.auth.pass
/
The password for accessing the Elasticsearch cluster.
es.nodes.wan.only
false
Specifies whether to enable node sniffing when the Elasticsearch cluster uses a virtual IP address for connections.
-
true: Enables node sniffing.
-
false: Disables node sniffing.
es.nodes.discovery
true
Specifies whether to use node discovery.
-
true: Uses node discovery.
-
false: Does not use node discovery.
ImportantYou must set this parameter to
falsewhen using Alibaba Cloud Elasticsearch.
es.input.use.sliced.partitions
true
Specifies whether to use slice partitions.
-
true: Uses slice partitions. Setting this parameter to
truecan significantly increase the index pre-read time, sometimes making it much longer than the query time itself. We recommend that you set this parameter tofalseto improve query performance. -
false: Does not use slice partitions.
es.index.auto.create
true
Specifies whether to automatically create an index if it does not exist when writing data from a Hadoop component to an Elasticsearch cluster.
-
true: Automatically creates the index.
-
false: Does not automatically create the index.
es.resource
/
The index and type to read from or write to.
es.mapping.names
/
The mappings between table columns and Elasticsearch index fields.
es.read.metadata
false
Enable this property if your operations involve internal Elasticsearch fields, such as _id.
For more information about ES-Hadoop configuration options, see the official configuration documentation.
-
-
Save and run the job.
add jar hdfs:///tmp/hadoop-es/elasticsearch-hadoop-hive-6.7.0.jar;

CREATE EXTERNAL table IF NOT EXISTS company(
    id BIGINT,
    name STRING,
    birth STRING,
    addr STRING
)
STORED BY 'org.elasticsearch.hadoop.hive.EsStorageHandler'
TBLPROPERTIES(
    'es.nodes' = 'http://es-cn-n6wxxx.elasticsearch.aliyuncs.com',
    'es.port' = '9200',
    'es.net.ssl' = 'true',
    'es.nodes.wan.only' = 'true',
    'es.nodes.discovery'='false',
    'es.input.json' = 'false',
    'es.resource' = 'company/_doc',
    'es.net.http.auth.user' = 'elastic',
    'es.net.http.auth.pass' = 'xxx'
);
On the Run Records tab, view the job run status. When the Status column displays OK, the job has run successfully.
Step 3: Write data to the index with Hive
-
Create a HiveSQL job to write data.
The job configuration is as follows.
add jar hdfs:///tmp/hadoop-es/elasticsearch-hadoop-hive-6.7.0.jar; INSERT INTO TABLE company VALUES (1, "zhangsan", "1990-01-01","No.969, wenyixi Rd, yuhang, hangzhou"); INSERT INTO TABLE company VALUES (2, "lisi", "1991-01-01", "No.556, xixi Rd, xihu, hangzhou"); INSERT INTO TABLE company VALUES (3, "wangwu", "1992-01-01", "No.699 wangshang Rd, binjiang, hangzhou"); -
Save and run the job.
add jar hdfs:///tmp/hadoop-es/elasticsearch-hadoop-hive-6.7.0.jar; INSERT INTO TABLE company VALUES (1, "zhangsan", "1990-01-01","No.969, wenyixi Rd, yuhang, hangzhou"); INSERT INTO TABLE company VALUES (2, "lisi", "1991-01-01", "No.556, xixi Rd, xihu, hangzhou"); INSERT INTO TABLE company VALUES (3, "wangwu", "1992-01-01", "No.699 wangshang Rd, binjiang, hangzhou"); -
After the job succeeds, log on to your cluster's Kibana console to view the data in the
companyindex.For information about how to log on to the Kibana console, see Log on to the Kibana console. In the Kibana console, run the following command to view the data in the
companyindex.GET company/_searchAfter the command runs successfully, the result is as follows.
{
  "took" : 2,
  "timed_out" : false,
  "_shards" : {
    "total" : 5,
    "successful" : 5,
    "skipped" : 0,
    "failed" : 0
  },
  "hits" : {
    "total" : 3,
    "max_score" : 1.0,
    "hits" : [
      {
        "_index" : "company",
        "_type" : "employees",
        "_id" : "T6XkvnQBHw8DvkRwat8M",
        "_score" : 1.0,
        "_source" : {
          "id" : 1,
          "name" : "zhangsan",
          "birth" : "1990-01-01",
          "addr" : "No.969, wenyixi Rd, yuhang, hangzhou"
        }
      },
      {
        "_index" : "company",
        "_type" : "employees",
        "_id" : "tTPkvnQBNOGEvdaOqoyb",
        "_score" : 1.0,
        "_source" : {
          "id" : 2,
          "name" : "lisi",
          "birth" : "1991-01-01",
          "addr" : "No.556, xixi Rd, xihu, hangzhou"
        }
      },
      {
        "_index" : "company",
        "_type" : "employees",
        "_id" : "D33kvnQBbtHntVTN6dAH",
        "_score" : 1.0,
        "_source" : {
          "id" : 3,
          "name" : "wangwu",
          "birth" : "1992-01-01",
          "addr" : "No.699 wangshang Rd, binjiang, hangzhou"
        }
      }
    ]
  }
}
Step 4: Read data from the index with Hive
-
Create a HiveSQL job to read data.
The job configuration is as follows.
add jar hdfs:///tmp/hadoop-es/elasticsearch-hadoop-hive-6.7.0.jar; select * from company; -
Save and run the job.
The job code editor contains two SQL statements:
add jar hdfs:///tmp/hadoop-es/elasticsearch-hadoop-hive-6.7.0.jar;andselect * from company;. After the job runs successfully, click the Results tab to view the query results. Thecompanytable returns 3 records with columnscompany.id,company.name,company.birth, andcompany.addr, containing data for zhangsan (Yuhang), lisi (Xihu), and wangwu (Binjiang).
FAQ
Q: What should I do if the following error occurs when reading from or writing to Elasticsearch using Hive?
Error message: FAILED: Execution Error, return code -101 from org.apache.hadoop.hive.ql.exec.mr.MapRedTask. Could not initialize class org.elasticsearch.hadoop.rest.commonshttp.CommonsHttpTransport。A: The error occurs because the Hive component in EMR 5.6.0 is missing the commons-httpclient-3.1.jar file. To resolve this issue, manually add the missing file to the lib directory of Hive. For the file download link, see commons-httpclient-3.1.