Canal is an open source tool by Alibaba Group that parses MySQL binary logs and streams incremental changes to downstream consumers. This guide walks through deploying Canal server and Canal adapter on an Elastic Compute Service (ECS) instance to synchronize incremental data from ApsaraDB RDS for MySQL to an Alibaba Cloud Elasticsearch cluster in real time.
How it works
Canal acts as a secondary node of your ApsaraDB RDS for MySQL instance and subscribes to its binary logs. As rows are inserted, updated, or deleted in MySQL, Canal captures each change event and writes it to Elasticsearch through a RESTful API.
Prerequisites
Before you begin, make sure you have:
-
An ApsaraDB RDS for MySQL instance. See Create an ApsaraDB RDS for MySQL instance. This guide uses a MySQL 5.7 instance.
-
An Alibaba Cloud Elasticsearch cluster. See Create an Alibaba Cloud Elasticsearch cluster. This guide uses an Elasticsearch V6.7 cluster (Kernel-enhanced Edition).
-
An ECS instance running CentOS 7.6 (64-bit), used to host Canal server and Canal adapter. See Create an instance by using the wizard.
-
All three resources in the same virtual private cloud (VPC).
-
The ECS instance IP address added to the Elasticsearch cluster's IP address whitelist. See Configure a public or private IP address whitelist for an Elasticsearch cluster.
Limitations
-
Canal synchronizes incremental data only — full table exports are not supported.
-
The Canal adapter cannot connect to an Elasticsearch cluster over HTTPS.
-
Field names and data types in the Elasticsearch index mapping must exactly match the corresponding MySQL table columns.
-
The Java Development Kit (JDK) version must be 1.8.0 or later.
-
Canal and Elasticsearch version compatibility:
Note Canal 1.1.4 cannot be used to synchronize data to an Elasticsearch V7.X cluster. Use Canal 1.1.5 for Elasticsearch V7.x clusters, and Canal 1.1.7 for Elasticsearch V8.x clusters. This guide uses Canal 1.1.4 with an Elasticsearch V6.7 cluster.Canal version Supported Elasticsearch versions 1.1.4 6.x 1.1.5 7.x 1.1.7 8.x
Step 1: Prepare a MySQL data source
Log on to the ApsaraDB RDS console and create a database and table. This guide uses the following table schema:
CREATE TABLE `es_test` (
    `id`    bigint(32) NOT NULL,
    `name`  text NOT NULL,
    `count` text NOT NULL,
    `color` text NOT NULL,
    PRIMARY KEY (`id`)
) ENGINE=InnoDB
DEFAULT CHARACTER SET=utf8;
For general instructions, see General workflow to use ApsaraDB RDS for MySQL.
Step 2: Create an Elasticsearch index with mappings
The field names and data types in the index mapping must match the MySQL table exactly.
-
Log on to the Kibana console of your Elasticsearch cluster. See Log on to the Kibana console.
Note This guide uses Elasticsearch V6.7.0. Operations may differ on other versions. -
In the left-side navigation pane, click Dev Tools.
-
On the Console tab, run the following command to create the
es_testindex:PUT es_test?include_type_name=true { "settings": { "index": { "number_of_shards": "5", "number_of_replicas": "1" } }, "mappings": { "_doc": { "properties": { "count": { "type": "text" }, "id": { "type": "integer" }, "name": { "type": "text", "analyzer": "ik_smart" }, "color": { "type": "text" } } } } }A successful response looks like:
{
  "acknowledged": true,
  "shards_acknowledged": true,
  "index": "es_test"
}
Step 3: Install the JDK
-
Connect to the ECS instance. See Connect to a Linux instance by using a password or key.
Note In this example, a regular user is used. -
Search for available JDK packages:
sudo yum search java | grep -i --color JDK -
Install the JDK. This guide uses
java-1.8.0-openjdk-devel.x86_64:sudo yum install java-1.8.0-openjdk-devel.x86_64 -
Configure environment variables:
-
Open
~/.bash_profile:vim ~/.bash_profile -
Add the following lines. Replace
JAVA_HOMEwith your actual JDK installation path. Runfind / -name 'java'to locate it.export JAVA_HOME=/usr/lib/jvm/java-1.8.0-openjdk-1.8.0.362.b08-1.el7_9.x86_64 export CLASSPATH=.:$JAVA_HOME/jre/lib/rt.jar:$JAVA_HOME/lib/dt.jar:$JAVA_HOME/lib/tools.jar export PATH=$PATH:$JAVA_HOME/bin -
Press Esc, type
:wqto save, then apply the configuration:source ~/.bash_profile
-
-
Verify the installation:
java -versionExpected output:
openjdk version "1.8.0_362"
OpenJDK Runtime Environment (build 1.8.0_362-b08)
OpenJDK 64-Bit Server VM (build 25.362-b08, mixed mode)
Step 4: Install and start Canal server
-
Download Canal server 1.1.4:
wget https://github.com/alibaba/canal/releases/download/canal-1.1.4/canal.deployer-1.1.4.tar.gzFor other versions, see Canal releases.
-
Decompress the package:
tar -zxvf canal.deployer-1.1.4.tar.gz -
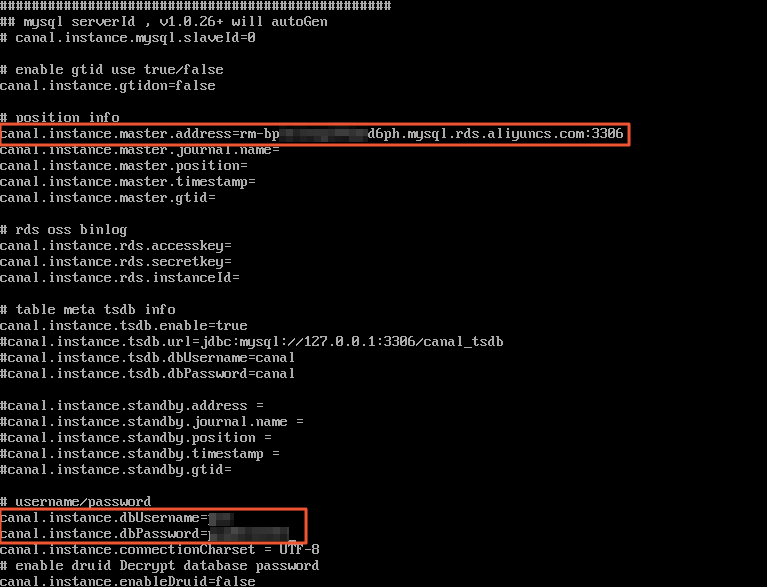
Edit
conf/example/instance.properties:Parameter Description Example canal.instance.master.addressInternal endpoint and port of the ApsaraDB RDS for MySQL instance. Get this from the Basic Information page of the RDS instance. rm-bp1u1xxxxxxxxx6ph.mysql.rds.aliyuncs.com:3306canal.instance.dbUsernameDatabase username. Get this from the Accounts page of the RDS instance. canal_usercanal.instance.dbPasswordDatabase password. <your-password>vi conf/example/instance.propertiesSet the following parameters:
-
Press Esc, type
:wqto save. -
Start Canal server and verify the logs:
./bin/startup.sh
cat logs/canal/canal.log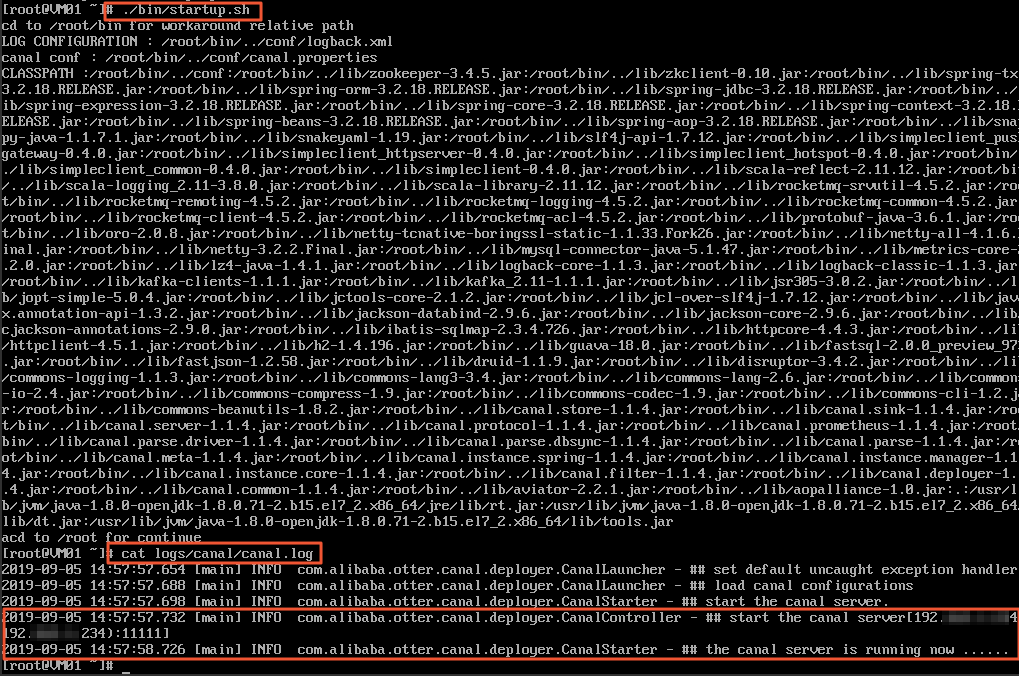
Step 5: Install and start Canal adapter
-
Download Canal adapter 1.1.4:
wget https://github.com/alibaba/canal/releases/download/canal-1.1.4/canal.adapter-1.1.4.tar.gz -
Decompress the package:
tar -zxvf canal.adapter-1.1.4.tar.gz -
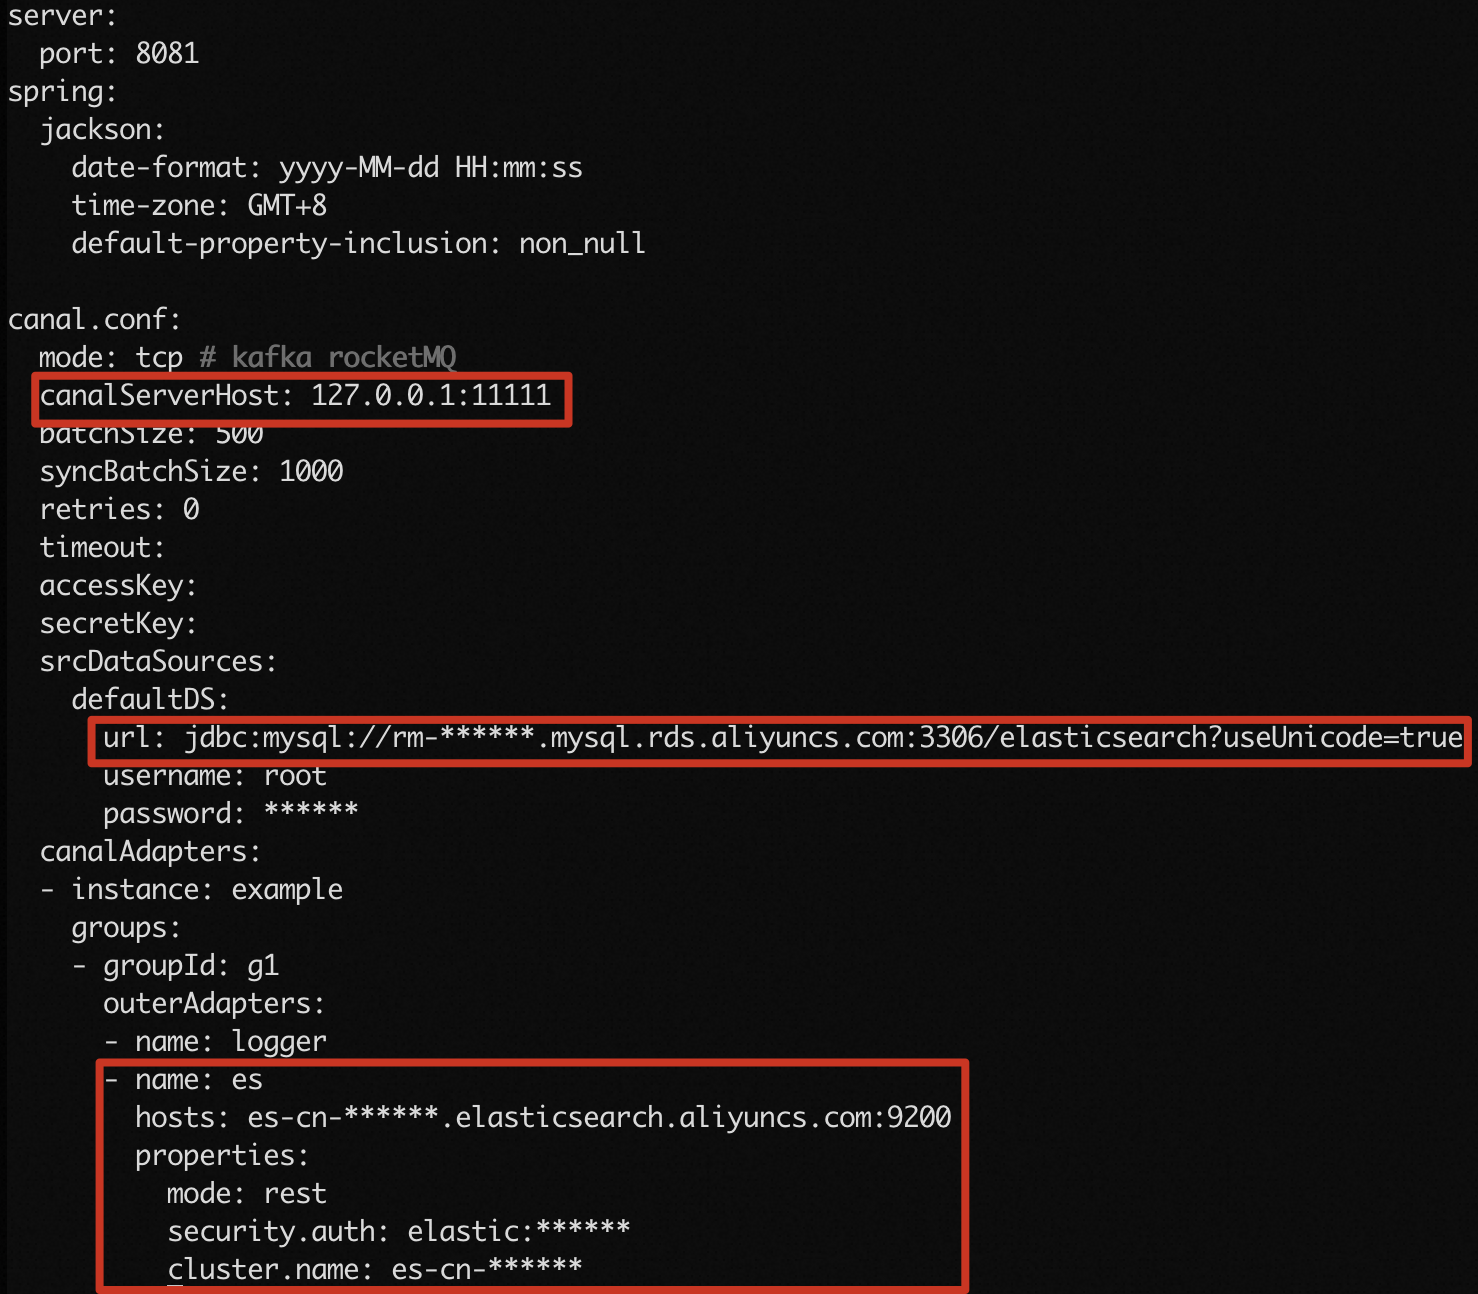
Edit
conf/application.yml:Parameter Description Example canal.conf.canalServerHostAddress of the Canal server. Keep the default value. 127.0.0.1:11111canal.conf.srcDataSources.defaultDS.urlJDBC connection URL of the ApsaraDB RDS for MySQL instance. Use the format jdbc:mysql://<endpoint>:<port>/<database>?useUnicode=true. Get the endpoint and port from the Basic Information page.jdbc:mysql://rm-bp1xxxxxxxxxnd6ph.mysql.rds.aliyuncs.com:3306/elasticsearch?useUnicode=truecanal.conf.srcDataSources.defaultDS.usernameDatabase username. Get this from the Accounts page. canal_usercanal.conf.srcDataSources.defaultDS.passwordDatabase password. <your-password>canal.conf.canalAdapters.groups.outerAdapters.hosts(undername: es)Internal endpoint and port of the Elasticsearch cluster. Get this from the Basic Information page of the cluster. es-cn-v64xxxxxxxxx3medp.elasticsearch.aliyuncs.com:9200canal.conf.canalAdapters.groups.outerAdapters.modeTransport mode. Set to rest.restcanal.conf.canalAdapters.groups.outerAdapters.properties.security.authElasticsearch credentials in <username>:<password>format.elastic:es_passwordcanal.conf.canalAdapters.groups.outerAdapters.properties.cluster.nameElasticsearch cluster ID. Get this from the Basic Information page. es-cn-v64xxxxxxxxx3medpvi conf/application.ymlSet the following parameters:
-
Press Esc, type
:wqto save. -
Edit the field mapping file
conf/es/*.ymlto define how MySQL columns map to Elasticsearch fields:Parameter Description Value used in this guide esMapping._indexName of the Elasticsearch index created in Step 2. es_testesMapping._typeType of the Elasticsearch index. _docesMapping._idDocument ID field. _idesMapping.sqlSQL query that selects the columns to synchronize. select t.id as _id, t.id, t.count, t.name, t.color from es_test t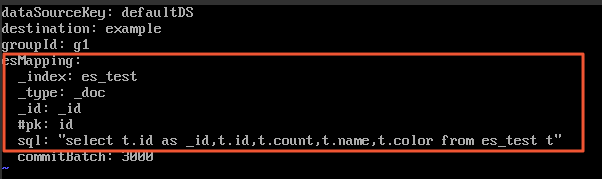
-
Start Canal adapter and verify the logs:
Note Canal adapter 1.1.4 bundles MySQL driver version 5.1.40. If your ApsaraDB RDS instance runs MySQL 8.x, the adapter fails to start. See Replace the MySQL driver for MySQL 8.x in the Troubleshooting section../bin/startup.sh cat logs/adapter/adapter.log
Step 6: Verify the synchronization
-
In the ApsaraDB RDS for MySQL database, insert a row into the
es_testtable:INSERT INTO `ES`.`es_test` (`count`, `id`, `name`, `color`) VALUES ('11', 2, 'canal_test2', 'red');You can also test with
UPDATEorDELETEstatements. -
Log on to the Kibana console of your Elasticsearch cluster. See Log on to the Kibana console.
-
In the left-side navigation pane, click Dev Tools.
-
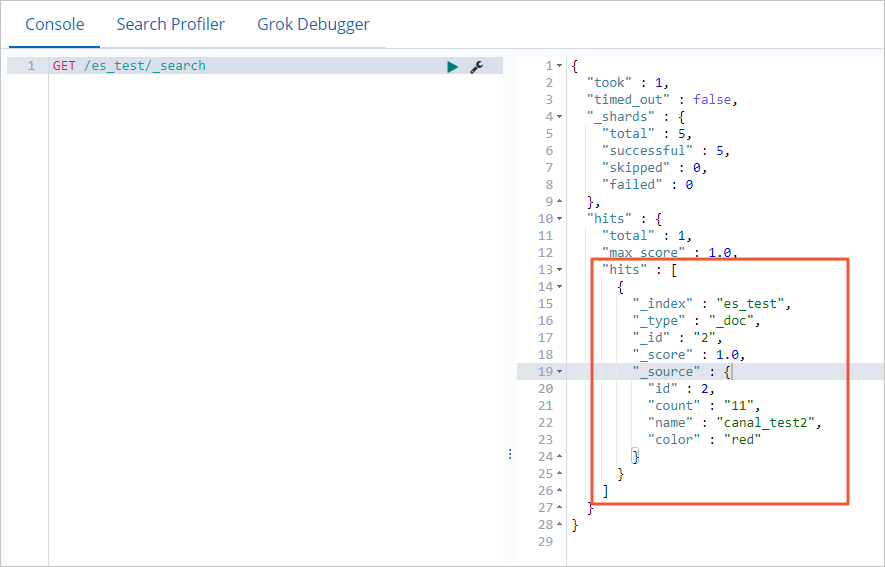
On the Console tab, run the following query:
ImportantCanal synchronizes incremental changes only.
GET /es_test/_searchIf synchronization is working, the response includes the row you inserted:
Troubleshooting
In the following examples, the root user is used.
ClassCastException when starting Canal adapter 1.1.5
Error:
java.lang.RuntimeException: java.lang.RuntimeException: java.lang.ClassCastException:
com.alibaba.druid.pool.DruidDataSource cannot be cast to
com.alibaba.druid.pool.DruidDataSource
at com.alibaba.otter.canal.client.adapter.es7x.ES7xAdapter.init(ES7xAdapter.java:54)
~[client-adapter.es7x-1.1.5-jar-with-dependencies.jar:na]
Replace client-adapter.es7x-1.1.5-jar-with-dependencies.jar in the canal.adapter-1.1.5\plugin directory with the version from the canal-1.1.5-alpha-2 release. For background, see Canal issue #3534.
-
Download the canal-1.1.5-alpha-2 adapter:
wget https://github.com/alibaba/canal/releases/download/canal-1.1.5-alpha-2/canal.adapter-1.1.5-SNAPSHOT.tar.gz -
Decompress the package:
tar -zxvf canal.adapter-1.1.5-SNAPSHOT.tar.gz -
Copy the fixed plugin file to the adapter's plugin directory:
Note The source path may vary depending on where you decompressed the package.cp canal.adapter-1.1.5-SNAPSHOT/plugin/client-adapter.es7x-1.1.5-SNAPSHOT-jar-with-dependencies.jar canal/canal.adapter/plugin -
Remove the original plugin file:
rm -rf client-adapter.es7x-1.1.5-jar-with-dependencies.jar -
Rename the new file to match the expected filename:
mv client-adapter.es7x-1.1.5-SNAPSHOT-jar-with-dependencies.jar client-adapter.es7x-1.1.5-jar-with-dependencies.jar
Replace the MySQL driver for MySQL 8.x
Canal adapter 1.1.4 bundles MySQL driver version 5.1.40, which is incompatible with MySQL 8.x. If you see the error Unknown system variable 'query_cache_size' when starting the adapter, replace the driver with the MySQL 8.0 connector:
-
Download the MySQL 8.0 connector:
wget https://dev.mysql.com/get/Downloads/Connector-J/mysql-connector-java-8.0.29.zip -
Decompress the package:
unzip mysql-connector-java-8.0.29.zip -
Copy the connector JAR to the adapter's lib directory:
mv mysql-connector-java-8.0.29/mysql-connector-java-8.0.29.jar lib/ -
Set the required permissions:
chmod 777 lib/mysql-connector-java-8.0.29.jar chmod +st lib/mysql-connector-java-8.0.29.jar -
Remove the old MySQL 5.x driver:
rm -rf lib/mysql-connector-java-5.1.40.jar