Alibaba Cloud Elasticsearch provides an online migration tool that uses node merging to improve migration speed and reliability. You can use this tool to efficiently and seamlessly migrate data from a self-managed Elasticsearch cluster that is deployed on an ECS instance to a fully managed Alibaba Cloud Elasticsearch cluster. This topic describes how to migrate data using the online migration tool.
Background information
The node merging migration solution merges a self-managed Elasticsearch cluster and an Alibaba Cloud Elasticsearch cluster into a single large cluster. After the clusters are merged, the data from the self-managed Elasticsearch cluster is migrated in phases. The migration process involves replica migration, master node migration, and primary shard migration, in that order. After the data migration is complete, you must switch business data requests, such as queries and writes, from the domain name of the self-managed Elasticsearch cluster to the domain name of the Alibaba Cloud Elasticsearch cluster. The Alibaba Cloud Elasticsearch cluster then handles all subsequent services. Concurrently, you must use network isolation to prevent the self-managed Elasticsearch cluster from providing services. After you verify the data accuracy, you can unpublish the self-managed Elasticsearch cluster.
During data migration, you can roll back a replica migration. However, you cannot roll back a master node migration or a primary shard migration. Proceed with caution.
Limits
Region limits: Cross-region data migration is not supported. The ECS instance where the self-managed Elasticsearch cluster resides must be in the same region as the Alibaba Cloud Elasticsearch cluster.
Network limits: Cross-VPC data migration is not supported. The self-managed Elasticsearch cluster and the Alibaba Cloud Elasticsearch cluster must be in the same VPC.
Version limits: You can migrate data from a self-managed Elasticsearch cluster only to an Alibaba Cloud Elasticsearch cluster that runs one of the following versions:
6.7,6.8,7.10,7.17,8.13,8.15, or8.17.If the version of your self-managed Elasticsearch cluster is one of the listed versions, you must migrate the data to an Alibaba Cloud Elasticsearch cluster of the same version. For example, you can migrate data from a self-managed Elasticsearch
6.7cluster to an Alibaba Cloud Elasticsearch6.7cluster.If the version of your self-managed Elasticsearch cluster is not one of the listed versions, you must select an Alibaba Cloud Elasticsearch version that is later than the version of your self-managed cluster. For example, you can migrate data from a self-managed Elasticsearch
8.5cluster to an Alibaba Cloud Elasticsearch8.13cluster.NoteCross-major version data migration, such as from 7.x to 8.x, is not supported.
Other limits:
Only migrate self-managed Elasticsearch data to Alibaba Cloud Elasticsearch instances deployed in the cloud-native new management (v3) mode.
The indexes of the self-managed Elasticsearch cluster must have replicas. We recommend that you create snapshots of the cluster locally.
Prerequisites
Self-managed Elasticsearch
A self-managed Elasticsearch cluster is deployed on an ECS instance. This cluster serves as the source cluster for the data migration.
NoteYou must configure the security group of the ECS instance to add a whitelist for a specific CIDR block. This allows the specified CIDR block to access the ECS instance through ports 9200 and 9300.
Port 9200: The HTTP API port for Elasticsearch, used by clients such as browsers, applications, and Kibana to interact with the Elasticsearch cluster.
Port 9300: The TCP communication port for Elasticsearch, used for communication between nodes within the cluster.
The indexes of the self-managed Elasticsearch cluster have replicas.
A decrypted P12 file is prepared. A P12 file stores public and private keys and contains digital certificates. During data migration, the P12 file is used to ensure normal communication between nodes.
(Optional) If authentication is not enabled for the self-managed Elasticsearch cluster, enable
X-Pack Securityby settingxpack.security.enabled: trueto ensure data security during the migration.
Alibaba Cloud Elasticsearch
An Alibaba Cloud Elasticsearch cluster is created. This cluster serves as the destination cluster for the data migration and receives data from the self-managed Elasticsearch cluster. To ensure a smooth migration, make sure that the Alibaba Cloud Elasticsearch cluster meets the following requirements:
It is deployed in the cloud-native new management (v3) mode.
It is in the same region and VPC as the ECS instance on which the self-managed Elasticsearch cluster resides.
The version should be consistent with your self-managed Elasticsearch.
NoteTo perform a cross-version data migration, contact the Alibaba Cloud Elasticsearch helpdesk.
The instance type and node count are not smaller than those of the self-managed Elasticsearch cluster.
It has the same username and password as the self-managed Elasticsearch cluster.
If the self-managed Elasticsearch cluster has custom plugins installed, such as the
elasticsearch-knnplugin for similarity search, you must install the same plugins on the Alibaba Cloud Elasticsearch cluster. For more information about plugin operations, see Plugin configuration.The features of the cloud cluster, such as the cluster configuration and dictionaries, meet your business requirements and are accessible over the network.
Procedure
Step 1: Create a migration task
Navigate to the online migration tool.
Log on to the Alibaba Cloud Elasticsearch console.
In the navigation pane on the left, click to access the online migration page.
-
You can click Create to create a migration task and configure the required parameters.
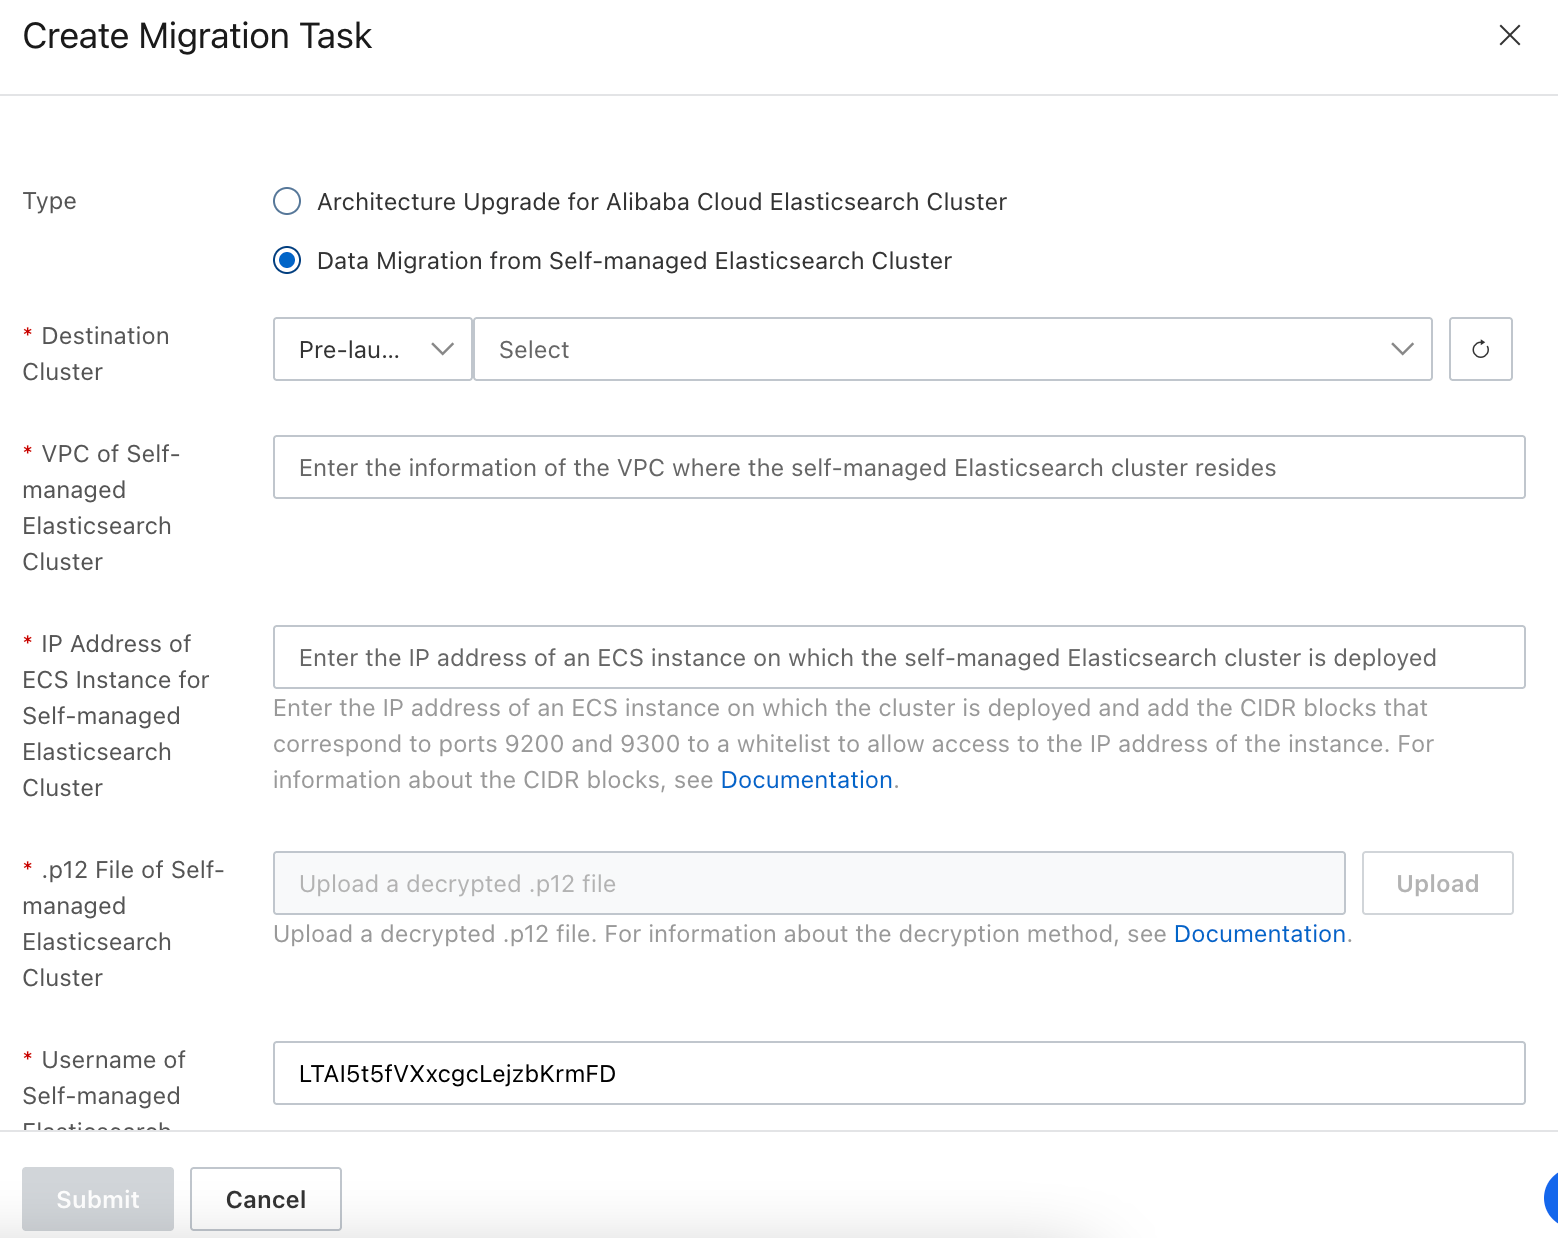
Parameter
Description
Type
Select Self-managed Elasticsearch Migration to migrate data from a self-managed Elasticsearch cluster to Alibaba Cloud Elasticsearch.
Destination Cluster
The Alibaba Cloud Elasticsearch instance that receives data from your self-managed Elasticsearch cluster. Select an instance in the same region as the ECS instance where your self-managed Elasticsearch is deployed. After you select an instance, enter its Virtual Switch ID as prompted on the page.
Note-
You can select only instances deployed in Cloud-native New Control Plane (v3) mode. If no suitable instance exists, create one as needed by following Create an Alibaba Cloud Elasticsearch Instance.
-
A virtual switch provides network isolation and access control. You can find the Virtual Switch ID on the instance details page by following View Basic Instance Information.
Self-managed ES VPC
The VPC ID of your self-managed Elasticsearch cluster.
Self-managed ES ECS IP
The IP address of any ECS instance that hosts a node in your self-managed Elasticsearch cluster.
NoteYou must configure the security group of the ECS instance to add a whitelist for a specific CIDR block. This allows the specified CIDR block to access the ECS instance through ports 9200 and 9300.
Port 9200: The HTTP API port for Elasticsearch, used by clients such as browsers, applications, and Kibana to interact with the Elasticsearch cluster.
Port 9300: The TCP communication port for Elasticsearch, used for communication between nodes within the cluster.
Self-managed ES P12 File
Upload the decrypted P12 file as prompted on the page. A P12 file stores a public key, a private key, and a digital certificate. It ensures secure communication between nodes during data migration.
Self-managed ES Username
The username used to log on to your self-managed Elasticsearch cluster.
Self-managed ES Password
The password used to log on to your self-managed Elasticsearch cluster.
-
Click OK to create the job.
Step 2: Configure and execute the migration task
In this step, you configure the migration task and complete the data migration by following the instructions on the page.
In the migration task, the source cluster is the self-managed Elasticsearch cluster, and the destination cluster is the Alibaba Cloud Elasticsearch cluster.
Perform a migration check and merge configurations.
On the Source and Destination Cluster Settings tab, you can perform a feasibility check and specify the merging configuration for the migration task as follows.
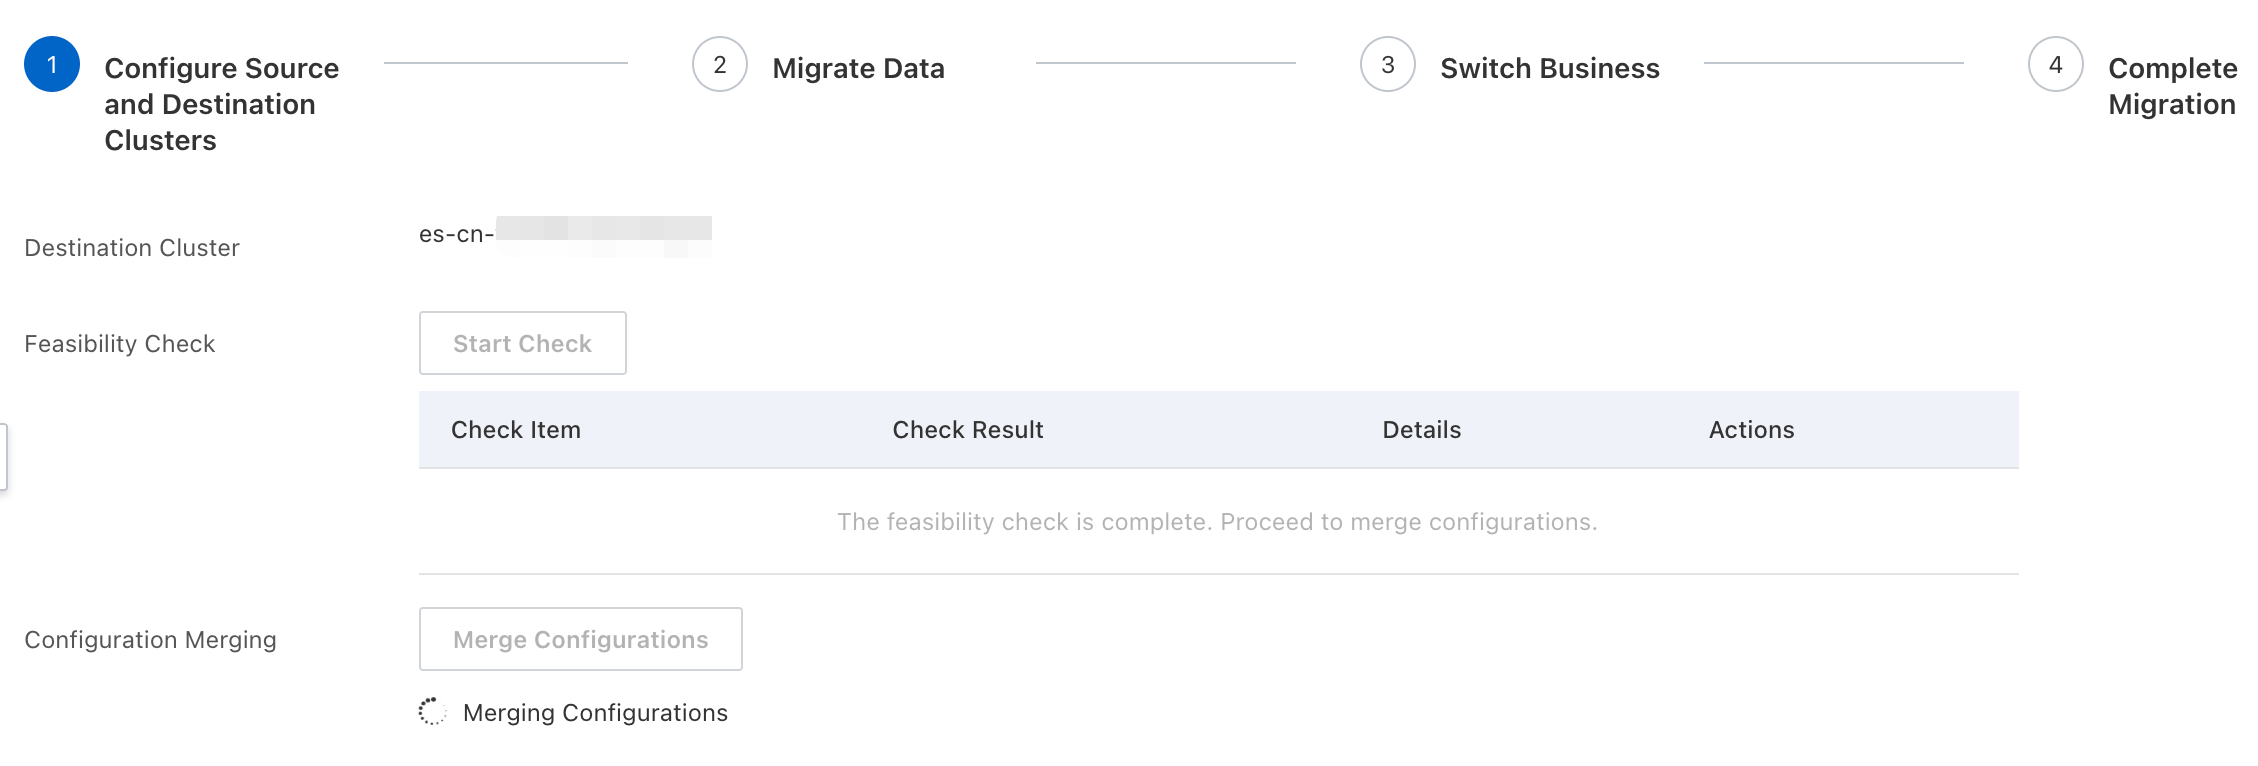
Feasibility check: Before the migration, the system automatically checks the network connectivity, version compatibility, and resource sufficiency of the source and destination clusters to ensure that the data migration is safe and feasible.
NoteIf the feasibility check fails, modify the configurations as prompted on the page.
Configure merging: The system automatically detects the configuration parameters of the source cluster, such as the number of replica shards, sharding strategy, and user permission configurations, and adapts them to the destination cluster. This ensures that the configuration parameters, resource allocation, and sharding strategy are seamlessly synchronized between the source and destination clusters. This enables a smooth migration and efficient operation.
NoteThis step takes about 20 minutes to complete. Please wait.
Migrate the data.
On the Data Migration tab, complete cluster merging, replica migration, master node migration, and primary shard migration in sequence, as shown in the following figure.

Operation
Description
Note
Cluster merging
The system merges the source and destination clusters into a single cluster. After the merge,
total nodes in the cluster = source cluster nodes + destination cluster nodes.After the clusters are merged, the Kibana console of the destination cluster is temporarily shut down. During the data migration, you can continue to use the Kibana console of the source cluster until the service is switched over.
Replica migration
The system migrates the index replica shards from the nodes of the source cluster to the nodes of the destination cluster.
If an unexpected failure occurs or your services are affected during the migration, you can perform a rollback. After the rollback, the current migration task cannot continue. You must create a new migration task.
Master node migration
The system migrates the master node in the merged cluster from the source cluster to the destination cluster.
The master node migration starts immediately after it is initiated. Rollback is not supported. Proceed with caution.
Primary shard migration
The system migrates the primary shards that store raw data from the nodes of the source cluster to the nodes of the destination cluster.
After the primary shard migration starts, rollback is not supported. Proceed with caution.
Switch services and perform network isolation.
In this step, you switch your services to the destination cluster. At the same time, you use network isolation to stop the source cluster from providing services.
Switch services.
On the Business Switch tab, follow the on-screen instructions to switch all query and write requests for your current business from the source cluster's domain name to the destination cluster's domain name. The destination cluster will then provide the related services.
Network isolation.
After the service switchover is complete, initiate a network isolation request to prevent the nodes of the source cluster from rejoining the destination cluster. This ensures that the source cluster no longer provides services.
NoteWhen the Take Offline Self-managed Cluster Nodes message appears, follow the prompts to take the self-managed cluster ECS nodes offline or shut down the ES process. (We recommend that you shut down the ES process by running the
kill -15 <ES process PID>command.) After the operation is complete, the system proceeds with the network isolation. This process takes approximately 20 minutes.
Complete the migration.
After network isolation is successful, the migration task is complete. Click Go to Instance List to view the instance details.
Step 3: Data validation
After the data migration task is complete, access the destination Alibaba Cloud Elasticsearch cluster from the Kibana console. Then, perform query or write operations to verify that the cluster works as expected.
What to do next
After the data migration is complete and you have verified the data, you can unpublish the self-managed Elasticsearch cluster.
References
For more information about how to migrate data from a self-managed Elasticsearch cluster, see Self-managed Elasticsearch data migration.
For more information about how to use an Alibaba Cloud Elasticsearch cluster, see Quick access and configuration.