You can use Alibaba Cloud CLI to call the Enterprise Distributed Application Service (EDAS) API. You can use EDAS SDKs to deploy Spring Cloud, Dubbo, and High-speed Service Framework (HSF) applications. This topic describes how to use Alibaba Cloud CLI to deploy a demo application in an Elastic Compute Service (ECS) cluster in the EDAS console.
Prerequisites
An ECS instance is created. For more information, see Create an ECS instance.
Install Alibaba Cloud CLI
Alibaba Cloud CLI is supported on macOS, Linux, and Windows operating systems.
For information about how to install Alibaba Cloud CLI on the preceding operating systems, see the following topics:
Specify the AccessKey pair
Before you use Alibaba Cloud CLI, run the aliyun configure command to specify the AccessKey pair, region, and language for your Alibaba Cloud account.
You can create and view your AccessKey pair on the Security Management page of the User Management console, or obtain the AccessKey pair from your system administrator.
aliyun configure
Configuring profile 'default' ...
Aliyun Access Key ID [None]: <Your AccessKey ID>
Aliyun Access Key Secret [None]: <Your AccessKey Secret>
Default Region Id [None]: cn-hangzhou
Default output format [json]: json
Default Language [zh]: zh
After the configuration is complete, the following information appears:
Configure Done!!!
..............888888888888888888888 ........=8888888888888888888D=..............
...........88888888888888888888888 ..........D8888888888888888888888I...........
.........,8888888888888ZI: ...........................=Z88D8888888888D..........
.........+88888888 ..........................................88888888D..........
.........+88888888 .......Welcome to use Alibaba Cloud.......O8888888D..........
.........+88888888 ............. ************* ..............O8888888D..........
.........+88888888 .... Command Line Interface(Reloaded) ....O8888888D..........
.........+88888888...........................................88888888D..........
..........D888888888888DO+. ..........................?ND888888888888D..........
...........O8888888888888888888888...........D8888888888888888888888=...........
............ .:D8888888888888888888.........78888888888888888888O ..............
Use Alibaba Cloud CLI to create an application
Run the following script to create an application in an ECS cluster:
#!/bin/bash

# The region in which you want to deploy the application.
REGION="cn-beijing"
# The ID of the ECS Instance.
ECS_ID="i-2z************b6"
# The ID of the virtual private cloud (VPC) to which the ECS instance belongs.
VPC_ID="vpc-t**********c"
# The name of the microservices namespace to which the application belongs. If no microservices namespace exists, the system automatically creates a microservices namespace.
NAMESPACE="myNamespace"
# The name of the ECS cluster in which the application resides. If no ECS cluster exists, the system automatically creates a cluster.
CLUSTER_NAME="myCluster"
# The name of the application. APP_NAME="myApp"

# Step 1: Create a microservices namespace.
aliyun edas InsertOrUpdateRegion --RegionTag $REGION:$NAMESPACE --RegionName $NAMESPACE --region $REGION --endpoint "edas.cn-beijing.aliyuncs.com" >> /dev/null

# Step 2: Create an ECS cluster.
CLUSTER_ID=`aliyun edas InsertCluster --ClusterName $CLUSTER_NAME --ClusterType 2 --NetworkMode 2 --VpcId $VPC_ID --logicalRegionId $REGION:$NAMESPACE --region $REGION --endpoint "edas.cn-beijing.aliyuncs.com" | sed -E 's/.*"ClusterId":"([a-z0-9-]*)".*/\1/g'`

# Step 3: Import an ECS instance.
aliyun edas TransformClusterMember --InstanceIds $ECS_ID --TargetClusterId $CLUSTER_ID --Password Hello1234 >> /dev/null
for i in `seq 300`
do
    OUT=`aliyun edas ListClusterMembers --ClusterId $CLUSTER_ID | grep EcuId` && break
    sleep 1
done
ECU_ID=`echo $OUT | sed -E 's/.*"EcuId":"([a-z0-9-]*)".*/\1/g'`

# Step 4: Create an application.
APP_ID=`aliyun edas InsertApplication --ApplicationName $APP_NAME --BuildPackId 51 --EcuInfo $ECU_ID --ClusterId $CLUSTER_ID --logicalRegionId $REGION:$NAMESPACE | sed -E 's/.*"AppId":"([a-z0-9-]*)".*/\1/g'`

printf "An application is created by CLI, App ID:"$APP_ID"\n"
Use Alibaba Cloud CLI to deploy the application
Run the following code in Alibaba Cloud CLI to deploy the application:
The values of the parameters in the following code are only for reference. Replace the values of the APP_ID and GROUP_ID parameters for the application with the actual values.
#!/bin/bash

# The ID of the application to be deployed. For more information, see Step 5 in this section.
APP_ID="87a6*********************4d1"
# The ID of the application group.
GROUP_ID="54b*********************f27"
# The name of the Object Storage Service (OSS) bucket to which you want to upload the deployment package. The OSS bucket must be publicly readable.
OSS_BUCKET="eda*****mo"
# The installation package, which is generated by your continuous integration system.
PACKAGE="hello-edas.war"
# The version number of the application. We recommend that you specify a timestamp.
VERSION=`date +%s`
# Step 1: Upload the deployment package to the OSS bucket.
ossutil cp -f $PACKAGE oss://$OSS_BUCKET/$PACKAGE >> /dev/null
PKG_URL=`ossutil sign oss://$OSS_BUCKET/$PACKAGE|head -1`

# Step 2: Send a request to deploy the application.
CO_ID=`aliyun edas DeployApplication --AppId $APP_ID --PackageVersion $VERSION  --DeployType url --WarUrl "${PKG_URL}" --GroupId $GROUP_ID | grep '.*"ChangeOrderId":' | sed -E 's/.*"ChangeOrderId":\s"([a-z0-9-]*)".*/\1/g'`

# Step 3: Wait until the deployment is complete.
for i in `seq 300`
do
    STATUS=`aliyun edas GetChangeOrderInfo --ChangeOrderId $CO_ID | grep '.*"PipelineStatus":' | sed -E 's/.*"PipelineStatus":\s(.).*/\1/g'`
    [[ 2 = ${STATUS} ]] && break
    sleep 1
done
To obtain the parameter values in the preceding code, perform the following steps:
Log on to the EDAS console.
In the left-side navigation pane, click . On the Applications page, click the name of the application that you want to deploy.
In the upper-right corner of the Basic Information tab, click Deploy.
On the Select Deployment Mode page, click Start Deployment next to Regular Release (Single-batch/Multi-batch).
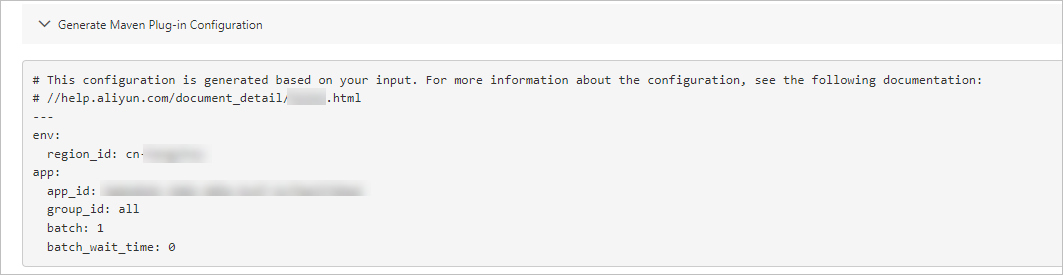
On the Regular Release (Single-batch/Multi-batch) page, click Generate Maven Plug-in Configuration to obtain the parameter values.
Verify the result
After the deployment is complete, perform the following steps to check whether the deployment is successful.
Log on to the EDAS console.
In the left-side navigation pane, choose .
Click the name of the deployed application, and then click the Instance Information tab next to Basic Information.
If the instance is in the Normal state, the deployment is successful.
NoteIf the application fails to be deployed, you can query the error codes of change processes to fix the error. For more information, see Error codes that may be returned in a change process.
References
DingTalk group for developer tools in EDAS
If you have questions or suggestions when you use developer tools in EDAS, submit a ticket. To give feedback, you can also join the DingTalk group by scanning the following QR code or searching for the DingTalk group ID 34556175.