Enterprise Distributed Application Service (EDAS) allows you to create and deploy applications in Elastic Compute Service (ECS) clusters. This guide walks you through creating an application, selecting a runtime environment, deploying a package, and exposing the application over the Internet.
Prerequisites
Before you begin, ensure that you have:
Activated Auto Scaling and authorized it to access other cloud services. For details, see Grant permissions to Auto Scaling
An ECS cluster. For details, see Create an ECS cluster in the EDAS console
Create and deploy the application
Log on to the EDAS console.
In the left-side navigation pane, choose Application Management > Applications.
In the top navigation bar, select the target region and microservices namespace. Click Create Application.
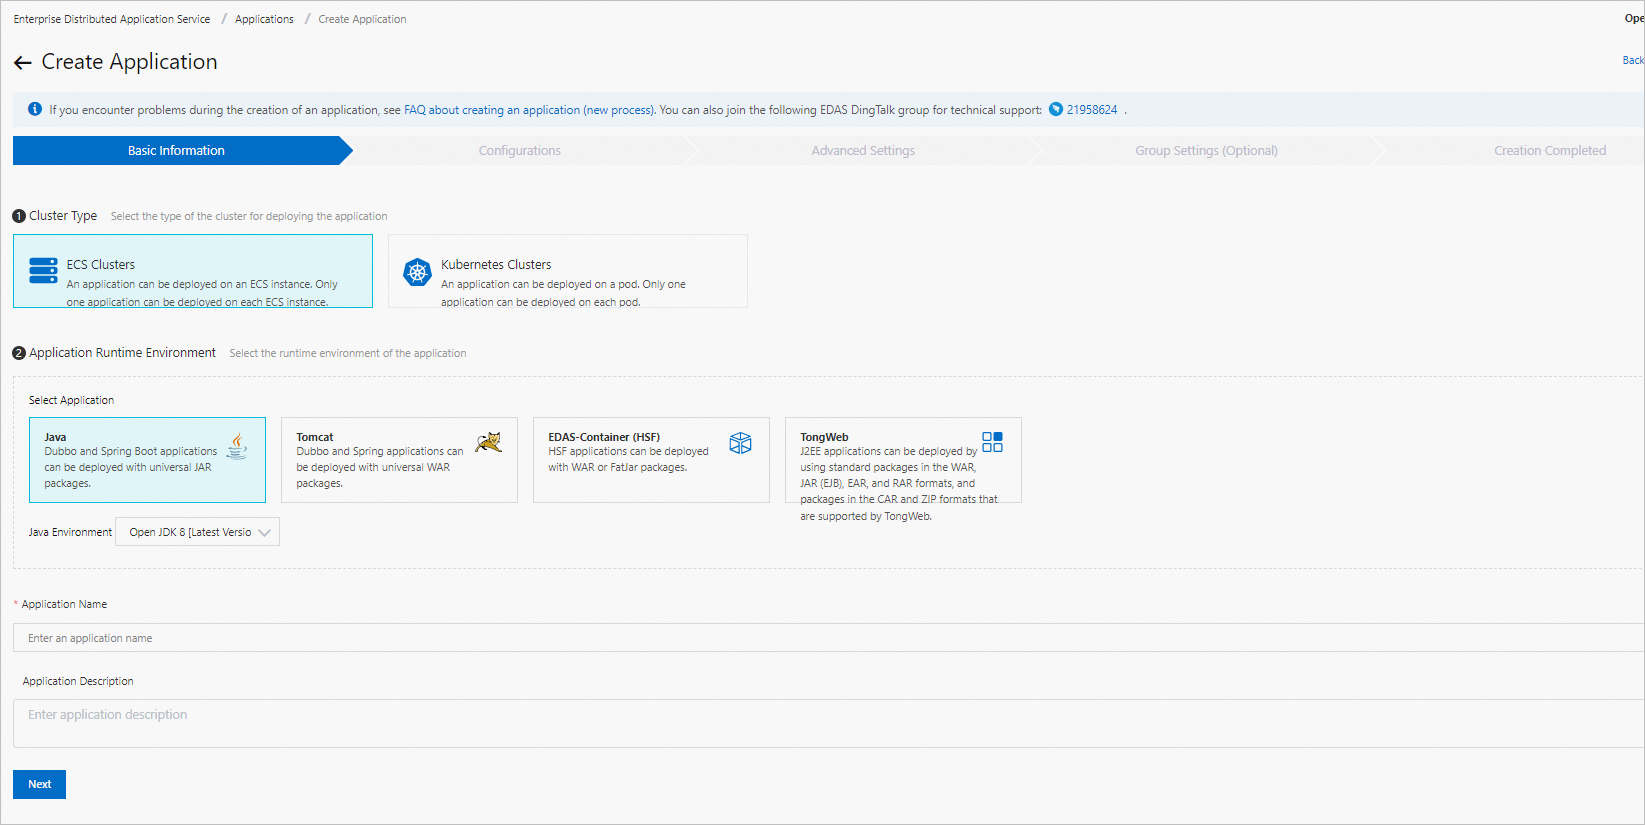
In the Basic Information step, configure the following parameters and click Next.
Parameter Description Cluster Type Select ECS Clusters. Application Runtime Environment Select the runtime based on your application framework and package type. See Select a runtime environment. Application Name Enter a name that starts with a letter. Valid characters: letters, digits, underscores (\_), and hyphens (-). Maximum length: 36 characters. Application Description Optional. Maximum length: 128 characters. In the Configurations step, specify the deployment package source and instance source, and click Next.
Parameter Description Source of Deployment Package Custom Program -- Upload a JAR, WAR, or deploy package from your local machine, or enter the public URL of a hosted package. Set the upload method in File Uploading Method. Official Demo -- Deploy a pair of application demos in the Spring Cloud, Apache Dubbo, or HSF framework. For details, see Get started with EDAS. Do Not Deploy -- Create the application record without deploying code. Instance Source Purchase Instance -- EDAS provisions new ECS instances. Use Existing Instance -- Select idle instances already in your cluster. Environment Default Environment -- Uses the default cluster and virtual private cloud (VPC) in the current region. Custom Environment -- Select a specific microservices namespace and cluster from the Microservices Namespace and Cluster drop-down lists. If none exist, click Create Microservices Namespace or Create Cluster to create them. Purchase Method (when purchasing new instances) Purchase Based on Recommended Specifications -- Select specifications, set Quantity and Logon Password, and accept Elastic Compute Service Terms of Service | Terms of Service for Images. Purchase Based on Existing Instance Specifications -- Select a template instance in the Select Template Instance section, configure Recycling Mode, Password, and Quantity, and accept the terms. Purchase Based on Instance Launch Template -- Select a launch template, configure Recycling Mode and Quantity, and accept the terms. In the Advanced Settings step, configure the Version and Application Health Check parameters, and click Create Application.
In the Creation Completed step, review the settings in Basic Information, Configurations, and Advanced Settings, and click Create Application.
Verify the deployment
On the Basic Information page, click View Details to open the Change Details page. The deployment takes a few minutes.
After the deployment finishes, go to the Instance Information tab. If the instance status shows Normal, the application is running.
Select a runtime environment
Select a runtime environment based on your application framework and packaging format.
Dubbo or Spring Cloud applications
JAR package:
Set Application Runtime Environment to Java.
From the Java Environment drop-down list, select a Java Development Kit (JDK) version.
To use a custom OpenJDK version, select Custom OpenJDK and enter the installation command. See Install a custom OpenJDK version.
OpenJDK 17 is compatible with Dubbo 2.7.14 and later or Dubbo 3.0.6 and later. See OpenJDK 17 compatibility for tested version combinations.
WAR package:
Set Application Runtime Environment to Tomcat.
From the Java Environment drop-down list, select a JDK version.
From the Container Version drop-down list, select an Apache Tomcat version.
Apache Tomcat is installed in the /home/admin/ directory by default. This directory cannot be changed.
HSF applications
Set Application Runtime Environment to EDAS-Container (HSF).
From the Java Environment drop-down list, select a JDK version.
From the Pandora Version drop-down list, select a Pandora version.
From the Ali-Tomcat Version drop-down list, select an Ali-Tomcat version.
Expose the application over the Internet
Applications deployed in a VPC do not have a public IP address by default. To make your application accessible over the Internet, bind an Internet-facing Server Load Balancer (SLB) instance to it.
EDAS enables session persistence for HTTP listeners. This feature cannot be disabled.
Log on to the EDAS console.
In the left-side navigation pane, choose Application Management > Applications.
In the top navigation bar, select the region and microservices namespace of your application. Filter by ECS Clusters in the Cluster Type drop-down list, and click the application name.
On the Basic Information tab, in the Application Settings section, click Add next to SLB (Internet).
In the Add Load Balancing (Public) dialog box, configure the SLB parameters. For details, see Configure a dedicated SLB instance for an application.
After the SLB instance is bound, copy the public IP address and port (for example, 39.XX.XX.65:81) and open it in a browser to access the application.
ECS instance configuration restrictions
Follow these restrictions when configuring ECS instances for your application:
Do not delete the admin user
Do not delete the
/home/adminconfigurationDo not stop the following processes:
/home/staragent/bin/staragentdcom.alibaba.edas.agent.AgentDaemon
Do not delete the following crontab entries:
bash /home/admin/edas-agent/bin/monitor.sh(root user crontab)bash /home/admin/edas-agent/bin/rotator.sh(admin user crontab)
Reserve enough free space on the root disk partition
If you use CentOS, make sure that yum repositories are correctly configured
For ECS instances with multiple network interface controllers (NICs) running a High-speed Service Framework (HSF) application, set the
-Dhsf.server.ipJVM parameter to specify the correct IP address. This applies when Docker or similar tools add extra NICs. For details, see Set JVM -D startup parametersKeep the system clock accurate within 15 seconds. A larger time drift disrupts communication with the EDAS registry
Install a custom OpenJDK version
EDAS runs the installation command you specify during ECS instance creation.
Available versions vary by OS image. The following example uses the aliyun_3_x64_20G_alibase_20210910.vhd image.
For ECS-deployed applications, install JDK and pass environment variables into java or jar commands. Verify the installation by running these commands in the CLI.
Query available OpenJDK 8 versions
Run one of the following commands on your ECS instance:
# Search for JRE packages
yum search --showduplicates java-1.8.0-openjdk

# Search for JDK packages
yum search --showduplicates java-1.8.0-openjdk | grep devel
Example output:
java-1.8.0-openjdk-1:1.8.0.292.b10-0.1.al8.x86_64 : OpenJDK 8 Runtime Environment
java-1.8.0-openjdk-1:1.8.0.302.b08-0.1.al8.x86_64 : OpenJDK 8 Runtime Environment
java-1.8.0-openjdk-1:1.8.0.312.b07-2.al8.x86_64 : OpenJDK 8 Runtime Environment
java-1.8.0-openjdk-1:1.8.0.322.b06-2.al8.x86_64 : OpenJDK 8 Runtime Environment
java-1.8.0-openjdk-1:1.8.0.272.b10-1.1.al8.x86_64 : OpenJDK Runtime Environment 8
Install a specific version
Install the desired OpenJDK 8 minor version and its development tools:
yum install -y java-1.8.0-openjdk-1:1.8.0.302.b08-0.1.al8.x86_64 java-1.8.0-openjdk-devel-1:1.8.0.302.b08-0.1.al8.x86_64Run java -version to confirm the installation. If the command returns an OpenJDK version, the installation succeeded.
OpenJDK 17 compatibility
The following table lists tested version combinations for OpenJDK 17 with Dubbo and Spring Boot.
| Dubbo version | Spring Boot version | Nacos client version | API call | ARMS monitoring | Service list |
|---|---|---|---|---|---|
| 2.7.14 | 2.7.9 | 1.4.4 | OK | OK | OK |
| 2.7.14 | 2.7.9 | 2.1.2 | OK | OK | OK |
| 2.7.14 | 2.7.9 | 2.2.0 | OK | OK | OK |
| 2.7.22 | 2.7.9 | 1.4.4 | OK | OK | OK |
| 2.7.22 | 2.7.9 | 2.1.2 | OK | OK | OK |
| 2.7.22 | 2.7.9 | 2.2.0 | OK | OK | OK |
| 3.0.6 | 2.7.9 | 1.4.4 | OK | OK | OK |
| 3.0.6 | 2.7.9 | 2.1.2 | OK | OK | OK |
| 3.0.6 | 2.7.9 | 2.2.0 | OK | OK | OK |
| 3.1.7 | 2.7.9 | 1.4.4 | OK | OK | OK |
| 3.1.7 | 2.7.9 | 2.1.2 | OK | OK | OK |
| 3.1.7 | 2.7.9 | 2.2.0 | OK | OK | OK |