Stream processing is crucial for real-time big data analytics. EMR Serverless Spark is a powerful, scalable platform that simplifies data processing by eliminating server management. This topic shows you how to use EMR Serverless Spark to submit a PySpark streaming job, highlighting its ease of use and maintainability for stream processing.
Prerequisites
You have created a workspace. For more information, see Create a workspace.
Procedure
Step 1: Create a Dataflow cluster and produce messages
-
On the EMR on ECS page, create a real-time Dataflow cluster that includes the Kafka service. For more information, see Create a cluster.
-
Log on to the master node of the EMR on ECS cluster. For more information, see Log on to a cluster.
-
Run the following command to change the directory:
cd /var/log/emr/taihao_exporter -
Run the following command to create a topic:
# Create a topic named taihaometrics with 10 partitions and a replication factor of 2. kafka-topics.sh --partitions 10 --replication-factor 2 --bootstrap-server core-1-1:9092 --topic taihaometrics --create -
Run the following command to send messages:
# Use kafka-console-producer to send messages to the taihaometrics topic.
tail -f metrics.log | kafka-console-producer.sh --broker-list core-1-1:9092 --topic taihaometrics
Step 2: Create a network connection
-
Go to the Network Connection page.
-
In the left-side navigation pane of the EMR console, choose .
-
On the Spark page, click the name of your target workspace.
-
On the EMR Serverless Spark page, click Normal Network Connection in the left-side navigation pane.
-
-
On the Normal Network Connection page, click Create Network Connection.
-
In the Create Network Connection dialog box, configure the following parameters and click OK.
Parameter
Description
Name
Enter a name for the connection. For example, connection_to_emr_kafka.
VPC
Select the VPC where your EMR on ECS cluster is deployed.
If no VPC is available, click Create VPC to go to the VPC console and create a VPC. For more information, see Create and manage a VPC.
vSwitch
Select the vSwitch that is in the same VPC as your EMR on ECS cluster.
If no vSwitch is available in the current zone, click vSwitch to go to the VPC console and create a vSwitch. For more information, see Create and manage a vSwitch.
When the Status is Succeeded, the network connection has been created.
Step 3: Add a security group rule
-
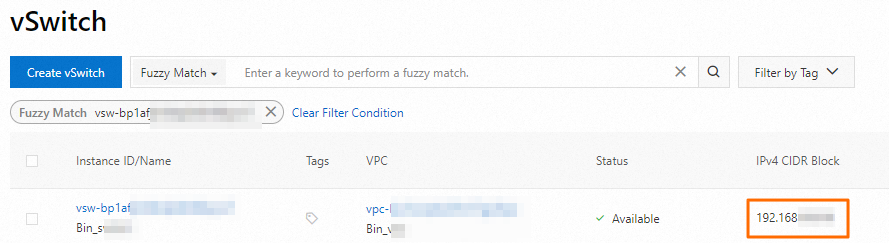
Obtain the vSwitch CIDR block for the cluster nodes.
On the Nodes page, click a node group name to find the associated vSwitch. Then, log on to the VPC console and find the vSwitch's CIDR block on the vSwitch page.
-
Add a security group rule.
-
On the Clusters page, click the ID of the target cluster.
-
On the Basic Information page, click the link next to Cluster Security Group.
-
On the Security Group Details page, in the Rules section, click Add Rule. Configure the following parameters and click OK.
Parameter
Description
Source
Enter the vSwitch CIDR block from the previous step.
ImportantDo not set this to 0.0.0.0/0, as it exposes the cluster to external access.
Destination (current instance)
Enter port 9092.
-
Step 4: Upload JAR packages to OSS
Extract kafka.zip and upload all JAR packages in the archive to OSS. For more information, see Simple upload.
Step 5: Upload the resource file
-
On the EMR Serverless Spark page, click Artifacts in the left-side navigation pane.
-
On the Artifacts page, click Upload File.
-
In the Upload File dialog box, click the upload area and select the pyspark_ss_demo.py file.
Step 6: Create and start a streaming job
-
On the EMR Serverless Spark page, click Development in the left-side navigation pane.
-
On the Development tab, click the
 icon.
icon. -
Enter a name, select as the job type, and then click OK.
-
In the new development tab, configure the following parameters, accept the defaults for the others, and then click Save.
Parameter
Description
Main Python Resources
Select the pyspark_ss_demo.py file that you uploaded on the Resource Upload page in the previous step.
Engine Version
Select the Spark version. For more information, see Engine versions.
Execution Parameters
Enter the internal IP address of the cluster's core-1-1 node. You can find this IP on the Nodes page, within the Core node group.
Spark Configuration
Specify the Spark configurations. The following is an example.
spark.jars oss://path/to/commons-pool2-2.11.1.jar,oss://path/to/kafka-clients-2.8.1.jar,oss://path/to/spark-sql-kafka-0-10_2.12-3.3.1.jar,oss://path/to/spark-token-provider-kafka-0-10_2.12-3.3.1.jar spark.emr.serverless.network.service.name connection_to_emr_kafkaNote-
spark.jars: The OSS paths of the required external JAR packages. Replace the example paths with the OSS paths to the JARs you uploaded in Step 4. -
spark.emr.serverless.network.service.name: The name of the network connection. Replace the example value with the name of your network connection from Step 2.
-
-
Click Publish.
-
In the Publish dialog box, click OK.
-
Start the streaming job.
-
Click Go to O&M.
-
Click START.
-
Step 7: View the logs
-
Click the Log Exploration tab.
-
On the Log Exploration tab, view application execution details and results.

Related topics
For a PySpark development workflow example, see PySpark development quick start.