Elasticsearch-Hadoop (ES-Hadoop) is a tool developed by open source Elasticsearch. It connects Elasticsearch to Apache Hadoop and enables data transmission between them. ES-Hadoop combines the quick search capability of Elasticsearch and the batch processing capability of Hadoop to achieve interactive data processing. This topic describes how to use ES-Hadoop to enable Hive to write data to and read data from Alibaba Cloud Elasticsearch and helps you combine Elasticsearch with Hadoop to implement more flexible data analytics.
Background information
Hadoop can handle large datasets. However, when it is used for interactive analytics, a high latency occurs. Elasticsearch has an advantage over Hadoop in interactive analytics. It can respond to queries, especially ad hoc queries, within seconds. ES-Hadoop combines the advantages of Hadoop and Elasticsearch. ES-Hadoop allows you to make only a few code modifications to process the data that is stored in Elasticsearch. ES-Hadoop also provides an accelerated query experience.
ES-Hadoop uses Elasticsearch as a data source of data processing engines, such as MapReduce, Spark, and Hive. ES-Hadoop also uses Elasticsearch as storage in a computing-storage separation architecture. Elasticsearch works in a similar way to other data sources of MapReduce, Spark, and Hive. However, Elasticsearch can select and filter data in a more rapid manner. This is critical to an analytics engine.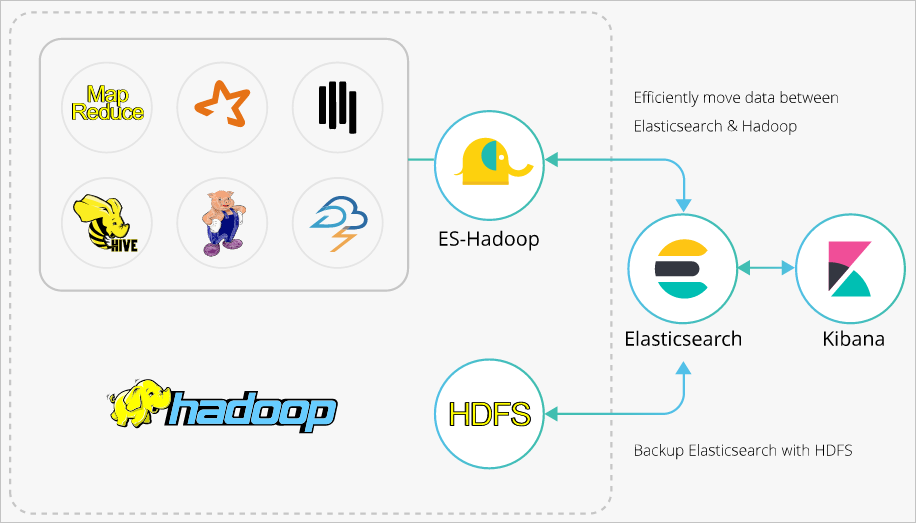
For more information about the advanced configurations of ES-Hadoop and Hive, see the documentation of open source Elasticsearch.
Procedure
Create an Alibaba Cloud Elasticsearch cluster and an E-MapReduce (EMR) cluster in the same virtual private cloud (VPC), disable the Auto Indexing feature for the Elasticsearch cluster, create an index in the Elasticsearch cluster, and configure mappings for the index.
Step 1: Upload the ES-Hadoop JAR package to HDFS
Download the ES-Hadoop package that is compatible with the version of the Elasticsearch cluster, and upload the ES-Hadoop package to the HDFS directory on the master node of the EMR cluster.
Step 2: Create a Hive external table
Create a Hive external table and map the fields in the table with those in the index of the Elasticsearch cluster.
Step 3: Use Hive to write data to the index
Use HiveSQL to write data to the index of the Elasticsearch cluster.
Step 4: Use Hive to read data from the index
Use HiveSQL to read data from the index of the Elasticsearch cluster.
Make preparations
Create an Alibaba Cloud Elasticsearch cluster.
In this example, an Elasticsearch V6.7.0 cluster is created. For more information, see Create an Alibaba Cloud Elasticsearch cluster.
Disable the Auto Indexing feature for the cluster, create an index in the cluster, and configure mappings for the index.
If you enable the Auto Indexing feature for the cluster, the index that is automatically created by the Elasticsearch cluster may not meet your requirements. For example, you define the age field of the INT data type and enable the Auto Indexing feature. In this case, the data type of the age field may become LONG in the index. Therefore, we recommend that you disable the Auto Indexing feature. An index named company is created in this example. The following code shows this index and its mappings:
PUT company
{
  "mappings": {
    "_doc": {
      "properties": {
        "id": {
          "type": "long"
        },
        "name": {
          "type": "text",
          "fields": {
            "keyword": {
              "type": "keyword",
              "ignore_above": 256
            }
          }
        },
        "birth": {
          "type": "text"
        },
        "addr": {
          "type": "text"
        }
      }
    }
  },
  "settings": {
    "index": {
      "number_of_shards": "5",
      "number_of_replicas": "1"
    }
  }
}
Create an EMR cluster that resides in the same VPC as the Elasticsearch cluster.
ImportantBy default, 0.0.0.0/0 is specified in the private IP address whitelist of the Elasticsearch cluster. You can view the whitelist configuration on the cluster security configuration page. If the default setting is not used, you must add the private IP address of the EMR cluster to the whitelist.
For more information about how to obtain the private IP address of an EMR cluster, see View the cluster list and cluster details.
For more information about how to configure a private IP address whitelist for an Elasticsearch cluster, see Configure a public or private IP address whitelist for an Elasticsearch cluster. The IP addresses in the whitelist can be used to access the Elasticsearch cluster over a VPC.
Step 1: Upload the ES-Hadoop JAR package to HDFS
Download an ES-Hadoop package that is compatible with the version of the Elasticsearch cluster.
The elasticsearch-hadoop-6.7.0.zip package is used in this example.
Log on to the EMR console and obtain the IP address of the master node of the EMR cluster. Then, use SSH to log on to the Elastic Compute Service (ECS) instance that is indicated by the IP address.
For more information, see Log on to a cluster.
Upload the elasticsearch-hadoop-6.7.0.zip package to the master node, and decompress the package to obtain the elasticsearch-hadoop-hive-6.7.0.jar file.
Create an HDFS directory and upload the elasticsearch-hadoop-hive-6.7.0.jar file to the directory.
hadoop fs -mkdir /tmp/hadoop-es
hadoop fs -put elasticsearch-hadoop-6.7.0/dist/elasticsearch-hadoop-hive-6.7.0.jar /tmp/hadoop-es
Step 2: Create a Hive external table
On the Data Platform tab of the EMR console, create a HiveSQL job.
For more information, see Configure a Hive SQL job.
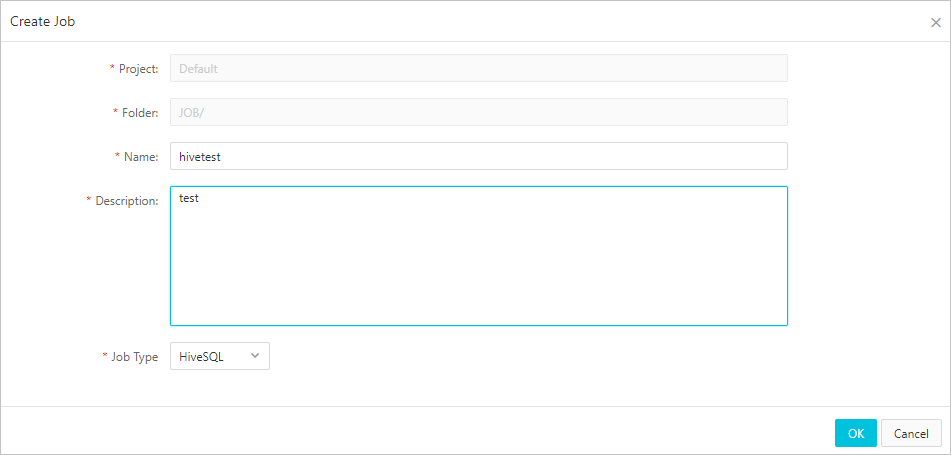
Configure the job and create a Hive external table.
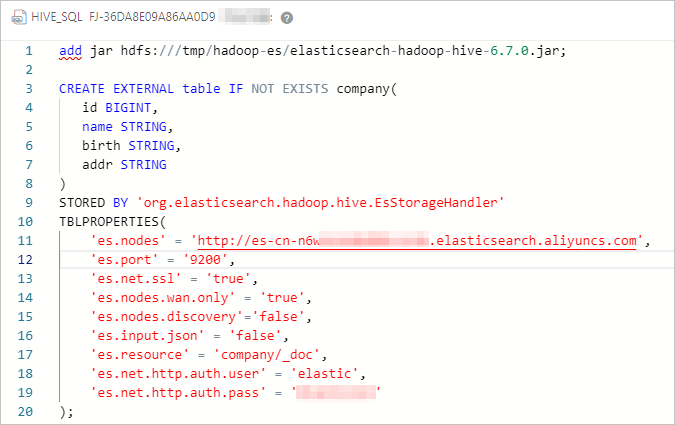
The following code shows the configuration of the job:
####Add a JAR file, which is valid only for the current session.########
add jar hdfs:///tmp/hadoop-es/elasticsearch-hadoop-hive-6.7.0.jar;
####Create a Hive external table and map the table with the index of the Elasticsearch cluster.####
CREATE EXTERNAL table IF NOT EXISTS company(
   id BIGINT,
   name STRING,
   birth STRING,
   addr STRING
)
STORED BY 'org.elasticsearch.hadoop.hive.EsStorageHandler'
TBLPROPERTIES(
    'es.nodes' = 'http://es-cn-mp91kzb8m0009****.elasticsearch.aliyuncs.com',
    'es.port' = '9200',
    'es.net.ssl' = 'true',
    'es.nodes.wan.only' = 'true',
    'es.nodes.discovery'='false',
    'es.input.use.sliced.partitions'='false',
    'es.input.json' = 'false',
    'es.resource' = 'company/_doc',
    'es.net.http.auth.user' = 'elastic',
    'es.net.http.auth.pass' = 'xxxxxx'
);
Table 1. ES-Hadoop parameters
Parameter
Default value
Description
es.nodes
localhost
The endpoint that is used to access the Elasticsearch cluster. We recommend that you use the internal endpoint. You can obtain the internal endpoint on the Basic Information page of the Elasticsearch cluster. For more information, see View the basic information of a cluster.
es.port
9200
The port number that is used to access the Elasticsearch cluster.
es.net.http.auth.user
elastic
The username that is used to access the Elasticsearch cluster.
NoteIf you use the elastic account to access your Elasticsearch cluster and reset the password of the account, it may require some time for the new password to take effect. During this period, you cannot use the elastic account to access the cluster. Therefore, we recommend that you do not use the elastic account to access an Elasticsearch cluster. You can log on to the Kibana console and create a user with the required role to access an Elasticsearch cluster. For more information, see Use the RBAC mechanism provided by Elasticsearch X-Pack to implement access control.
es.net.http.auth.pass
/
The password that is used to access the Elasticsearch cluster.
es.nodes.wan.only
false
Specifies whether to enable node sniffing when the Elasticsearch cluster uses a virtual IP address for connections. Valid values:
true: enables node sniffing.
false: disables node sniffing.
es.nodes.discovery
true
Specifies whether to enable the node discovery mechanism. Valid values:
true: enables the node discovery mechanism.
false: disables the node discovery mechanism.
ImportantIf you use Alibaba Cloud Elasticsearch, you must set this parameter to false.
es.input.use.sliced.partitions
true
Specifies whether to use partitions. Valid values:
true: uses partitions. In this case, more time may be required for the index read-ahead phase. The time required for this phase may be longer than the time required for data queries. To improve query efficiency, we recommend that you set this parameter to false.
false: does not use partitions.
es.index.auto.create
true
Specifies whether the system creates an index in the Elasticsearch cluster when you use ES-Hadoop to write data to the cluster. Valid values:
true: The system creates an index in the Elasticsearch cluster.
false: The system does not create an index in the Elasticsearch cluster.
es.resource
/
The name and type of the index on which data read or write operations are performed.
es.mapping.names
/
The mappings between the field names in the table and those in the index of the Elasticsearch cluster.
es.read.metadata
false
Specifies whether to include the document metadata such as _id in the results. To include the document metadata, set the value to true.
For more information about the configuration items of ES-Hadoop, see open source ES-Hadoop configuration.
Save and run the job.
If the job is successfully run, the result shown in the following figure is returned.

Step 3: Use Hive to write data to the index
Create a HiveSQL data write job.
The following code shows the configuration of the job:
add jar hdfs:///tmp/hadoop-es/elasticsearch-hadoop-hive-6.7.0.jar;
INSERT INTO TABLE company VALUES (1, "zhangsan", "1990-01-01","No.969, wenyixi Rd, yuhang, hangzhou");
INSERT INTO TABLE company VALUES (2, "lisi", "1991-01-01", "No.556, xixi Rd, xihu, hangzhou");
INSERT INTO TABLE company VALUES (3, "wangwu", "1992-01-01", "No.699 wangshang Rd, binjiang, hangzhou");
Save and run the job.

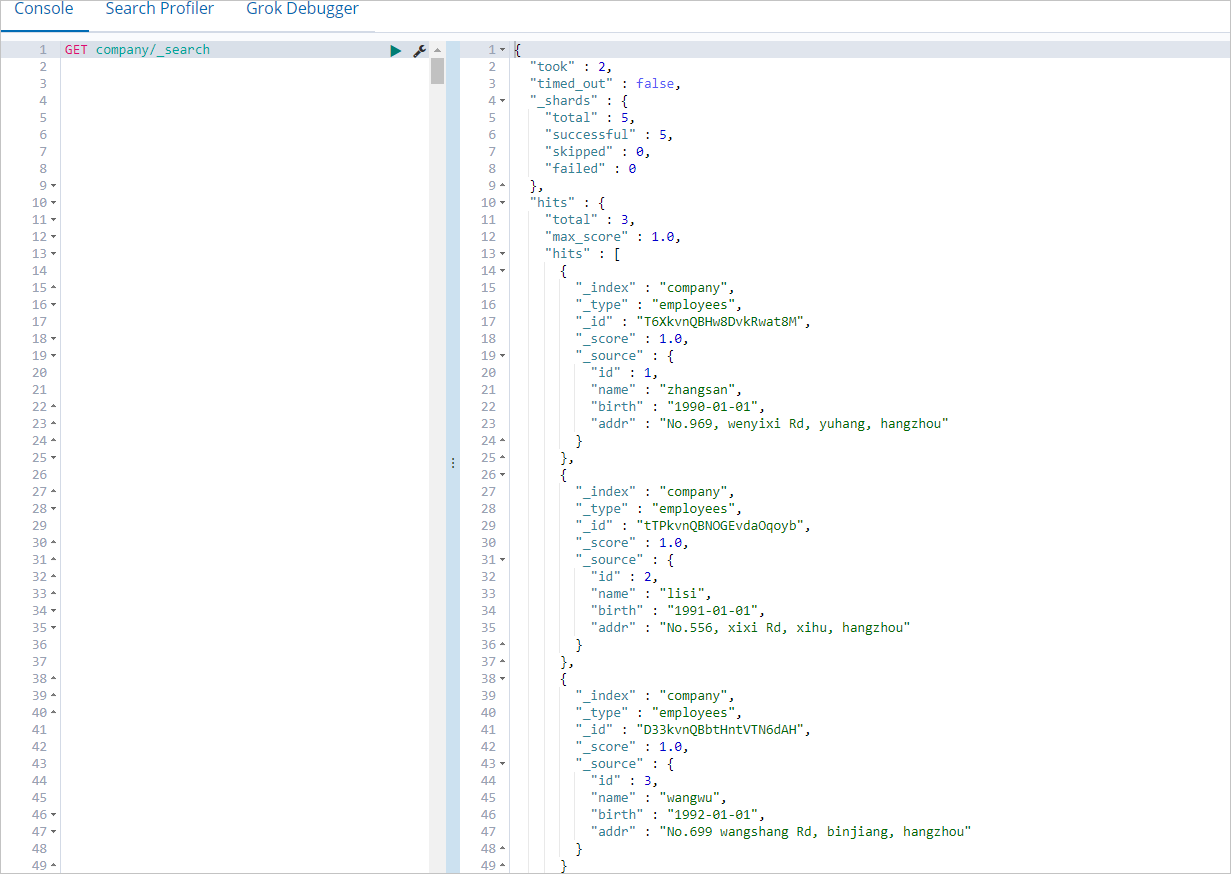
If the job is successfully run, log on to the Kibana console of the Elasticsearch cluster and query the data in the company index.
For more information about how to log on to the Kibana console, see Log on to the Kibana console. You can run the following command to query the data in the company index:
GET company/_searchIf the command is successfully run, the result shown in the following figure is returned.
Step 4: Use Hive to read data from the index
Create a HiveSQL data read job.
The following code shows the configuration of the job:
add jar hdfs:///tmp/hadoop-es/elasticsearch-hadoop-hive-6.7.0.jar;
select * from company;
Save and run the job.

FAQ
Q: What do I do if the following error message is reported when Hive reads data from and writes data to Elasticsearch?
FAILED: Execution Error, return code -101 from org.apache.hadoop.hive.ql.exec.mr.MapRedTask. Could not initialize class org.elasticsearch.hadoop.rest.commonshttp.CommonsHttpTransport.
A: The error message is reported because the commons-httpclient-3.1.jar file does not exist for the Hive component in your EMR V5.6.0 cluster. To resolve this issue, manually add the file to the lib directory of Hive. For more information, see commons-httpclient-3.1.