ID Verification provides a plugin for the UniApp platform. You can use this plugin to add the eKYC remote identity verification feature to your UniApp application. This topic describes the UniApp integration process and provides code examples.
Before you begin
Some developers have created third-party plugins by encapsulating the Alibaba Cloud ID Verification software development kit (SDK). These plugins are sold on various platforms. Alibaba Cloud is not responsible for and assumes no legal liability for any issues that arise from using these unofficial plugins or services. To ensure stability and security, use the official Alibaba Cloud SDK.
Configure dependencies
To integrate the UniApp plugin, see the DCloud official documentation or follow these steps.
Download the UniApp SDK and decompress it to the `nativePlugins` directory in your project.

Import the local plugin.
In the manifest.json file, click App Native Plugin Configuration.
In the App Native Plugin Configuration section, click Select Local Plugin.
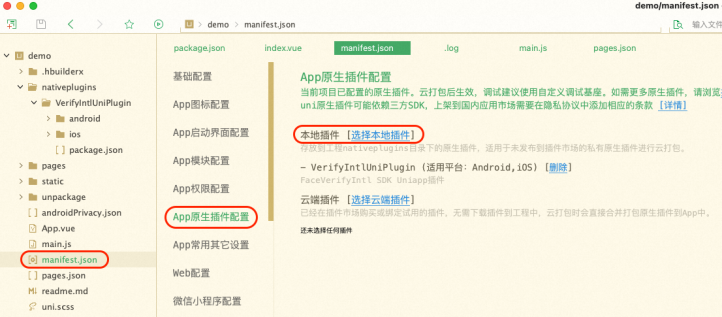
In the Select Local Plugin dialog box, select the plugin to package.
Create a custom debug base.
To create a custom debug base, choose in the manifest.json file.
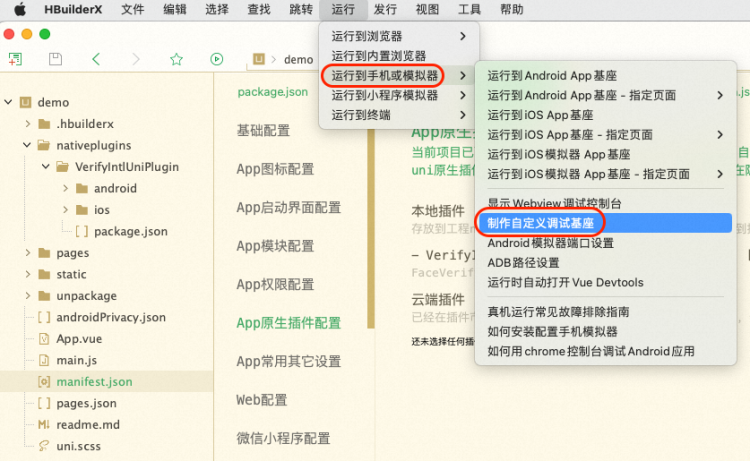
To set a custom debug base, in the manifest.json file, choose .
NoteTo package the release version, choose .

Call the service
Call the
initWithOptionsmethod to initialize the SDK. This method accepts the options parameter as a JSON object.options: Specifies optional parameters for information collection. This parameter is optional. The optional parameters are as follows:
NoteThe ID Verification client has a built-in Device Guard security module. To meet data collection compliance requirements in different regions, it provides different data reporting sites. You can set CustomUrl and CustomHost to specify a reporting site based on user attributes.
Note: You can specify only one reporting site within a single application session lifecycle. The server query region must match the reporting site.
Specify a reporting site:
Singapore site (default):
https://cloudauth-device.ap-southeast-1.aliyuncs.comIndonesia site:
https://cloudauth-device.ap-southeast-5.aliyuncs.comUS West (Silicon Valley):
https://cloudauth-device.us-west-1.aliyuncs.comGermany (Frankfurt):
https://cloudauth-device.eu-central-1.aliyuncs.comChina (Hong Kong):
https://cloudauth-device.cn-hongkong.aliyuncs.com
For more information about the regions supported by product servers, see Supported regions.
Field name
Description
Example
IPv6
Specifies whether to use an IPv6 domain name to report device information:
0 (default): No (use an IPv4 domain name)
1: Yes (use an IPv6 domain name)
"1"
DataSwitch
The timing for reporting device information.
0 (default): At initialization
1: When getting the token
NoteWe recommend using the default configurations.
"1"
CustomUrl
Sets the data reporting server domain name.
"https://cloudauth-device.ap-southeast-1.aliyuncs.com"
CustomHost
Sets the data reporting server host.
"cloudauth-device.ap-southeast-1.aliyuncs.com
Call the `getMetaInfo` function to retrieve the MetaInfo data. Pass this value when you call the ID Verification server to start a verification request.
To start the verification, call the `startVerify` function and pass the transactionId. You can obtain the transactionId by calling the server-side Initialize API.
Call the
startVerify()interface to initiate a verification request.The `startVerify()` interface has the following parameters:
transactionId: A required parameter.
extParams: Optional extension parameters.
The following example shows how to pass parameters:
// For Android,
aliyunVerify.startVerify({
  transactionId:"<verification_id>",// Enter the transactionId obtained from the server.
  SdkLanguage:"cn"// Pass the fields in the extension parameters.
}, function(t){
  console.log(t)
});

// Response format
{
  code:1000,				 // Error code
  message:"CODE_VERIFY_SUCCESS"		// Error code description
}
Call the
setCustomUI()interface to customize UI colors.params: Pass the data in JSON format. For more information about UI customization configurations, see the documentation for the native SDKs:
Complete code example
<template>
  <view class="button-sp-area">
  <button type="primary" plain="true" @click="init">init</button>
  <button type="primary" plain="true" @click="getMetaInfo">getMetaInfo</button>
  <button type="primary" plain="true" @click="verify">verify</button>
  <button type="primary" plain="true" @click="setCustomUi">setCustomUi</button>

  </view>
</template>

<script>
const aliyunVerify = uni.requireNativePlugin('VerifyIntlUniPlugin');

export default {
  data() {
    return {
      title: ''
    }
  },
  onLoad() {

  },
  methods: {
    init:function() {
      console.log("init");
      const json={
        CustomUrl:"https://cloudauth-device.ap-southeast-5.aliyuncs.com",
        CustomHost:"cloudauth-device.ap-southeast-5.aliyuncs.com"
      };
      aliyunVerify.initWithOptions(json);
    },
    getMetaInfo:function() {
      console.log("getMetaInfo");
      var t = aliyunVerify.getMetaInfo();
      console.log(t);
      uni.showToast({
        title: t,
        icon: 'none'
      });
    },
    setCustomUi:function(){
      const json={
        faceConfig:{faceBGColor:"#FF00FF"}
      };
      var t = aliyunVerify.setCustomUI(JSON.stringify(json));
      console.log("setCustomUi"+t);
    },
    verify:function(){
      console.log("Face Verify");
      aliyunVerify.startVerify({
          transactionId:"xxxxx",// Verification ID
        },
       function(t){
         console.log(t);
         const msg = JSON.stringify(t);
         console.log(msg);
         // uni.showToast({
         // 	title: t,
         // 	icon: 'none'
         // });
       });
    }
  }
}
</script>
<style>
button {
  margin-top: 30upx;
  margin-bottom: 30upx;
}

.button-sp-area {
  margin: 0 auto;
  width: 60%;
}

.content {
  text-align: center;
  height: 400upx;
}

.wrapper {
  flex-direction: column;
  justify-content: center;
}

.button {
  width: 200px;
  margin-top: 30px;
  margin-left: 20px;
  padding-top: 20px;
  padding-bottom: 20px;
  border-width: 2px;
  border-style: solid;
  border-color: #458B00;
  background-color: #458B00;
}

.text {
  font-size: 30px;
  color: #666666;
  text-align: center;
}
</style>
You can also download the UniApp Demo to view a complete example.
This demo code is provided for integration reference only. Ensure that you use the latest SDK version for your application.
Error codes
Error code | Description |
1000 | Verification successful. This result is for reference only. Call the server-side CheckResult API to get the final verification result. |
1001 | Verification failed. To get detailed failure reasons, call the server-side CheckResult API. |
1002 | System error. |
1003 | SDK initialization failed. Check if the client time is correct. |
1004 | Camera permission error. Try the following steps to resolve the issue:
|
1005 | Network error. |
1006 | User exited. |
1007 | Invalid TransactionId. |
1009 | Client timestamp error. |
1011 | Incorrect certificate type submitted. |
1012 | Key information from the detected certificate is missing or the format check failed. |
1013 | Poor image quality. |
1014 | The number of errors exceeded the upper limit. |
1015 | The Android system version is too low. |
1016 | Camera permission not granted. |