When an application runs on multiple Elastic Compute Service (ECS) instances, it needs a single entry point for external traffic. Binding a dedicated Server Load Balancer (SLB) instance to the application provides a stable IP address, distributes traffic across all instances, and isolates the load balancer's bandwidth and capacity for that application alone.
How it works
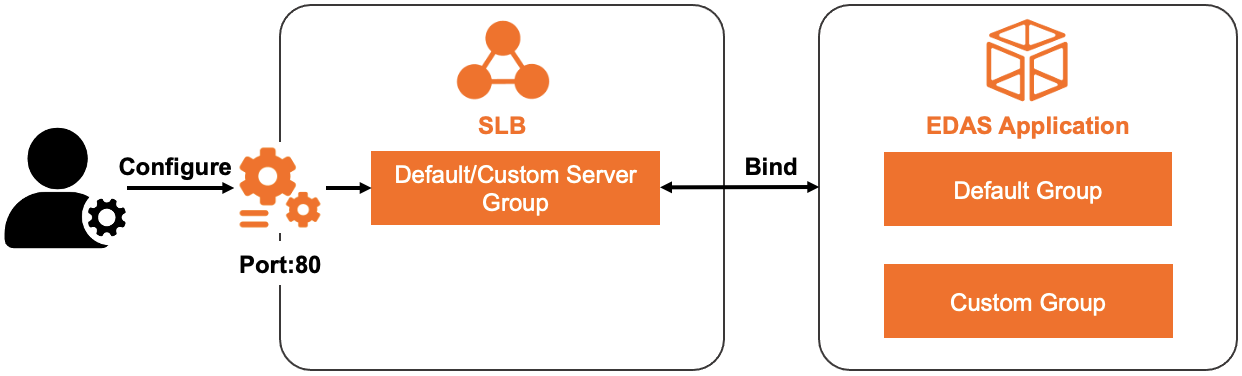
When you bind an SLB instance to an application in the Enterprise Distributed Application Service (EDAS) console, EDAS automatically:
Creates a vServer group for the application.
Adds all ECS instances of the application to the vServer group.
Routes inbound traffic from the SLB instance's IP address to these instances.
Each SLB instance serves one application exclusively. The queries per second (QPS) the application can handle depends on the SLB instance's specifications.
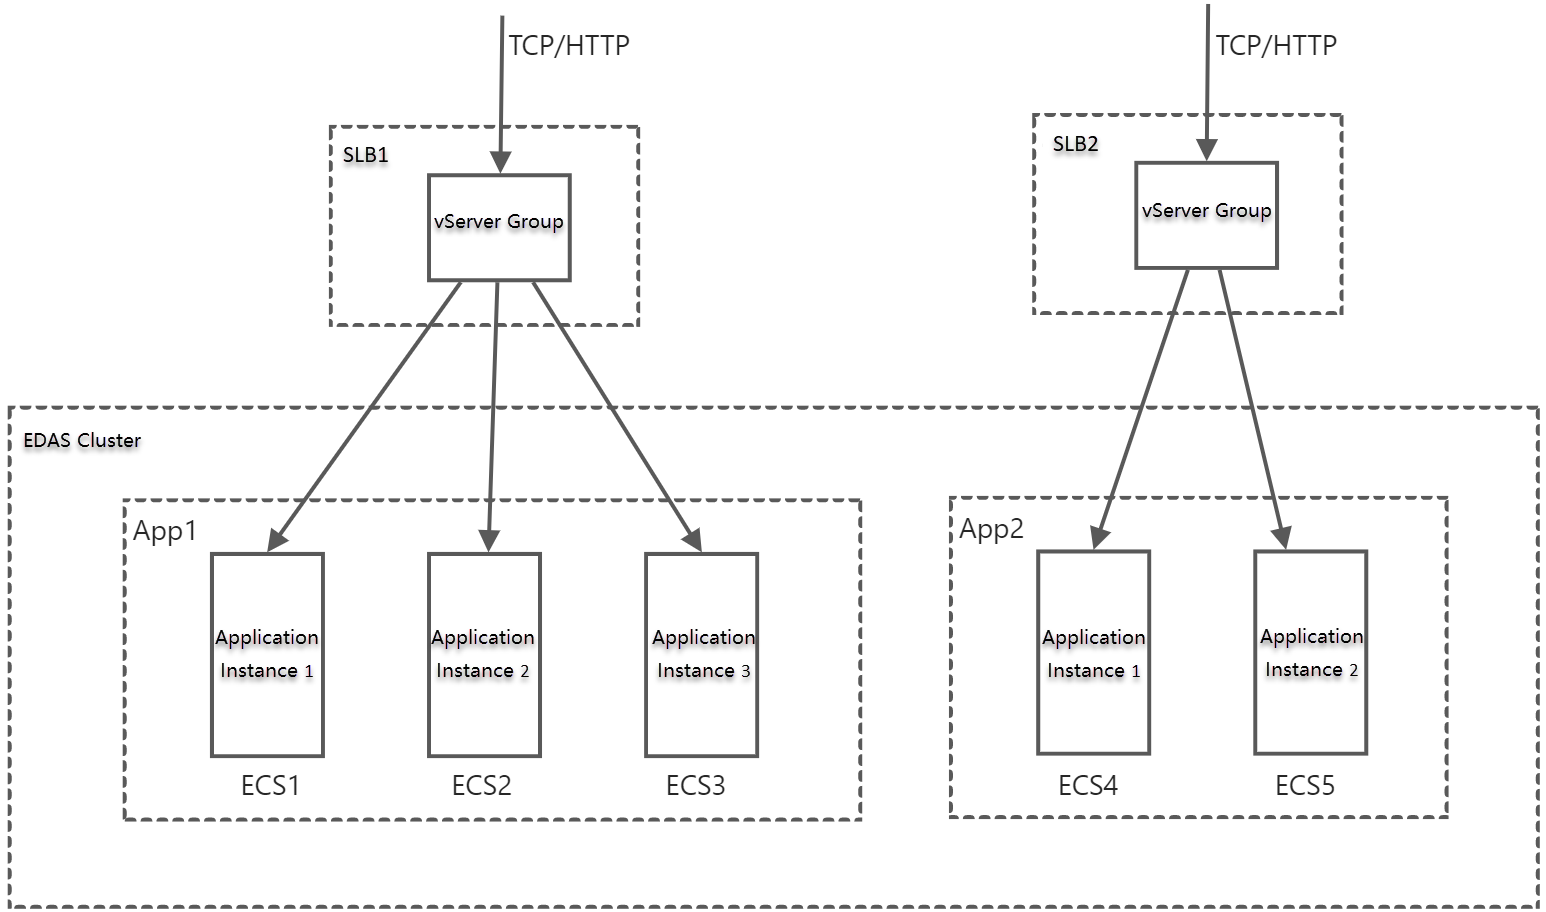
For example, in an EDAS cluster where App1 is deployed on three instances and App2 is deployed on two instances, you can bind a separate SLB instance to each application.
ALB vs CLB
EDAS supports two SLB types. Choose based on your requirements:
| Capability | ALB | CLB |
|---|---|---|
| Listener configuration | Select an existing listening port only | Select an existing port or create a new listener |
| vServer group configuration | Select an existing vServer group only | Use default, select existing, or create a new vServer group |
| Best for | Applications that already have ALB listeners and vServer groups configured | Applications that need new listeners or vServer groups created during binding |
Prerequisites
Before you begin, make sure that you have:
An SLB instance (ALB or CLB). To create one, see Create a CLB instance
An application deployed on an ECS cluster in EDAS
Bind an SLB instance to an application
Log on to the EDAS console.
In the left-side navigation pane, choose Application Management > Applications.
On the Applications page, select a region in the top navigation bar and select an option from the Microservice Namespace drop-down list. From the Cluster Type drop-down list, select ECS Clusters. Click the name of the target application.
In the Application Settings section of the Basic Information page, click Add next to SLB (Internet).
NoteIf an SLB instance is already bound, its IP address and port are displayed. Click Modify to change the configuration, or click Unbind to remove the binding.
In the AddLoad Balancing (Public) wizard, complete the following steps:
Step 1: Select an SLB instance
Set SLBType to ALB or CLB, select the SLB instance from the SLB (Internet) drop-down list, and click Next.
Step 2: Configure a listener
Configure a listening port for the SLB instance and click Next.
The available options depend on the SLB type:
ALB: Select an existing listening port only.
CLB: Select Select Existing Listening Port to reuse a configured port, or select Add Listening Port to create a listener with the following parameters:
| Parameter | Description |
|---|---|
| Protocol | The protocol for forwarding inbound requests to backend servers. ECS clusters support TCP and HTTP. TCP suits scenarios that require high reliability and data accuracy but medium data transfer speed, such as file transfers, emails, and remote logons. HTTP suits applications that need to inspect data content, such as web applications and small mobile games. For details, see Listener overview and Create a listener. |
| Frontend Port Number | The port on which the SLB instance receives external traffic. |
| Health Check Path (URI) | The URI for checking backend server health. Default: /_ehc.html. Displayed only when Protocol is set to HTTP. For details, see Configure and manage health checks. |
| Backend Port Number | The application port. This value is fixed. |
Step 3: Configure a vServer group
Configure a vServer group for the SLB instance and click Next.
A forwarding policy is not required when you configure a dedicated SLB instance for an application.
The available options depend on the SLB type:
ALB: Select an existing vServer group only.
CLB: Choose one of the following options:
Default vServer group (recommended for dedicated SLB instances). The default vServer group does not support forwarding policies.
Existing VServer Group: Select a vServer group that is already configured for the SLB instance.
ImportantImportant: A vServer group can be associated with only one application or application group.
Create VServer Group: Specify a VServer Group Name to create a new vServer group.
Step 4: Confirm
Review the SLB instance settings and click Confirm.
Verify the result
On the Basic Information tab, go to the Application Settings section and copy the IP:Port value next to SLB (Internet). For example:
115.28.XX.XX:80. If IP:Port does not appear, the binding failed. Check the change records to identify the cause. For details, see View application changes.Paste the IP:Port value into a browser address bar and verify that the application is accessible.
The steps above use an Internet-facing Application Load Balancer (ALB) instance as an example. For an internal-facing SLB instance, verify access from within the internal network.
Configuration summary
Use this table to review your configuration at a glance:
| Setting | Value |
|---|---|
| SLB type | ALB or CLB |
| SLB instance | (Selected from SLB (Internet) drop-down list) |
| Protocol (CLB only) | TCP or HTTP |
| Frontend port | (Port for external traffic) |
| Health check path (HTTP only) | Default: /_ehc.html |
| Backend port | (Fixed application port) |
| vServer group | Default (recommended), existing, or new (CLB); existing only (ALB) |
What's next
View application changes to monitor the binding status
Configure health checks and adjust listener settings to match your application's requirements