Serverless Kubernetes supports pod-granularity elasticity and has the benefits of startup within seconds, billing by second, and starting 2,000 pods per minute. A large number of users are using serverless Kubernetes to run Argo workflows. This topic describes how to use elastic container instances to run Argo workflows in Alibaba Cloud Container Service for Kubernetes (ACK) clusters.
Deploy Argo in a Kubernetes cluster
Create an ACK Serverless cluster.
(Recommend) Create an ACK Serverless cluster. For more information, see Create an ACK Serverless cluster.
Create an ACK cluster and deploy the ack-virtual-node controller in the cluster to generate virtual nodes. For more information, see Create an ACK managed cluster and Deploy the virtual node controller and use it to create Elastic Container Instance-based pods.
Deploy Argo in the Kubernetes cluster.
(Recommended) Install the ack-workflow component. For more information, see ack-workflow.
Deploy Argo without using a component. For more information, see Argo Quick Start.
Install Argo commands. For more information, see argo-workflows.
Optimize infrastructure configurations
By default, after you deploy Argo in a Kubernetes cluster, resources are not specified for the pods that correspond to the argo-server core component and workflow-controller core component. The quality of service (QoS) level of the corresponding pods is low. If cluster resources are insufficient, OOM (out-of-memory) kills may occur on the components and the pods may be evicted. We recommend that you adjust the resources of the pods that correspond to the preceding core components based on your cluster size. We also recommend that you set the requests or limits to 2 vCPUs and 4 GiB of memory or more.
Use an OSS bucket as an artifact repository
By default, Argo uses MinIO as artifact repositories. In production environments, you need to consider the stability of artifact repositories. ack-workflow allows you to use Object Storage Service (OSS) buckets as artifact repositories. For information about how to configure OSS buckets as artifact repositories, see Configuring Alibaba Cloud OSS.
After you configure OSS, you can create a workflow to verify the configuration based on the following example.
Create a file named workflow-oss.yaml and copy the following template to the file:
apiVersion: argoproj.io/v1alpha1
kind: Workflow
metadata:
  generateName: artifact-passing-
spec:
  entrypoint: artifact-example
  templates:
  - name: artifact-example
    steps:
    - - name: generate-artifact
        template: whalesay
    - - name: consume-artifact
        template: print-message
        arguments:
          artifacts:
          # bind message to the hello-art artifact
          # generated by the generate-artifact step
          - name: message
            from: "{{steps.generate-artifact.outputs.artifacts.hello-art}}"

  - name: whalesay
    container:
      image: docker/whalesay:latest
      command: [sh, -c]
      args: ["cowsay hello world | tee /tmp/hello_world.txt"]
    outputs:
      artifacts:
      # generate hello-art artifact from /tmp/hello_world.txt
      # artifacts can be directories as well as files
      - name: hello-art
        path: /tmp/hello_world.txt

  - name: print-message
    inputs:
      artifacts:
      # unpack the message input artifact
      # and put it at /tmp/message
      - name: message
        path: /tmp/message
    container:
      image: alpine:latest
      command: [sh, -c]
      args: ["cat /tmp/message"]
Create a workflow.
argo -n argo submit workflow-oss.yamlView the execution result of the workflow.
argo -n argo listExpected output:

Select an executor
A worker pod that is created by Argo contains at least the following containers:
Main container
The business container that runs the business logic.
Wait container
An Argo system component that is injected into pods as a sidecar. The wait container has the following core characteristics:
In the startup stage of pods
Loads the artifacts and inputs that the main container depends on.
In the running stage of pods
Waits for the main container to exit, and then kills the associated sidecar container.
Collects the outputs and artifacts of the main container, and reports the status of the main container.
The wait container uses executors to access and manage the main container. Argo abstracts the executors into ContainerRuntimeExecutor. The following list describes the API operations of ContainerRuntimeExecutor:
GetFileContents: obtains the output parameters of the main container by using outputs/parameters.
CopyFile: obtains the outputs of the main container by using outputs/artifacts.
GetOutputStream: obtains the standard outputs (including standard errors) of the main container.
Wait: waits for the main container to exit.
Kill: kills the associated sidecar container.
ListContainerNames: lists the names of containers in the pod.
Argo supports multiple executors that have different working principles but are designed to work on native Kubernetes architectures. The architecture of ACK Serverless is different from the architecture of native Kubernetes. You need to select a suitable executor to run Argo workflows in ACK Serverless clusters. We recommend that you select Emisarry as the executor to run Argo workflows in ACK Serverless clusters. The following table describes the executors supported by native Kubernetes clusters:
Executor | Description |
Emisarry | The executor configures relevant capabilities by using shared emptyDir files and emptyDir as a dependency. The executor depends only on the standard capability emptyDir and does not have other dependencies. We recommend that you use this executor to run Argo workflows in ACK Serverless clusters. |
Kubernetes API | The executor configures relevant capabilities by using Kubernetes API. The executor uses Kubernetes API as a dependency, but cannot provide complete capabilities. The executor puts pressure on the Kubernetes control plane if the cluster contains a large number of tasks. This affects the cluster size. We recommend that you do not use the executor. |
PNS | The executor configures relevant capabilities based on chroot and PID (process identification) sharing in pods. The executor pollutes the process space of pods and requires privileges. ACK Serverless clusters require stricter security isolation, and do not support privileges. These clusters do not support the executor. |
Docker | The executor configures relevant capabilities by using Docker CLI and uses the underlying container runtime Docker as a dependency. ACK Serverless clusters do not contain real nodes and cannot access Docker components on virtual nodes. These clusters cannot use the executor. |
Kubelet | The executor configures relevant capabilities by using Kubelet Client API and uses the underlying component Kubelet of Kubernetes as a dependency. ACK Serverless clusters do not contain real nodes and cannot access Kubelet components on virtual nodes. These clusters cannot use the executor. |
Schedule Argo tasks to run on Elastic Container Instance
By default, ACK Serverless clusters schedule all pods to run on Elastic Container Instance. You do not need to perform additional configurations for these clusters. If you want ACK clusters to schedule pods to run on Elastic Container Instance, you must configure ACK clusters. For more information, see Schedule pods to an x86-based virtual node.
In the following example, a label is added to configure the ACK cluster:
Add the
alibabacloud.com/eci: "true"label: After the label is added, the pods that have the label are automatically scheduled to run on Elastic Container Instance.(Optional) Specify
{"schedulerName": "eci-scheduler"}: We recommend that you use this setting. When you update or change Virtual Kubelet, the webhook may be unavailable for a short period of time. If you use this setting, pods are not scheduled to real nodes.
apiVersion: argoproj.io/v1alpha1
kind: Workflow
metadata:
  generateName: parallelism-limit1-
spec:
  entrypoint: parallelism-limit1
  parallelism: 10
  podSpecPatch: '{"schedulerName": "eci-scheduler"}'  # Schedule pods to run on Elastic Container Instance.
  podMetadata:
    labels:
      alibabacloud.com/eci: "true"   # Add the label to schedule pods to run on Elastic Container Instance.
  templates:
  - name: parallelism-limit1
    steps:
    - - name: sleep
        template: sleep
        withSequence:
          start: "1"
          end: "10"
  - name: sleep
    container:
      image: alpine:latest
      command: ["sh", "-c", "sleep 30"]
Improve the success rate of pod creation
In a production environment, an Argo workflow may contain multiple computing pods. If a pod in the workflow fails, the entire workflow fails. If the success rate of your Argo workflow is low, you need to run the Argo workflow multiple times. This affects the execution efficiency of tasks and increases computing costs of the Argo workflow. You need to take the following measures to improve the success rate of pod creation:
Define an Argo workflow
Create an Elastic Container Instance pod
Configure multiple zones to prevent pod creation failure that occurs due to insufficient resources in a single zone. For more information, see Deploy pods in multiple zones.
Specify multiple specifications to prevent pod creation failure that occurs due to insufficient resources of a single specification. For more information, see Create pods by specifying multiple specifications.
Use the method of specifying vCPU and memory specifications to create pods. The system automatically matches the specifications based on the inventory.
Specify 2 vCPUs and 4 GiB of memory or higher specifications. Instances of these specifications are exclusive enterprise-level instances that can provide stable performance.
Configure a fault handling policy for the pod to specify whether to recreate the pod if the pod fails to be created. For more information, see Configure a fault handling policy for a pod.
Sample configurations:
Modify eci-profile to configure multiple zones.
kubectl edit -n kube-system cm eci-profileSpecify multiple vSwitch IDs as the values of
vSwitchIdsin thedatasection.data: ...... vSwitchIds: vsw-2ze23nqzig8inprou****,vsw-2ze94pjtfuj9vaymf**** # Specify multiple vSwitch IDs to configure multiple zones. vpcId: vpc-2zeghwzptn5zii0w7**** ......Use multiple policies to improve the success rate when you create pods.
Use the
k8s.aliyun.com/eci-use-specsannotation to specify multiple specifications. In this example, three specifications are specified. The system matches the inventory resources ofecs.c6.large,ecs.c5.large, and2-4Giin sequence.Use the
k8s.aliyun.com/eci-schedule-strategyannotation to configure the multi-zone scheduling policy. In this example, theVSwitchRandomscheduling policy is used to schedule pods to a random zone.Use the
retryStrategyparameter to configure the retry policy of the Argo workflow. In this example, theAlwaysvalue is specified to retry all failed steps.Use the
k8s.aliyun.com/eci-fail-strategyannotation to configure the fault handling policy for the pod. In this example, thefail-fastvalue specifies a quick failure. If a pod fails to be created, the system reports an error. ProviderFailed is displayed as the status of the pod. The upper-layer orchestration determines whether to retry the creation of the pod or schedule the pod to real nodes.
apiVersion: argoproj.io/v1alpha1
kind: Workflow
metadata:
  generateName: parallelism-limit1-
spec:
  entrypoint: parallelism-limit1
  parallelism: 10
  podSpecPatch: '{"schedulerName": "eci-scheduler"}'
  podMetadata:
    labels:
      alibabacloud.com/eci: "true"
    annotations:
      k8s.aliyun.com/eci-use-specs: "ecs.c6.large,ecs.c5.large,2-4Gi"
      k8s.aliyun.com/eci-schedule-strategy: "VSwitchRandom"
      k8s.aliyun.com/eci-fail-strategy: "fail-fast"
  templates:
  - name: parallelism-limit1
    steps:
    - - name: sleep
        template: sleep
        withSequence:
          start: "1"
          end: "10"
  - name: sleep
    retryStrategy:
      limit: "3"
      retryPolicy: "Always"
    container:
      image: alpine:latest
      command: [sh, -c, "sleep 30"]
Optimize the cost of pods
Elastic Container Instance supports multiple billing methods. You can plan workloads based on different billing methods to reduce the cost of computing resources.
For information about how to optimize costs of pods, see:
Accelerate the creation of pods
The system must pull specified container images before pods are started. Image pulling is the main operation that requires a long period of time during pod startup due to factors such as network conditions or the image size. To accelerate the creation of pods, Elastic Container Instance provides the image cache feature. You can create image caches for images. Then, you can use the image caches to create pods. This way, you do not need to download image layers or only need to download fewer image layers. This accelerates the creation of pods.
Image caches are classified into the following types:
Automatically created image caches: By default, automatic creation of image caches is enabled for elastic container instances. If no exactly matched images are available when you create an Elastic Container Instance pod, the system automatically uses the image that corresponds to the pod to create an image cache.
Manually created image caches: You can use custom resource definitions (CRDs) to create image caches.
We recommend that you manually create an image cache before you execute highly concurrent Argo tasks. After the image cache is created, specify the image cache and set the image pulling policy of the pod to IfNotPresent. This way, the pod does not need to pull images during startup. This accelerates the creation of the pod, decreases the run time of Argo tasks, and reduces running costs. For more information, see Use ImageCache to accelerate the creation of pods.
If you performed the preceding operations in the "Schedule Argo tasks to run on Elastic Container Instance" section or "Improve the success rate of pod creation" section, an image cache is created. You can log on to the Elastic Container Instance console to check the status of the image cache. You can use the following YAML template to create a workflow that contains the existing image cache, and then test the startup speed of the pod.
apiVersion: argoproj.io/v1alpha1
kind: Workflow
metadata:
  generateName: parallelism-limit1-
spec:
  entrypoint: parallelism-limit1
  parallelism: 100
  podSpecPatch: '{"schedulerName": "eci-scheduler"}'
  podMetadata:
    labels:
      alibabacloud.com/eci: "true"
    annotations:
      k8s.aliyun.com/eci-use-specs: "ecs.c6.large,ecs.c5.large,2-4Gi"
      k8s.aliyun.com/eci-schedule-strategy: "VSwitchRandom"
      k8s.aliyun.com/eci-fail-strategy: "fail-fast"
  templates:
  - name: parallelism-limit1
    steps:
    - - name: sleep
        template: sleep
        withSequence:
          start: "1"
          end: "100"
  - name: sleep
    retryStrategy:
      limit: "3"
      retryPolicy: "Always"
    container:
      imagePullPolicy: IfNotPresent
      image: alpine:latest
      command: [sh, -c, "sleep 30"]
After the workflow is created, you can view the ID of the matched image cache in the pod event of the workflow. The image pulling process is skipped when the pod is started.

Accelerate data loading
Argo is used in the AI inference sector. In AI-based scenarios, computing tasks require access to large volume of data. In the popular compute-storage separation architecture, the efficiency of data loading on compute nodes directly affects the time and cost for the entire batch of tasks. If a large number of Argo tasks need to access the data in the storage in parallel, bottleneck issues occur for the bandwidth and performance of the storage system. For example, if Argo tasks load data in OSS in parallel and a bottleneck issue occurs for the bandwidth of OSS buckets, compute nodes of the Argo tasks are blocked at the data loading phase. Each compute node requires a longer period of time. This affects the computing efficiency and increases computing costs.
You can use Fluid to solve this problem. Before you execute a batch of compute tasks, you can create and preload a Fluid dataset and pre-cache data in OSS to a few cache nodes. Then, you can concurrently start Argo tasks. In Fluid, Argo reads data from cache nodes. Cache nodes can extend the bandwidth of OSS and improve the data loading efficiency of compute nodes. This helps improve the execution efficiency of Argo tasks and reduces the running costs of Argo tasks. For more information, see Overview of Fluid.
In the following example, 100 concurrent tasks are configured to load a 10 GB test file from OSS, and the MD5 hash is calculated.
Deploy Fluid.
Log on to the ACK console.
In the left-side navigation pane, choose Marketplace > Marketplace.
Find ack-fluid and click the corresponding card.
On the ack-fluid page, click Deploy.
In the panel that appears, select the cluster for which you want to deploy Fluid, configure the parameters, and click OK.
After Fluid is deployed, you are redirected to the publishing details page of the ack-fluid component. Return to the Helm page. You can see the ack-fluid component is in the Deployed state. You can also run the kubectl command to check whether Fluid is deployed.

Prepare data for the test.
After Fluid is deployed, you can use Fluid datasets to accelerate data. You need to upload a 10 GB test file to an OSS bucket before you perform subsequent operations.
Generate a test file.
dd if=/dev/zero of=/test.dat bs=1G count=10Upload the test file to an OSS bucket. For more information, see Simple upload.
Create an accelerated dataset.
Create a dataset and a JindoRuntime.
kubectl -n argo apply -f dataset.yamlThe following sample code provides an example of the dataset.yaml file. Specify actual values for the AccessKey pair and OSS bucket in the YAML file.
apiVersion: v1 kind: Secret metadata: name: access-key stringData: fs.oss.accessKeyId: *************** # The AccessKey ID that is used to access the OSS bucket. fs.oss.accessKeySecret: ****************** # The AccessKey secret that is used to access the OSS bucket. --- apiVersion: data.fluid.io/v1alpha1 kind: Dataset metadata: name: serverless-data spec: mounts: - mountPoint: oss://oss-bucket-name/ # The path of your OSS bucket. name: demo path: / options: fs.oss.endpoint: oss-cn-shanghai-internal.aliyuncs.com # The endpoint of the OSS bucket. encryptOptions: - name: fs.oss.accessKeyId valueFrom: secretKeyRef: name: access-key key: fs.oss.accessKeyId - name: fs.oss.accessKeySecret valueFrom: secretKeyRef: name: access-key key: fs.oss.accessKeySecret --- apiVersion: data.fluid.io/v1alpha1 kind: JindoRuntime metadata: name: serverless-data spec: replicas: 10 # The number of JindoRuntime cache nodes that you want to create. podMetadata: annotations: k8s.aliyun.com/eci-use-specs: ecs.g6.2xlarge # Specify a specification for the pod. k8s.aliyun.com/eci-image-cache: "true" labels: alibabacloud.com/eci: "true" worker: podMetadata: annotations: k8s.aliyun.com/eci-use-specs: ecs.g6.2xlarge # Specify a specification for the pod. tieredstore: levels: -mediumtype: MEM # The type of the cache. If you specify a specification that uses local disks, this value can be LoadRaid0 volumeType: emptyDir path: /local-storage # The path of the cache. quota: 12Gi # The maximum capacity of the cache. high: "0.99" # The upper limit of storage capacity. low: "0.99" # The lower limit of storage capacity.NoteIn this example, the memory of an Elastic Container Instance pod is used as a cache node. Each Elastic Container Instance pod uses a dedicated VPC network interface controller (NIC). The bandwidth of each pod is not affected by other pods.
View the results.
Check the status of the accelerated dataset. If the value of PHASE is Bound, the accelerated dataset is created.
kubectl -n argo get datasetExpected output:

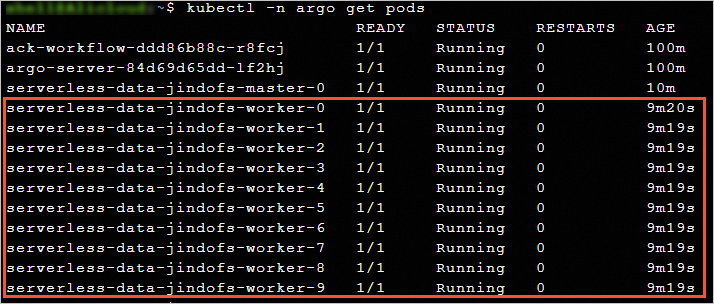
Check the information about pods. 10 JindoRuntime cache nodes are created by using the accelerated dataset.
kubectl -n argo get podsExpected output:
Preload data.
After the accelerated dataset is created, you can create a DataLoad to trigger data preloading.
Create a DataLoad to trigger data preloading.
kubectl -n argo apply -f dataload.yamlThe following sample code provides an example of the dataload.yaml fie.
apiVersion: data.fluid.io/v1alpha1
kind: DataLoad
metadata:
  name: serverless-data-warmup
  namespace: argo
spec:
  dataset:
    name: serverless-data
    namespace: argo
  loadMetadata: true
Check the progress of data preloading on DataLoad.
kubectl -n argo get dataloadThe following figure shows a sample output. The test file is 10 GB in size, but the preloading speed is fast.

Run the Argo workflow.
After data is preloaded, you can concurrently run Argo tasks. We recommend that you use the image cache feature together with Fluid to test the Argo workflow.
Prepare the argo-test.yaml configuration file of the Argo workflow.
The following sample code provides an example of the argo-test.yaml file.
apiVersion: argoproj.io/v1alpha1
kind: Workflow
metadata:
  generateName: parallelism-fluid-
spec:
  entrypoint: parallelism-fluid
  parallelism: 100
  podSpecPatch: '{"terminationGracePeriodSeconds": 0, "schedulerName": "eci-scheduler"}'
  podMetadata:
    labels:
      alibabacloud.com/fluid-sidecar-target: eci
      alibabacloud.com/eci: "true"
    annotations:
      k8s.aliyun.com/eci-use-specs: 8-16Gi
  templates:
  - name: parallelism-fluid
    steps:
    - - name: domd5sum
        template: md5sum
        withSequence:
          start: "1"
          end: "100"
  - name: md5sum
    container:
      imagePullPolicy: IfNotPresent
      image: alpine:latest
      command: ["sh", "-c", "cp /data/test.dat /test.dat && md5sum test.dat"]
      volumeMounts:
      - name: data-vol
        mountPath: /data
    volumes:
    - name: data-vol
      persistentVolumeClaim:
        claimName: serverless-data
Create an Argo workflow.
argo -n argo submit argo-test.yamlView the execution result of the workflow.
argo -n argo listExpected output:

Run the
kubectl get pod -n argo --watchcommand to view the execution progress of the tasks. The 100 Argo tasks in the sample scenario are completed within 2 to 4 minutes.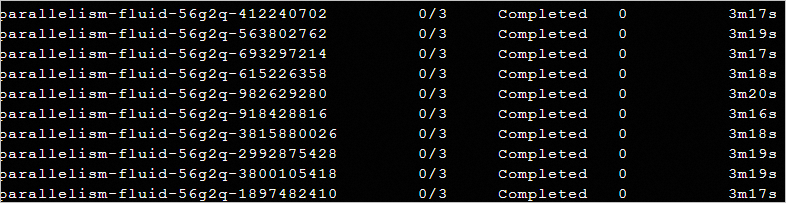
If Fluid is not used for the same set of Argo tasks, 14 to 15 minutes are required to load the 10 GB test file from OSS and calculate the MD5 hash.
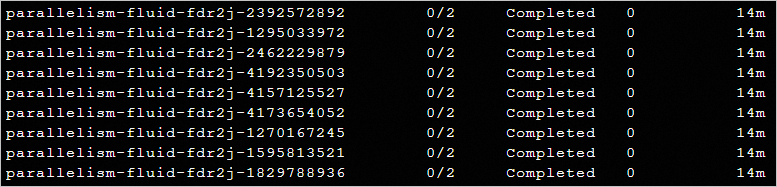
The test results indicate that Fluid can improve computing efficiency and reduce computing costs.