AnalyticDB for MySQL is a real-time online analytical processing (OLAP) service that is developed by Alibaba Cloud for online data analysis with high concurrency. AnalyticDB for MySQL can analyze petabytes of data from multiple dimensions at millisecond-level timing to provide you with data-driven insights into your business. This topic describes how to synchronize data from a PolarDB-X 1.0 instance to an AnalyticDB for MySQL cluster by using Data Transmission Service (DTS). After you synchronize data, you can use AnalyticDB for MySQL to build internal business intelligence (BI) systems, interactive query systems, and real-time report systems.
Prerequisites
A database is created in the source PolarDB-X instance based on one or more ApsaraDB RDS for MySQL instances.
An AnalyticDB for MySQL cluster is created. For more information, see Create a cluster.
The destination AnalyticDB for MySQL cluster has sufficient storage space.
Precautions
DTS uses read and write resources of the source and destination RDS instances during initial full data synchronization. This may increase the loads of the RDS instances. If the instance performance is unfavorable, the specification is low, or the data volume is large, database services may become unavailable. For example, DTS occupies a large amount of read and write resources in the following cases: a large number of slow SQL queries are performed on the source RDS instance, the tables have no primary keys, or a deadlock occurs in the destination RDS instance. Before data synchronization, evaluate the impact of data synchronization on the performance of the source and destination RDS instances. We recommend that you synchronize data during off-peak hours. For example, you can synchronize data when the CPU utilization of the source and destination RDS instances is less than 30%.
When the data synchronization task is running, do not upgrade or downgrade the PolarDB-X instance, migrate frequently-accessed tables, change shard keys, or perform DDL operations on source objects. Otherwise, the data synchronization task fails.
If you need to change the network type of a PolarDB-X instance during data synchronization, you must modify the network connection information of the data synchronization task after you complete the network type change.
We recommend that you do not use gh-ost or pt-online-schema-change to perform DDL operations on the required objects during data synchronization. Otherwise, data may fail to be synchronized.
Due to the limits of AnalyticDB for MySQL, if the disk space usage of the nodes in an AnalyticDB for MySQL cluster exceeds 80%, the cluster is locked. We recommend that you estimate the required disk space based on the objects to be synchronized. Make sure that the destination cluster has sufficient storage.
Prefix indexes cannot be synchronized. If the source database contains prefix indexes, data may fail to be synchronized.
SQL operations that can be synchronized
INSERT, UPDATE, and DELETE
Permissions required for database accounts
Database | Required permission |
PolarDB-X | The SELECT permission on the objects to synchronize and the REPLICATION CLIENT and REPLICATION SLAVE permissions. These permissions are automatically granted by DTS. |
AnalyticDB for MySQL | Read and write permissions on the objects to synchronize |
Data type mappings
For more information, see Data type mappings for schema synchronization.
Procedure
Purchase a data synchronization instance. For more information, see Purchase a DTS instance.
NoteOn the buy page, set Source Instance to PolarDB-X, Target Instance to AnalyticDB for MySQL, and Synchronization Topology to One-Way Synchronization.
Log on to the DTS console.
NoteIf you are redirected to the Data Management (DMS) console, you can click the
 icon in the
  to go to the previous version of the DTS console.
In the left-side navigation pane, click Data Synchronization.
In the upper part of the Synchronization Tasks page, select the region in which the destination instance resides.
Find the data synchronization instance and click Configure Task in the Actions column.
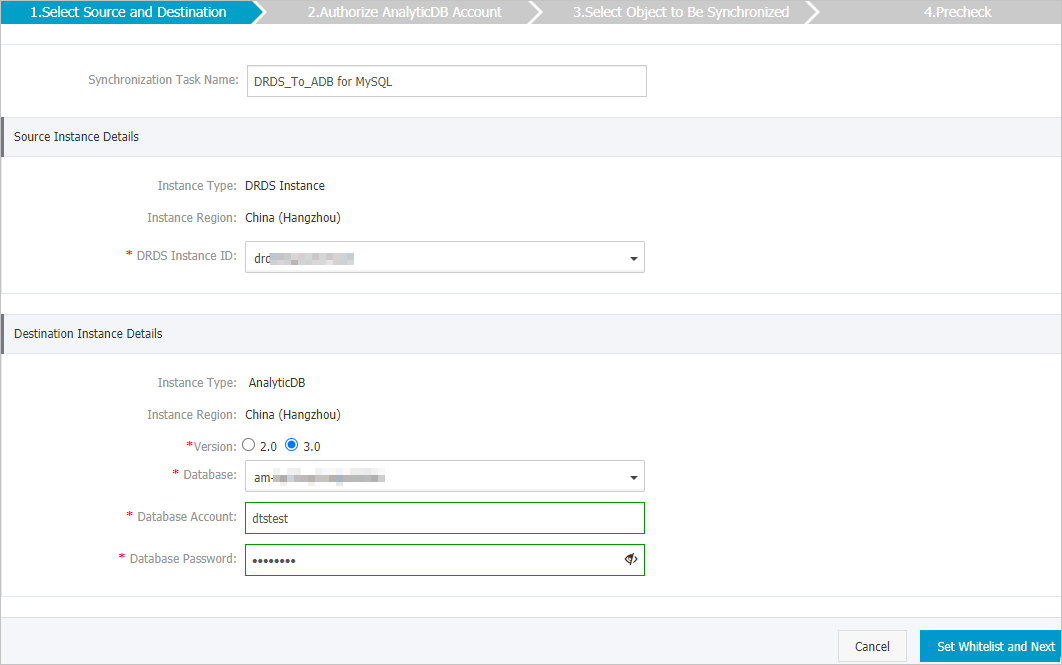
Configure the source and destination instances.
Section
Parameter
Description
N/A
Synchronization Task Name
The task name that DTS automatically generates. We recommend that you specify a descriptive name that makes it easy to identify the task. You do not need to use a unique task name.
Source Instance Details
Instance Type
This parameter is set to DRDS Instance and cannot be changed.
Instance Region
The source region that you selected on the buy page. The value of this parameter cannot be changed.
DRDS Instance ID
The ID of the source PolarDB-X 1.0 instance.
Destination Instance Details
Instance Type
This parameter is set to AnalyticDB and cannot be changed.
Instance Region
The destination region that you selected on the buy page. The value of this parameter cannot be changed.
Version
Select 3.0.
Database
The ID of the AnalyticDB for MySQL instance.
Database Account
The database account of the AnalyticDB for MySQL cluster. For information about the permissions that are required for the account, see Permissions required for database accounts.
Database Password
The password of the database account.
In the lower-right corner of the page, click Set Whitelist and Next.
If the source or destination database is an Alibaba Cloud database instance, such as an ApsaraDB RDS for MySQL or ApsaraDB for MongoDB instance, DTS automatically adds the CIDR blocks of DTS servers to the IP address whitelist of the instance. If the source or destination database is a self-managed database hosted on an Elastic Compute Service (ECS) instance, DTS automatically adds the CIDR blocks of DTS servers to the security group rules of the ECS instance, and you must make sure that the ECS instance can access the database. If the self-managed database is hosted on multiple ECS instances, you must manually add the CIDR blocks of DTS servers to the security group rules of each ECS instance. If the source or destination database is a self-managed database that is deployed in a data center or provided by a third-party cloud service provider, you must manually add the CIDR blocks of DTS servers to the IP address whitelist of the database to allow DTS to access the database. For more information, see Add the CIDR blocks of DTS servers.
WarningIf the CIDR blocks of DTS servers are automatically or manually added to the whitelist of the database or instance, or to the ECS security group rules, security risks may arise. Therefore, before you use DTS to synchronize data, you must understand and acknowledge the potential risks and take preventive measures, including but not limited to the following measures: enhancing the security of your username and password, limiting the ports that are exposed, authenticating API calls, regularly checking the whitelist or ECS security group rules and forbidding unauthorized CIDR blocks, or connecting the database to DTS by using Express Connect, VPN Gateway, or Smart Access Gateway.
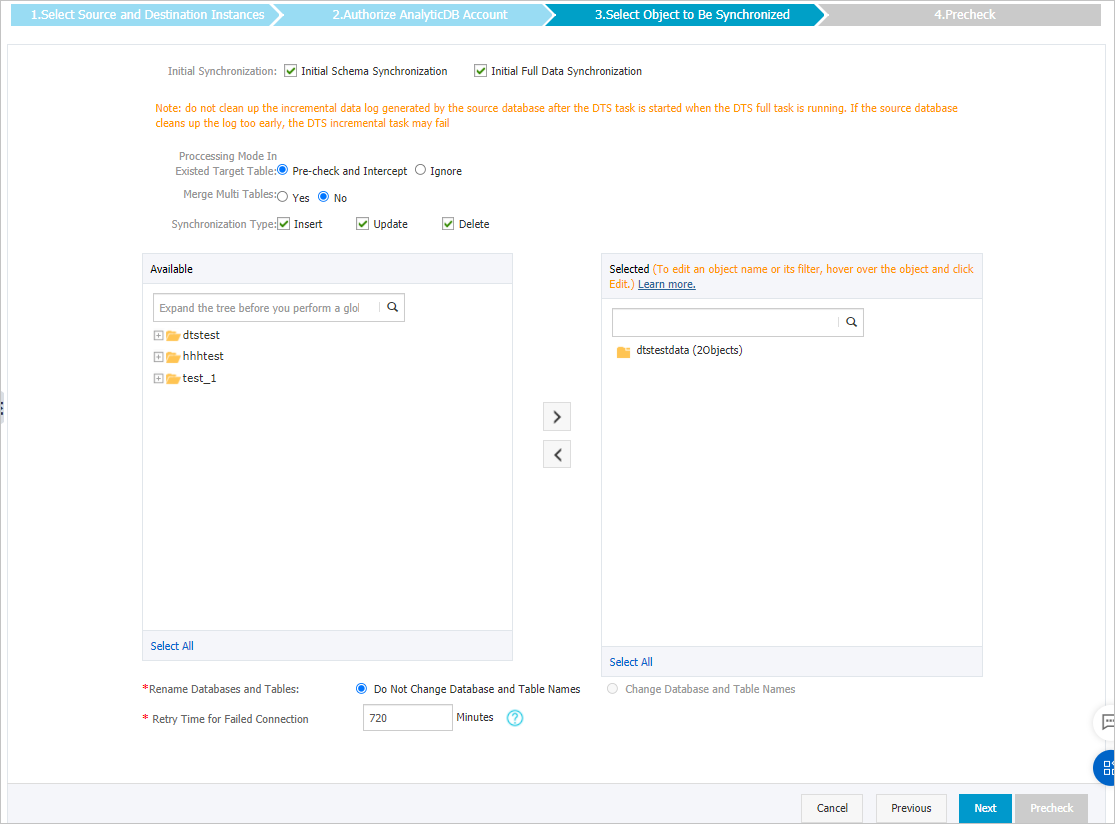
Select the synchronization policy and objects to synchronize.
Setting
Description
Initial Synchronization
You must select both Initial Schema Synchronization and Initial Full Data Synchronization in most cases. After the precheck is complete, DTS synchronizes the schemas and data of required objects from the source instance to the destination cluster. The schemas and data are the basis for subsequent incremental synchronization.
Processing Mode In Existed Target Table
Pre-check and Intercept: checks whether the destination database contains tables that have the same names as tables in the source database. If the destination database does not contain tables that have the same names as those in the source database, the precheck is passed. Otherwise, an error is returned during precheck and the data synchronization task cannot be started.
NoteIf the source and destination databases contain identical table names and the tables in the destination database cannot be deleted or renamed, you can use the object name mapping feature to rename the tables that are synchronized to the destination database. For more information, see Rename an object to be synchronized.
Ignore Errors and Proceed: skips the precheck for identical table names in the source and destination databases.
WarningIf you select Ignore Errors and Proceed, data consistency is not guaranteed and your business may be exposed to potential risks.
If the source and destination databases have the same schema, DTS does not synchronize data records that have the same primary keys as data records in the destination database.
If the source and destination databases have different schemas, initial data synchronization may fail. In this case, only part of columns are synchronized, or the data synchronization task fails.
Merge Multi Tables
If you select Yes, DTS adds the
__dts_data_sourcecolumn to each table to record data sources.No is selected by default.
NoteIf you set this parameter to Yes, all of the selected source tables in the task are merged into a destination table. If you want to merge only part of the source tables, you can create two data synchronization tasks.
Synchronization Type
Select the types of operations that you want to synchronize based on your business requirements. All operation types are selected by default.
Insert
Update
Delete
Select the objects to synchronize
Select one or more tables from the Available section and click the
 icon to add the tables to the Selected section. Note
You can select only tables as objects to synchronize.
You can use the object name mapping feature to rename the columns that are synchronized to the destination database. For more information, see Rename an object to be synchronized.
Rename Databases and Tables
You can use the object name mapping feature to rename the objects that are synchronized to the destination instance. For more information, see Object name mapping.
Retry Time for Failed Connections
By default, if DTS fails to connect to the source or destination database, DTS retries within the next 720 minutes (12 hours). You can specify the retry time based on your needs. If DTS reconnects to the source and destination databases within the specified time, DTS resumes the data synchronization task. Otherwise, the data synchronization task fails.
NoteWhen DTS retries a connection, you are charged for the DTS instance. We recommend that you specify the retry time based on your business needs. You can also release the DTS instance at your earliest opportunity after the source and destination instances are released.
In the lower-right corner of the page, click Next.
Specify a type for the tables that you want to synchronize to the destination database.
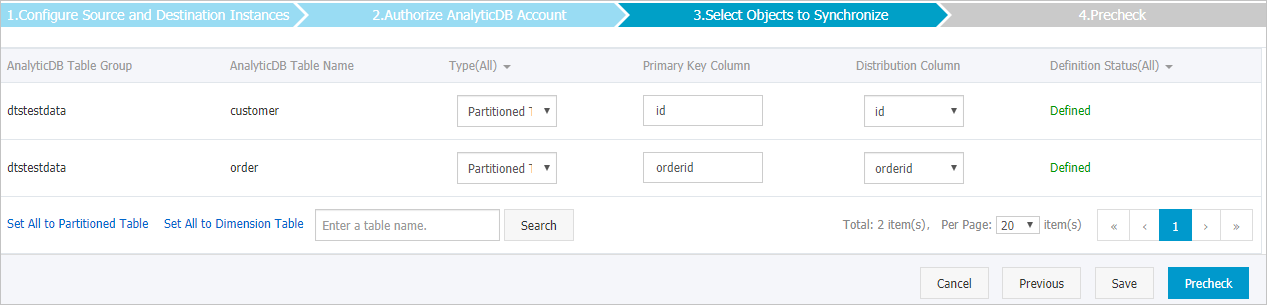 Note
NoteAfter you select Initial Schema Synchronization, you must specify the type, primary key column, and partition key column for the tables that you want to synchronize to the AnalyticDB for MySQL cluster. For more information, see CREATE TABLE.
In the lower-right corner of the page, click Precheck.
NoteBefore you can start the data synchronization task, DTS performs a precheck. You can start the data synchronization task only after the task passes the precheck.
If the task fails to pass the precheck, you can click the
 icon next to each failed item to view details.
 After you troubleshoot the issues based on the details, initiate a new precheck.
If you do not need to troubleshoot the issues, ignore the failed items and initiate a new precheck.
Close the Precheck dialog box after the following message is displayed: Precheck Passed. Then, the data synchronization task starts.
Wait until initial synchronization is complete and the data synchronization task enters the Synchronizing state.
You can view the status of the data synchronization task on the Synchronization Tasks page.
